
Creating a steady movie with a digital camera is an essential skill for any aspiring filmmaker or videographer. In today’s digital age, almost everyone has access to a digital camera, whether it’s a dedicated video camera or a smartphone with a capable camera. However, capturing steady footage can be a challenge, especially if you’re a beginner. The good news is that with the right techniques and equipment, you can achieve professional-looking results.
Stability is key when it comes to shooting a movie. A steady camera allows your audience to focus on the story you’re telling, rather than being distracted by shaky footage. There are several techniques and tools you can use to ensure stability while shooting. One of the first things to consider is your camera grip. Make sure you hold the camera with both hands, keeping your elbows close to your body. This will provide a solid base and reduce camera shake.
Investing in a tripod is another important step in creating a steady movie. A tripod is a three-legged stand that holds your camera in a fixed position. It allows you to keep your camera steady during static shots or when shooting scenes that require minimal movement. Tripods come in various sizes, so it’s important to choose one that suits your camera and shooting style.
Image stabilization is a feature that many modern digital cameras have. It helps reduce camera shake and produces smoother footage. If your camera has this feature, make sure to enable it. Additionally, you can also consider using a camera stabilizer or a gimbal. These accessories provide extra stability by counteracting any movements or vibrations while you’re shooting.
In conclusion, creating a steady movie with a digital camera is achievable with the right techniques and equipment. Remember to maintain stability by using proper camera grip, investing in a tripod, and utilizing image stabilization features. By mastering these skills, you can capture smooth and professional-looking footage that will impress your audience.
Achieving steady shots with a digital camera
Capturing steady shots is essential to create high-quality videos with a digital camera. Here are some tips to help you achieve smooth and stable shots:
1. Use a tripod
A tripod is a must-have tool for achieving steady shots. It provides a stable base for your camera and helps eliminate camera shake caused by hand movements. Invest in a high-quality tripod that suits your needs, whether it’s for shooting indoors or outdoors.
2. Hold the camera with both hands
When shooting handheld, hold the camera with both hands to improve stability. This will help reduce the chances of shaky footage. Hold the camera close to your body for added support and keep your elbows tucked in to steady your shots.
3. Apply proper body posture
Your body posture plays a crucial role in achieving steady shots. Stand with your feet shoulder-width apart and slightly bend your knees. This will help you maintain balance and minimize camera movements. Avoid leaning forward or backward, as it can result in shaky footage.
4. Use image stabilization
Many digital cameras come equipped with image stabilization technology. Enable this feature to compensate for unintentional camera movements. It helps reduce blur and results in smoother footage, especially when shooting on the go or in low-light conditions.
5. Utilize camera support accessories
Explore camera support accessories like shoulder rigs, stabilizers, or gimbals to further stabilize your shots. These tools provide additional stability and control, especially when shooting while walking or in dynamic environments.
Remember, achieving steady shots requires practice and patience. Experiment with different techniques and settings to find the best approach for your specific shooting needs. By mastering the art of steady shots, you can capture professional-looking videos with your digital camera.
Selecting the right equipment
When it comes to creating a steady movie with a digital camera, selecting the right equipment is crucial. The following factors should be considered before making a decision:
1. Camera
The first and most important piece of equipment is the digital camera itself. Look for a camera with image stabilization features to reduce camera shake. A camera with a good autofocus system will also help in maintaining steady shots. Additionally, consider the weight and size of the camera, as it can affect stability.
2. Tripod
A sturdy tripod is essential for achieving steady shots. Look for a tripod with adjustable leg sections and a solid build. Consider the weight and load capacity of the tripod to support the weight of your camera and any additional accessories. A tripod with a fluid head will provide smooth pans and tilts.

3. Lens
Choosing the right lens can greatly improve the stability of your shots. Look for lenses with image stabilization or optical stabilization features to reduce camera shake. A wide-angle lens can help capture a broader frame and make it easier to stabilize the camera.
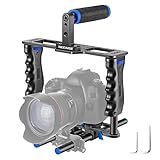
4. Camera rig
A camera rig is an accessory that helps in stabilizing the camera and provides additional mounting options for accessories like microphones or lights. Look for a camera rig that is compatible with your camera model and offers a comfortable grip.
| Equipment | Key Features |
|---|---|
| Camera | Image stabilization, autofocus |
| Tripod | Adjustable leg sections, solid build, fluid head |
| Lens | Image stabilization, wide-angle |
| Camera Rig | Stabilization, mounting options |
By carefully selecting the right equipment, you can ensure that your digital camera is capable of capturing steady shots, resulting in a high-quality movie.
Choosing the appropriate camera settings
When it comes to creating a steady movie with a digital camera, choosing the right camera settings is crucial. The settings you choose can greatly impact the quality and stability of your video. Here are some key factors to consider:
- Frame rate: The frame rate refers to the number of frames per second that your camera will capture. For smoother motion, it is recommended to set a higher frame rate, such as 30 frames per second (fps). However, keep in mind that higher frame rates will require more storage space.
- Resolution: The resolution of your video determines the level of detail captured. Higher resolutions, such as 1080p or 4K, provide more clarity but can be more demanding on your camera and storage space. Choose a resolution that suits your needs and the capabilities of your camera.
- Shutter speed: The shutter speed controls the amount of time that the camera’s sensor is exposed to light. A faster shutter speed can help reduce motion blur, while a slower speed can create a smoother and more cinematic look. Experiment with different shutter speeds to achieve the desired effect.
- ISO: The ISO setting determines the camera’s sensitivity to light. A lower ISO value, such as 100, is recommended for bright lighting conditions to minimize noise. In low light situations, a higher ISO value may be necessary, but it can introduce more image noise. Find the right balance between exposure and noise reduction.
- White balance: White balance ensures that colors appear natural in different lighting conditions. Most digital cameras have automatic white balance settings, but you can also manually adjust it. Consider the type of lighting you will be filming in and choose the appropriate white balance setting.
By choosing the appropriate camera settings, you can enhance the stability and visual quality of your movie. Experiment with different settings and find the combination that works best for your creative vision. Remember to consider the specific capabilities of your camera and the shooting conditions to achieve optimal results.

Understanding the Importance of Stability
When it comes to creating a steady movie with a digital camera, stability is a crucial factor. Whether you are shooting a short film, a documentary, or a home video, having a stable camera can make a significant difference in the quality of the final product. In this section, we will discuss the importance of stability and why you should pay close attention to it.
1. Eliminating Shaky Footage
One of the most obvious reasons why stability is vital is the elimination of shaky footage. Shaky footage can be distracting and make it difficult for viewers to focus on the content of the video. With a stable camera, you can capture smooth and professional-looking shots that enhance the overall viewing experience.
2. Enhancing Image Quality
Stability is also essential for enhancing image quality. A stable camera allows you to maintain a consistent focus, exposure, and composition, resulting in sharper and more detailed images. This is particularly important when shooting in low light conditions or capturing fast-moving subjects.
A stable camera also reduces the chances of capturing motion blur, which can occur when the camera moves during the exposure. By keeping the camera steady, you can ensure that your footage remains sharp and clear.
| Benefits of Stability: | How to Achieve Stability: |
|---|---|
| 1. Eliminates shaky footage | 1. Use a tripod or camera stabilizer |
| 2. Enhances image quality | 2. Hold the camera with both hands |
| 3. Use image stabilization features | |
| 4. Avoid sudden movements |
As you can see, stability plays a crucial role in capturing high-quality footage. By understanding the importance of stability and taking the necessary steps to achieve it, you can elevate the overall quality of your movie and engage your audience with smooth and visually appealing shots.

Using a tripod for steady shots
One of the key ingredients to creating a steady movie with a digital camera is using a tripod. A tripod is a three-legged stand that helps stabilize the camera, allowing you to capture clear and steady shots.
When choosing a tripod, it is important to consider its weight, height, and stability. A lightweight tripod is easy to carry around and convenient for outdoor shoots. However, it may not be as stable as a heavier tripod. The height of the tripod should be adjustable so that you can easily position the camera at various angles and heights.
In addition to stability, the tripod should also have a secure mounting mechanism to hold the camera firmly in place. This will prevent any accidental movement or shaking during filming.
Once you have set up your tripod, it is important to ensure that it is placed on a stable surface. Avoid setting it up on uneven or slippery ground, as this can contribute to camera shake.
Using a tripod allows you to achieve smooth panning shots, steady tracking shots, and eliminates the need for handheld shots, which can result in shaky footage. It also enables you to keep the camera steady for longer durations, which is especially helpful when shooting long scenes or time-lapse videos.

In conclusion, when creating a steady movie with a digital camera, using a tripod is essential. It provides stability, prevents camera shake, and allows you to capture clear and professional-looking shots. Invest in a quality tripod that suits your needs and practice using it to improve the overall quality of your videos.
Exploring alternative stabilization options
While camera stabilization equipment, such as tripods and gimbals, is commonly used to create stable footage, there are also alternative options available for filmmakers. These options provide unique techniques to stabilize the camera and add creative visual effects to the movie.
1. Handheld stabilizers
Handheld stabilizers, also known as camera stabilizers or camera rigs, are a popular choice for independent filmmakers and videographers. These devices provide stabilization by distributing the weight of the camera across multiple points, allowing for smoother movements while capturing footage. They come in various forms, including shoulder rigs, action camera stabilizers, and camera cages. Handheld stabilizers are particularly useful for capturing dynamic shots with a natural handheld feel.
2. DIY stabilization techniques
If you’re on a tight budget or enjoy experimenting with homemade solutions, there are several do-it-yourself stabilization techniques you can try. These can involve using everyday objects like PVC pipes or using household items like rubber bands or bean bags to stabilize the camera. While these techniques may not provide the same level of stability as professional equipment, they can still offer a creative and affordable alternative for filmmakers.
- One common DIY stabilization technique involves attaching the camera to a construction pole or monopod, providing a stable extension for capturing high or low-angle shots.
- Another option is using a camera harness, which distributes the weight of the camera across your body, reducing hand jitter for smoother footage.
- Using a bean bag or sandbag as a makeshift stabilizer can also help reduce camera shake during handheld shots.
While DIY stabilization techniques may require some experimentation and creativity, they can provide unique visual effects and add a personal touch to your movie.

Remember, the choice of stabilization technique depends on the specific needs of your movie, your budget, and the level of stability you want to achieve. Whether you opt for professional camera stabilization equipment or try out alternative options, the goal is to create steady footage that enhances the overall viewing experience for your audience.
Properly holding the camera
When it comes to creating a steady movie with a digital camera, a proper grip is crucial. Holding the camera correctly can greatly reduce shaky footage and improve the overall quality of your videos. Here are some tips to help you achieve a steady hold:
1. Use both hands
Hold the camera with both hands, gripping it firmly but not too tightly. This will provide stability and prevent your hands from shaking while filming.
2. Brace against your body
Keep your elbows close to your body to provide extra support for the camera. This will help reduce any unwanted movements and keep your shots steady.
By holding the camera properly, you can ensure smooth and steady footage, giving your videos a professional look. Practice these techniques and experiment with different grips to find what works best for you.
Utilizing camera stabilization features
Camera stabilization is essential for creating a steady movie with a digital camera. Even with a steady hand, it can be challenging to prevent camera shake and maintain a smooth footage. Fortunately, many digital cameras come equipped with built-in stabilization features that can help eliminate shaky footage and improve the overall quality of your movie.
Optical image stabilization
One common camera stabilization feature is optical image stabilization. This technology uses a system of lenses or sensors to detect camera shake and adjusts them to compensate for the movement. This helps to reduce blur and shake in your footage, resulting in smoother and more stable videos.
Electronic image stabilization
Another popular camera stabilization feature is electronic image stabilization. This technology works by processing the camera’s video signal and digitally adjusting it to compensate for any shaking or movement. While not as effective as optical image stabilization, electronic stabilization can still significantly improve the stability of your footage.
When using electronic stabilization, keep in mind that it may crop the image slightly to compensate for the movement. This means your final video may have a slightly narrower field of view compared to the original footage.
It’s important to note that not all digital cameras have built-in stabilization features. If your camera doesn’t have these features, there are still ways to stabilize your footage:
- Use a tripod or monopod: Using a stable support such as a tripod or monopod can greatly reduce camera shake and ensure smoother footage.
- Hold the camera properly: Proper handholding technique can also help minimize camera shake. Hold the camera with both hands, tuck your elbows in, and stand with a stable stance.
- Invest in a camera stabilizer: There are specialized camera stabilizers available in the market that can provide smooth movement and stabilization during filming.
Overall, utilizing camera stabilization features can greatly enhance the quality and professionalism of your movie. Whether through built-in stabilization or external tools, take advantage of these features to achieve smooth and steady footage.
Practicing smooth camera movements
Creating smooth camera movements is an essential skill for capturing steady footage with a digital camera. Here are some tips to help you practice and master this technique:
- Use a tripod or stabilizer: Using a tripod or a stabilizer helps to reduce camera shake and ensures steady footage. Invest in a good quality tripod or stabilizer that suits your camera.
- Practice your grip: Hold the camera with both hands and keep your arms close to your body for stability. Avoid shaking or jerky movements by maintaining a firm grip on the camera.
- Use slow and controlled movements: When panning or tilting, move the camera slowly and smoothly to achieve a steady shot. Avoid sudden or rapid movements that can result in shaky footage.
- Utilize camera stabilization features: Many digital cameras come with built-in stabilization features, such as electronic image stabilization or optical image stabilization. Enable these features to further enhance the stability of your footage.
- Practice walking shots: Walking while filming can be challenging, but with practice, you can achieve smooth walking shots. Keep your steps small and try to distribute your weight evenly to minimize camera bouncing.
- Experiment with different camera movements: Explore different camera movements, such as tracking shots, dolly shots, or crane shots, to add variety to your footage. Practice these movements to ensure smooth execution.
- Use manual focus: When filming moving subjects, it’s best to use manual focus to maintain sharpness. Autofocus may cause the camera to shift focus, resulting in unstable footage.
- Optimize camera settings: Adjust the camera settings, such as shutter speed and ISO, to suit your shooting conditions. Faster shutter speeds can help reduce motion blur, while lower ISO values reduce image noise.
- Edit out shaky footage: In post-production, you can further stabilize your footage by using video editing software. Apply stabilization filters or use tools that correct camera shake to enhance the overall stability of your movie.
Remember, mastering smooth camera movements takes practice and patience. By following these tips and dedicating time to train your filming techniques, you’ll be able to create steady and professional-looking movies with your digital camera.
Post-processing techniques for stabilization
While shooting a steady movie with a digital camera is ideal, sometimes it can be challenging to achieve perfect stability during filming. However, there are post-processing techniques that can help stabilize your footage, ensuring a smoother viewing experience for your audience.
One popular method for stabilizing shaky footage is using video stabilization software. These programs analyze the video frames and apply algorithms to reduce or eliminate motion blur and shake. They can also help correct any warping or distortion that may occur due to camera movement.
Another technique is using motion tracking software. This software tracks specific points in the video frame and applies stabilization algorithms based on their movement. By analyzing the motion patterns, the software can stabilize the footage and reduce any unwanted camera shake.
In addition to specialized software, there are also editing techniques that can help improve the stability of your footage. One such technique is the use of keyframing. Keyframing involves manually adjusting the position and rotation of the video frame at specific points in the timeline. By carefully adjusting these keyframes, you can smooth out any abrupt camera movements and create a more stable video.
Another editing technique is the use of cropping. Cropping involves removing the unstable edges of the footage, leaving only the stable center portion. This can help eliminate any unwanted camera shake and provide a more focused and stable viewing experience.
| Pros | Cons |
| Easy to apply with video stabilization software | May result in slight loss of video quality |
| Can correct warping and distortion | Can be time-consuming for manual keyframing |
| Provides smoother viewing experience | May require additional software or editing skills |
In conclusion, while achieving perfect stability during filming may not always be possible, post-processing techniques can help you produce a steady movie with a digital camera. Whether using specialized software or editing techniques, these methods can enhance the quality of your footage and provide a more enjoyable viewing experience for your audience.
Continuous learning and improvement
In order to create a steady movie with a digital camera, continuous learning and improvement are crucial. Here are some tips to help you enhance your skills and enhance the quality of your videos:
- Study different techniques: Take the time to study various filming techniques used by professionals. This will help you understand the basics of composition, lighting, and camera movements.
- Practice framing: Experiment with different framing techniques to find the ones that work best for your desired shot. Proper framing can greatly enhance the visual appeal of your movie.
- Master camera settings: Familiarize yourself with your camera’s settings and learn how to adjust them for different shooting conditions. Understanding exposure, white balance, and ISO settings will help you capture better footage.
- Invest in stabilization equipment: Consider purchasing a tripod or a gimbal stabilizer to minimize camera shake and achieve smoother shots. These tools can greatly improve the overall steadiness of your movie.
- Experiment with different editing techniques: Editing plays a crucial role in creating a steady movie. Learn how to use software tools to stabilize shaky footage and make seamless cuts. Continuously explore new editing techniques to enhance the visual flow of your movie.
- Seek feedback: Share your work with others and ask for constructive feedback. Feedback from fellow filmmakers or even friends can help you identify areas for improvement and refine your skills.
- Stay updated with industry trends: Keep yourself informed about the latest advancements in camera technology, editing software, and filmmaking techniques. Being aware of industry trends will help you stay ahead of the game and constantly improve your work.
By continuously learning and seeking improvement, you can enhance your skills and create steady movies that captivate your audience.
Question-answer:
What equipment do I need to create a steady movie with a digital camera?
To create a steady movie with a digital camera, you will need a few pieces of equipment. Firstly, you will need a sturdy tripod to mount your camera on. This will help keep the camera steady during filming. Additionally, you may want to consider using a camera stabilizer or gimbal, which can further reduce camera shake and provide smooth movement. Finally, using a camera with built-in image stabilization technology can also help create steady footage.
Are there any techniques to hold a digital camera steady while filming?
Yes, there are several techniques to hold a digital camera steady while filming. Firstly, make sure to hold the camera with both hands, gripping it firmly. Keep your elbows tucked in close to your body to create a stable base. Additionally, you can try leaning against a wall or object for extra support. Remember to breathe steadily and avoid sudden movements. If possible, using a tripod or other stabilizing equipment can greatly help in creating steady footage.
What settings should I use on my digital camera to create a steady movie?
When shooting a movie with a digital camera, there are a few settings you can adjust to help create steady footage. Firstly, make sure to set your camera to use a higher frame rate, such as 24 or 30 frames per second, as this can help capture smoother motion. Additionally, using a smaller aperture and higher ISO can help in capturing sharper images. If your camera has image stabilization technology, make sure it is turned on. Lastly, consider shooting in manual mode so you have more control over the settings.


