
Preserving memories of family gatherings, vacations, and special moments captured on film is priceless. However, as time goes by, old home movies stored on VHS tapes or film reels can degrade, leading to lost or damaged footage. The good news is that you can easily digitize your old home movies with just a camera, allowing you to preserve and share those precious moments for years to come.
To digitize your old home movies, all you need is a camera with video-recording capabilities, a tripod, and some basic equipment. Whether you have a digital camera or a smartphone with a high-quality camera, you can achieve remarkable results. By following a few simple steps, you’ll be able to convert your old footage into digital files that can be easily stored and shared.
First, gather all your old home movies and choose a location with good lighting and minimal background noise. Set up your camera on a tripod to ensure stability and clear shots. It’s also a good idea to clean the camera lens to avoid any smudges or dust particles that may affect video quality. To get the best results, record your old home movies in a well-lit area to avoid dark or shadowy images.
Next, play the VHS tape or film reel on a compatible device, such as a VHS player or projector, and position the camera in front of the screen. Make sure the entire frame is captured, and adjust the camera settings, such as exposure and focus, for optimum results. It’s recommended to use a higher resolution setting to capture as much detail as possible. You may also consider using a remote control to minimize camera movement and ensure smoother recordings.
In conclusion, digitizing old home movies using a camera is a simple yet effective way to preserve and share cherished memories. With just a camera, tripod, and a little preparation, you can easily convert your old footage into digital files that can be easily stored, edited, and enjoyed with family and friends. Take the time to digitize your old home movies now, and you’ll be grateful for the timeless memories they hold in the years to come.

Preserving Memories: How to Digitize Old Home Movies with Camera
Preserving family memories is important, especially when it comes to old home movies. These videos capture precious moments that we can relive and share with future generations. If you have old home movies sitting on VHS tapes or even reels, digitizing them using a camera is a great way to ensure they last for years to come.
What You’ll Need
- A camera (preferably a digital camera or a smartphone with high-quality video capabilities)
- A tripod (to stabilize your camera)
- A clean and flat area to set up your camera and tapes
- Blank DVDs or external storage devices (USB drives or hard drives)
Step-by-Step Guide
- Set up your camera on the tripod, ensuring it is stable and secure.
- Connect your camera to a power source or make sure it is fully charged.
- If your camera has an external microphone input, consider using a microphone for better audio quality.
- Gather your old home movies and place them in a clean and organized manner.
- Place the VHS tape or reel on a flat surface, making sure it is clean and free from any dust or debris.
- Position your camera directly in front of the VHS tape or reel, ensuring it is focused and centered on the screen.
- Press the record button on your camera to start capturing the video.
- Play the home movie on the VCR or projector, making sure it plays smoothly and without any issues.
- Monitor the recording on your camera’s screen to ensure the video is being captured properly.
- When the movie finishes, press the stop button on your camera to stop the recording.
- Repeat these steps for each home movie you want to digitize.
- Transfer the video files from your camera onto your computer or external storage device.
- If you want to edit the videos, you can use video editing software on your computer.
- Make sure to backup your digitized home movies onto multiple devices to prevent loss.
By following these steps, you can effectively digitize your old home movies with a camera. It’s a rewarding process that allows you to relive and share those cherished memories with loved ones for years to come. Preserve your family history today!
Gather Your Materials
Before you begin the process of digitizing your old home movies, it’s important to gather all the necessary materials. Here are the items you’ll need:
1. Camera or Camcorder: You’ll need a digital camera or camcorder that can record video. Make sure it has enough storage space and a good battery life for the duration of the digitizing process.
2. Tripod: To ensure steady and stable footage, using a tripod is highly recommended. This will help prevent shaky footage and ensure a better-quality digitized video.

3. Blank DVDs or External Hard Drive: You’ll need a blank DVD or an external hard drive to save and store your digitized videos. Depending on the size of your collection, you may need multiple discs or a large-capacity hard drive.
4. Cleaning Supplies: It’s essential to clean your old movies before digitizing them. Use a soft, lint-free cloth to remove any dust or dirt from the film. A gentle cleaning solution can also be used, but make sure it’s safe for the type of film you have.
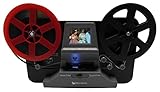
5. Film Projector (Optional): If your old movies are on film reels, a film projector can be useful for previewing and organizing the footage. This step is optional but can be beneficial if you want to organize your movies before starting the digitization process.
6. Computer with Video Editing Software: After digitizing your home movies, you’ll need a computer with video editing software to edit and enhance the digitized videos. There are many free and paid software options available, so choose one that suits your needs and skill level.
7. Firewire or USB Cable: Depending on the type of camera or camcorder you’re using, you may need a firewire or USB cable to connect it to your computer. Make sure you have the appropriate cable for your device.

Once you have gathered all the necessary materials, you’ll be ready to start the process of digitizing your old home movies.
Set Up a Scanning Area
When digitizing old home movies with a camera, it is important to set up a proper scanning area. This will ensure that you get the best possible results and that your footage is clear and well-lit. Here are some steps to help you set up a scanning area:
1. Find a suitable location:
Choose a room or area in your home that is quiet and well-lit. Avoid places with direct sunlight or harsh lighting that could cause glare or shadows on your footage.
2. Clean the area:

Clear away any clutter or distractions that could interfere with the scanning process. Make sure the surface you will be working on is clean and free from dust or debris.
3. Set up a stable surface:
Place a table or desk in your scanning area to provide a stable surface for your camera and equipment. Make sure the surface is level and sturdy to prevent any shaking or movement during the scanning process.
4. Position the camera:
Set up your camera on a tripod or stable surface facing down towards the scanning area. Adjust the height and angle of the camera to ensure that it is capturing the entire frame of your footage.
5. Light the area:
Provide adequate lighting for your scanning area. Use soft, diffused lighting sources to minimize harsh shadows and create an even light distribution. You can use lamps or professional photography lights to achieve the desired lighting setup.
6. Test the setup:
Before you start scanning your old home movies, take some test shots and review the footage to ensure that everything is set up correctly. Adjust the camera position or lighting if necessary to achieve the best results.
By following these steps and setting up a proper scanning area, you can ensure that your old home movies are digitized with the best possible quality and clarity.

Prepare Your Film
Before digitizing your old home movies, it’s important to properly prepare your film to ensure the best possible results. Here are some steps you can take:
| Step | Description |
| 1 |
Gather your film reels and inspect them for any damage or deterioration. Look for any tears, scratches, or mold. If your film has severe damage, it may be best to consult a professional for restoration before attempting to digitize. |
| 2 |
Clean your film using an anti-static film cleaning solution and a soft, lint-free cloth. Gently wipe the film to remove any dust or dirt that may have accumulated over the years. Be careful not to apply too much pressure, as this could cause further damage. |
| 3 |
Check the film’s sprocket holes to ensure they are intact and not torn. The sprocket holes are used to advance the film through the projector or scanner, so it’s important that they are in good condition. |
| 4 |
Organize your film reels in the order in which you would like them to be digitized. This will make the process of capturing and editing your footage much easier. 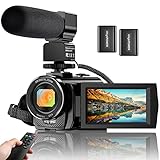
$89.99
2 new from $89.99
1 used from $89.09
as of September 19, 2024 9:45 pm
Amazon.com
|
| 5 |
If your film reels are on small, 3-inch reels, consider transferring them to larger, 7-inch reels. This will make handling and digitizing the film easier and reduce the risk of damage. |
By properly preparing your film reels before digitizing, you can help ensure that the resulting digital files will be of the highest quality and preserve your precious memories for years to come.
Position Your Camera
Positioning your camera correctly is crucial when digitizing old home movies. The angle and distance at which you place your camera can greatly affect the quality and visibility of the footage.
1. Stable Surface: Begin by placing your camera on a stable surface, such as a tripod or a table. This will help reduce camera shake and ensure a steady image.
2. Level Alignment: Make sure your camera is aligned horizontally and vertically. Use the camera’s built-in level or grid lines to ensure the image is straight and well-framed.
3. Good Lighting: Choose a well-lit area for filming, as adequate lighting can significantly improve the quality of the footage. Avoid areas with harsh shadows or extreme brightness, as they can distort the image.
4. Distance and Zoom: Position your camera at a suitable distance from the screen or projection, depending on the size of your original home movie. Experiment with different zoom levels to find the best balance between capturing the entire frame and maintaining image quality.
5. Stability and Focus: Once you’ve positioned your camera, make sure it is stable and secure. Avoid unnecessary movement or adjustments during recording, as this can result in blurry or distorted footage. Manually focus your camera to ensure a sharp and clear image.
Additional Tips:
- Consider using a remote control or self-timer functionality to start and stop recording without touching the camera, minimizing potential camera shake.
- If possible, cover any reflective surfaces around the filming area to reduce glare and unwanted reflections.
By following these positioning tips, you will be able to capture high-quality footage while digitizing your old home movies.
Adjust Camera Settings
Before you start digitizing your old home movies, it’s essential to adjust the settings on your camera to ensure the best possible results. Here are some key settings you should consider:
Resolution
Set the camera’s resolution to the highest available option. This will capture more details and result in a clearer and more vibrant digital copy of your movies.
Frame Rate
Choose a frame rate that matches the original film’s speed. Typically, home movies were filmed at 24 or 30 frames per second. Adjusting your camera’s frame rate accordingly will help retain the natural motion of the footage.
It’s important to note that some cameras have a “cinema mode” or “film mode” that mimics the look of traditional film. This setting may be worth exploring if you want to achieve a more cinematic look.
Exposure
Ensure that the exposure settings are properly adjusted to achieve a balanced brightness and contrast. Use the camera’s built-in light meter or manual adjustment controls to fine-tune the exposure. Avoid overexposure or underexposure, as they can result in loss of detail or washed-out colors.
If you’re unsure about the exposure settings, consider using the camera’s automatic exposure mode. While this may not provide as much control, it can help ensure a decently exposed image.
Adjusting these camera settings before you start digitizing your old home movies can significantly improve the quality of the final digital copies. Take some time to experiment and find the best settings that suit your specific needs and preferences.
Start Scanning
Once you have set up your camera and prepared the tapes or films, you can begin the process of digitizing your old home movies. Follow these steps to start scanning:
- Connect your camera to your computer using a USB cable or any other appropriate connection.
- Open the video capture software on your computer. Most cameras come with their own software that you can install on your computer.
- Insert the tape or film into the camera and press play.
- Use the video capture software to start recording the video as it plays on your camera.
- Adjust the settings on the video capture software to ensure that the video is being recorded at the desired quality and format.
- Monitor the recording process to make sure that the video is being digitized properly. Check for any issues with sound or video quality.
- Once the tape or film has finished playing, stop the recording on the video capture software.
- Save the digitized video file to your computer or an external storage device.
- Repeat the process for each tape or film that you want to digitize.
It’s important to note that the digitization process can be time-consuming, especially if you have a large collection of tapes or films. Take breaks as needed and be patient throughout the process. Remember, the end result will be worth it as you’ll be able to preserve and enjoy your old home movies for years to come.
Transfer and Organize Your Digital Files
Once you have digitized your old home movies using a camera, it is important to transfer and organize your digital files properly. This will not only help you preserve your precious memories but also make it easier to access and share them with others. Here are some tips on how to transfer and organize your digital files effectively:
1. Create a Folder Structure
Start by creating a folder structure on your computer or external hard drive to store your digital files. This will help you maintain a well-organized collection and make it easier to find specific videos in the future.
Consider creating separate folders for different years or time periods, and then organizing your videos within those folders based on specific events or occasions. For example, you can have folders such as “Family Vacations,” “Birthdays,” or “Holidays.”
2. Rename Your Files
Renaming your digital files can be incredibly helpful when it comes to searching for specific videos later on. By giving your files descriptive and meaningful names, you can easily identify and locate the videos you want.
For example, instead of having a file named “VIDEO001.mp4,” rename it to “Christmas_1995_Family_Gathering.mp4” to make it more informative and memorable.
3. Add Metadata
Adding metadata to your digital files can provide even more details and context about your home movies. This can include information such as the date, location, and people featured in the videos.
You can add metadata using a video editing software or a metadata editor specifically designed for organizing media files. By doing so, you can easily search and filter your videos based on specific criteria in the future.
4. Regularly Backup Your Files
Ensure that you regularly backup your digital files to prevent any accidental loss or data corruption. Consider using cloud storage services, external hard drives, or both to have multiple copies of your precious memories.
Having backup copies of your videos will provide you with peace of mind knowing that your memories are safe even if something were to happen to your primary storage device.
In conclusion, transferring and organizing your digital files is crucial for preserving and enjoying your old home movies. By creating a folder structure, renaming files, adding metadata, and regularly backing up your videos, you can ensure that your memories will be easily accessible and secure for years to come.
Question-answer:
What equipment do I need to digitize my old home movies with a camera?
To digitize your old home movies with a camera, you will need a camera with video recording capabilities, a tripod to keep the camera steady, a suitable storage device like an external hard drive or a computer, and video editing software.
Can I use my smartphone camera to digitize my old home movies?
Yes, you can use your smartphone camera to digitize your old home movies. Most smartphones have high-quality cameras that can record video in high-definition. However, make sure you have enough storage space on your smartphone and consider using a tripod for stability.
What is the best way to transfer old home movies to a computer?
The best way to transfer old home movies to a computer is by connecting the camera to the computer using a USB cable and transferring the video files directly. Alternatively, you can remove the memory card from the camera and use a card reader to transfer the files. Another option is to use a video capture device to connect the camera to the computer and transfer the videos through the device.
Is it necessary to edit the digitized home movies?
Editing the digitized home movies is not necessary, but it can enhance the viewing experience. You can trim the videos to remove unwanted footage, adjust the colors and brightness, add titles or captions, and even incorporate background music. Video editing software provides tools to customize the videos according to your preferences.


