
Have you ever wondered how to achieve that unique and vintage-looking Lomo effect on your digital camera? Lomography is a photography style that emulates the look of old and imperfect images, often characterized by saturated colors, high contrast, and vignetting. While Lomography started with analogue film cameras, it is now possible to recreate this popular effect on your digital camera.
To get the Lomo effect on your digital camera, there are a few techniques and settings you can try. One of the simplest ways is to use the “cross-processing” technique, which involves intentionally mismatching the film and developing process. In the digital world, you can simulate this effect by adjusting the color balance and saturation settings in your camera’s menu. By increasing the saturation and shifting the color balance towards a more warm or cool tone, you can achieve that distinct Lomo look.
Another important aspect of the Lomo effect is the use of vignetting, which is the darkening of the corners of the image. While some digital cameras have the option to add vignetting in-camera, you can also achieve this effect during post-processing. Use photo editing software to darken the edges of the image and draw attention to the subject in the center. Experiment with different levels of vignetting to find the perfect balance for your desired Lomo effect.
Lastly, consider the composition and subjects when shooting for the Lomo effect. Lomography often captures candid and spontaneous moments, embracing imperfections and unexpected results. Look for interesting textures, colors, and lighting conditions to enhance the vintage feel of your images. Experiment with multiple exposures, light leaks, and unconventional angles to further enhance the Lomo effect on your digital camera.
In conclusion, achieving the distinctive Lomo effect on your digital camera is a matter of experimenting with various settings, techniques, and compositions. By adjusting color balance, increasing saturation, adding vignetting, and exploring unconventional approaches to photography, you can recreate the unique and nostalgic Lomo aesthetic in your digital images.

What is lomo effect
The lomo effect is a photographic technique that aims to recreate the unique and vibrant look of the images captured by Lomo cameras. Lomo cameras are inexpensive, plastic film cameras that became popular in the 1990s. They are known for their unique characteristics such as intense saturation, high contrast, strong vignetting, and unpredictable behaviors.
The lomo effect is characterized by its retro, artistic, and nostalgic feel. It often produces images that have a dream-like quality, with vibrant colors and a slightly blurred or distorted appearance. The effect can enhance the mood and atmosphere of a photograph, giving it a more creative and experimental look.
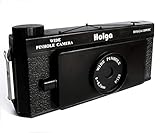
The lomo effect can be achieved using various methods. One way is to use a Lomo camera itself, which can be purchased online or at specialty stores. These cameras use 35mm film and have specific features that contribute to the lomo effect.
Another way to achieve the lomo effect is through digital editing. There are many software and mobile applications available that offer lomo filters and presets that can be applied to digital photographs. These filters simulate the characteristics of a Lomo camera, allowing users to achieve the desired effect without needing an actual Lomo camera.
Additionally, photographers can experiment with different settings on their digital cameras to mimic the lomo effect. This can include adjusting the saturation, contrast, and sharpness levels, as well as adding vignetting or a slight blur to the image.
Overall, the lomo effect is a popular technique among photographers and enthusiasts who want to add a vintage and artistic touch to their photographs. Whether achieved through a Lomo camera or digital editing, the lomo effect can enhance the visual appeal and storytelling potential of an image.
Advantages of lomo effect
The lomo effect, also known as the Lomography effect, has gained popularity among photographers due to its unique and distinctive look. Here are some advantages of using the lomo effect on your digital camera:
1. Creative and Artistic Photos
The lomo effect adds a touch of creativity and artistry to your photos. It can turn ordinary scenes into visually striking images with vibrant colors, strong contrast, and unique vignetting. The resulting photos often have a dreamy and nostalgic feel, making them stand out from the regular digital images.
2. Expressive and Experimental Photography
The lomo effect encourages photographers to take a more experimental approach to their photography. It allows you to embrace imperfections and embrace the unexpected results. With lomo photography, you can let go of strict rules and technical perfection and focus on capturing the moment and expressing your artistic vision.
3. Enhances Subject and Mood
The lomo effect can enhance the subject and mood of your photos. Its unique coloring and lighting effects can make portraits more captivating by adding warmth and depth to the subject’s features. The lomo effect is also ideal for capturing landscapes and urban scenes, as it can create a surreal atmosphere and emphasize the atmosphere and mood of the location.
4. Adds a Vintage Appeal
The lomo effect has a nostalgic and vintage appeal, reminiscent of old film photography. It can transport viewers back to a different era and evoke feelings of nostalgia. By adding the lomo effect to your digital photos, you can give them a timeless quality and make them appear as if they were taken with analog film cameras.
5. Easy to Achieve
With digital cameras and photo editing software, achieving the lomo effect is relatively easy. Many camera apps and editing tools offer lomo filters or presets that can be applied with a click of a button. This makes it accessible to all photographers, regardless of their level of experience or expertise.
In conclusion, the lomo effect is a popular choice among photographers due to its ability to add creativity, artistry, and a vintage appeal to digital photos. Experimenting with the lomo effect can unleash your artistic vision and result in unique and visually striking images.
How lomo effect works
The lomo effect, also known as the Lomographic look, is a popular photographic style that emulates the characteristics of photographs taken with a Lomo camera. The Lomo camera is a Russian camera brand known for producing images with unique and distinct qualities.
The lomo effect is characterized by its vibrant colors, strong contrast, vignetting, and film grain. It gives photos a nostalgic and dreamy feel, often enhancing the experience of capturing a moment.

The lomo effect is achieved by manipulating various aspects of the camera settings and post-processing techniques. Here are some key factors that contribute to the lomo effect:
- Saturation and Contrast: Increasing the saturation and contrast of an image helps to intensify colors and create a more distinctive look. This can be done through camera settings or post-processing.
- Vignetting: Vignetting is the darkening or blurring of the edges of a photograph. It helps to draw attention to the center of the frame and adds a vintage touch. Some digital cameras have built-in vignetting effects, while others can be created during post-processing.
- Light Leaks: Light leaks are areas of overexposure or light leaks that occur unintentionally during the photographic process. They can add a unique and unpredictable element to the image. Light leaks can be imitated through post-processing techniques or by using a camera that allows manual control over the exposure.
- Film Grain: Film grain refers to the visible texture or graininess in analog photographs. It adds a distinctively retro look to images, and the digital equivalent can be achieved through post-processing techniques or by using a camera that allows adjustment of ISO settings.
Overall, the lomo effect is a creative and artistic approach to photography that allows photographers to experiment with different settings and techniques to achieve a unique and personalized look. Whether it’s through camera settings or post-processing, the lomo effect adds a touch of nostalgia and uniqueness to digital photographs.
Different ways to achieve lomo effect
There are several methods you can use to achieve the desired lomo effect using a digital camera:
1. Adjusting the exposure settings
One technique is to intentionally overexpose or underexpose your photos. Lomo cameras are known for their high contrast and vibrant colors, so experiment with different exposure settings to achieve a similar look. Try increasing the exposure to create brighter and more vibrant photos, or decrease the exposure for a darker and more moody effect.
2. Using the vignetting effect
Vignetting, which is the darkening of the corners and edges of a photo, is a common characteristic of lomo photography. You can achieve this effect by using a lomo camera lens attachment, or by editing your digital photos afterwards. Many photo editing software programs have vignetting filters that can help you achieve the desired look.

3. Adding saturation and contrast
Lomo photos are known for their bold and saturated colors. To achieve this effect, you can increase the saturation and contrast levels in your photos during the editing process. This will make the colors more vibrant and the overall image more dramatic.
4. Experimenting with light leaks
Lomo cameras often produce photos with light leaks, which are variations in exposure caused by light entering the camera through unintended gaps. While digital cameras don’t typically have this issue, you can emulate the effect by digitally adding light leaks using photo editing software. There are also apps available that can add light leaks to your photos directly on your smartphone.
5. Using a lomo camera or lens
If you want to achieve the most authentic lomo effect, you can invest in a lomo camera or lens. Lomo cameras are known for their unique and unpredictable results, with each camera having its own quirks and characteristics. This can add an element of surprise and creativity to your photography.
Remember, the lomo effect is all about experimentation and embracing imperfections. So don’t be afraid to try different techniques and have fun with it!
Tips for capturing lomo effect on digital camera
Creating a lomo effect on a digital camera can add a unique and artistic touch to your photographs. Here are some tips to help you achieve that vintage, retro look:

| 1. Shoot with a plastic lens | The lomo effect is characterized by soft focus, vignetting, and color distortion. Using a plastic lens can help you achieve this look by introducing imperfections and blurring the edges of your subject. |
| 2. Experiment with exposure | Lomo photography often features high contrast and overexposed or underexposed areas. Play around with the exposure settings on your camera to achieve this effect. Overexposing your subject can create a dreamy, washed-out look, while underexposing can add depth and moodiness to your photos. |
| 3. Embrace lens flare | Lens flare occurs when bright light enters your camera lens and creates a haze or streaks of light in your image. This effect can add a sense of drama and whimsy to your photos. Shoot into the light source or use a lens hood to create lens flare. |
| 4. Play with colors | Lomography often emphasizes vibrant and saturated colors. Experiment with color settings on your camera or use photo editing software to enhance and manipulate the colors in your photos. Boosting the saturation and vibrance can help achieve that lomo look. |
| 5. Get close and be spontaneous | Lomography is all about capturing the moment and embracing imperfections. Get close to your subject and don’t worry too much about framing. Embrace spontaneous shots and unexpected outcomes. The beauty of lomo photography lies in its unpredictability. |
Remember, capturing the lomo effect is all about pushing the boundaries and experimenting. Don’t be afraid to break the rules and have fun with your digital camera!
Post-processing techniques for lomo effect
If you want to achieve the lomo effect on your digital camera, but don’t have a specialized lomo camera, don’t worry! You can simulate the lomo effect using post-processing techniques. Here are a few techniques you can try:
- Increase contrast: One of the key characteristics of lomo photography is high contrast. You can achieve this by increasing the contrast in your photo editing software. This will make the dark areas darker and the bright areas brighter, resulting in a more dramatic look.
- Add vignetting: Vignetting is a popular feature in lomo photography, where the corners of the image are darker than the center. You can add vignetting to your photos by using a vignette tool in your editing software or by manually darkening the corners using the brush tool.
- Adjust colors: Lomo photos often have vibrant colors with a slight shift towards the warm tones. You can achieve this by adjusting the color temperature and saturation. Increase the temperature slightly to make the colors warmer and boost the saturation to make the colors more vibrant.
- Add film grain: Lomo cameras often produce photos with a grainy texture. You can recreate this effect by adding a film grain filter to your photos. Experiment with different levels of grain to find the right balance that mimics the look of a lomo photo.
- Create light leaks: Light leaks are accidental exposures to light that result in streaks or spots of light on the photo. You can simulate this effect by adding light leaks using overlays or by manually creating them using brushes in your editing software.
Remember, the key to achieving the lomo effect is to experiment and play around with different settings and techniques. Don’t be afraid to try new things and have fun with the process!
Popular digital cameras for lomo effect
If you’re interested in capturing the trendy lomo effect with a digital camera, you’re in luck! There are several popular options available that can help you achieve this unique and artistic look.
1. Canon EOS M100

The Canon EOS M100 is a compact mirrorless camera that offers a range of creative filters, including one specifically designed to recreate the lomo effect. This camera is known for its exceptional image quality and user-friendly interface, making it a great choice for beginners and advanced photographers alike.
2. Sony Cyber-shot DSC-RX100
The Sony Cyber-shot DSC-RX100 is a high-end point-and-shoot camera that packs a punch when it comes to features. It offers a variety of creative effects, including a lomo effect filter. With its compact size and powerful capabilities, this camera is perfect for those who want to experiment with lomo photography on the go.
3. Fujifilm X100F
The Fujifilm X100F is a premium compact camera that combines style and functionality. It features a built-in film simulation mode that includes a lomo effect filter. This camera’s retro design and advanced features make it a popular choice among lomo photography enthusiasts.
4. Nikon Coolpix P900
The Nikon Coolpix P900 is a superzoom bridge camera that offers a wide range of shooting modes and creative filters. It includes a lomo effect filter that can add a unique twist to your photos. With its impressive zoom capabilities, this camera is great for capturing both close-up and distant subjects with the lomo effect.
In conclusion, these popular digital cameras provide the tools you need to achieve the lomo effect on your photos. Whether you’re a beginner or an advanced photographer, there’s a camera on this list that will meet your needs and help you capture stunning lomo-inspired images.
Examples of lomo effect photography
1. Cityscape with vibrant colors
One of the signature characteristics of lomo photography is the vibrant and saturated colors. In a cityscape photo, you can capture the bright lights of the city and enhance the colors to create a lomo effect. The result is a dynamic and eye-catching image that highlights the energy of the urban environment.
2. Portrait with soft focus
Lomo cameras often produce images with a soft focus, which adds a dreamy and nostalgic feel to the photograph. To achieve this effect with a digital camera, you can use post-processing software to blur the edges slightly and reduce the sharpness of the image. This technique works particularly well for portrait photography, as it can create a romantic and intimate atmosphere.
3. Landscape with vignette
Vignetting is another characteristic of lomo photography, where the corners of the image are darker than the center. This effect draws the viewer’s attention towards the main subject and adds a sense of depth. In landscape photography, you can emphasize the vignette effect by framing the subject in the center and capturing the surrounding scenery.
4. Still life with high contrast
Lomo cameras often produce images with high contrast, where the shadows are deep and the highlights are bright. This can create a dramatic and moody effect, particularly in still life photography. To achieve this look with a digital camera, you can adjust the contrast settings in post-processing or use lighting techniques to create strong shadows and highlights.
5. Street photography with multiple exposures
One of the unique features of lomo cameras is the ability to take multiple exposures on a single frame. This allows you to combine different elements and create surreal and unexpected images. With a digital camera, you can simulate this effect by taking multiple photos of the same scene and overlaying them in post-processing. This technique works well for street photography, as it can capture the fast-paced and chaotic nature of urban life.
Question-answer:
What is a lomo effect?
The lomo effect is a photographic technique that recreates the look and feel of photos taken with a Lomography analogue camera. It typically involves saturated colors, high contrast, vignettes, and sometimes light leaks or other imperfections.
Can I achieve the lomo effect on a digital camera?
Yes, you can achieve the lomo effect on a digital camera by applying certain editing techniques to your photos. While it may not be exactly the same as shooting with a Lomography camera, you can still achieve similar results.
What editing techniques can I use to get the lomo effect on my digital camera?
There are several editing techniques you can use to get the lomo effect on your digital camera. These include increasing the saturation and contrast, adding vignettes, applying filters or presets that mimic the lomo look, and adding light leaks or other imperfections.
Are there any specific camera settings I should use to get the lomo effect?
While there may not be specific camera settings to get the lomo effect, you can experiment with different settings to achieve the desired look. Try shooting in manual mode, adjusting the exposure to overexpose or underexpose the image, and using a wide aperture to create a shallow depth of field.
Are there any smartphone apps that can help me get the lomo effect?
Yes, there are several smartphone apps available that can help you achieve the lomo effect. These apps often have filters or presets that mimic the lomo look, as well as other editing tools to further enhance your photos.


