
If you are an astronomy enthusiast or a photography enthusiast, you might find yourself wanting to capture stunning images of celestial objects. While a telescope can help you observe and study these objects, mounting a digital camera to your telescope can take your astrophotography to a whole new level.
Mounting a digital camera to a telescope allows you to capture detailed images of planets, galaxies, and other celestial objects. By combining the power of a telescope’s optics with the capabilities of a digital camera, you can capture breathtaking images of the night sky.
So how can you mount a digital camera to a telescope? The process might seem a bit intimidating at first, but with the right equipment and a little bit of know-how, it can be relatively straightforward.
Step 1: Choose the right adapter
The first step in mounting your digital camera to a telescope is to choose the right adapter. There are many different types of adapters available, so it’s important to choose one that is compatible with both your camera and your telescope’s eyepiece.
Tip: Look for adapters that have an adjustable feature, as this will allow you to achieve the proper alignment between your camera and the telescope’s optics.
Step 2: Attach the adapter to your camera
Once you have chosen the right adapter, you will need to attach it to your camera. Most adapters will screw or clamp onto the camera body, providing a secure connection.
Tip: Make sure to tighten the adapter securely so that your camera doesn’t accidentally come loose while capturing images.
Step 3: Connect the adapter to your telescope

With the adapter securely attached to your camera, you can now connect it to your telescope. Slide the adapter over the eyepiece of your telescope and tighten any screws or clamps to secure it in place.
Tip: Take care when connecting the adapter to avoid accidentally scratching the optics or damaging the telescope.
Step 4: Align your camera with the telescope
Once the adapter is securely attached to both your camera and your telescope, you will need to align your camera with the telescope’s optics. This can be done by adjusting the positioning of your camera within the adapter or by adjusting the position of the telescope’s eyepiece.
Tip: Use the telescope’s focusing knob to achieve a clear image on your camera’s LCD screen.

Now that you have successfully mounted your digital camera to your telescope, you are ready to capture stunning images of the night sky. Experiment with different exposure settings and capture the beauty and wonder of our universe like never before!
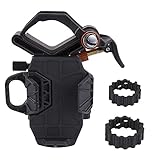
Choosing the Right Mounting Bracket for Your Digital Camera
When it comes to capturing stunning images with your digital camera through a telescope, choosing the right mounting bracket is essential. A mounting bracket allows you to securely attach your camera to the telescope, ensuring stability and precision during astrophotography sessions. Here are some key factors to consider when selecting a mounting bracket for your digital camera.
Compatibility with Your Camera and Telescope
Before purchasing a mounting bracket, it’s crucial to ensure that it is compatible with both your digital camera and telescope. Different camera models and telescopes have varying sizes and mounting systems, so be sure to check the specifications of your equipment before making a decision. Some mounting brackets are designed for specific camera and telescope models, while others offer more flexibility for a wider range of devices.
Type of Mounting Bracket
There are different types of mounting brackets available, and each offers its own advantages and features. The most common types include tube rings, dovetail plates, and camera adapters. Tube rings provide a secure grip around the telescope, while dovetail plates offer a more versatile mounting solution. Camera adapters, on the other hand, allow you to attach your camera directly to the telescope’s eyepiece holder. Consider your specific needs and preferences to determine which type of mounting bracket will best serve your astrophotography goals.
Ultimately, choosing the right mounting bracket for your digital camera is a crucial step in achieving high-quality astrophotography results. By ensuring compatibility with your camera and telescope, and considering the different types of mounting brackets available, you can find the perfect solution to capture breathtaking images of the night sky.

Understanding the Basics of Telescope Photography
Telescope photography is the process of capturing images of celestial objects using a telescope and a digital camera. It allows amateur astronomers to document their observations and share their discoveries with others. Here are the key concepts you need to understand to get started with telescope photography:
- Telescope Selection: The first step in telescope photography is choosing the right telescope. There are different types of telescopes available, each with its own strengths and limitations. Reflecting telescopes, refracting telescopes, and compound telescopes are some common options to consider.
- Camera Mounting: To mount a digital camera to a telescope, you will need an appropriate camera adapter or a T-ring that matches the camera’s mount. This allows you to attach the camera directly to the telescope, aligning the camera’s lens with the telescope’s eyepiece.
- Focusing: Achieving proper focus is crucial in telescope photography. You can use the telescope’s focuser to adjust the focus, ensuring that the image appears sharp and clear on the camera’s sensor. Manual and auto-focus options are available, depending on the camera and telescope setup.
- Exposure Settings: Determining the right exposure settings greatly influences the quality of your images. It involves finding the right balance between exposure time, ISO sensitivity, and aperture size. Longer exposure times allow for capturing dimmer objects, while higher ISO sensitivities can help in low-light conditions.
- Tracking and Stabilization: To capture detailed images of celestial objects, a telescope needs to track their movement across the sky. You can use a motorized equatorial mount or a computerized telescope mount to compensate for the Earth’s rotation. Stabilizing the setup is also essential to avoid vibrations and blurring of images.
- Processing and Editing: Once you have captured your images, processing and editing software can help enhance their quality. Adjustments for brightness, contrast, colors, and noise reduction can be made to bring out the details and make the images more visually appealing.
- Practice and Patience: Telescope photography takes practice and patience. It may take time to perfect your techniques and capture stunning images. Experimenting with different settings, objects, and conditions will help you improve your skills and achieve better results.
By understanding these basics, you can start exploring the fascinating world of telescope photography and capture breathtaking images of the night sky.
Step-by-Step Guide: How to Mount a Digital Camera to Your Telescope
Mounting a digital camera to your telescope is a great way to capture stunning images of celestial objects. Whether you are an amateur stargazer or a professional astronomer, this step-by-step guide will help you easily set up your camera for astrophotography.
What You Will Need
To get started, you will need the following equipment:
- A digital camera with manual settings
- A telescope with a compatible camera mount
- A T-ring adapter specific to your camera model
- A telescope eyepiece projection adapter
- An optional remote shutter release cable
Step 1: Prepare Your Camera
Before attaching your camera to the telescope, make sure to fully charge its battery and insert a memory card with sufficient storage capacity. Set the camera to manual mode to have better control over the exposure settings.

Step 2: Attach the T-ring Adapter
Remove the lens from your camera and attach the T-ring adapter specific to your camera model. The T-ring connects your camera to the telescope and allows you to achieve focus. Ensure the adapter is securely attached to the camera.
Step 3: Connect the Telescope and Camera
Attach the T-ring adapter to the camera mount of your telescope. Make sure to tighten any screws or knobs to keep it securely in place. Check that the camera is aligned with the telescope’s optical axis for optimal image capture.
Step 4: Use the Eyepiece Projection Adapter
If you want to magnify the image even further, you can use an eyepiece projection adapter. This adapter allows you to insert an eyepiece into the telescope’s focuser before attaching your camera. Adjust the distance between the eyepiece and the camera to achieve the desired magnification.
Step 5: Focus and Image Capture
Turn on your camera’s live view mode and adjust the focus using the telescope’s focusing knobs. Look for a bright star or other celestial object to achieve sharp focus. Once you are satisfied with the focus, you can start capturing images by pressing the camera’s shutter button or using a remote shutter release cable.
Experiment with different exposure settings, ISO levels, and shutter speeds to capture the best possible images. Continuous shooting mode can also be useful for capturing multiple frames of an object. Don’t forget to review your images on the camera’s screen to ensure the desired results.

Congratulations! You have successfully mounted your digital camera to your telescope and are now ready to explore the wonders of astrophotography.
Essential Equipment for Attaching a Camera to a Telescope
Mounting a digital camera to a telescope can open up a whole new world of astrophotography. However, to achieve the best results, it is important to have the right equipment. Here are some essential items you will need:
1. T-ring
A T-ring serves as an adapter between your camera and the telescope. It attaches to the camera body and has a T-thread on the other end that connects to the telescope’s focuser. Make sure to get a T-ring that is compatible with your specific camera model.
2. T-Adapter
A T-adapter is another crucial component for attaching a camera to a telescope. It connects to the T-ring on one end and slides into the telescope’s focuser on the other end. The T-adapter holds the camera securely in place, allowing you to capture crisp, clear images.
3. Telescope Prime Focus Adapter
If you prefer to attach your camera directly to the telescope without using an eyepiece, a prime focus adapter is necessary. This adapter replaces the eyepiece and allows the camera to be attached directly to the telescope’s focuser. It ensures that the telescope’s primary mirror or lens aligns perfectly with the camera sensor.

4. Camera Remote or Cable Release
To avoid any camera shake and blurring, it is advisable to use a camera remote or cable release. This allows you to trigger the camera’s shutter without physically touching it. A remote or cable release ensures that your astrophotos come out sharp and clear.
With these essential pieces of equipment, you can confidently attach your digital camera to a telescope and start capturing stunning images of the night sky.
Troubleshooting Common Issues with Mounting a Camera to a Telescope
Mounting a digital camera to a telescope can be an exciting way to capture stunning celestial images, but it can also come with its fair share of challenges. Here are some common issues you may encounter and troubleshooting tips to help you overcome them:
-
Incompatible Mounting Hardware: One common issue is that the camera and telescope may not have compatible mounting hardware. Ensure that you have the correct camera adapter for your telescope and that it is securely attached.
-
Vignetting: Vignetting occurs when the edges of the camera’s field of view are darkened. To fix this issue, try using a camera adapter with a larger diameter or adjust the telescope’s focal length.
-
Camera Shake: Camera shake can result in blurry images. To minimize this issue, use a remote shutter release or a self-timer function to reduce vibrations caused by pressing the camera’s shutter button.
-
Focusing Difficulties: Achieving proper focus can be challenging when using a camera on a telescope. Make sure to carefully adjust the telescope’s focus knob and use the camera’s live view feature to fine-tune the focus.
-
Light Pollution: Light pollution can significantly impact image quality. Consider finding a darker observing location or using light pollution filters to minimize the impact of unwanted light sources.
-
Image Noise: High ISO settings or long exposure times can lead to image noise. Experiment with different ISO settings and exposure times to find the right balance between capturing enough light and reducing noise.
Remember, troubleshooting these issues may require patience and experimentation. Don’t be afraid to try different solutions and techniques to achieve the best results with your camera and telescope setup.
Tips and Tricks for Capturing Stunning Photos through a Telescope
When it comes to capturing stunning photos through a telescope, there are a few tips and tricks that can greatly enhance your results. Follow these simple guidelines to make the most out of your photography experience:
1. Choose the Right Telescope and Camera Combination
Before getting started, it’s important to ensure that your telescope and camera are compatible. Consider factors such as focal length, sensor size, and mounting options. A camera with a larger sensor and interchangeable lenses will generally produce better results.
2. Use Manual Focus and Adjustments
Auto-focus may not work well when photographing through a telescope, so it’s best to switch to manual focus mode. Experiment with different focus settings until you achieve the desired sharpness. Additionally, adjust the exposure settings manually to optimize your image quality.
3. Eliminate Vibrations and Shutter Shake
Even slight vibrations can significantly affect the sharpness of your photos. To minimize vibrations, use a remote shutter release or a self-timer function. Investing in a sturdy tripod or mounting system can also help to stabilize your setup.
4. Use Prime Focus or Eyepiece Projection
There are two primary methods for attaching your camera to a telescope: prime focus and eyepiece projection. Prime focus involves using a T-ring adapter to connect the camera directly to the telescope’s focuser. Eyepiece projection, on the other hand, utilizes an eyepiece to project the image onto the camera’s sensor. Experiment with both methods to see which yields better results for your specific setup.
5. Experiment with Different Filters and Accessories
Filters can be an excellent way to enhance your astrophotography results through a telescope. Consider using a light pollution filter to reduce the impact of artificial light on your images, or a solar filter to capture stunning shots of the sun. Additionally, explore different accessories such as Barlow lenses or focal reducers to achieve the desired magnification and field of view.
By following these tips and tricks, you’ll be well-equipped to capture stunning photos through your telescope. Remember to be patient, experiment with different settings, and continue learning to refine your astrophotography skills!
Taking Your Astro Photography to the Next Level
Astro photography is a captivating hobby that allows you to capture breathtaking images of the night sky. Whether you’re a beginner or an experienced photographer, there are several techniques and tools that can help you take your astro photography to the next level.
1. Invest in a Sturdy Tripod
One of the first steps in improving your astro photography is to invest in a sturdy tripod. A tripod will help stabilize your camera and reduce camera shake, allowing you to capture sharper and more detailed images of the night sky.
2. Use Remote Shutter Release or Self-Timer
Camera shake can occur when you press the shutter button on your camera, even if you’re using a tripod. To minimize this, use a remote shutter release or the self-timer function on your camera. This will allow you to take the photo without physically touching the camera, ensuring a more stable shot.
| Equipment | Description |
|---|---|
| Telescope | A high-quality telescope is an essential tool for capturing detailed images of celestial objects. |
| Mount | A sturdy mount is necessary to hold the telescope steady and track the motion of the night sky. |
| Camera | A digital camera with manual settings and long exposure capabilities is ideal for astrophotography. |
| T-Adapter | A T-adapter allows you to connect your camera to the telescope for prime focus photography. |
| Remote Shutter Release | A remote shutter release or intervalometer is useful for taking long exposure shots without touching the camera. |
| Software | Specialized software, such as image stacking and post-processing tools, can help enhance your astro photos. |
By investing in the right equipment, using proper techniques, and experimenting with different settings, you can take your astro photography to new heights. Remember to practice patience and have fun exploring the wonders of the night sky!
Question-answer:
What equipment do I need to mount a digital camera to a telescope?
To mount a digital camera to a telescope, you will need several pieces of equipment. First, you will need a T-ring adapter that is specific to your camera model. This adapter allows you to attach your camera to the telescope. You will also need a T-adapter that connects the T-ring adapter to the telescope’s focuser. Additionally, you may need extension tubes or a Barlow lens to achieve the desired focal length. Lastly, you will need a sturdy tripod to mount your telescope and camera setup.
Can I mount any digital camera to a telescope?
Most digital cameras can be mounted to a telescope with the right adapter. However, it’s important to note that not all adapters are universal, and you will need a specific T-ring adapter that is compatible with your camera model. Additionally, the size and weight of your camera may also impact the stability of your telescope setup, so it’s recommended to use a DSLR or mirrorless camera for optimal results.


