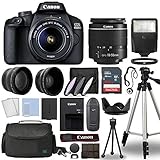
When it comes to capturing stunning photographs, a good camera setup is essential. One important aspect of setting up your Canon digital camera is configuring it for flash photography. Whether you’re shooting in a studio or in natural lighting conditions, understanding how to effectively use flash can greatly enhance the quality of your images. In this article, we will guide you through the step-by-step process of setting up your Canon digital camera for flash, so you can start taking professional-looking photos.
Step 1: Familiarize Yourself with Your Camera’s Flash Settings
Before you begin setting up your Canon digital camera for flash, it’s important to understand the various flash settings that your camera offers. This includes knowing how to turn the flash on and off, adjusting the flash mode (such as automatic, manual, or red-eye reduction), and controlling the flash output intensity. To do this, refer to your camera’s user manual or navigate through your camera’s menu to find the flash settings.
Step 2: Attach an External Flash
If you’re looking to take your flash photography to the next level, consider using an external flash. These flashes offer more power and versatility compared to the built-in flash of your Canon digital camera. To attach an external flash, locate the hot shoe mount on top of your camera and carefully slide the flash onto it. Make sure it securely clicks into place and check that the flash is properly connected to your camera.

Step 3: Adjust Flash Settings and Experiment
Once you’ve familiarized yourself with your camera’s flash settings and attached an external flash if desired, it’s time to fine-tune your flash setup. Experiment with different flash modes, such as using the automatic mode for basic flash photography or the manual mode for precise control over the flash output. You can also try adjusting the flash output intensity to achieve the desired lighting effect. Remember to review your photos and make adjustments as necessary to get the best results.
By following these steps and practicing with your Canon digital camera’s flash setup, you’ll be well on your way to capturing stunning photographs in any lighting conditions. Don’t be afraid to experiment with different settings and techniques to find what works best for you. With time and practice, you’ll master the art of using flash photography to create striking images that truly stand out.
Understanding Canon Digital Camera Settings
When setting up your Canon digital camera for flash photography, it is important to understand the various settings and options available to you. By familiarizing yourself with these settings, you can ensure that you capture the best possible photos in different lighting conditions.
Exposure Mode: The exposure mode on your Canon digital camera allows you to control how the camera meters and sets the exposure for each shot. Some common exposure modes include Aperture Priority, Shutter Priority, and Program Auto. Each mode offers different levels of control over the exposure settings.

ISO: ISO refers to the sensitivity of your camera’s image sensor to light. A higher ISO setting allows for faster shutter speeds and better low-light performance, but it also introduces more noise into the image. For flash photography, it is generally recommended to use a lower ISO setting to minimize noise.
White Balance: White balance is used to ensure that the colors in your photos appear accurate. Different lighting conditions can have different color temperatures, and adjusting the white balance setting will compensate for these variations. For flash photography, it is generally recommended to use the Auto white balance setting, as the flash will provide a consistent color temperature.
Flash Mode: The flash mode on your Canon digital camera determines how the flash fires and interacts with the ambient light. Common flash modes include Auto, Fill Flash, and Rear Sync. Auto mode automatically adjusts the flash output based on the camera’s metering, while Fill Flash mode is useful for filling in shadows in backlit situations. Rear Sync mode allows you to capture motion blur while still illuminating the subject with the flash.
Flash Exposure Compensation: Flash exposure compensation allows you to adjust the power output of the flash independently of the camera’s metering. This is useful when you want to override the flash output to achieve a desired effect or balance the flash with the ambient light. Positive values increase the flash power, while negative values decrease it.
By understanding and utilizing these Canon digital camera settings, you can take full control of your flash photography and achieve stunning results. Experiment with different settings in various shooting conditions to find the combination that works best for you.

Choosing the Right Flash for Your Canon Digital Camera
When it comes to capturing perfect photos with your Canon digital camera, having the right flash is essential. The flash plays a crucial role in providing additional light in low-light conditions and can greatly improve the quality of your images. Here are some factors to consider when choosing the right flash for your Canon digital camera.
Flash Compatibility
The first thing to consider is the compatibility of the flash with your Canon digital camera. Canon cameras typically have a hot shoe mount, which allows you to attach an external flash directly onto the camera’s body. Make sure that the flash you choose is compatible with your camera model. You can check the compatibility information in your camera’s user manual or on the Canon website.
Flash Power
The power of the flash is another important factor to consider. The power of a flash is measured in terms of its guide number, which indicates the flash’s maximum range. A higher guide number means that the flash has more power and can illuminate subjects from a greater distance. Consider your shooting needs and the typical shooting conditions you will encounter to determine the appropriate power level for your flash.
Flash Features
Flash features can vary greatly depending on the model and brand. Some flashes offer adjustable power settings, which allow you to control the intensity of the flash output. Others may have a built-in diffuser or bounce card, which can help soften the light or redirect it for more flattering results. Consider the features that are important to you and choose a flash that offers the functionalities you need.
Budget
Finally, consider your budget when choosing a flash for your Canon digital camera. The price of flashes can vary greatly depending on the brand, features, and power level. Set a budget and look for flashes within that range. Keep in mind that investing in a high-quality flash can greatly enhance your photography, so it may be worth spending a bit more for better results.

By considering flash compatibility, power, features, and budget, you can choose the right flash for your Canon digital camera and take your photography to the next level. Happy shooting!
Setting up Your Canon Digital Camera for Flash
Using flash with your Canon digital camera can greatly enhance your photography, allowing you to capture well-lit images even in low-light conditions. To make the most of your flash, it’s important to set up your camera correctly. Follow the steps below to ensure optimal flash performance.
1. Adjusting Flash Settings
Begin by checking your camera’s settings menu to find the flash options. Different Canon models may have slightly different menu layouts, but typically the flash settings can be accessed through the main menu or the quick settings menu.
Once you’ve found the flash settings, you can adjust parameters such as flash mode, flash intensity, and flash exposure compensation. Experiment with these settings to achieve the desired results for your photographs. For example, you can set the flash to fire automatically, always on, or disabled, depending on the shooting conditions.
2. Attaching an External Flash
If you have an external flash unit, you can attach it to your Canon digital camera for more powerful and versatile lighting options. To do this, locate the hot shoe on top of your camera. The hot shoe is a metal bracket with electrical contacts.
To attach the external flash, align the contacts on the bottom of the flash unit with the contacts in the hot shoe of the camera. Gently slide the flash unit into the hot shoe and tighten the locking mechanism, if available. Ensure that the flash is securely attached before using it.
3. Using Flash Sync Modes
Canon digital cameras offer different flash sync modes, such as front-curtain sync, rear-curtain sync, and high-speed sync. These modes control when the flash fires in relation to the opening and closing of the camera’s shutter.
Front-curtain sync is the default mode and fires the flash as soon as the shutter opens. Rear-curtain sync, on the other hand, fires the flash just before the shutter closes, creating trailing light effects. High-speed sync allows you to use flash even at high shutter speeds, useful when capturing fast-moving subjects.
4. Diffusing the Flash
In certain situations, direct flash can create harsh and unflattering lighting. To soften the light from your flash, you can use diffusers. These are typically plastic or fabric attachments that fit over the flash head and spread the light out more evenly.
Diffusers can help reduce shadows and produce more natural-looking images. Experiment with different types of diffusers, such as bounce cards, softboxes, or mini light modifiers, to achieve the desired lighting effect.

By following these steps, you can properly set up your Canon digital camera for flash photography and improve the overall quality of your images. Remember to experiment and adjust the flash settings to suit specific shooting conditions for the best results.
Adjusting Flash Power on Your Canon Digital Camera
Adjusting the flash power on your Canon digital camera is essential to capturing perfectly exposed photos in various lighting conditions. Fortunately, Canon cameras offer the flexibility to control the flash power, allowing you to achieve the desired lighting for your images.
Here is a step-by-step guide on how to adjust the flash power on your Canon digital camera:
- Turn on your Canon digital camera and select the desired shooting mode.
- Open the camera’s menu by pressing the menu button.
- Navigate to the flash settings option in the menu and select it.
- Choose the flash power adjustment option, which may be represented by a lightning bolt icon.
- Use the camera’s navigation buttons or scroll wheel to increase or decrease the flash power as needed.
- Preview the effect of the flash power adjustment on your camera’s LCD screen.
- Press the menu button again to exit the flash settings menu.
Remember that lower flash power can result in a more natural-looking and subtle lighting effect, while higher flash power can provide a stronger and more illuminating light. Understanding how to adjust the flash power on your Canon digital camera will allow you to have greater control over the lighting in your photos and enhance their overall quality.
Experiment with different flash power settings in different shooting scenarios to see how it affects the lighting and exposure of your photos. With practice, you will be able to use the flash power adjustment feature on your Canon digital camera to produce incredible images in any lighting situation.

Using Flash Compensation on Your Canon Digital Camera
Flash compensation is an important feature on your Canon digital camera that allows you to adjust the output of the camera’s built-in flash unit. This feature is especially useful when you want to control the amount of light emitted by the flash to achieve a desired exposure.
To use flash compensation on your Canon digital camera, follow these steps:
- Turn on your camera and set it to shooting mode.
- Press the the flash compensation button, which is usually indicated by a lightning bolt icon.
- Use the arrow keys or the dial to adjust the flash compensation value. A positive value increases the flash output, while a negative value decreases it.
Note: The flash compensation value is measured in EV (exposure value). - Press the shutter button halfway to exit the flash compensation mode.
- Take a test shot and review the image to see if the flash output matches your desired results.
It’s important to note that flash compensation only affects the output of the built-in flash unit of your Canon digital camera. If you are using an external flash unit, you will need to adjust the flash compensation on the flash unit itself.
By using flash compensation, you have more control over the lighting conditions in your photos. This feature enables you to properly expose your subject, even in difficult lighting situations, such as when shooting against bright backgrounds or in low-light environments.
Remember to experiment with different flash compensation values to find the perfect balance of light for your photos!
Utilizing High-Speed Sync on Your Canon Digital Camera
High-Speed Sync (HSS) is a feature available on many Canon digital cameras that allows you to use flash at higher shutter speeds, even higher than the camera’s maximum synchronization speed. This feature is especially useful in situations where you want to freeze motion or use a wide aperture in bright conditions.
1. Understanding High-Speed Sync
In traditional flash photography, the flash is fired at the beginning of the exposure while the camera’s shutter is fully open. The maximum synchronization speed, usually around 1/200th to 1/250th of a second, limits the fastest shutter speed you can use.
With High-Speed Sync, the flash is fired multiple times throughout the exposure, effectively allowing you to use flash at higher shutter speeds. This feature helps you maintain proper exposure and eliminate the risk of dark areas in your images, even when using fast shutter speeds.
2. Activating High-Speed Sync
To utilize High-Speed Sync on your Canon digital camera, follow these steps:
- Access your camera’s menu and go to the Flash Control settings.
- Select the High-Speed Sync option.
- Enable High-Speed Sync.
Once activated, you can adjust the shutter speed as needed, even beyond the camera’s maximum synchronization speed.
3. Tips for Using High-Speed Sync
- Use High-Speed Sync when shooting outdoors in bright sunlight to balance the exposure between the subject and the background.
- Experiment with different shutter speeds to achieve the desired effect. Higher shutter speeds will freeze motion, while slower speeds may introduce motion blur.
- Consider using an external flash with a High-Speed Sync capability for better control and flexibility.
- Be mindful of the flash’s power output as it decreases at higher shutter speeds. You may need to increase the flash output or get closer to the subject to maintain proper exposure.
By utilizing High-Speed Sync on your Canon digital camera, you can overcome the limitations of the maximum synchronization speed and capture stunning images with flash even in challenging lighting conditions.
Using External Flash with Your Canon Digital Camera
Canon digital cameras offer a variety of features and settings to enhance your photography experience. One of these features is the ability to utilize an external flash. Adding an external flash to your Canon camera can greatly improve your lighting capabilities, allowing you to achieve better exposure and more professional-looking photos.
Choosing the Right External Flash
When selecting an external flash for your Canon digital camera, it is important to choose one that is compatible with your camera model. Canon offers a range of external flash options designed specifically for their cameras. These flashes are designed to work seamlessly with Canon cameras, providing optimal performance and functionality.
Setting Up the External Flash
Once you have chosen the right external flash for your Canon digital camera, setting it up is a straightforward process. Follow these steps to get started:
- Power off your camera and external flash before attaching the flash to the hot shoe mount on top of your camera.
- Align the metal contacts on the bottom of the flash with the metal contacts on the hot shoe mount, ensuring a secure connection.
- Power on your camera and external flash.
- Access the flash settings on your camera menu. Depending on your camera model, this may be located under the “Flash Control” or “External Flash Control” section.
- Adjust the flash settings according to your lighting requirements. You can typically control the flash mode, flash exposure compensation, and flash output power.
- Take a test shot to ensure the flash is properly synced with your camera.
- Experiment with different flash settings to achieve the desired lighting effects and improve your photography.
By using an external flash with your Canon digital camera, you can take your photography to the next level. Whether you are shooting in low-light conditions, capturing fast-moving subjects, or simply want to add depth and dimension to your photos, an external flash can greatly enhance your results.
Overcoming Flash Shadows on Your Canon Digital Camera
If you own a Canon digital camera and have been experiencing annoying shadows in your flash photographs, there are a few steps you can take to eliminate or reduce them. By understanding the causes of flash shadows and making a few adjustments, you can greatly improve the quality of your images.
1. Use External Flash
One way to overcome flash shadows is to invest in an external flash. External flashes can provide a larger light source and help to eliminate harsh shadows. Additionally, you can adjust the angle and direction of the flash to further reduce shadows. Canon offers a variety of external flashes that are compatible with their digital cameras.
2. Bounce the Flash
An alternative technique is to bounce the flash off a nearby surface, such as a wall or ceiling. This indirect lighting can help to disperse the light and minimize shadows. Some Canon digital cameras have a built-in feature that allows you to tilt and swivel the flash head for better control of the bounced light.
3. Use Diffusers
Diffusers are a great tool for softening the harsh light from the flash. They can help to reduce shadows by spreading the light evenly across the subject. There are various diffusers available for Canon digital cameras, including attachments that fit over the flash head or diffuser caps that can be attached to the camera lens.
4. Adjust the Flash Settings
Experimenting with the flash settings on your Canon digital camera can also help to reduce shadows. You can try decreasing the flash power or using the slow sync flash mode to allow more ambient light into the photo. Additionally, adjusting the flash exposure compensation can help to balance the exposure and minimize shadows.
By following these tips and techniques, you can overcome flash shadows on your Canon digital camera and capture high-quality photos without the distraction of harsh shadows. Remember to practice and experiment with different settings and techniques to find what works best for your specific camera model and shooting conditions.
Troubleshooting Flash Issues on Your Canon Digital Camera
If you’re having trouble with the flash on your Canon digital camera, there are a few steps you can take to troubleshoot and resolve the issue. Follow these troubleshooting tips to get your flash working properly again.
1. Check the Flash Settings
Start by checking the flash settings on your camera. Ensure that the flash is enabled and set to the desired mode, such as automatic or manual. Double-check that the flash isn’t set to “off” or “disabled.”
2. Adjust the Flash Intensity
If you find that the flash is too bright or too dim, you can adjust the flash intensity. Look for the flash exposure compensation setting in your camera’s menu and make the necessary adjustments. Increase the intensity if the images are too dark, or decrease it if they’re too bright.
3. Clean the Flash
Dirt or debris on the flash can impact its performance. Use a soft, lint-free cloth to gently clean the flash unit. Be careful not to scratch the flash or push any debris into it. Cleaning the flash regularly can help maintain its effectiveness.
4. Use a Fully Charged Battery
A low battery can affect the flash’s performance. Ensure that your camera has a fully charged battery before using the flash. If the battery is old or not holding a charge, consider replacing it with a new one.
5. Reset the Camera
If the above steps don’t resolve the issue, try resetting your camera to its default settings. Look for the “Reset” or “Restore Factory Settings” option in your camera’s menu. This can help correct any software or firmware issues that may be causing the flash problem.
If you’re still experiencing flash issues after trying these troubleshooting tips, it may be a hardware problem. In this case, it’s recommended to contact Canon customer support or bring your camera to an authorized service center for further assistance.
Remember to refer to your camera’s user manual for specific instructions and additional troubleshooting steps tailored to your particular Canon model.
Question-answer:
What is the purpose of setting up a Canon digital camera for flash?
Setting up a Canon digital camera for flash allows you to properly control the lighting conditions when taking photos. It ensures that the flash is synchronized with the camera and provides the desired amount of light for the subject.
What are the steps to set up a Canon digital camera for flash?
The steps to set up a Canon digital camera for flash may vary depending on the specific camera model. However, in general, you would need to navigate to the camera’s menu, locate the flash settings, and then adjust the desired parameters such as flash mode, flash intensity, and flash synchronization. The exact steps can be found in the camera’s user manual.