
Photographing the moon can be a challenging yet rewarding experience. The moon’s bright surface, constantly changing phases, and unique features make it an intriguing subject for photographers. With the advancements in digital camera technology, capturing stunning images of the moon has become more accessible than ever before.
1. Equip Yourself with the Right Gear: To capture the moon’s beauty, you will need some essential equipment. Firstly, make sure you have a digital camera with manual settings, as this will give you more control over the exposure and focus. A zoom lens with a focal length of at least 200mm is also recommended to capture the moon’s details.
Tip: Investing in a tripod can greatly improve the sharpness of your photos, as it will eliminate camera shake caused by handheld shooting.
2. Choose the Right Time: Timing is crucial when it comes to photographing the moon. The best time to capture detailed images of the moon is during the night of a full moon. However, shooting during the night of a crescent moon can also lead to striking images, as the moon’s shadow creates a three-dimensional effect.
Tip: Use an online moon phase calendar to determine the best time to photograph the moon based on the phase and location.
3. Set Up the Camera Settings: Once you have the right gear and perfect timing, it’s time to set up your camera settings. Start by switching your camera to manual mode and set the ISO to the lowest possible value to minimize noise. Use a narrow aperture (high f-number) to ensure a wide depth of field, and adjust the shutter speed accordingly, depending on the moon’s brightness.
Tip: Experiment with different camera settings to find the perfect balance between brightness and detail in your moon photos.
By following these tips and techniques, you’ll be able to capture breathtaking images of the moon with your digital camera. Remember, practice makes perfect, so don’t be discouraged if your first attempts don’t turn out as expected. Keep experimenting, and before you know it, you’ll be taking professional-quality moon photos.
Preparation
Before you can start taking pictures of the moon with your digital camera, there are a few steps you need to take in order to ensure a successful photography session.
First, make sure you have the right equipment. You will need a digital camera with manual settings and a telephoto lens. The telephoto lens will allow you to get a closer shot of the moon and capture more detail. It’s also a good idea to have a tripod to keep your camera steady during the long exposure times required for moon photography.

Next, find a good location. It’s best to find a spot away from bright city lights and other sources of light pollution. This will help improve the visibility of the moon and make it easier to capture its details. Look for a location with a clear view of the sky, preferably with minimal obstructions such as buildings or trees.
Check the weather forecast before you head out. You’ll want a clear night with minimal cloud cover to ensure the best visibility of the moon. Additionally, be mindful of the phase of the moon. Full moons can be bright and may wash out the details, so it’s often better to photograph the moon during a crescent phase when the shadows and details are more pronounced.
Lastly, familiarize yourself with your camera’s manual settings. Moon photography typically requires manual control over exposure and focus. You’ll want to set your camera to manual mode and adjust the ISO, aperture, and shutter speed accordingly. Play around with these settings before your photography session to get a feel for how they affect your photos.
| Equipment | Location | Weather | Camera Settings |
|---|---|---|---|
| A digital camera with manual settings | Away from bright city lights and light pollution | Clear night with minimal cloud cover | Manual mode, adjust ISO, aperture, and shutter speed |
| Telephoto lens | A clear view of the sky | Crescent moon phase for more pronounced details | |
| Tripod | Minimal obstructions |
Choosing the right equipment
When it comes to taking pictures of the moon with a digital camera, choosing the right equipment is crucial to achieving the best results. Here are some key factors to consider:
Camera
First and foremost, you will need a digital camera with manual settings. This is important because automatic settings can often struggle to capture the subtle details and contrast of the moon. Look for a camera with a large image sensor and high resolution to ensure good image quality.
Lens
The lens you choose will have a significant impact on your moon photography. A telephoto lens with a long focal length between 200mm and 400mm is ideal as it allows you to zoom in and capture the moon in great detail. Additionally, a lens with a wide aperture, such as f/2.8 or f/4, will help you achieve a sharp image with good exposure.
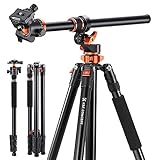
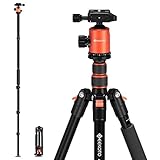
Tripod
Using a tripod is essential for moon photography as it helps eliminate any camera shake, resulting in a sharper image. Look for a sturdy tripod that can support the weight of your camera and lens. A tripod with a ball head will provide flexibility in positioning your camera and allow for smooth adjustments.
Remote Shutter Release
A remote shutter release is a handy accessory that allows you to trigger the camera without touching it, thus minimizing any accidental movement. Using a remote shutter release further reduces the risk of camera shake and ensures the sharpest possible images.
| Camera | Lens | Tripod | Remote Shutter Release |
|---|---|---|---|
| Digital camera with manual settings | Telephoto lens (200mm – 400mm) with wide aperture | Sturdy tripod with a ball head | Remote shutter release |
Selecting the right settings
When taking pictures of the moon with a digital camera, it’s important to select the right settings in order to capture the details and beauty of the moon. Here are some tips to help you choose the perfect settings:
- Use manual mode: Switch your camera to manual mode to have full control over the settings. This will allow you to adjust the aperture, shutter speed, and ISO.
- Set a low ISO: A lower ISO, such as 100 or 200, will result in less noise and a cleaner image. Keep in mind that the moon is a bright object, so a low ISO is ideal.
- Adjust the aperture: Use a smaller aperture, like f/8 or higher, to ensure a larger depth of field and sharper details. This will help capture the craters and textures on the surface of the moon.
- Choose the right shutter speed: The moon is a fast-moving object, so you need a faster shutter speed to avoid blur. Start with a shutter speed of around 1/125th of a second and adjust as needed.
- Use spot metering: Spot metering allows you to meter the exposure based on a specific area of the frame. Aim the spot meter on the moon to properly expose it, as the rest of the scene may be much darker.
- Consider using a tripod: To minimize camera shake and ensure sharp images, it’s recommended to use a tripod. This will help you maintain stability and allow for longer exposures if needed.
Remember, it may take some trial and error to find the perfect settings for capturing the moon. Don’t be afraid to experiment and adjust your camera settings until you achieve the desired results.

Finding the best location
When it comes to taking clear and detailed pictures of the moon with your digital camera, finding the best location is crucial. Here are a few tips to help you choose the perfect spot:
- Minimal light pollution: Look for a location away from city lights and other sources of light pollution. The less ambient light there is, the clearer your moon pictures will turn out.
- Elevated position: Find a spot that offers a clear view of the sky and the horizon. Being at a higher elevation can provide a better vantage point and reduce any obstructions that may hinder your photography.
- Wide-open space: Avoid locations with tall buildings, trees, or other structures that could block your view of the moon. Look for an open area with a clear line of sight.
- Stability: It’s important to set up your camera on a stable surface to avoid shaky or blurry images. Consider using a tripod or other stable platforms to keep your camera secure.
- Accessibility: Choose a location that is easy to access, especially if you plan on bringing a lot of equipment with you. It’s always best to be prepared and have everything you need within reach.
By taking these factors into consideration, you can significantly improve your chances of capturing stunning moon photos with your digital camera. Remember to plan ahead, scout locations, and experiment to find the best spot for your specific needs.
Understanding the moon’s phases
The moon goes through different phases throughout its 29.5-day lunar cycle. Understanding these phases can help you plan your moon photography sessions and capture stunning images of Earth’s natural satellite.
Lunar Phases: A Brief Overview
The moon’s phases are a direct result of its position in relation to the sun and Earth. As sunlight reflects off the moon, different portions of its surface are visible from Earth, leading to the different phases.
1. New Moon: During this phase, the moon is not visible as it is positioned between the Earth and the sun. It marks the beginning of a new lunar cycle.

2. Waxing Crescent: As a small sliver of the moon becomes visible, the moon progresses into the waxing crescent phase. This phase is characterized by the crescent shape growing larger each night.
3. First Quarter: The first quarter moon occurs about a week after the new moon. At this phase, half of the moon’s surface is visible from Earth.
4. Waxing Gibbous: As the lit portion of the moon continues to grow, it enters the waxing gibbous phase. During this phase, the moon is more than half illuminated.
5. Full Moon: The full moon occurs when the moon is positioned on the opposite side of the Earth as the sun, allowing the entire illuminated side to be visible. It is the brightest phase of the lunar cycle.
6. Waning Gibbous: After the full moon, the moon enters the waning gibbous phase, gradually becoming less illuminated each night.

7. Last Quarter: The last quarter moon occurs about a week after the full moon. At this point, half of the moon’s surface is visible again, but on the opposite side as the first quarter.
8. Waning Crescent: The waning crescent phase is when only a small sliver of the moon is visible, marking the conclusion of the lunar cycle before it begins again with the new moon.
Capturing the Moon’s Phases
Each phase of the moon offers unique photographic opportunities. For example, during the waxing crescent phase, the moon’s sliver shape can create interesting compositions when framed with other elements in the night sky.
On the other hand, the full moon provides ample light and can be mesmerizing when captured against a scenic backdrop, such as a city skyline or a serene landscape.
Experiment with different exposure settings, focal lengths, and compositions to capture the moon’s texture and details during each phase. It is recommended to use a tripod to ensure image stability and minimize camera shake.
Remember to check the lunar calendar to plan your photography sessions and choose the optimal timing and phase for your desired shots.
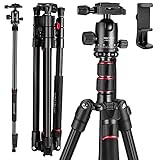
Using a Tripod
To capture clear and sharp images of the moon, it is essential to use a tripod. The moon appears bright in the sky, but it is still a distant object, and any camera shake can result in blurry photos. A tripod provides stability, ensuring that the camera remains steady, even during longer exposure times.
When selecting a tripod, look for a sturdy and lightweight option that is suitable for both indoor and outdoor photography. Consider the maximum load capacity to ensure it can support the weight of your camera and lens combination. Furthermore, check if it has a quick-release plate for easy attachment and detachment of your camera.
Setting Up the Tripod
Once you have chosen a suitable tripod, here are the steps to set it up correctly:
- Extend the legs of the tripod to the desired height based on your shooting position and requirements. Make sure the tripod is stable on the ground.
- Attach the camera to the top of the tripod using the quick-release plate. Ensure it is securely fastened to prevent any accidental falls.
- Adjust the tripod head to position the camera at the desired angle and framing. This might include tilting or panning the head to align the moon in the frame.
- Use the tripod’s controls to fine-tune the height, angle, and framing if necessary. This allows for precise composition and framing of the moon.
Extra Tips
Here are a few additional tips to maximize the benefits of using a tripod when photographing the moon:
-
Use a remote shutter release or a self-timer: Even the act of pressing the camera’s shutter button can introduce vibrations and camera shake. Using a remote shutter release or the camera’s self-timer feature eliminates this issue, ensuring sharp images.
-
Avoid windy conditions: Wind can cause vibrations that can impact the stability of the tripod. If possible, find a sheltered location or choose a calm day to shoot the moon.
-
Consider using mirror lock-up: Some cameras have a mirror lock-up feature that prevents internal camera vibrations caused by the mirror movement. This feature can further enhance image sharpness.
Editing your moon photos
After capturing your moon photos with a digital camera, you may want to enhance them further through editing. Here are some tips to help you achieve the best results:
1. Adjust the exposure: The brightness of your moon photos can be improved by adjusting the exposure settings. Increase the exposure slightly to bring out more details in the moon’s surface.
2. Enhance the contrast: By increasing the contrast, you can make the moon appear sharper and more defined. This can be done by adjusting the contrast levels or using a curve adjustment tool.
3. Reduce noise: Depending on the camera and settings used, there may be some noise present in your moon photos. Apply noise reduction techniques to reduce the graininess and improve the overall quality.
4. Sharpen the details: To make the craters and surface features of the moon stand out, use the sharpening tool. Be careful not to over-sharpen as it can introduce artifacts.
5. Adjust the white balance: In some cases, the moon may appear too warm or cool in color. Adjust the white balance to correct any color casts and make the moon appear more natural.
6. Crop and straighten: If needed, crop the image to remove any distractions and focus on the moon itself. Additionally, straighten the horizon line if it appears tilted.
7. Experiment with creative effects: Once the technical adjustments are made, feel free to experiment with creative effects like black and white conversion, sepia tones, or adding a vignette to give your moon photos a unique look.
Remember to work with a copy of your original photo, so you can always start afresh if needed. With practice and experimentation, you can create stunning moon photos that showcase the beauty of our celestial neighbor.
Question-answer:
What equipment do I need to take pictures of the moon?
To capture detailed pictures of the moon, you will need a digital camera with manual exposure settings, a telephoto lens with a focal length of at least 200mm, a tripod to keep your camera steady, and a remote shutter release to minimize camera shake.
What camera settings should I use to photograph the moon?
To photograph the moon, set your camera to manual mode and choose a low ISO setting (between 100-200) to reduce noise. Use a fast shutter speed (around 1/250th of a second) to capture the details of the moon’s surface, and set your aperture to around f/8 to ensure that the moon is in focus.
How can I focus my camera on the moon?
To ensure that your camera is focused correctly on the moon, switch your lens to manual focus and set it to infinity. You can also use the zoom feature on your camera’s screen to magnify the moon and fine-tune the focus manually.
What is the best time to photograph the moon?
The best time to photograph the moon is during the “golden hour,” which is shortly after sunset or before sunrise. During this time, the moon is at a low angle in the sky, creating dramatic shadows and adding depth to your photographs.
Do I need any additional accessories to photograph the moon?
If you want to capture the moon in its full glory, you can use a teleconverter or a telescope with an adapter to attach it to your camera. These accessories will allow you to zoom in even closer and capture more detailed shots of the moon’s surface.


