Imagine the thrill of soaring through the skies, capturing breathtaking aerial footage, and controlling every move of your drone from the palm of your hand. With a Sky Rider drone, you can turn this dream into a reality. However, before you can start flying your drone with your phone, you need to know how to connect them. In this guide, we will walk you through the step-by-step process of connecting your Sky Rider drone to your phone, so you can experience the excitement of piloting your drone with ease.
Step 1: Download the App
To connect your Sky Rider drone to your phone, the first thing you need to do is download the accompanying app. This app acts as the bridge between your phone and your drone, allowing you to control your drone’s flight, adjust settings, and view the live feed from your drone’s camera. You can find the app in your device’s app store by searching for “Sky Rider drone app.” Once you’ve found the app, click the download button and wait for it to install on your phone.
Step 2: Turn on Your Drone and Phone
Once the app is installed on your phone, make sure both your drone and phone are turned on. Most Sky Rider drones have a power button located on the drone itself. Press and hold this button until you see the lights on your drone start to blink. This indicates that your drone is powering on. On your phone, ensure that the Wi-Fi and Bluetooth features are enabled. These are the two methods through which your phone will connect to your drone.

Step 3: Connect to Your Drone’s Wi-Fi
Now that both your drone and phone are powered on, it’s time to establish a connection between them. Open the settings on your phone and navigate to the Wi-Fi options. Look for your drone’s Wi-Fi network in the available networks list. The network name will typically start with “Sky Rider” followed by a series of numbers or letters. Select your drone’s Wi-Fi network and enter the password, if prompted. Once connected, you should see a confirmation message indicating that your phone is connected to the drone’s Wi-Fi.
Step 4: Launch the App and Connect
Now that your phone is connected to your drone’s Wi-Fi, launch the Sky Rider app. You should see an option to connect or pair your drone within the app’s interface. Tap on this option and wait for the app to establish a connection with your drone. Once connected, you should see a live feed from your drone’s camera on your phone’s screen, along with a variety of controls for piloting your drone. Congratulations! You have successfully connected your Sky Rider drone to your phone.
With your Sky Rider drone now connected to your phone, you can explore the world from a whole new perspective. Whether you’re capturing stunning aerial photographs, recording epic videos, or simply enjoying the thrill of flying, the possibilities are endless. So, grab your phone, connect it to your Sky Rider drone, and let the adventure begin!

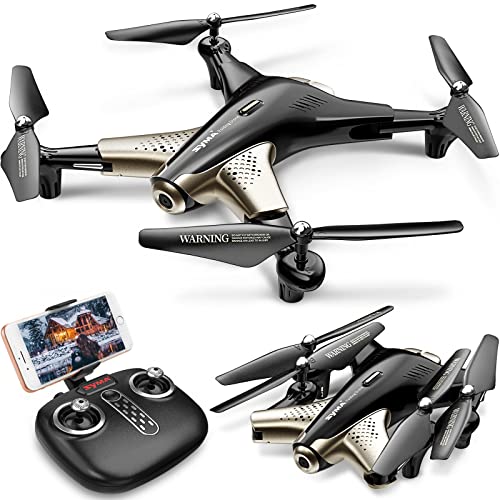
Getting Started with the Sky Rider Drone
The Sky Rider Drone is an exciting and innovative device that allows you to capture breathtaking aerial footage. Before you can begin using your drone, you will need to complete a few simple steps to set it up correctly.
Step 1: Charging the Drone
Before your first flight, it is important to ensure that the drone’s battery is fully charged. Connect the included USB charging cable to the drone’s charging port and connect the other end to a power source, such as a computer or a USB wall charger. The LED light on the drone will indicate when the battery is fully charged, which typically takes around 60-90 minutes.
Step 2: Downloading the App
To control your Sky Rider Drone using your phone, you will need to download the Sky Rider Drone app. Search for “Sky Rider Drone” in your device’s app store and install the app. Once the app is installed, open it and follow the on-screen instructions to set up your account and connect to your drone.
Step 3: Connecting Your Phone to the Drone
After downloading and opening the app, make sure that Bluetooth is enabled on your phone. On the app’s main screen, tap the “Connect” button to begin searching for available devices. Select your drone from the list of detected devices and follow the prompts to pair your phone with the drone.
Step 4: Familiarizing Yourself with the Controls
Once your phone is connected to the drone, take some time to familiarize yourself with the app’s interface and the drone’s controls. The app will provide you with access to various features and settings, such as camera control, flight modes, and altitude adjustment. It is important to understand how these controls work before attempting to fly the drone.

Step 5: Calibrating the Drone
Before your first flight, it is crucial to calibrate the drone to ensure stable and accurate flight. Follow the on-screen instructions in the app to calibrate the gyroscope and compass of the drone. This step is essential for optimal performance and control.
Step 6: Going for Your First Flight
Now that your drone is fully set up and your phone is connected, you are ready to take your first flight! Find an open outdoor area, away from obstacles and people, to ensure safe flying conditions. Start with gentle movements and gradually increase your skill level as you become more comfortable controlling the drone.
| Required Equipment: | Included in the Package: |
|---|---|
| Smartphone or tablet with Bluetooth capabilities | Sky Rider Drone |
| USB charging cable | USB wall charger |
| User manual |
Understanding the Basics of the Sky Rider Drone
The Sky Rider drone is a popular device that allows users to capture aerial footage and experience the thrill of flying. Before connecting the drone to your phone, it is important to understand the basic features and functionalities of the Sky Rider drone.
1. Drone Controls and Navigation
The Sky Rider drone is equipped with a remote control that allows users to control its movement and direction. The control features joysticks for adjusting the altitude, direction, and rotation of the drone. Understanding these controls is crucial for flying the drone safely and efficiently.
2. Camera Capabilities
One of the most exciting features of the Sky Rider drone is its built-in camera. The drone is equipped with a high-definition camera that enables users to capture stunning aerial photos and videos. Understanding the camera capabilities and settings will help you capture the best footage during your flights.
3. Flight Modes
The Sky Rider drone offers various flight modes that enhance the flying experience for different users. These flight modes include hover mode, which enables the drone to hover in one place, and follow me mode, which allows the drone to track the user’s movement. Understanding these flight modes will help you utilize the drone’s capabilities to the fullest.
4. Battery Life and Charging
Like any other drone, the Sky Rider drone relies on a rechargeable battery for power. It is important to be aware of the drone’s average battery life and charging time to ensure uninterrupted flights. Understanding the battery life and charging process will help you plan your flights accordingly.
By familiarizing yourself with the basic features and functionalities of the Sky Rider drone, you can ensure a smooth and enjoyable flying experience. Now that you have a good understanding of the drone, you are ready to connect it to your phone and explore its advanced features.
Selecting the Right Phone for Connecting to the Drone
When it comes to connecting your Sky Rider drone to your phone, you’ll need to ensure that your phone is compatible with the required specifications. Here are a few factors to consider when selecting the right phone for connecting to the drone:
Operating System Compatibility
The first thing to consider is the operating system of your phone. Make sure that your phone is running the required operating system, such as iOS or Android, as specified by the manufacturer of the Sky Rider drone. You’ll need to check the compatibility requirements and ensure that your phone meets them.

Processor and RAM
Another important factor to consider is the processing power and RAM of your phone. The Sky Rider drone app may require a certain level of processing power and RAM to run smoothly and handle the live video feed from the drone. Make sure that your phone meets or exceeds the minimum requirements mentioned by the drone manufacturer.
If your phone has a slow processor or insufficient RAM, you may experience lag or freezing issues when connecting to the drone, which can affect your flying experience.
It’s also worth noting that some drones may have additional requirements, such as a specific chipset, for optimal performance. Be sure to check the specifications of both your phone and the drone to ensure compatibility.
Screen Size and Resolution
The screen size and resolution of your phone can greatly impact your flying experience. A larger screen size can make it easier to see the live video feed and control the drone. Similarly, a higher resolution display can provide a clearer and more detailed view of what the drone is capturing.
Consider the size of your phone’s screen and its resolution when selecting a phone for connecting to the drone. A phone with a larger screen and higher resolution can enhance your overall experience and make it more enjoyable.

Remember to also check the connectivity options of your phone, such as Bluetooth or Wi-Fi, as these are essential for establishing a connection with the Sky Rider drone. Overall, selecting the right phone with the necessary specifications will ensure a smooth and seamless connection, allowing you to fully enjoy your drone flying experience.
Installing the Sky Rider Drone App on Your Phone
If you want to connect your Sky Rider drone to your phone, you will need to install the Sky Rider Drone App. The app allows you to control your drone and access various features directly from your phone.
Step 1: Check Compatibility
Before installing the app, you should check if your phone is compatible with the Sky Rider Drone App. The app is typically available for both Android and iOS devices.
If you have an Android phone, make sure it meets the system requirements specified by the app. You can find this information on the app’s download page in the Google Play Store. For iOS devices, check if your phone has the required operating system version.
Step 2: Download the App
Once you’ve confirmed compatibility, you can proceed with downloading the Sky Rider Drone App. Open the App Store or Google Play Store on your phone and search for “Sky Rider Drone App”.

Click on the app when it appears in the search results, and then tap the “Install” button. Wait for the app to download and install on your phone. The download time may vary depending on your internet connection.
Step 3: Launch the App
After the app has finished installing, you can launch it by locating the app icon on your home screen or app drawer. Tap on the icon to open the app.
Once the app is open, you may be prompted to create an account or log in if you are an existing user. Follow the on-screen instructions to complete the process.
If this is your first time using the Sky Rider Drone App, you may need to pair your drone with your phone. Follow the instructions provided within the app to connect your phone to the drone.
Note: Make sure your phone’s Bluetooth or Wi-Fi is turned on to establish a connection between your phone and the drone.
Once your phone is connected to the drone, you should now be able to control it and access the various features available through the Sky Rider Drone App.
If you encounter any issues during the installation or pairing process, refer to the app’s user manual or contact customer support for assistance.
Connecting Your Phone to the Sky Rider Drone
Connecting your phone to the Sky Rider drone allows you to have full control and access to various features and functions of the drone. By following these steps, you can easily establish a connection between your phone and the drone:
- First, ensure that both your phone and the drone are fully charged.
- Install the Sky Rider app from the App Store or Google Play Store on your phone.
- Ensure that your phone’s Wi-Fi is turned on.
- Power on the Sky Rider drone and wait for it to initialize.
- On your phone, go to the Wi-Fi settings and look for the Wi-Fi network name of the drone. It should be something like “Sky Rider XXXX” (the X’s represent a unique identifier).
- Select the Wi-Fi network of the drone from the list of available networks.
- Enter the password for the Wi-Fi network if prompted. The default password is usually mentioned in the drone’s user manual.
- Once connected, open the Sky Rider app on your phone.
- The app will automatically detect the connected drone and establish a connection.
- Now you can use the app to control the drone, access settings, view a live video feed, and perform other actions based on the capabilities of your Sky Rider drone model.
It is important to note that the steps mentioned above are a general guide, and the exact process may vary depending on the specific model of the Sky Rider drone and the app version being used. It is recommended to refer to the user manual or instructions provided by the manufacturer for detailed guidance on connecting your phone to the Sky Rider drone.
Pairing Your Phone with the Sky Rider Drone
To connect your phone to the Sky Rider Drone, follow the steps below:
Step 1: Download the App
The first thing you need to do is download the Sky Rider Drone app on your phone. You can find the app on the App Store for iOS devices or on the Google Play Store for Android devices. Make sure to download the latest version of the app to ensure compatibility with your phone.
Step 2: Turn on the Drone and Enable Wi-Fi
Next, turn on the Sky Rider Drone by pressing the power button located on the body of the drone. Once the drone is powered on, open the Wi-Fi settings on your phone and select the Wi-Fi network listed as the drone’s name. This network name should be indicated on the packaging or in the drone’s manual.
Step 3: Launch the App and Connect
After connecting to the drone’s Wi-Fi network, launch the Sky Rider Drone app on your phone. Once the app is open, it should automatically detect the connected drone. If not, check your phone’s Wi-Fi settings and ensure that you are connected to the correct network.
Once the drone is detected, tap on the “Connect” button within the app. The app will initiate the pairing process with the drone. This may take a few moments, so be patient.
Step 4: Confirm Connection and Calibration
Once the pairing process is complete, you should see a confirmation message on the app indicating a successful connection. At this point, you may be prompted to calibrate the drone’s compass. Follow the on-screen instructions to complete the calibration process.
Once the compass is calibrated, you should now be able to control the Sky Rider Drone using your phone. Use the virtual joystick and buttons within the app to navigate the drone and access its features.
Note: It’s important to ensure that your phone’s Wi-Fi is connected to the drone’s network throughout the flying session to maintain a stable connection.
Now that you have successfully paired your phone with the Sky Rider Drone, you’re ready to take to the skies and enjoy your drone-flying experience!
Exploring the Features of the Sky Rider Drone App
The Sky Rider Drone App is a powerful tool that allows you to connect your drone to your phone and unlock a range of exciting features. With this app, you can take your drone flying experience to the next level and make the most out of your aerial adventures.
Real-time Video Streaming
One of the standout features of the Sky Rider Drone App is real-time video streaming. Once you have connected your drone to your phone, you can stream live video footage directly to your device’s screen. This feature enables you to have a complete view of what your drone sees, giving you a first-person perspective of the flight. Whether you are capturing epic aerial shots or exploring your surroundings, the real-time video streaming feature enhances your overall drone flying experience.
Intuitive Flight Controls
The Sky Rider Drone App offers intuitive flight controls that make piloting your drone a breeze. Using the app’s user-friendly interface, you can easily take off, land, and control the movement of your drone. The flight controls provide smooth and precise handling, allowing you to navigate your drone with ease. Additionally, the app also offers features like altitude hold and headless mode, which further enhance your flight controls and enable you to fly your drone with confidence.
| Feature | Description |
|---|---|
| Smart Return Home | The app includes a smart return home feature that allows your drone to automatically return to its takeoff point with the tap of a button. This feature ensures that your drone comes back safely in case of low battery or lost connection. |
| Gesture Control | You can control your drone using simple hand gestures through the app. This feature adds a fun and interactive element to your drone flying experience. |
| Flight Path Planning | The app enables you to plan and set a custom flight path for your drone. You can easily map out a route for your drone to follow, which is ideal for capturing cinematic shots or exploring specific areas. |
The Sky Rider Drone App brings a range of powerful features right to your fingertips. Whether you are a beginner or an experienced drone pilot, this app provides you with the tools to maximize your drone flying experience and unleash your creativity in the sky.
Troubleshooting Common Issues with Connecting the Sky Rider Drone to Your Phone
If you are facing difficulties connecting your Sky Rider Drone to your phone, don’t worry! Some common issues can arise, but fear not, we have solutions to help you troubleshoot and get your drone connected and flying in no time.
1. Check Compatibility: Ensure that your phone is compatible with the Sky Rider Drone. Check the specifications of the drone and cross-reference it with your phone’s specifications to ensure they are compatible.
2. Enable Bluetooth: Make sure that Bluetooth is enabled on your phone. You can usually find this in the settings under the “Bluetooth” option. Once enabled, your phone will be able to detect the Sky Rider Drone.
3. Restart Phone and Drone: Sometimes a simple restart can resolve the issue. Turn off both your phone and the drone. Wait a few moments and then turn them back on. Try connecting again after the devices have restarted.
4. Forget and Re-pair: If you have previously connected your drone to another phone or device, ensure that it is “forgotten” or disconnected from that device. Then, try pairing it again with your phone, following the instructions provided in the drone’s user manual.
5. Wi-Fi Interference: Wi-Fi signals can interfere with the connection between your phone and the drone. Try disconnecting from any Wi-Fi networks and turn off the Wi-Fi functionality on your phone. This can free up the bandwidth and improve the connection with the drone.
6. Update Firmware: Make sure that both your phone’s operating system and the Sky Rider Drone’s firmware are up to date. Check for any available updates and install them. Firmware updates often contain bug fixes and improvements that can help with the connection and overall performance.
7. Range Limitations: Keep in mind that the range of the Sky Rider Drone may have limitations. If you are too far away from the drone, the connection may be weak or lost. Stay within the recommended range specified in the user manual for optimal connection.
If you have tried these troubleshooting steps and are still unable to connect your Sky Rider Drone to your phone, it may be helpful to reach out to customer support for further assistance. They can provide additional guidance specific to your drone model and help resolve any technical issues you may be experiencing.
Question-answer:
Can I connect my sky rider drone to my iPhone?
Yes, you can connect your sky rider drone to your iPhone by following a few simple steps. First, turn on the drone and go to the Wi-Fi settings on your iPhone. Look for the Wi-Fi network name of the drone and connect to it. Once connected, you can open the drone’s app on your iPhone to control the drone and stream live video.
What are the requirements to connect a sky rider drone to my phone?
To connect a sky rider drone to your phone, you will need a compatible smartphone or tablet. The drone’s app is usually available for both iOS and Android devices. Additionally, you will need a stable internet connection and the ability to download and install the app from the app store. Make sure your phone meets the system requirements specified by the drone manufacturer.
Is it possible to connect multiple phones to a sky rider drone?
No, it is not possible to connect multiple phones to a sky rider drone simultaneously. The drone typically creates its own Wi-Fi network that only one device can connect to at a time. However, you can switch between devices by disconnecting one and connecting another to the drone’s Wi-Fi network.
What features can I access by connecting my phone to a sky rider drone?
By connecting your phone to a sky rider drone, you can access a range of features depending on the drone model and its accompanying app. Some common features include live video streaming, remote control of the drone, GPS tracking, altitude hold, automatic takeoff and landing, waypoint navigation, and various flight modes. The app may also provide additional features like flight data recording, photo or video capture, and social media sharing.