
Have you ever wanted to capture smooth and professional-looking footage with your DSLR camera? One way to achieve this is by using a camera crane, also known as a jib.
A camera crane is a versatile piece of equipment that allows you to get dynamic and cinematic shots, whether you are shooting a film, a documentary, or just capturing breathtaking footage for your personal projects. While professional camera cranes can be expensive, you can build your own at a fraction of the cost.
Building a DSLR camera crane requires some basic DIY skills and materials that are easily accessible. With a little bit of time and effort, you can have your own camera crane that will dramatically improve the quality of your shots.
In this article, we will guide you through the process of building a DIY DSLR camera crane. We will provide step-by-step instructions, including the materials you will need, tips and tricks, and safety precautions to ensure a successful build. Get ready to take your videography skills to the next level!
What is a DSLR Camera Crane?
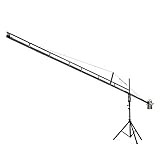
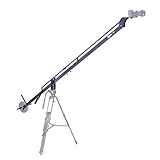
A DSLR camera crane, also known as a camera jib or camera crane arm, is a versatile tool used in film and video production to capture smooth and dynamic camera movements. It consists of a long arm or boom that can be extended and tilted, and a counterweight system to maintain balance. The arm is mounted on a stable base, allowing the camera to move horizontally, vertically, or both simultaneously.

The main purpose of a DSLR camera crane is to create visually appealing shots with fluid and controlled camera movements. It allows filmmakers to achieve high and low-angle shots, sweeping panoramas, and smooth tracking shots that add depth and professionalism to their videos.
A DSLR camera crane is commonly used in various types of productions, including films, documentaries, music videos, commercials, and live events. It is especially popular among independent filmmakers and videographers who want to add cinematic effects to their projects without the need for expensive and complex equipment.
Using a DSLR camera crane requires some skill and practice to operate smoothly and safely. It is essential to take proper precautions and ensure the setup is stable and secure to avoid accidents or damage to the camera equipment. By mastering the techniques and techniques of camera crane operation, filmmakers can elevate the production value of their videos and tell stories in a more engaging and professional manner.
Benefits of Using a DSLR Camera Crane
Using a DSLR camera crane can greatly enhance the quality of your video footage and offer numerous benefits to the filmmaker. Whether you are shooting a professional production or capturing family memories, here are some reasons why you should consider using a DSLR camera crane:
1. Increased Stability
A DSLR camera crane provides superior stability compared to hand-held shooting or using a regular tripod. The crane’s solid construction and counterweight system help minimize camera shake, leading to smoother and more professional-looking shots. This stability can be especially useful when shooting in challenging conditions such as windy environments.
2. Enhanced Camera Movement
A DSLR camera crane allows for smooth and controlled camera movements, such as pans, tilts, and tracking shots. These movements can greatly improve the visual appeal of your footage and add a professional touch to your videos. With a crane, you can achieve cinematic shots, giving your videos a more polished and dynamic look.
Additionally, a camera crane enables you to capture unique perspectives and angles that would be difficult or impossible to achieve with handheld or tripod-mounted shots. This opens up creative possibilities and allows you to explore new ways of storytelling through visual composition.
3. Versatility
DSLR camera cranes are highly versatile tools that can be used in a variety of filming scenarios. They can be used indoors or outdoors, on location or in a studio, making them suitable for a wide range of projects. Whether you are shooting a documentary, a wedding video, or a short film, a camera crane can help you capture the desired shots with ease and precision.
Furthermore, DSLR camera cranes often come with adjustable features such as telescopic arms and adjustable heights, allowing you to customize the crane’s setup to meet your specific shooting requirements.
In conclusion, using a DSLR camera crane brings numerous benefits to filmmakers, including increased stability, enhanced camera movement, and versatility. Investing in a camera crane can greatly elevate the quality of your videos and take your filmmaking skills to the next level.

Improved Stability and Smoothness
When building a DSLR camera crane, it is essential to prioritize stability and smooth movement. This will enable you to capture high-quality footage without any unwanted shakes or blurs. Here are some tips to improve stability and smoothness with your camera crane:
1. Use High-Quality Materials
Start by using high-quality materials for your camera crane. This includes sturdy metal or carbon fiber for the main frame and arm, as well as robust joints and connectors. By using strong and durable materials, you can ensure that your crane will remain stable during operation.
2. Counterbalance System
To enhance stability, incorporate a counterbalance system into your camera crane design. This system will help distribute the weight of the camera and any additional accessories evenly, preventing the crane from tipping over or becoming unbalanced. Consider using counterweights or a fluid-filled arm for optimal balance.
3. Smooth Movement Mechanism
To achieve smooth movement, it is crucial to have a well-designed mechanism for controlling the arm and camera. This mechanism should allow for precise and controlled movements, such as panning or tilting, without any jerks or sudden stops. Utilize high-quality bearings, gears, and motors to ensure smooth operation.
4. Proper Weight Distribution
Ensure that the weight of your camera and any additional equipment is properly distributed along the arm of the crane. Uneven weight distribution can lead to instability and affect the smoothness of movements. Use adjustable mounting options to find the optimal balance based on your specific camera setup.
5. Balancing and Fine-Tuning
Take the time to balance and fine-tune your camera crane before using it. Properly align the arm, camera, and counterbalance system to ensure everything is in harmony. Make small adjustments as needed to eliminate any unwanted movements or vibrations.
By following these tips, you can significantly improve the stability and smoothness of your DIY DSLR camera crane. Remember to always prioritize safety and quality during the construction process to achieve the best results.
Increased Range of Motion
One of the key advantages of building your own DSLR camera crane is the ability to increase the range of motion. With a custom-built crane, you can design it to have a longer boom arm or a higher vertical reach, allowing you to capture shots from unique angles and perspectives.
By increasing the range of motion, you can achieve smooth and sweeping camera movements that would be difficult to achieve with a standard camera tripod. This added flexibility allows you to bring a new level of creativity to your videography or photography projects.
To improve the range of motion of your DIY camera crane, you can consider extending the boom arm. This can be done by using longer pipes or rods and securely attaching them to your crane’s frame. Additionally, you can add hinges or adjustable joints to allow for more versatile movement.

Another strategy to increase the range of motion is by using counterweights. These can help balance the weight of your camera and make it easier to control and maneuver the crane. By adjusting the counterweights, you can fine-tune the balance and stability of the crane, allowing for smooth camera movements.
It’s important to plan and test the increased range of motion carefully to ensure the safety and stability of your camera crane. Be sure to use sturdy materials and secure all connections properly. Regularly inspect the crane for any signs of wear or damage, and make any necessary repairs or adjustments as needed.
In conclusion, building your own DSLR camera crane gives you the freedom to increase the range of motion and capture impressive shots from unique angles. Consider extending the boom arm, using adjustable joints, and incorporating counterweights to enhance the versatility and stability of your crane.
Ability to Capture Unique Angles
One of the greatest advantages of building your own DSLR camera crane is the ability to capture unique angles that would be otherwise difficult to achieve. With a camera crane, you can easily raise or lower your camera, as well as move it horizontally, vertically, or in any desired direction. This flexibility allows you to capture shots from high or low angles, as well as achieve smooth and sweeping camera movements.
Diverse Perspectives
With a camera crane, you can easily achieve diverse perspectives that can enhance the visual storytelling of your shots. Whether you want to capture an aerial view, a low-angle shot, or a unique tracking shot, having a camera crane enables you to get creative with your compositions and add a dynamic touch to your footage.

Smooth and Stable Movements
Building your own DSLR camera crane ensures that you have full control over the stability and smoothness of your camera movements. By using a crane, you can easily eliminate shakes and vibrations that may occur when shooting handheld or using other camera support systems. This results in professional-looking footage with smooth and stable movements, allowing you to capture high-quality videos and showcase your creativity.
- Highlighting Details: With a camera crane, you can easily highlight specific details or objects by smoothly moving your camera towards or away from them.
- Cinematic Establishing Shots: A camera crane can add a cinematic touch to your videos by allowing you to capture impressive establishing shots, setting the scene for your story.
- Dramatic Reveals: By slowly revealing a subject or a scene using a camera crane, you can create a sense of mystery and anticipation, adding drama to your footage.
Choosing the Right DSLR Camera Crane
When it comes to capturing smooth and professional shots with your DSLR camera, a crane can be an essential tool. However, choosing the right DSLR camera crane can be a daunting task, given the numerous options available in the market today. Here are some key factors to consider when making your decision:
Type of Crane
There are different types of DSLR camera cranes available, including jib cranes, motorized cranes, and handheld cranes. Each type has its advantages and limitations. Jib cranes provide smooth movements and can reach higher angles, while motorized cranes offer automated movements for precise shots. Handheld cranes are portable and easy to use, but may not provide the same level of stability as the other types. Consider your shooting style and preferences to determine the best type for your needs.
Weight Capacity
DSLR cameras come in various sizes and weights, so it’s important to choose a crane that can support the weight of your camera and any additional accessories you may use. Check the weight capacity of the crane and ensure that it can handle your setup without compromising stability or safety.
Build Quality and Stability

When investing in a DSLR camera crane, it’s crucial to choose one that is built with high-quality materials and offers stability for steady shots. Look for cranes made of sturdy materials like aluminum or carbon fiber, as they tend to be more durable and lightweight. Stability features such as double-bearing joints and adjustable counterweights can also contribute to smoother shots.
Additional Features and Accessories
Consider any additional features or accessories that may enhance your filming experience. Some cranes offer remote control options, allowing you to operate the camera without touching it directly. Others come with counterbalance systems or quick-release plates for easy setup and adjustments. Assess your needs and budget to determine which features are essential for you.
Overall, choosing the right DSLR camera crane depends on your shooting style, camera setup, and budget. Take your time to research and compare different options, read customer reviews, and consider renting or borrowing cranes before making a final decision. With the right crane, you can elevate your DSLR videography and achieve professional-looking shots.
Weight Capacity
The weight capacity of a camera crane is an important consideration when building a DSLR camera crane. It refers to the maximum weight that the crane can safely support without compromising stability or causing any damage.
The weight capacity of a camera crane depends on various factors, including the materials used in its construction, the design, and the quality of the components such as the joints and counterweights.
When determining the weight capacity, it is crucial to consider not only the weight of the camera itself but also any additional accessories that may be attached to it, such as lenses, filters, or external microphones. These accessories can significantly add to the overall weight, and it is important to ensure that the camera crane can handle the load.
It is recommended to choose a camera crane with a weight capacity that exceeds the total weight of the equipment you plan to use. This provides a safety margin and ensures that the crane will remain stable and secure during operation.
Proper maintenance and regular inspections are essential to ensure that the camera crane maintains its weight capacity over time. Any signs of wear or damage should be addressed promptly, and repairs or replacements should be done as needed.
By selecting a camera crane with an appropriate weight capacity and taking proper care of it, you can ensure safe and stable operation while capturing amazing shots with your DSLR camera.
Material and Build Quality
When it comes to building a DSLR camera crane, it is important to pay attention to the materials used and the overall build quality. This will determine the stability, durability, and functionality of the crane.
One of the key materials that you will need is aluminum. Aluminum is lightweight yet strong, making it an ideal choice for constructing the main components of the crane. Look for high-grade aluminum that can withstand the weight of a DSLR camera without bending or warping.
In addition to aluminum, you will also need some stainless steel hardware for connecting the different parts of the crane. Stainless steel is corrosion-resistant and will ensure that your crane remains in top condition even after prolonged use.
The build quality of the crane is equally important. Make sure that all the parts fit together snugly and securely. Check for any loose or wobbly connections that could compromise the stability of the crane. It is also beneficial to use high-quality locking mechanisms to ensure that the crane can hold its position without any accidental sliding or movement.
Testing and Maintenance
Once you have built your DSLR camera crane, it is crucial to test its functionality and perform regular maintenance to keep it in optimal working condition.
Test the stability and range of motion of the crane by attaching your DSLR camera and moving it in different directions. Make sure that it can smoothly pan, tilt, and rotate without any jerking or resistance.
Regularly inspect the crane for any signs of wear and tear, especially in the locking mechanisms and joints. Lubricate any moving parts to minimize friction and ensure smooth operation.
By using high-quality materials and paying attention to the build quality, and by testing and maintaining the crane regularly, you can ensure that your DSLR camera crane will be a reliable tool for capturing smooth and professional-looking footage.
Portability
One of the most important factors to consider when building a DSLR camera crane is portability. Being able to transport the crane easily is essential, especially if you plan on using it on different locations or for travel purposes.
To achieve portability, it is crucial to carefully consider the design and materials used for the camera crane. Opt for lightweight yet durable materials such as aluminum or carbon fiber for the main components of the crane. These materials are not only sturdy but also help reduce the overall weight of the crane, making it easier to carry.
| Design considerations for portability: |
| – Folding or collapsible design: Look for a design that allows the crane to fold or collapse for easy storage and transportation. This can be achieved by using hinged joints or telescoping sections. |
| – Compact size: Choose a design that can be disassembled into smaller parts and easily fit into a carrying case or bag. This way, you can easily take it with you wherever you go. |
| – Quick setup and breakdown: Consider a design that allows for quick and hassle-free setup and breakdown. This will save you time and effort when using the crane on location. |
Another aspect to consider for portability is the transportation options available. If you primarily plan on traveling by car, you may have more flexibility in terms of the crane’s size and weight. On the other hand, if you plan on air travel or need to carry the crane long distances, you will need to ensure it meets the required dimensions and weight restrictions.
By prioritizing portability in your DSLR camera crane design, you can enjoy the convenience and flexibility of using it in different locations without the hassle of bulkiness or difficulty in transportation.
Question-answer:
What materials do I need to build a DSLR camera crane?
To build a DSLR camera crane, you will need a sturdy metal or wooden frame, a pivoting mount for the camera, counterweights to balance the crane, cables or ropes for lifting and controlling the camera, and various nuts, bolts, and screws for assembly.
How much weight can a DIY DSLR camera crane support?
The weight capacity of a DIY DSLR camera crane will depend on the design and materials used. However, a well-built crane can typically support up to 10-15 pounds (4.5-6.8 kilograms) of weight, which is sufficient for most DSLR cameras and lenses.
Is it difficult to build a DSLR camera crane?
Building a DSLR camera crane can be a moderately challenging project, especially if you have limited experience with construction and assembly. However, with the right tools, materials, and instructions, it is definitely achievable for a DIY enthusiast.
Can I use a DSLR camera crane for shooting videos?
Yes, a DSLR camera crane is commonly used in videography to achieve smooth and dynamic camera movements. It can add a professional touch to your videos and significantly enhance the production value.
Does a DSLR camera crane require any special maintenance?
A DSLR camera crane does not require any special maintenance, but it is important to regularly inspect the crane for any signs of wear or damage. Additionally, you should keep the moving parts well lubricated and clean to ensure smooth operation.


