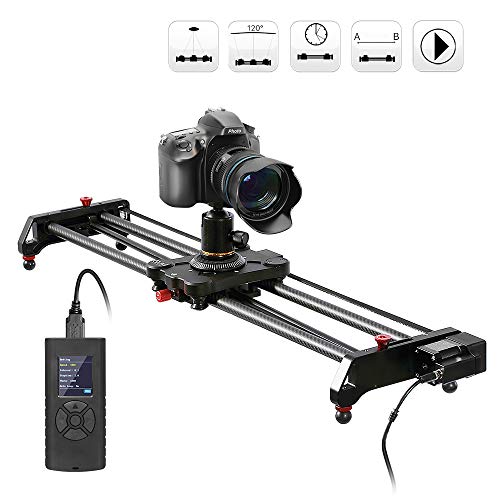
Are you a videographer or a photography enthusiast who wants to take their camera movements to the next level? Adding a motor to your DSLR camera track slider can help you achieve smooth and precise camera shots. In this article, we will guide you through the process of making a DIY motorized DSLR camera track slider.
Step 1: Gather the Materials
To begin, you will need a few essential materials: a DSLR camera track slider, a stepper motor, a motor driver, a power supply, Arduino or similar microcontroller, and various tools such as a soldering iron and screwdrivers. Additionally, you may want to have some cables, connectors, and mounting brackets to secure the motor and driver to the slider.
Step 2: Mounting the Motor
The first step is to mount the stepper motor onto the camera track slider. This step may vary depending on the specific slider model you have. In general, you will need to attach the motor securely to a bracket or directly onto the slider itself. Make sure the motor is aligned with the slider’s movement path and can smoothly travel back and forth along it.
Step 3: Wiring and Connecting
Next, you will need to wire and connect the motor to the motor driver and the microcontroller. Start by connecting the motor driver to the power supply. Then, using appropriate cables, connect the motor to the motor driver. Finally, connect the motor driver to the microcontroller, ensuring proper signal and power connections.
Step 4: Programming and Testing
Now it’s time to program the microcontroller. Using the Arduino IDE or another programming software, write a code that will control the motor’s movement. You can specify the speed, acceleration, and direction of the motor. Once the code is ready, upload it to the microcontroller and test the motor’s movement. Make any necessary adjustments to achieve the desired motion.
Step 5: Fine-tuning and Improvements

After testing, you may want to fine-tune the motor’s performance. Adjust the speed, acceleration, or other parameters in the code to achieve the desired camera movement. Additionally, you can explore adding limit switches or a remote control to further enhance the functionality and versatility of your motorized DSLR camera track slider.
With these steps, you can transform your regular DSLR camera track slider into a motorized one. Enjoy capturing professional-looking videos and photos with smooth camera movements and take your photography skills to new heights!
Importance of Motorization
Motorization is a crucial feature for a DSLR camera track slider as it offers several significant advantages over manual operation. This innovative technology allows users to automate camera movements, resulting in smoother and more precise shots.
Here are some key reasons why motorization is important:
- Consistency: Motorized camera sliders ensure consistent movement, eliminating any potential variations caused by human error. This results in a more professional and polished final product.
- Efficiency: Motorization simplifies the process by automating camera movements, saving time and effort for photographers and videographers. It allows them to focus more on capturing the perfect shot rather than manually adjusting the camera’s position.
- Smoothness: Motorized sliders offer smooth and precise camera movements, resulting in fluid and cinematic shots. These sliders have programmable speed settings, allowing users to control the exact pace and acceleration of the camera movement.
- Repeatable Shots: Motorized sliders enable users to repeat shots with consistent movements, making them ideal for creating time-lapse videos or capturing multiple shots with minimal variation.
- Advanced Features: Some motorized camera sliders come with additional features like auto-start, stop-motion capabilities, and ramping options, further enhancing the creative possibilities and versatility of the equipment.
Overall, motorization plays a significant role in improving the quality, efficiency, and flexibility of a DSLR camera track slider. It allows photographers and videographers to unleash their creativity, expand their shooting capabilities, and produce captivating visual content.

Benefits of Making a Motorized DSLR Camera Track Slider
A DSLR camera track slider is a useful tool for videographers and photographers, allowing them to create smooth and professional-looking tracking shots. By adding a motorized system to your camera track slider, you can take your footage to the next level and unlock a variety of benefits.
1. Consistent and Precise Movement
One of the main advantages of a motorized DSLR camera track slider is that it provides consistent and precise movement. The motorized system ensures that your camera moves at a constant speed, eliminating any jerky or uneven movements that may occur with manual operation. This results in ultra-smooth shots that enhance the overall quality of your footage.
2. Time-Lapse and Slow-Motion Capabilities
With a motorized camera track slider, you can easily capture stunning time-lapse and slow-motion shots. The motorized system allows you to set the desired speed and duration, enabling you to achieve smooth and seamless movements even during extended periods of time. This opens up creative possibilities and allows you to add dynamic visual elements to your videos.
3. Enhanced Creative Options
By motorizing your DSLR camera track slider, you gain access to various creative options. You can program the motorized system to execute complex movements, such as curved or diagonal tracks, which would be challenging to achieve manually. This flexibility allows you to experiment with different camera angles and perspectives, giving your footage a unique and professional look.
In conclusion, adding a motorized system to your DSLR camera track slider offers a range of benefits. It provides consistent and precise movement, enables time-lapse and slow-motion capabilities, and enhances your creative options. Investing in a motorized system can greatly improve the quality and versatility of your footage, allowing you to capture stunning shots and take your video production to the next level.
Necessary Tools and Materials
When making a DSLR camera track slider motorized, you will need a variety of tools and materials to complete the project. Here is a list of the essential items you will need:
1. Track Slider
First and foremost, you will need a track slider to attach your DSLR camera to. This can be a standard manual track slider or a motorized one. Make sure the slider is compatible with your camera model.
2. Motor
In order to make your camera track slider motorized, you will need a suitable motor. This motor will be responsible for moving the camera along the track smoothly and precisely.
3. Motor Controller
To control the movement of the motor, you will need a motor controller. This controller will allow you to adjust the speed and direction of the camera’s movement.
4. Power Supply
Since the motor and controller will require power to operate, you will need a suitable power supply. This can be a battery pack or a power adapter, depending on your preference and setup.
5. Mounting Brackets
In order to attach the motor and controller to the track slider, you will need mounting brackets. These brackets will ensure that the components are securely fastened and properly aligned.
6. Cables and Connectors
To connect the motor, controller, and power supply, you will need various cables and connectors. Make sure you have the appropriate cables for your specific components and their connectors.
7. Tools
Lastly, you will need a set of basic tools for assembly and installation. This may include screwdrivers, wrenches, pliers, and other tools depending on the specific requirements of your camera track slider and components.
With these necessary tools and materials, you will be well-equipped to make your DSLR camera track slider motorized. Make sure to follow any instructions provided by the manufacturer and take proper safety precautions during the installation process.
Step-by-Step Guide to Motorizing the DSLR Camera Track Slider
Introduction:

Motorizing your DSLR camera track slider is a great way to add smooth and precise motion to your video shots. This step-by-step guide will walk you through the process of motorizing your slider, allowing you to capture professional-looking footage with ease.
Materials Needed:
- A DSLR camera track slider
- A motorized slider kit
- A camera mount plate compatible with your DSLR
- A camera shutter release cable
- A tripod or other stable surface
- A battery to power the motor
- Various tools (screwdriver, Allen wrenches, etc.)
Step 1: Mounting the Motor:
Begin by attaching the motor to your DSLR camera track slider. Follow the instructions provided with your motorized slider kit to ensure proper installation. Use the included tools to secure the motor tightly to the slider.
Step 2: Attaching the Camera:
Next, attach your DSLR camera to the camera mount plate. Make sure the plate is securely fastened to the camera. Slide the camera onto the motorized slider, aligning it with the track. Use the provided screws or clamps to hold the camera in place.
Step 3: Connecting the Motor and Camera:
Connect the camera shutter release cable to your DSLR camera. This cable allows the motor to trigger the camera shutter, enabling automatic movements and time-lapse videos. Be sure to check the compatibility of the shutter release cable with your camera model.
Step 4: Powering the Motor:
Attach a fully charged battery to the motor to power it. Make sure the battery is compatible with your motorized slider kit. Consult the user manual for specific instructions on battery installation.
Step 5: Testing and Adjusting:
Now that everything is connected and powered up, test the motorized slider by turning it on and adjusting the speed and direction of movement. Practice with different settings to achieve the desired effect.
Step 6: Shooting Your Videos:
With your motorized DSLR camera track slider set up, you are now ready to start shooting your videos. Take advantage of the smooth and controlled movements to enhance your footage. Experiment with different angles, speeds, and movements to create visually stunning shots.
Conclusion:
Motorizing your DSLR camera track slider is a relatively simple process that can greatly enhance your video production capabilities. By following this step-by-step guide, you can transform your slider into a powerful tool for capturing professional-quality footage.
Tips for a Smooth and Efficient Motorized Slider
Motorizing your DSLR camera track slider can greatly enhance your filmmaking capabilities by providing smooth and controlled camera movements. Here are some tips to ensure that your motorized slider operates smoothly and efficiently:
1. Choose the Right Motorized Slider
When selecting a motorized slider, consider factors such as payload capacity, speed control options, and durability. Look for a slider that is compatible with your camera and lens setup and fits your shooting needs.
2. Balance the Weight Distribution
Properly balancing the weight distribution on your motorized slider is crucial for smooth and stable camera movements. Ensure that the slider is evenly placed on the track and that the camera setup is centered and secure.
3. Set the Speed and Interval Settings
Most motorized sliders allow you to set the speed and interval settings for your camera movements. Experiment with different speeds and intervals to achieve the desired effect for your shots. Slow and subtle movements are great for dramatic shots, while faster movements can add energy and dynamism.
4. Use a Remote Control or App
Controlling your motorized slider remotely using a dedicated remote control or an app can greatly enhance convenience and precision. Use the remote control or app to start, stop, and adjust the camera movements from a distance.
5. Smooth Start and Stop
Avoid jerky camera movements by ensuring a smooth start and stop. Use the ramp-up and ramp-down settings on your motorized slider to gradually accelerate and decelerate the camera movements, resulting in smoother transitions.
6. Consider Adding Motion Timelapse
If your motorized slider supports motion timelapse functionality, consider incorporating it into your shots. Motion timelapse can add visual interest and creativity to your videos by allowing the camera to move slowly during a timelapse sequence.
By following these tips, you can maximize the potential of your motorized slider and capture smooth and professional-looking camera movements for your videos.
Troubleshooting Common Issues
If you are experiencing issues with your motorized DSLR camera track slider, there are a few common issues that you can troubleshoot. Here are some steps to help you identify and fix the problem:
No power:
If your motorized slider is not turning on, double-check that it is properly connected to a power source. Make sure that the power cable is securely plugged into both the slider and the outlet. If it is connected properly and the slider still does not turn on, try using a different power cable or outlet to see if that resolves the issue.
Slider not moving:
If your motorized slider is not moving when you turn it on, there are a few things you can check. First, make sure that the motor is properly attached and aligned with the sliding mechanism. If it is not aligned properly, adjust it until it is correctly positioned. Also, check that the slider is not being obstructed by any objects or debris that could prevent it from moving.
Jittery or jerky movements:
If your slider is producing jittery or jerky movements instead of smooth and consistent ones, there are a few potential causes. First, check that the motor speed is set appropriately for your desired movement. If the speed is too high, it can cause jerky movements. Additionally, make sure that the slider’s bearings and sliding mechanisms are clean and well-lubricated. Dirty or dry components can cause uneven movements.
Remote control issues:
If you are having problems with the remote control not working or inconsistently controlling the slider, there are a few things you can try. First, ensure that the batteries in the remote control are fresh and properly installed. Weak or incorrectly installed batteries can cause issues with the remote control’s functionality. Additionally, make sure that there are no obstacles between the remote control and the motorized slider that could be interfering with the signal.
If you have tried these troubleshooting steps and are still experiencing issues with your motorized DSLR camera track slider, it may be helpful to consult the manufacturer’s instructions or contact their customer support for further assistance.
Maintenance and Care of the Motorized Slider
Proper maintenance and care of your motorized slider are essential to ensure its optimal performance and longevity. By following these guidelines, you can keep your equipment in excellent working condition:
1. Clean the Slider Regularly
Keep your motorized slider clean by removing any dust or debris that may accumulate on its surface. Use a soft, lint-free cloth or a camera cleaning brush to gently wipe down the slider and remove any dirt or particles that may affect its operation.
2. Lubricate the Moving Parts
Regular lubrication is necessary to ensure smooth movement of the motorized slider. Apply a small amount of camera lubricant or silicone-based lubricant to the moving parts, following the manufacturer’s instructions. Avoid using excessive lubricant, as it may attract dirt and cause the slider to become clogged.
3. Check and Tighten Screws
Periodically inspect the screws and fasteners on your motorized slider to ensure they are tight and secure. Loose screws can cause the slider to wobble or produce unwanted vibrations during operation. Use a screwdriver or Allen wrench to tighten any loose screws as needed.
4. Protect from Extreme Temperatures and Humidity
Avoid exposing your motorized slider to extreme temperatures or high humidity, as these conditions can damage the internal components and affect its performance. Store the slider in a cool, dry place when not in use and avoid using it in extremely hot or humid environments.
5. Handle with Care
When using and transporting your motorized slider, handle it with care to prevent accidental drops or impacts that could damage the mechanism or electronics. Avoid placing heavy objects on top of the slider and use protective cases or bags during transport to minimize the risk of damage.
By following these maintenance and care guidelines, you can ensure that your motorized slider remains in excellent condition and continues to provide smooth and reliable movement for your DSLR camera.
Question-answer:
What is a DSLR camera track slider?
A DSLR camera track slider is a device used to move a camera smoothly along a track, allowing for dynamic and smooth camera movements while filming.
Why would I want to motorize my DSLR camera track slider?
Motorizing your DSLR camera track slider allows for more controlled and precise camera movements. It eliminates the need for manual pushing and pulling, resulting in smoother and more professional-looking shots.
How can I make my DSLR camera track slider motorized?
Making your DSLR camera track slider motorized can be done by adding a motor, a motor controller, and a power source. You will need to choose the appropriate motor and controller based on the weight of your camera setup and the desired speed and control options.


