
Have you ever wanted to make your own camera? Well, now you can! In this step-by-step guide, we will show you how to create a functioning DSLR camera using just paper and a few simple household materials. Whether you’re a photography enthusiast or just looking for a fun DIY project, this paper DSLR camera will surely impress.
Before we dive into the details, let’s talk about what a DSLR camera is. DSLR stands for Digital Single Lens Reflex, which means it uses a mirror and prism system to direct light from the lens to the optical viewfinder. This allows you to see exactly what you’re capturing before taking the photo. The paper DSLR camera we’ll be making may not have the same advanced technology as a real DSLR, but it will still give you a hands-on experience with the mechanics of a camera.
To start, gather the following materials: thick cardboard, black construction paper, scissors, glue, a ruler, a craft knife, and a small rectangle of clear plastic. You’ll also need a template to cut out the camera parts, which you can easily find online or create yourself. Once you have everything ready, let’s begin constructing our paper DSLR camera!
Choosing the Right Materials
When making a paper DSLR camera, it is important to select the right materials to ensure the durability and functionality of your creation. Here are some factors to consider when choosing the materials:
Paper: The type of paper you use for the camera body will significantly affect its strength and stability. It is recommended to use thick cardstock or cardboard to provide the necessary support for the structure. Avoid using thin or flimsy paper that may easily tear or collapse.
Adhesive: To assemble the various parts of the camera, you will need a strong adhesive that can securely attach the pieces together. Choose a reliable glue or double-sided tape that can withstand the weight and movement of the camera.
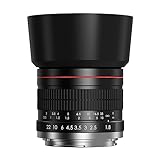
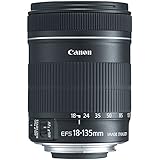
Lens: The lens is an essential component of any DSLR camera. While it is not possible to create an actual functioning lens with paper, you can use a small plastic or glass lens that can be easily attached to the camera body. Look for a lens that fits well with the size and shape of your camera.
Button and controls: For convenience and functionality, consider adding buttons and controls to your paper DSLR camera. These can be made from small plastic or metal pieces that can be attached to the camera body. Ensure that the buttons and controls are sturdy enough to withstand repeated use.
By carefully selecting the right materials for your paper DSLR camera, you can ensure that your creation is both visually appealing and functional. Remember to experiment and have fun with your materials, as creativity is key in this DIY project.
Gathering the Necessary Tools
Before you begin making your own paper DSLR camera, you will need to gather a few essential tools. These tools will help you in the construction process and ensure that you have everything you need to create a functional camera.
1. Cardboard or Thick Paper
First and foremost, you will need cardboard or thick paper to create the body of the camera. This will provide stability and durability to your camera and serve as the foundation for the rest of the components.
2. Scissors
A good pair of scissors is necessary to cut the cardboard or paper into the required shapes and sizes. Make sure to choose scissors that are sharp and suitable for cutting through thick materials.
3. Craft Knife
A craft knife or utility knife can be handy for more precise cutting and trimming. This tool will allow you to create intricate details and ensure clean and accurate cuts.
4. Ruler
A ruler is an essential tool for measuring and marking the correct dimensions for your camera components. It will help you achieve accuracy and precision in your construction process.
5. Pencil or Marker
Using a pencil or marker will allow you to mark the areas that need to be cut or folded. It will serve as a guide and prevent any mistakes or confusion during the assembly process.

6. Glue or Tape
To hold the various parts of the camera together, you will need glue or tape. Choose a strong adhesive that will securely bond the components and ensure the camera’s stability and longevity.
By gathering these necessary tools, you will be well-prepared to start constructing your own paper DSLR camera. Remember to take your time and follow the instructions carefully, and soon you’ll have a unique and functional camera that you can proudly showcase!
Preparing the Paper Templates
Before you start constructing your paper DSLR camera, you’ll need to prepare the paper templates. These templates will serve as the base for the different parts of the camera, allowing you to easily cut and assemble them.
Gather the Materials
To begin, gather the following materials:
- Thick cardstock paper
- Scissors
- Glue or double-sided tape
Make sure the cardstock paper is sturdy enough to hold the shape of the camera. Thicker paper will provide better durability.
Download and Print the Templates
Next, you’ll need to download and print the paper camera templates. There are various websites and online resources where you can find free printable templates for making paper cameras.
Once you have the templates, make sure to print them at their original size. You can typically find instructions on the template page regarding the required paper size and settings for printing. Be sure to follow these instructions to ensure accurate measurements.
If you prefer, you can also create your own templates by measuring and drawing the different parts of the camera on the cardstock paper. This approach may require more time and precision, but it gives you more control over the final design.
After printing or creating the templates, cut them out carefully using a pair of scissors. Take your time to ensure clean and precise cuts, as they will affect the overall quality of the paper DSLR camera.
Once the templates are cut out, you’re ready to proceed to the next step of assembling the camera.

Printing the Templates
To create your paper DSLR camera, you will need to print out the templates provided. These templates will serve as a guide for cutting out the necessary pieces and assembling your camera.
We recommend using a high-quality printer and sturdy paper for best results. You can find the templates for the camera body, lens, and other components on our website. Simply download and save the templates to your computer.
Once you have the templates ready, open the files and print them out. Make sure to select the appropriate paper size for your printer. If you’re unsure, consult your printer’s manual or print settings.
When printing, ensure that the templates are printed at 100% scale to ensure accurate measurements. Any scaling or resizing may result in a camera that doesn’t fit together properly.
After printing, carefully cut out each template along the designated lines. Take your time and ensure that you are cutting accurately to ensure the pieces fit together seamlessly. Using a sharp pair of scissors or a craft knife can help to achieve clean cuts.

Once the templates are cut out, it’s time to start assembling your paper DSLR camera. Refer to the instructions provided with the templates for detailed steps on how to assemble each component. Take your time and follow the instructions carefully to create a functional and impressive camera.
| Print Quality: | High-quality printout recommended |
| Paper Type: | Sturdy paper such as cardstock |
| Printing Scale: | 100% |
Cutting and Trimming the Paper
Once you have all the necessary materials ready, it’s time to start cutting and trimming the paper to create the different parts of the DSLR camera. Make sure you have a ruler, a cutting mat, and a sharp craft knife for this step.
Step 1: Measure and Mark
Begin by measuring and marking the dimensions of each part of the camera onto the paper. Use the ruler to ensure accurate measurements and make small pencil marks to indicate where you will need to cut.
Step 2: Cut the Paper
Using the craft knife, carefully cut along the marked lines to create the different pieces of the camera. Take your time and make smooth, steady cuts to avoid any jagged or uneven edges.
Refer to the template or instructions you are using to determine the specific shapes and sizes required for each part. Some common pieces you may need to cut include the front and back panels, the lens housing, the viewfinder, and any additional accessories or details.

Tip: It’s always a good idea to cut slightly outside the pencil marks to ensure you have some extra paper to work with during the assembly process.
Step 3: Trim and Adjust
After cutting out all the necessary pieces, take a moment to trim and adjust any edges or corners that may need some refinement. Use the craft knife to gently shave off any rough edges or make any necessary adjustments to the shape or size of the paper parts.
Remember to be cautious while handling the craft knife, and always cut away from your body to prevent any accidents or injuries.
Once you have finished cutting and trimming the paper, you are ready to move on to the next step of assembling the DIY DSLR camera.
Assembling the Camera Body
Once you have gathered all the necessary materials and printed out the camera template, it’s time to start assembling the camera body. Follow these steps to build your paper DSLR camera:
|
|

Remember to be patient and give the glue enough time to dry before moving on to the next step. It is essential to have a sturdy and well-assembled camera body to ensure the functionality of your paper DSLR camera.
Building the Camera Structure
Creating the structure of your paper DSLR camera is the first step in assembling this DIY project. By following these steps, you will have a sturdy and functional camera that you can take great pictures with.
Gather the Necessary Materials
Before getting started, gather all the materials you will need. This includes a printed template of the camera parts, a pair of scissors, glue stick, ruler, and a cutting mat or surface.
Cut Out the Template
Using your scissors, carefully cut out each individual part of the template. Make sure to follow the lines precisely to ensure a proper fit when assembling the camera.
Note: Take your time during this step to avoid any mistakes or tears in the paper.
Once all the parts are cut out, use a ruler to bend along the dotted lines. This will create the necessary folds to give the camera structure its shape.
Tip: Use a ruler to help create straight and precise folds.
Apply a thin layer of glue onto the tabs of each part and carefully attach them to their corresponding places. Press down firmly to ensure a strong bond between the pieces. Allow the glue to dry completely before moving on to the next step.
Caution: Be careful not to use too much glue, as it may cause the paper to warp or become soggy.
Once all parts are glued together and fully dried, carefully assemble the camera by connecting the different sections. Make sure everything fits snugly and securely.
Finally, give your camera structure a once-over to ensure that everything is in its proper place and that the folds are secure. You can reinforce any weak areas with additional glue if needed.
Now you have successfully built the camera structure for your paper DSLR camera! In the next steps, we will focus on adding the lens, viewfinder, and other components to make it fully functional.
Attaching the Camera Components
Once you have all your paper camera components prepared and ready, it’s time to start assembling them. Follow these steps to attach the camera components:
1. Attach the Lens
Begin by attaching the lens to the front of the camera body. Line up the lens with the opening on the front and carefully glue it into place. Make sure it is securely attached and centered.
2. Connect the Film Compartment
Next, connect the film compartment to the camera body. Fold the film compartment along the score lines and apply glue to secure the folds. Attach it to the back of the camera body, making sure it is aligned properly.
3. Attach the Viewfinder
After securing the film compartment, attach the viewfinder to the top of the camera body. Align it with the marked area and glue it down. The viewfinder will allow you to frame your shots properly.
4. Mount the Shutter Button
Mount the shutter button on the top or front of the camera body, depending on your design. This button will allow you to capture images. Ensure it is securely glued down and easily accessible.
5. Add the Flash
If desired, you can add a flash to your paper DSLR camera for better lighting. Cut out a small rectangle from the top or side of the camera body and paste a piece of translucent paper inside. This will diffuse the light from an external flash.
Once all the camera components are securely attached, allow the glue to dry completely before using your paper DSLR camera. You are now ready to start taking creative and fun paper photography!
Adding the Lens and Image Sensor
Once you have constructed the basic body of your paper DSLR camera, it is time to add the lens and image sensor. These components are essential for capturing high-quality photographs.
Step 1: Installing the Lens
To install the lens, carefully attach it to the front of the camera body. The lens should fit securely into place and align with the lens mount on the camera. Make sure that it is firmly attached to avoid any movement that could result in blurry images.
Step 2: Attaching the Image Sensor
The image sensor is a crucial component that captures and converts light into digital signals, which are then processed to create the final photograph. To attach the image sensor, locate the image sensor slot on the camera body and carefully insert the sensor into it, making sure that it is properly aligned. Securely fasten the sensor in place to ensure that it does not move during use.
It is important to note that the specifics of attaching the lens and image sensor may vary depending on the design of your paper DSLR camera. Refer to the instructions provided with your camera kit for detailed guidance.
| Tools and Materials | Instructions |
|---|---|
| Screwdriver | Some camera models may require the use of a screwdriver to attach the lens securely. |
| Cleaning Cloth | Before attaching the lens and image sensor, use a cleaning cloth to wipe away any dust or debris that may be present on the camera body or lens. |
| Alignment Markings | Take note of any alignment markings on the lens or camera body to ensure that the lens and image sensor are correctly positioned. |
With the lens and image sensor properly attached, your paper DSLR camera will be ready to capture stunning photographs. Ensure that everything is securely in place before turning on the camera, and take care when handling the lens and image sensor to avoid any damage. Happy shooting!
Create a Removable Lens
To enhance the functionality of your paper DSLR camera, you can create a removable lens that allows you to change the focal length and capture different types of shots. With a removable lens, you can experiment with various focal lengths and achieve a wide range of photographic effects.
To make a removable lens, you will need the following materials:
- A plastic bottle cap
- A small piece of flexible plastic or acrylic sheet
- A magnifying glass or a convex lens
- A hot glue gun or adhesive
Follow these steps to create a removable lens:
- Start by removing the bottom of the plastic bottle cap. Trim the edges if necessary to create an opening that is slightly smaller than the size of the magnifying glass or convex lens you are using.
- Place the magnifying glass or convex lens on the inside of the bottle cap and secure it with hot glue or adhesive. Make sure it is centered and held securely in place.
- Cut a small piece of flexible plastic or acrylic sheet that is slightly larger than the opening of the bottle cap. This will act as a cover for the lens.
- Make a small hole in the center of the plastic cover that matches the size of the lens. This will allow you to attach the cover to the lens.
- Attach the plastic cover to the lens using hot glue or adhesive. Make sure it is securely attached and covers the lens completely.
Your removable lens is now ready to be used with your paper DSLR camera. Simply attach it to the front of the camera body by inserting it into the lens mount. You can now experiment with different focal lengths and capture a variety of creative shots.
Remember to handle the removable lens with care and avoid touching the lens surface with your fingers. Keep it clean and protected when not in use to ensure optimal performance.
Inserting the Image Sensor
Once you have completed the outer casing of your paper DSLR camera, it’s time to move on to inserting the image sensor. The image sensor is a crucial component that captures the light and converts it into digital signals, giving you the final image.
Start by carefully opening the back panel of your camera. This will give you access to the inside of the camera where the image sensor will be placed. Take note of any instructions or guides provided by the camera template you are using, as the process might vary slightly.
Step 1: Preparing the Image Sensor
Before inserting the image sensor, make sure it is clean and free of any dust or debris. Any particles on the sensor can impact the final image quality. Use a clean, lint-free cloth or air blower to gently remove any dirt or dust.
Note: Handle the image sensor with extreme care, as it is a delicate component that can be easily damaged.
Step 2: Positioning the Image Sensor
Locate the designated area for the image sensor inside the camera. It is usually a rectangular or square-shaped slot that fits the size of the sensor. Align the image sensor with the slot, making sure the connectors on the sensor match the corresponding connectors inside the camera.
Note: Some camera templates might have additional components, such as flex cables or image sensor holders, to ensure proper positioning and stability. Follow the instructions provided for your specific camera model.
Step 3: Securing the Image Sensor
Once the image sensor is properly positioned, secure it in place using the provided clips or adhesive. Make sure the sensor is tightly held and does not move or shift inside the camera.
Tip: If your camera template does not include clips or adhesive, you can carefully apply a small amount of glue or tape to secure the image sensor. Just be cautious not to damage any nearby components or cables.
With the image sensor securely in place, you have successfully inserted the most important component of your paper DSLR camera. The image sensor will now be ready to capture stunning photographs when combined with the other essential components like the lens and shutter mechanism.
Question-answer:
Can I use the paper DSLR camera to take actual photos?
No, the paper DSLR camera is a fun craft project and does not have the capability to take real photos. It is purely for decorative purposes or for imaginative play.


