
Welcome to the wonderful world of DSLR cameras! If you’re a beginner, the buttons, dials, and numbers on a DSLR camera can seem overwhelming at first. Don’t worry, though – with a little guidance, you’ll be taking stunning photos in no time. This article will walk you through the basics of using a DSLR camera, step by step.
Step 1: Know Your Camera
Before you start using your DSLR camera, it’s essential to familiarize yourself with its different parts and functions. DSLR stands for Digital Single-Lens Reflex, which means it uses a mirror and prism system to reflect light from the lens to the viewfinder. Pay attention to the shutter button, mode dial, exposure compensation button, and other basic controls. Understanding these features will help you navigate the camera settings and make adjustments easily.
Step 2: Learn the Exposure Triangle
One of the key principles to master when using a DSLR camera is understanding the exposure triangle: aperture, shutter speed, and ISO. Aperture controls the depth of field, shutter speed determines how long the shutter stays open, and ISO controls the camera’s sensitivity to light. Experimenting with different combinations of these settings will allow you to achieve the desired exposure and capture the perfect shot.

Step 3: Choose the Right Mode
DSLR cameras offer various shooting modes, such as manual, aperture priority, shutter priority, and automatic. As a beginner, it’s recommended to start with the automatic mode and gradually move towards manual mode as you gain confidence and experience. Automatic mode allows the camera to make all the adjustments for you, while the manual mode gives you full control over the settings. Aperture priority mode is great for controlling depth of field, while shutter priority mode is ideal for capturing motion.
Step 4: Composition and Lighting
Composition and lighting play a crucial role in photography. Consider the rule of thirds, leading lines, and framing to create visually appealing images. Additionally, pay attention to the lighting conditions while shooting. Natural light is often the best choice, but you can also experiment with different types of artificial lighting to achieve different effects. Don’t be afraid to try different angles and perspectives to add interest and creativity to your photos.
Remember, practice makes perfect. As you continue to use your DSLR camera and gain experience, you’ll become more comfortable with the settings and techniques. So grab your camera, go out, and start capturing those amazing moments!

Guide to Using a DSLR Camera for Beginners
Are you new to the world of photography and just got yourself a brand new DSLR camera? Don’t worry, we’ve got you covered! Here’s a beginner’s guide to help you get started with using your DSLR camera:
1. Know your camera
Before you start taking pictures, it’s important to familiarize yourself with the different parts and features of your DSLR camera. Take some time to read the manual and understand the basic functions such as adjusting the ISO, aperture, and shutter speed.
2. Shooting modes
Most DSLR cameras come with different shooting modes such as Auto, Manual, Aperture Priority, and Shutter Priority. Start with the Auto mode if you’re a beginner and gradually switch to other modes as you gain more confidence and knowledge about photography.
3. Composition
Composition plays a vital role in creating stunning photographs. Remember the rule of thirds – imagine breaking an image into nine equal parts using two horizontal and two vertical lines. Place the subject of your photo along these lines or at the intersection points to create a visually pleasing composition.
4. Focus
Ensure your subject is in focus by using the autofocus feature of your camera. Depending on your camera model, you can choose between single-point AF, continuous AF, or automatic AF modes. Experiment with different focus points and see what works best for your photos.

5. Lighting
Understanding lighting is key to capturing great photos. Experiment with natural light, diffused light, and even artificial lighting to see how it affects your images. Avoid shooting in harsh midday sunlight as it can create harsh shadows and overexposure.
6. Post-processing
After capturing photos, it’s time to enhance them using post-processing software such as Adobe Lightroom or Photoshop. Adjust the exposure, contrast, saturation, and other parameters to make your photos more visually appealing.
With these tips in mind, you’re on your way to becoming a DSLR camera pro! Remember, practice makes perfect, so get out there and start clicking!
Choosing the Right DSLR Camera
When it comes to choosing a DSLR camera, there are a few important factors to consider. With a wide range of options available on the market, it can be overwhelming for beginners. However, by understanding these key factors, you can make an informed decision and find the perfect camera for your needs.
1. Know your budget
Before diving into the world of DSLR cameras, it’s important to establish your budget. Determine how much you are willing to invest in a camera and set a realistic price range. This will help narrow down your options and prevent you from overspending.
![ZHIYUN CINEPEER Weebill 3E[Official], 3-Axis Lightweight Gimbal Stabilizer for DSLR & Mirrorless Camera Canon/Sony/Panasonic/Nikon, 3KG Payload, Native Vertical Shooting, Bluetooth Shutter Control](https://m.media-amazon.com/images/I/41eCw0RtrAL._SL160_.jpg)
2. Consider your needs and preferences
Every photographer has different needs and preferences when it comes to using a DSLR camera. Think about what you will mainly use the camera for – whether it’s capturing landscapes, portraits, or action shots. Consider the features that are essential to you, such as autofocus capabilities, image stabilization, or video recording.
Additionally, think about the size and weight of the camera. If you plan on carrying it around for long periods of time, a lighter and more compact option might be preferable. On the other hand, if you value a robust construction and larger grip, a heavier camera might be a better fit.
3. Research and compare models
Once you have an idea of your budget and preferences, start researching different DSLR camera models. Look for reviews and comparisons online to get a better understanding of their pros and cons. Pay attention to factors such as image quality, low-light performance, and ease of use.
Consider visiting a local camera store to see and handle the cameras in person. This can give you a better sense of their ergonomics and how they feel in your hands. Don’t be afraid to ask questions and seek advice from experts.
Remember, choosing the right DSLR camera is a personal decision. Take your time, do your research, and trust your instincts. With the right camera in hand, you’ll be able to capture stunning photographs and unleash your creativity.

Understanding DSLR Camera Controls
When it comes to using a DSLR camera, understanding the various controls is key to getting the most out of your equipment. Here, we will guide you through the different buttons and dials found on a typical DSLR camera, so you can navigate through its features with ease.
1. Shutter button: The shutter button is located on the top right-hand side of the camera. Pressing this button halfway will activate the autofocus, while fully pressing it down will capture the image.
2. Mode dial: The mode dial is typically situated on the top of the camera and allows you to select different shooting modes. These may include Automatic, Manual, Aperture Priority, Shutter Priority, and more. Choosing the appropriate mode for your desired effect can greatly enhance the outcome of your photographs.
3. Exposure compensation button: This button allows you to adjust the exposure of your photos. It is usually marked with a “+/-” symbol and is often found on the top or back of the camera. Use this feature to brighten or darken your images, depending on the lighting conditions.
4. ISO button: The ISO button allows you to control the camera’s sensitivity to light. It is often located near the mode dial or on the back of the camera. Adjusting the ISO can help you achieve well-exposed shots, even in low light situations.

5. Aperture and shutter speed controls: DSLR cameras have dedicated controls for adjusting the aperture and shutter speed. These controls are typically found on the top or back of the camera and allow you to manually set the desired values. Understanding how these settings interact with each other is essential for achieving the desired effect in your photos.
6. Focus mode switch: The focus mode switch allows you to choose between different autofocus modes, such as single-shot autofocus or continuous autofocus. This switch is usually located on the front or side of the camera. Selecting the appropriate focus mode can ensure that your subject is captured sharply.
7. Menu button: The menu button provides access to the camera’s settings and options. It is usually denoted by a symbol resembling a grid and is typically found on the back of the camera. Familiarize yourself with the menu options to customize your camera’s settings to suit your shooting preferences.
| Control | Function |
|---|---|
| Shutter button | Captures the image when fully pressed down |
| Mode dial | Allows you to select different shooting modes |
| Exposure compensation button | Adjusts the exposure of your photos |
| ISO button | Controls the camera’s sensitivity to light |
| Aperture and shutter speed controls | Manually set the desired values for aperture and shutter speed |
| Focus mode switch | Choose between different autofocus modes |
| Menu button | Provides access to the camera’s settings and options |
Understanding these DSLR camera controls will empower you to take full control of your photography. Experiment with different settings and modes to unleash your creativity and capture stunning images.
Essential Camera Accessories for Beginners
When starting out with a DSLR camera, there are a few essential accessories that can greatly enhance your photography experience. These accessories will not only help you take better photos but also protect your camera and allow you to explore different creative techniques.
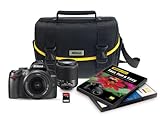
| Accessory | Description |
|---|---|
| Camera Bag | A durable and well-padded camera bag is a must-have accessory for beginners. It will protect your camera from bumps, scratches, and weather conditions while allowing you to take your gear with you wherever you go. |
| Tripod | A tripod is an essential accessory for beginners who want to take steady and sharp photos. It helps eliminate camera shake, especially in low light situations or when using longer exposure times. |
| Lens Cleaning Kit | A lens cleaning kit is essential for keeping your lenses and camera sensor clean. Dust particles and fingerprints can degrade image quality, so regularly cleaning your gear is important to maintain optimal performance. |
| Memory Cards | Investing in high-quality memory cards is crucial for storing your photos. Look for cards with fast read and write speeds and ample storage capacity to ensure that you never run out of space while shooting. |
| External Flash | An external flash can greatly improve your lighting options when shooting indoors or in low light conditions. It allows you to control the direction and intensity of the light, resulting in more creative and professional-looking photos. |
| Extra Batteries | Carrying extra batteries is essential for long shooting sessions or when traveling. DSLR cameras can quickly drain battery power, so having spare batteries ensures that you never miss a shot. |
These are just a few essential accessories to consider when starting out with a DSLR camera. As you gain more experience and explore different photography genres, you may find other accessories that suit your specific needs. Remember, investing in quality accessories will enhance your photography journey and help you capture stunning images.
Mastering the Exposure Triangle
Understanding the exposure triangle is essential for taking great photos with your DSLR camera. The exposure triangle consists of three elements: aperture, shutter speed, and ISO. Together, these three settings determine the overall exposure of your photograph.
Aperture
Aperture refers to the size of the opening in the camera lens that allows light to enter. It is measured in f-stops, with smaller numbers representing larger openings. A wider aperture (smaller f-stop) lets in more light, resulting in a brighter photo, while a narrower aperture (larger f-stop) restricts the amount of light, resulting in a darker image. Aperture also affects the depth of field in your photos, with wider apertures creating a shallow depth of field, where only the subject is in focus, and narrower apertures creating a larger depth of field, where both the subject and the background are in focus.
Shutter Speed
Shutter speed refers to the amount of time that the camera’s shutter is open, allowing light to reach the image sensor. It is measured in fractions of a second, such as 1/1000 or 1/30. A faster shutter speed (like 1/1000) freezes motion and is ideal for capturing fast-moving subjects, while a slower shutter speed (like 1/30) allows for motion blur and is great for creating artistic effects. Keep in mind that longer shutter speeds require a steady hand or the use of a tripod to avoid camera shake.
ISO
ISO represents the camera’s sensitivity to light. A lower ISO value (such as 100) is less sensitive to light and is suitable for bright environments, while a higher ISO value (such as 1600) is more sensitive to light and is useful in low-light situations. However, higher ISO settings can introduce digital noise or graininess into the image, so it’s important to find the right balance between ISO and image quality.
By mastering the exposure triangle and understanding how aperture, shutter speed, and ISO work together, you’ll have greater creative control over your DSLR camera and be able to capture stunning photographs in a variety of lighting conditions.
Exploring Different Shooting Modes
Shooting modes are an essential feature of DSLR cameras that allow you to control the settings and achieve the desired look for your photographs. By understanding and utilizing different shooting modes, you can enhance your photography skills and capture impressive shots.
Here are some common shooting modes you will find on most DSLR cameras:
| Shooting Mode | Description |
|---|---|
| Auto Mode | In auto mode, the camera takes care of all the settings, including the exposure, focus, and white balance. It is suitable for beginners or situations when you want to capture quick shots without worrying about manual adjustments. |
| Manual Mode | In manual mode, you have full control over all settings, including aperture, shutter speed, and ISO. It provides maximum creative freedom and is suitable for experienced photographers. |
| Aperture Priority Mode | In aperture priority mode, you set the desired aperture, and the camera adjusts the shutter speed accordingly. It is great for controlling the depth of field and is often used for portraits or landscape photography. |
| Shutter Priority Mode | In shutter priority mode, you set the desired shutter speed, and the camera adjusts the aperture accordingly. It is useful for capturing motion or freezing action in sports or wildlife photography. |
| Program Mode | Program mode is a semi-automatic mode where the camera selects the aperture and shutter speed. You can still make adjustments to other settings, such as ISO and exposure compensation, giving you more control over the final image. |
| Scene Modes | Scene modes are pre-set modes tailored for specific shooting scenarios, such as portrait, landscape, sports, or night photography. They optimize the camera settings to achieve the best results in different situations. |
| Custom Modes | Some advanced DSLR cameras offer custom modes that allow you to save your favorite settings for quick access. It can be useful when you frequently shoot in specific situations and want to switch between preferred configurations without manually adjusting all the settings. |
Exploring and experimenting with these shooting modes will help you understand the capabilities of your DSLR camera and enable you to capture a wide range of subjects and scenes effectively. Remember, practice and experience are key to mastering the art of DSLR photography.
Composition Techniques for Stunning Photos
When it comes to taking captivating photos with your DSLR camera, composition is a key element that can make or break your shot. By using various techniques, you can enhance the visual appeal and make your photos stand out. Here are some composition techniques to consider:
Rule of Thirds
The rule of thirds is a fundamental guideline in photography. To apply this technique, imagine that your frame is divided into nine equal parts by two horizontal and two vertical lines. When framing your subject, try placing it along these lines or at the intersections. This off-center placement creates more visually appealing and balanced compositions.
Leading Lines
Leading lines are a powerful tool for drawing the viewer’s eye into the photo and creating a sense of depth. Look for natural or man-made lines, such as roads, fences, or rivers, that lead towards your main subject. By positioning your subject at the end of these lines, you can create a dynamic and engaging composition.
Tip: Experiment with different angles and perspectives to enhance the effect of leading lines.
Foreground and Background
Avoid having a flat and uninteresting background by incorporating elements in the foreground. This adds depth and context to your photos, making them more visually appealing. For instance, you can include a tree branch, flowers, or any other object that complements your main subject.
Tip: Use a wide aperture to blur the background and make your subject stand out even more.
By utilizing these composition techniques, you can take your DSLR photography to the next level. Don’t be afraid to experiment and try new things – that’s how you discover your unique style and create stunning photos.
Mastering Manual Focus and Autofocus
When using a DSLR camera, understanding how to effectively use manual focus and autofocus is essential for capturing sharp and correctly focused images. Both manual focus and autofocus have their advantages and can be used in different situations to achieve the desired results.
Manual Focus: Manual focus allows you to take complete control over the focus of your image. To use manual focus, simply switch the focus mode on your camera to manual. Look through the viewfinder or use the camera’s LCD screen to compose your shot. Rotate the focus ring on the lens until your subject appears in sharp focus. This method is especially useful in situations where your subject is stationary, such as landscape photography or still life shots.
Autofocus: Autofocus is a convenient feature that allows your camera to automatically adjust focus based on its built-in algorithms. There are several autofocus modes available, such as single-point autofocus and continuous autofocus, which are suitable for different subjects and shooting scenarios.
Single-Point Autofocus: This mode allows you to choose a specific focus point in the frame. Simply select the desired focus point on your camera’s LCD screen or through the viewfinder, and the camera will adjust focus accordingly. Single-point autofocus is ideal for subjects that are not moving or for situations where you want precise control over the focus.
Continuous Autofocus: As the name suggests, continuous autofocus is designed for capturing moving subjects. This mode continuously adjusts focus as the subject moves, ensuring that it remains sharp and in focus. Continuous autofocus is particularly useful for sports photography, wildlife photography, or any situation where your subject is constantly in motion.
It is important to note that autofocus may not always be perfect and can sometimes struggle in certain lighting conditions or with subjects lacking contrast. In such cases, manual focus can be a reliable alternative.
To improve your focusing skills, practice using both manual focus and autofocus in different shooting situations. Experiment with different focus modes and techniques to determine which one works best for your specific needs. Remember that mastering focus is an ongoing process, and with practice, you will become more proficient in achieving sharp and focused images.
Post-processing Tips for DSLR Beginners
Once you have taken some great shots with your DSLR camera, the next step is to enhance and refine them through post-processing. Post-processing involves editing your photos using software to bring out their best qualities. Here are some post-processing tips for DSLR beginners:
1. Choose the Right Software
There are several software options available for post-processing your DSLR photos. Adobe Photoshop and Lightroom are popular choices, but there are also free options like GIMP and RawTherapee. Research and choose the software that best fits your needs and budget.
2. Shoot in RAW Format
When shooting with your DSLR camera, it is recommended to shoot in RAW format rather than JPEG. RAW files contain more data and allow for more flexibility during post-processing, giving you greater control over the final result.
3. Crop and Straighten
During the post-processing stage, you can crop your photos to improve composition and remove any distractions. You can also straighten your images if they were taken at a slightly tilted angle, using the rotate or straighten tool in your chosen software.
4. Adjust Exposure
Exposure refers to the brightness of your photo. In post-processing, you can adjust the exposure to enhance the details and make your photo more visually appealing. Experiment with adjusting the brightness, contrast, and highlights to achieve the desired effect.
5. Enhance Colors
If your photo lacks vibrancy, you can enhance the colors during post-processing. Use the saturation and vibrance adjustments to make the colors pop without going overboard. Be mindful of not making the photo look unnatural.
6. Sharpen Your Images
To make your photos appear crisper and more detailed, you can apply a sharpening filter during post-processing. Be careful not to overdo it, as excessive sharpening can result in a noisy and unrealistic look. Adjust the sharpening settings to find the right balance.
7. Remove Noise
Noise can be present in photos, especially when shooting in low-light conditions or at high ISO settings. Fortunately, most post-processing software offers tools to reduce noise. Experiment with the noise reduction settings to minimize noise while preserving details.
By following these post-processing tips, even DSLR beginners can enhance their photos and take their photography to the next level. Remember, practice makes perfect, so don’t be afraid to experiment and try different techniques to find your unique style.
Question-answer:
What is a DSLR camera?
A DSLR camera, or a digital single-lens reflex camera, is a type of camera that uses a mirror and prism system to allow the photographer to see through the lens and capture higher quality images.
How do I choose the right DSLR camera?
When choosing a DSLR camera, consider factors such as your budget, intended use, and skill level. Research different camera models, compare their features, and read customer reviews to make an informed decision.
What do the different shooting modes on a DSLR camera mean?
Shooting modes on a DSLR camera, such as manual, aperture priority, shutter priority, and program mode, allow you to have control over different aspects of your photograph, such as exposure, depth of field, and shutter speed.
How can I improve my photography skills with a DSLR camera?
To improve your photography skills with a DSLR camera, practice regularly, experiment with different settings and techniques, learn about composition and lighting, and study the work of other photographers for inspiration and ideas.


