In today’s digital world, capturing moments with your camera has become easier than ever before. Whether you’re a professional photographer or just love taking pictures, there may come a time when you want to transfer those precious moments from your camera to your computer.
Gone are the days when you had to wait for hours to get your pictures developed. With the advancements in technology, you can now transfer photos from your camera to your computer instantly. This allows you to edit, share, and store your pictures with ease.
So, how can you send a picture instantly from your camera to your computer? There are several methods you can use, depending on the type of camera and computer you have.
If you have a digital camera, the most common way to transfer pictures is by using a USB cable. Simply connect one end of the cable to your camera and the other end to your computer’s USB port. Once connected, your computer will recognize the camera as a removable storage device, and you can easily browse and transfer your pictures.
Choosing the Right Camera
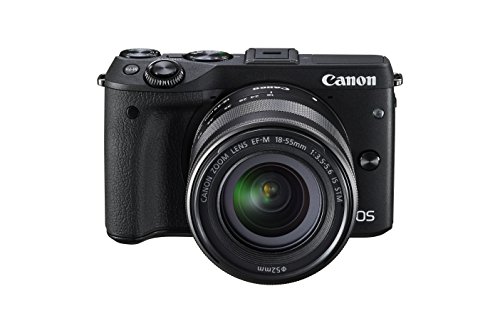
When it comes to sending pictures instantly from your camera to your computer, it’s important to choose the right camera that meets your needs. There are a wide range of cameras available on the market, each with their own features and capabilities. To make sure you’re making the right choice, consider the following factors:

|
Image Quality: Look for a camera that provides high image quality. This will ensure that your pictures are crisp, clear, and vibrant, making them more enjoyable to view on your computer. |
Resolution: The resolution of the camera determines how many pixels are captured in an image. Higher resolution cameras will produce sharper and more detailed pictures, which is ideal for sending them to your computer. |
|
Connectivity: Make sure the camera has connectivity options such as USB or Wi-Fi, allowing you to easily transfer pictures to your computer without any hassle. |
Storage: Consider the storage capacity of the camera. If you take a lot of pictures, you’ll want a camera with ample storage space or the ability to expand storage using memory cards. |
|
Battery Life: Check the battery life of the camera to ensure that it can last for an extended period of time without needing to be recharged. This is especially important if you’re planning on using the camera extensively. |
Size and Weight: Consider the size and weight of the camera for portability. If you’ll be taking the camera with you on the go, you’ll want something lightweight and compact. |


By considering these factors, you can choose the right camera that will allow you to instantly send pictures from your camera to your computer with ease.
Factors to consider when buying a camera for instant picture transfer
When it comes to buying a camera for instant picture transfer, there are several important factors to consider. The ability to quickly and easily send a picture from your camera to your computer is essential for many photographers. Here are some factors to keep in mind when making your decision:
1. Wireless connectivity:
One of the most important features to look for in a camera for instant picture transfer is wireless connectivity. This allows you to transfer your photos to your computer without the need for cables or memory cards. Look for cameras that have built-in Wi-Fi or Bluetooth capabilities to ensure seamless and quick picture transfer.

2. Compatibility with transfer methods:
Make sure that the camera you choose is compatible with the transfer methods you prefer to use. Some cameras may only support transferring pictures via a specific app or software, while others may offer compatibility with various methods such as email, cloud storage, or direct transfer to your computer via USB.
Additionally, check if the camera is compatible with both Mac and Windows operating systems, as this will ensure that you can easily transfer your pictures regardless of the computer you are using.
3. Image quality:
While instant picture transfer is important, it is also crucial to consider the overall image quality of the camera. Look for a camera with a high-resolution sensor, good ISO range, and a variety of shooting modes to ensure that your pictures have exceptional quality.
Keep in mind that a higher megapixel count does not always guarantee better image quality. Other factors such as lens quality, image stabilization, and low-light performance can significantly impact the overall image quality.
4. Battery life:
Since instant picture transfer requires the use of wireless connectivity, it is important to choose a camera with a long battery life. Look for cameras with efficient power management and consider buying spare batteries if you anticipate longer shooting sessions or frequent picture transfers.

A camera with a short battery life may be frustrating, especially if it constantly runs out of power during the transfer process.
In conclusion, when buying a camera for instant picture transfer, consider factors such as wireless connectivity, compatibility with transfer methods, image quality, and battery life. Taking the time to research and choose a camera that meets these criteria will ensure that you have a seamless and enjoyable experience transferring your pictures from your camera to your computer.
Connecting Camera to Computer
In order to send a picture instantly from your camera to your computer, you will first need to establish a connection between the two devices. This can be done using either a USB cable or a memory card reader.
Using a USB Cable
If your camera has a USB port, you can connect it directly to your computer using a USB cable. Here are the steps to follow:
- Make sure your camera is turned off.
- Locate the USB port on your camera and the USB port on your computer.
- Insert one end of the USB cable into the camera’s USB port.
- Insert the other end of the USB cable into the computer’s USB port.
- Turn on your camera.
- Your computer should recognize the camera and prompt you to import the pictures.
- Follow the on-screen instructions to transfer the pictures to your computer.
Using a Memory Card Reader
If your camera uses a memory card to store pictures, you can remove the memory card from the camera and insert it into a memory card reader connected to your computer. Here’s how:

- Turn off your camera.
- Locate the memory card slot on your camera and remove the memory card.
- Insert the memory card into the corresponding slot on the memory card reader.
- Connect the memory card reader to your computer using a USB cable.
- Your computer should recognize the memory card and prompt you to import the pictures.
- Follow the on-screen instructions to transfer the pictures to your computer.
Once the pictures are transferred to your computer, you can edit, save, and share them as desired.
It is important to note that the steps may vary depending on your camera model and computer system. Refer to your camera’s user manual and computer’s documentation for more specific instructions.
| Pros of using a USB cable: | Cons of using a USB cable: |
| Direct connection | Requires a compatible USB port |
| Fast file transfer | May drain camera battery |
| Easier to import pictures |
Step-by-step guide on how to connect your camera to your computer
Step 1: Check your camera’s compatibility
Before connecting your camera to your computer, make sure that they are compatible with each other. Check the user manual or the manufacturer’s website for information on compatibility and required software.
Step 2: Install the necessary software
Once you have verified compatibility, install any required software or drivers on your computer. This software will enable your computer to communicate with the camera and transfer pictures.
Step 3: Connect your camera to your computer
Using the USB cable provided with your camera, connect one end to the camera and the other end to an available USB port on your computer. Ensure that both devices are turned on before proceeding.
Step 4: Configure your camera settings
On your camera, navigate to the settings menu and select the option for connecting to a computer. Choose the appropriate connection mode (e.g., USB Mass Storage, PTP, or MTP) based on the instructions provided in your user manual or by the manufacturer.
Step 5: Transfer pictures
Once your camera is connected and the settings are configured, your computer should recognize the camera as a removable storage device. Open File Explorer (Windows) or Finder (Mac) and navigate to the camera’s storage location. From here, you can select and copy the pictures you wish to transfer, and paste them into a desired folder on your computer.
Step 6: Safely disconnect your camera
After transferring your pictures, it is important to properly disconnect your camera from your computer to avoid data loss or damage. Eject the camera from your computer by right-clicking on its icon and selecting “Eject” or “Safely Remove”. Unplug the USB cable from both the camera and the computer.
Step 7: Review and edit your pictures
Now that your pictures are safely transferred to your computer, you can review and edit them using your preferred photo editing software. Share them with others, print them, or store them for safekeeping.
| Troubleshooting |
|---|
|
Setting up Instant Picture Transfer
To enable instant picture transfer from your camera to your computer, follow these simple steps:
1. Make sure your camera and computer are both connected to the same Wi-Fi network.
2. Install the necessary software on your computer. There are several programs available that allow for instant picture transfer, such as Nikon’s Wireless Transmitter Utility or Canon’s EOS Utility.
3. Launch the software on your computer and ensure that it is connected to your camera.
4. On your camera, go to the settings menu and navigate to the Wi-Fi settings. Enable the Wi-Fi feature and select the option to connect to a computer.
5. A list of available networks will appear on your camera’s screen. Select your computer’s network from the list.
6. Enter the Wi-Fi password if prompted.
7. Once your camera is connected to your computer, you can start transferring pictures instantly. Simply take a photo with your camera and it will be automatically sent to your computer.
8. You can then access the transferred pictures on your computer and save them to a desired location.
Following these steps will allow you to set up instant picture transfer from your camera to your computer with ease. Enjoy the convenience of transferring and accessing your photos seamlessly!
Configuring the necessary settings for instant picture transfer
Before you can start sending pictures from your camera to your computer instantly, you need to configure a few settings to ensure smooth and efficient transfer. Follow these steps to get started:
1. Check camera compatibility
Make sure your camera supports instant picture transfer functionality. Check the camera’s user manual or contact the manufacturer for information on whether your camera has this feature.
2. Connect your camera to the computer
Use the USB cable provided with your camera to connect it to your computer. Make sure both devices are powered on and properly connected.
3. Enable instant picture transfer
Access the camera’s settings menu to enable instant picture transfer. The process may vary depending on the camera model, but you can usually find this option under the “Connection” or “Transfer” settings.
Note: If your camera has a physical button or switch for instant transfer, make sure it is turned on.
4. Install the necessary software
Some cameras require specific software to facilitate instant picture transfer. Check the camera’s user manual or the manufacturer’s website for instructions on how to install the necessary software on your computer.
5. Configure the software settings
Once the software is installed, open it on your computer and configure the settings to enable instant picture transfer. This may include selecting the destination folder for transferred pictures, setting up automatic file renaming, or specifying the desired file format.
Note: The software settings may vary depending on the camera brand and the software being used.
6. Test the instant picture transfer
Take a test photo with your camera and check if it is instantly transferred to your computer. If the transfer is successful, you are now ready to send pictures instantly from your camera to your computer.
By configuring these necessary settings, you can seamlessly transfer pictures in real-time, saving you time and effort in manually transferring each photo.
Sending Pictures Wirelessly
If you want to send pictures instantly from your camera to your computer without the hassle of cables or memory cards, you can take advantage of wireless technology. This method allows you to transmit your photos wirelessly using a Wi-Fi connection or a Bluetooth connection.
Here are some steps to send pictures wirelessly:
| Step 1: | Ensure that both your camera and computer are equipped with Wi-Fi or Bluetooth capabilities. If not, you may need to purchase an external wireless adapter. |
| Step 2: | Enable Wi-Fi or Bluetooth on both your camera and computer. Refer to the user manuals for instructions specific to your devices. |
| Step 3: | Connect your camera and computer to the same Wi-Fi network if you are using a Wi-Fi connection. If you are using Bluetooth, pair your camera and computer by following the on-screen prompts. |
| Step 4: | Launch the software or app provided by the camera manufacturer on your computer or smartphone. |
| Step 5: | Select the option to transfer photos wirelessly. |
| Step 6: | Choose the pictures you want to send from your camera to your computer. |
| Step 7: | Click the “Transfer” or “Send” button to start the wireless transfer process. |
| Step 8: | Wait for the transfer to complete. The time it takes may vary depending on the size and number of pictures being transferred. |
| Step 9: | Once the transfer is finished, you can access and view your pictures on your computer. |
With the ability to send pictures wirelessly, you can easily and conveniently transfer your photos from your camera to your computer in an instant, eliminating the need for cables or memory cards. Enjoy the freedom of wireless technology and simplify your photo transfer process.
Methods for sending pictures from camera to computer wirelessly
With the advancement in technology, there are several methods available for wirelessly sending pictures from a camera to a computer. These methods offer convenience and ease of use, eliminating the need for any physical connections.
1. Wi-Fi Transfer: Many modern cameras come equipped with Wi-Fi capabilities, allowing you to transfer pictures wirelessly. To use this method, you need to connect your camera and computer to the same Wi-Fi network. Then, follow the camera’s instructions to enable Wi-Fi transfer and use the camera’s dedicated app or software on your computer to initiate the transfer process.
2. Bluetooth Transfer: Some cameras also offer Bluetooth connectivity, which enables you to send pictures wirelessly. To use this method, ensure that both your camera and computer have Bluetooth enabled. Pair the devices by following the camera’s instructions and use the camera’s app or software to initiate the transfer.
3. NFC Transfer: Near Field Communication (NFC) is another wireless transfer method offered by select cameras. NFC allows you to establish a connection between your camera and computer simply by bringing them close together. Once connected, you can transfer pictures using the camera’s dedicated app or software.
4. Cloud Storage: Another popular method for wireless picture transfer is through cloud storage services. Upload your pictures from your camera to a cloud storage platform like Google Drive, Dropbox, or iCloud. Then, access the cloud storage service on your computer to download the pictures.
5. Wireless Memory Card: Some cameras support wireless memory cards that can be inserted into the camera’s memory card slot. These cards create their own Wi-Fi network, allowing you to connect your computer to the card and transfer pictures wirelessly.
Using these wireless methods, you can easily and quickly send pictures from your camera to your computer without the hassle of cables or physical connections.
Question-answer:
What is the fastest way to transfer photos from a camera to a computer?
The fastest way to transfer photos from a camera to a computer is to use a USB cable. Simply connect the camera to the computer using the cable, and the computer should recognize the device. You can then copy and paste the photos from the camera’s storage to a folder on the computer.
Is it possible to send photos from a camera to a computer wirelessly?
Yes, it is possible to send photos from a camera to a computer wirelessly. Some cameras have built-in Wi-Fi capabilities that allow you to transfer photos directly to a computer or a mobile device. You can also use a wireless memory card or a wireless adapter to achieve the same result.
What software do I need to transfer photos from a camera to a computer?
To transfer photos from a camera to a computer, you generally don’t need any specific software. Most computers have built-in tools or applications that can recognize and import photos from a camera. However, if you want more advanced features or organization options, you can use software like Adobe Lightroom or Google Photos.