
Having the ability to capture great photos with your iPhone camera is one of the key features that sets it apart from other smartphones. However, sometimes the lighting conditions may not be ideal, resulting in dark or overexposed photos. In order to achieve the perfect exposure, it’s important to know how to adjust the light on your iPhone camera.
One of the simplest ways to adjust the light on your iPhone camera is to use the built-in exposure control. When you open the camera app, tap on the screen to focus on your subject. Then, swipe up or down to manually adjust the exposure. Swiping up will increase the exposure, making the image brighter, while swiping down will decrease the exposure, making the image darker.
Another useful feature for adjusting the light on your iPhone camera is the HDR (High Dynamic Range) mode. HDR combines multiple exposures of the same photo to capture a greater range of light and shadow. To enable HDR mode, open the camera app, tap on “HDR” at the top of the screen, and select “On”. Make sure to keep your hand steady while taking the photo, as HDR mode takes slightly longer to capture the image.
If you want more precise control over the light on your iPhone camera, you can use third-party camera apps that offer manual controls. These apps allow you to adjust settings such as ISO, shutter speed, and white balance. By manually adjusting these settings, you can achieve the desired exposure in any lighting condition.
In conclusion, the ability to adjust the light on your iPhone camera is crucial for capturing high-quality photos. Whether you use the built-in exposure control, enable HDR mode, or opt for third-party camera apps, taking the time to adjust the light will greatly enhance your photography skills and help you capture stunning images in any lighting situation.

Understanding camera settings
When it comes to adjusting the light on your iPhone camera, understanding the camera settings is crucial. By knowing how to manipulate these settings, you can effectively control the lighting conditions and capture the perfect photo.
Exposure
Exposure refers to the amount of light that enters the camera sensor. It determines the brightness or darkness of your photo. Adjusting the exposure allows you to brighten or darken your image. To adjust the exposure on your iPhone camera, tap on the screen where you want the camera to focus, and then swipe up or down to adjust the exposure level.
Note: A higher exposure level brightens the image, while a lower exposure level darkens it.
HDR

HDR stands for High Dynamic Range. When enabled, this feature allows your iPhone camera to capture a wider range of lighting details, resulting in more balanced photos. It is particularly useful in high-contrast scenes where there are areas of both bright and dark elements. To enable HDR on your iPhone camera, go to “Settings” > “Camera” > “HDR” and toggle it on.
Flash
The flash on your iPhone camera can be used to illuminate a scene in low-light conditions. It is important to use flash judiciously to avoid overexposed or harshly lit photos. To adjust the flash settings on your iPhone camera, tap on the lightning bolt icon at the top of the camera screen and choose the desired flash mode: Auto, On or Off.
White Balance
White balance refers to the color temperature of your photos. It ensures that the colors in your image appear as they should, without any unwanted color casts. Your iPhone camera automatically adjusts the white balance based on the lighting conditions. However, you can manually control it by tapping on the screen where you want to set the white balance, and then dragging your finger up or down to adjust the temperature level.

Note: A higher temperature level adds warmth, while a lower temperature level adds coolness to your photos.
By understanding and effectively using these camera settings on your iPhone, you can capture well-exposed and beautifully lit photos in any lighting conditions.
Using manual exposure adjustments
One way to adjust the light on your iPhone camera is by using manual exposure adjustments. This feature allows you to manually control the exposure settings of your camera, giving you more control over the brightness and darkness of your photos.
To access the manual exposure adjustments, follow these steps:
| 1. | Open the Camera app on your iPhone. |
| 2. | Tap on the screen to focus on the subject you want to capture. |
| 3. | A yellow square will appear with a sun icon next to it. This indicates the focus and exposure area. |
| 4. | Swipe up or down on the screen to adjust the exposure level. Moving your finger upwards will make the image brighter, while moving it downwards will make it darker. |
| 5. | Once you have adjusted the exposure to your desired level, tap on the screen again to lock the exposure settings. |
By using manual exposure adjustments, you can ensure that your photos are properly exposed, even in challenging lighting conditions. Experiment with different exposure levels to achieve the desired lighting effect for your photos.

Utilizing HDR mode for better lighting
One of the key features of the iPhone camera is its ability to capture stunning photos even in challenging lighting conditions. To make the most of your iPhone’s camera and adjust the light, you can utilize the HDR (High Dynamic Range) mode. This mode works by capturing multiple photos at different exposure levels and then combining them to create a well-lit image with balanced highlights and shadows.
Here’s how you can use the HDR mode on your iPhone:
- Open the Camera app on your iPhone.
- Tap on “HDR” at the top of the screen to enable HDR mode.
- Compose your shot and tap the shutter button to take a photo.
- Your iPhone will capture a series of images with varying exposure levels.
- You can find the HDR photo in your Camera Roll alongside the regular photo.
Using HDR mode can greatly improve the overall lighting and dynamic range of your photos. It’s especially useful in situations where there are both bright and dark areas, such as when capturing landscapes with the sun in the frame.
Keep in mind that the HDR mode works best when your iPhone is stabilized. If you’re shooting handheld, it’s recommended to use a tripod or rest your iPhone on a steady surface to avoid blurriness in the final image. Additionally, HDR mode may not be ideal for moving subjects, as it requires multiple shots to capture.
Experimenting with HDR mode can help you achieve better-lit photos with more details in both dark and bright areas. It’s a powerful tool that can enhance your photography and make your images look more professional.
Using third-party camera apps
If you’re not satisfied with the built-in camera app on your iPhone and want more control over the light adjustments, you can consider using third-party camera apps. These apps offer additional features and settings that can help you achieve the desired lighting for your photos.
Here are a few popular third-party camera apps you can try:
- VSCO: VSCO is a powerful camera app that provides advanced manual controls for adjusting exposure, focus, and white balance. It also offers a wide range of filters and editing tools to enhance your photos.
- ProCamera: ProCamera is another professional-grade camera app that allows you to manually adjust light settings like exposure, ISO, and shutter speed. It also offers various shooting modes, including a dedicated low-light mode for capturing photos in challenging lighting conditions.
- Camera+ 2: Camera+ 2 is a feature-rich camera app that offers manual controls for adjusting exposure, white balance, and focus. It also has a Clarity feature that enhances details and a wide range of shooting modes for different scenarios.
When using third-party camera apps, make sure to explore their settings and features to find the options that best suit your needs. Experiment with different settings and techniques to achieve the desired lighting in your photos.
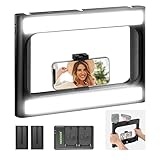
Using external lighting accessories
While the iPhone camera has built-in lighting features, sometimes you may need additional lighting to capture the perfect shot. Luckily, there are several external lighting accessories available that can help you adjust the light on your iPhone camera.
1. Ring light
A ring light is a circular light that attaches to the front of your iPhone. It provides even and diffused lighting, which can help eliminate harsh shadows and improve the overall lighting in your photos or videos.

2. LED panel
An LED panel is a square or rectangular-shaped light that can be easily attached to your iPhone. It offers adjustable brightness levels and color temperatures, allowing you to customize the lighting according to your preference.
3. Softbox
A softbox is a light modifier that helps create soft and diffused lighting. It usually consists of a fabric diffuser that is attached to a light source. Using a softbox with your iPhone camera can help in achieving more professional-looking photos and videos.
4. Portable studio light
If you’re looking for a more comprehensive lighting solution, you can consider using a portable studio light. These lights come with adjustable brightness and color temperature settings, offering a wide range of lighting possibilities for your iPhone camera.
Before choosing an external lighting accessory, consider your specific needs and the type of photography or videography you’re interested in. Each accessory offers different features and benefits, so it’s important to choose one that aligns with your requirements.
Tips for capturing well-lit photos
Getting the lighting right is crucial when taking photos with your iPhone camera. Here are some tips to help you capture well-lit photos:

1. Natural light is key: Whenever possible, try to take photos outdoors or near a window to make use of natural light. Natural light provides a softer and more even illumination that can enhance the overall quality of your photos.
2. Avoid harsh shadows: Be mindful of the direction of the light source. Direct sunlight can create harsh shadows, especially during midday. Look for areas with diffused light or use objects like reflectors or diffusers to soften the light and reduce shadows.
3. Experiment with different angles: Changing the angle from which you’re taking the photo can significantly affect lighting. Try shooting from different positions to see how the light falls on your subject and adjust accordingly.
4. Use the exposure setting: The iPhone camera allows you to manually adjust the exposure to brighten or darken your photos. Tap on the screen where your subject is and a yellow box will appear with a sun icon. Drag your finger up or down to adjust the exposure level to achieve the desired lighting.
5. Consider using artificial lighting: If natural light is not available or insufficient, you can experiment with artificial lighting sources. Use lamps, LED lights, or even the built-in flash on your iPhone to add more light to your photos. Be mindful of the intensity and direction of the artificial light to avoid creating harsh or unnatural lighting.
6. Edit your photos: After capturing the photo, you can further enhance the lighting using photo editing apps. Adjust brightness, contrast, and exposure levels to optimize the lighting in your images.
By following these tips, you can capture well-lit photos using your iPhone camera and showcase your subjects in the best possible light.
Question-answer:
How can I adjust the light on my iPhone camera?
You can adjust the light on your iPhone camera by tapping on the screen while in the camera app. This will bring up a small sun icon, which you can drag up or down to adjust the exposure.
What is the purpose of adjusting the light on the iPhone camera?
The purpose of adjusting the light on the iPhone camera is to ensure that your photos or videos are properly exposed. Adjusting the light can help to prevent overexposure or underexposure, resulting in better quality images.
Can I adjust the light on my iPhone camera for videos?
Yes, you can adjust the light on your iPhone camera for videos. Simply open the camera app and tap on the screen to bring up the sun icon. Then, drag it up or down to adjust the exposure for your videos.
Is there a manual option to adjust the light on the iPhone camera?
No, there is no manual option to adjust the light on the iPhone camera. However, you can use the sun icon on the screen to manually adjust the exposure by dragging it up or down.
Are there any third-party apps that can help adjust the light on the iPhone camera?
Yes, there are various third-party camera apps available on the App Store that provide additional features for adjusting the light on the iPhone camera. Some of these apps offer more advanced manual controls for adjusting exposure and other camera settings.


