
If you are new to photography or looking to upgrade your old camera, the Canon Mirrorless R Camera is a fantastic option to consider. Packed with innovative features and cutting-edge technology, this camera can help you take your photography skills to the next level.
Whether you are a professional photographer or an amateur enthusiast, learning how to use the Canon Mirrorless R Camera is essential to unlock its full potential. In this article, we will walk you through the basics of using this camera, from setting it up for the first time to capturing stunning photos.
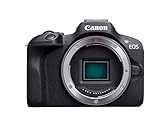
First and foremost, it is important to familiarize yourself with the physical aspects of the camera. The Canon Mirrorless R Camera features a sleek and compact design, making it easy to handle and carry around. It has a high-resolution electronic viewfinder that allows you to preview your shots in real-time, ensuring you capture the perfect image every time.
Once you have become comfortable with the camera’s physical features, the next step is to understand its menu system and settings. The Canon Mirrorless R Camera offers a wide range of shooting modes and customizable settings, allowing you to tailor the camera’s performance to your specific needs. Take some time to navigate through the menu and familiarize yourself with the various options available.
Now that you are acquainted with the camera’s physical aspects and settings, it’s time to start shooting. The Canon Mirrorless R Camera boasts exceptional autofocus capabilities and a wide range of lenses to choose from, ensuring sharp and detailed images. Experiment with different shooting modes, such as aperture priority or shutter priority, to understand how they affect the outcome of your photos.

In conclusion, the Canon Mirrorless R Camera is a powerful tool that can bring your photography to new heights. By taking the time to understand its physical aspects, menu system, and shooting modes, you can unleash its full potential and capture breathtaking images. So grab your camera, head outside, and start exploring all the amazing features that the Canon Mirrorless R Camera has to offer!
Benefits of Using Canon Mirrorless R Camera
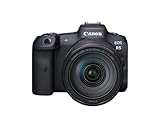
1. Superior Image Quality: The Canon Mirrorless R Camera is equipped with a high-resolution sensor and advanced image processing capabilities, allowing you to capture stunning photos with exceptional detail and clarity.
2. Compact and Lightweight: Compared to traditional DSLR cameras, the Canon Mirrorless R Camera is significantly smaller and lighter, making it more portable and easier to carry during long photography sessions or while traveling.
3. Versatility: The Canon Mirrorless R Camera supports a wide range of lenses, allowing you to choose the perfect lens for different types of photography, such as landscapes, portraits, or macro shots. This versatility allows you to capture a variety of subjects with ease.
4. Fast and Accurate Autofocus: The camera’s advanced autofocus system ensures quick and precise focusing, even in challenging lighting conditions. You can rely on the Canon Mirrorless R Camera to capture sharp and well-focused images every time.

5. Intuitive Touchscreen Interface: The Canon Mirrorless R Camera features a user-friendly touchscreen interface, which makes it easy to navigate through menus, adjust settings, and review your images. The touchscreen functionality adds convenience and improves the overall user experience.
6. Improved Battery Life: The Canon Mirrorless R Camera is designed to optimize power consumption, resulting in improved battery life. You can take more photos or record longer videos without worrying about running out of battery power.
7. Enhanced Connectivity Options: The camera is equipped with built-in Wi-Fi and Bluetooth capabilities, allowing you to transfer images wirelessly to your smartphone or tablet for quick sharing on social media or remote control of the camera using dedicated apps.
8. 4K Video Recording: The Canon Mirrorless R Camera supports 4K video recording, enabling you to capture stunning cinematic footage with exceptional detail and sharpness. Whether you are a professional videographer or a casual user, the camera’s 4K capabilities will enhance your video shooting experience.
9. Customization Options: The Canon Mirrorless R Camera offers a wide range of customizable features, allowing you to personalize the camera settings according to your preferences and shooting style. You can configure buttons, dials, and menus to suit your needs, providing a more tailored and efficient photography experience.
10. Future-Proof System: Canon continues to develop and release new lenses, accessories, and firmware updates for the Mirrorless R Camera system, ensuring that your camera remains up to date and compatible with the latest technologies and advancements in photography.
Overall, the Canon Mirrorless R Camera offers numerous benefits, including superior image quality, compactness, versatility, fast autofocus, intuitive interface, extended battery life, enhanced connectivity, 4K video recording capabilities, customization options, and future-proof functionality. Whether you are a professional photographer or an enthusiast, this camera is an excellent choice to take your photography to the next level.
Choosing the Right Lens for Canon Mirrorless R Camera
When it comes to choosing the right lens for your Canon Mirrorless R Camera, there are several factors to consider. The lens you choose can greatly impact the quality and versatility of your photographs, so it’s important to make an informed decision.
Focal Length: The focal length of a lens determines its angle of view and magnification. Canon offers a wide range of lenses with different focal lengths to suit various photography needs. Wide-angle lenses (less than 35mm) are ideal for landscapes and architecture, while telephoto lenses (greater than 70mm) are great for sports and wildlife photography.
Aperture: The aperture of a lens affects the amount of light that enters the camera and controls the depth of field. A lens with a wider maximum aperture (represented by a smaller f-number) allows more light to enter and creates a shallower depth of field, ideal for portraits and low-light situations.
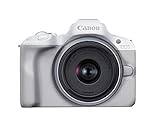
Image Stabilization: Image stabilization technology helps reduce camera shake and allows you to capture sharper images in challenging shooting conditions. Canon lenses are available with various types of image stabilization, including in-lens stabilization and in-camera stabilization, so choose according to your needs.
Compatibility: Ensure that the lens you choose is compatible with the Canon Mirrorless R Camera. Canon offers an extensive lineup of RF-mount lenses specifically designed for their mirrorless cameras, as well as adapters that allow you to use EF and EF-S lenses.
Budget: Lastly, consider your budget when choosing a lens. Canon lenses vary in price, and while high-end lenses may offer superior image quality, there are also budget-friendly options available that offer excellent performance for their cost.
By considering factors such as focal length, aperture, image stabilization, compatibility, and budget, you can choose the right lens for your Canon Mirrorless R Camera and enhance your photographic capabilities.
Tips for Properly Handling Canon Mirrorless R Camera
Canon mirrorless R cameras are known for their high-quality performance and advanced features. To ensure you get the best out of your camera, it is important to properly handle and care for it. Here are some tips to help you do just that:

1. Familiarize Yourself with the Camera: Take the time to read the user manual and understand the different controls and settings of your Canon mirrorless R camera. This will allow you to make the most out of its features and functionalities.
2. Use a Camera Strap: Canon mirrorless R cameras can be quite expensive, and dropping it can cause irreversible damage. Always use a camera strap to secure your camera around your neck or shoulder, especially when shooting in busy or crowded areas.
3. Clean the Camera Regularly: Dust and dirt can accumulate on the camera’s body and lenses, affecting image quality. Use a soft clean cloth or a camera-specific cleaning kit to clean the camera and lenses regularly. Be sure to follow the manufacturer’s instructions for cleaning to avoid any damage.
4. Handle the Camera with Care: Avoid rough handling and sudden movements when using your Canon mirrorless R camera. Be mindful of any shocks or impacts it may encounter to prevent damage and maintain its performance.
5. Protect the Camera from Extreme Conditions: Canon mirrorless R cameras are designed to work in a variety of conditions, but it is always best to protect them from extreme temperatures, humidity, and moisture. Use protective cases or bags when storing or traveling with your camera.

6. Use a Lens Cap and UV Filter: Always use a lens cap to protect the camera lens when not in use. Additionally, consider using a UV filter to provide an extra layer of protection against scratches, dust, and accidental damage to the lens.
7. Backup your Data: Regularly transfer your photos and videos to a computer or external storage device to ensure you have a backup in case of camera malfunctions or accidents. This will help you avoid losing precious memories.
8. Update Firmware: Check for firmware updates periodically on Canon’s official website. Updating the camera’s firmware can improve its performance and add new features.
By following these tips, you can ensure that your Canon mirrorless R camera remains in excellent condition and continues to deliver stunning images and videos for years to come.
Understanding the Shooting Modes of Canon Mirrorless R Camera
The Canon Mirrorless R camera offers a variety of shooting modes, allowing photographers to capture images in different situations. Understanding these shooting modes can help you achieve the best results with your camera.
- Program Mode: Program mode is an automatic mode that allows the camera to select the optimal settings for exposure, aperture, and shutter speed. It provides a good balance between control and convenience, making it a popular choice for beginners and casual photographers.
- Aperture Priority Mode: Aperture priority mode allows you to manually set the aperture value while the camera adjusts the other settings for proper exposure. This mode is useful when you want to control the depth of field, such as when shooting portraits or landscapes.
- Shutter Priority Mode: Shutter priority mode allows you to manually set the shutter speed while the camera adjusts the other settings for proper exposure. This mode is great for capturing fast-moving subjects, as it allows you to freeze the action or create motion blur.
- Manual Mode: Manual mode provides full control over all exposure settings, including aperture, shutter speed, and ISO. This mode is ideal for experienced photographers who want complete control over their images.
- Scene Intelligent Auto Mode: Scene Intelligent Auto mode is an automatic mode that analyzes the scene and selects the best settings for optimal results. It is a great choice for beginners who want to let the camera do all the work.
- Special Scene Modes: The Canon Mirrorless R camera also offers various special scene modes that are tailored for specific shooting conditions, such as portrait, landscape, sports, and night mode. These modes optimize the camera settings to produce the best results in those particular situations.
By understanding and utilizing the different shooting modes of the Canon Mirrorless R camera, you can enhance your photography skills and capture stunning images in any situation. Experiment with these modes to discover the best settings for your specific needs and creative vision.
Mastering the Exposure Settings on Canon Mirrorless R Camera
Understanding and controlling exposure is essential for capturing the perfect shot with your Canon Mirrorless R Camera. The exposure settings allow you to adjust the brightness, darkness, and overall tone of your image. To help you master these settings, we’ve provided an overview of the exposure settings and how to use them effectively.
1. ISO: The ISO setting controls the sensitivity of your camera’s image sensor to light. A lower ISO value (e.g., 100) is ideal for well-lit environments, while a higher ISO value (e.g., 1600) is suitable for low-light conditions. Keep in mind that higher ISO settings may introduce noise or graininess to your images.
2. Shutter Speed: The shutter speed determines how long the camera’s shutter remains open to capture light. A faster shutter speed (e.g., 1/1000) freezes motion and is suitable for sports or action photography. A slower shutter speed (e.g., 1/30 or longer) allows more light to enter the sensor and is ideal for low-light situations or capturing motion blur.
3. Aperture: The aperture is the opening in the lens that controls the amount of light entering the camera. It is measured in f-stops. A lower f-stop (e.g., f/2.8) results in a larger aperture and shallow depth of field, ideal for portraits or subject isolation. A higher f-stop (e.g., f/11) results in a smaller aperture and greater depth of field, suitable for landscape or group photos.
4. Exposure Compensation: Exposure compensation allows you to adjust the brightness or darkness of your image. It is particularly useful in challenging lighting situations where the camera’s automatic exposure may not produce the desired results. Use positive values (+1, +2) to brighten the image and negative values (-1, -2) to darken it.
5. Metering Modes: The metering mode determines how the camera measures the light in a scene to calculate the exposure. Canon Mirrorless R Camera offers various metering modes, including evaluative metering, partial metering, and spot metering. Experiment with different metering modes to achieve accurate exposures in different lighting conditions.
| Setting | Recommended Use |
|---|---|
| ISO | Adjust according to the lighting conditions |
| Shutter Speed | Use faster shutter speed to freeze motion, slower shutter speed for low light or creative effects |
| Aperture | Choose based on desired depth of field |
| Exposure Compensation | Use when automatic exposure doesn’t produce desired results |
| Metering Modes | Experiment and choose based on scene and lighting |
By mastering the exposure settings on your Canon Mirrorless R Camera, you can take full control of your images and achieve the desired results in various lighting conditions. Practice and experiment with different settings to develop your own unique style and capture stunning photographs.
Optimizing Autofocus on Canon Mirrorless R Camera
When using the Canon Mirrorless R Camera, optimizing the autofocus settings is key to capturing crisp and sharp images. Here are some tips to help you get the most out of the autofocus capabilities of your camera.
1. Select the Right Autofocus Mode:
The Canon Mirrorless R Camera offers several autofocus modes, including Single AF, Continuous AF, and Manual AF. Single AF is ideal for still subjects, as it will lock focus once you press the shutter button halfway. Continuous AF is better suited for moving subjects, as it will continuously adjust focus as the subject moves. Manual AF gives you full control over focus and is useful when shooting in challenging lighting conditions or when using manual focus lenses.
2. Customize Autofocus Tracking Sensitivity:
The Mirrorless R Camera allows you to customize the autofocus tracking sensitivity to match your shooting style and subject. You can adjust the sensitivity to prioritize either speed or stability, depending on your needs. Experiment with different settings to find the one that works best for you.
3. Utilize Face and Eye Detection:
If you’re shooting portraits, take advantage of the camera’s face and eye detection feature. This feature allows the camera to detect and track faces and eyes, ensuring that your subjects are in focus. To enable this feature, go to the autofocus settings and activate face and eye detection. The camera will then prioritize focusing on the detected faces and eyes.
4. Use the Center AF Point for Precision:
The center autofocus point is often the most accurate and sensitive. When shooting a static subject, consider using the center AF point and recomposing the shot after focusing. This will help ensure precise focus on your intended subject.
5. Take Advantage of AF-Assist Beam:
In low light conditions, the AF-assist beam can help the camera achieve accurate focus. When enabled, the beam emits a burst of light to illuminate the subject, allowing the camera to focus effectively. Keep in mind that the AF-assist beam might not work with certain lenses or in specific shooting modes, so consult your camera’s manual for more information.
6. Consider Using Back Button Focus:
Back button focus is a technique that separates the autofocus function from the shutter button. By assigning autofocus to a separate button on the back of the camera, you gain more control over focusing and can react quickly to changing conditions. This technique is especially useful in dynamic shooting situations or when shooting subjects that are constantly moving.
By following these tips and experimenting with different autofocus settings, you can optimize the autofocus performance of your Canon Mirrorless R Camera and capture stunning, in-focus images every time.
Utilizing Built-in Wi-Fi and Bluetooth Features on Canon Mirrorless R Camera
The Canon Mirrorless R Camera is equipped with built-in Wi-Fi and Bluetooth capabilities, allowing you to easily connect and share your images wirelessly with compatible devices.
Here are some steps to help you navigate and utilize the built-in Wi-Fi and Bluetooth features:
- First, ensure that both your camera and the device you want to connect to are compatible with the Canon Camera Connect app. This app allows you to control your camera remotely and transfer images wirelessly.
- On your camera, go to the settings menu and select the Wi-Fi or Bluetooth option.
- Turn on Wi-Fi or Bluetooth on your camera, and enable the connection.
- On your compatible device, download and install the Canon Camera Connect app from the App Store or Google Play Store.
- Open the app and follow the on-screen instructions to connect your device to your camera.
- Once connected, you can use the Canon Camera Connect app to control your camera remotely, adjust settings, and capture images.
- You can also transfer images and videos wirelessly from your camera to your device, making it easy to share them on social media or edit them using your favorite apps.
- Furthermore, the Canon Camera Connect app allows you to geotag your images by using the GPS capabilities of your device. This feature is especially useful for travel photography.
By utilizing the built-in Wi-Fi and Bluetooth features on your Canon Mirrorless R Camera, you can enhance your photography experience by easily connecting and sharing your images wirelessly. Whether you want to control your camera remotely or transfer images to your device, the Canon Camera Connect app provides a convenient and efficient solution.
Editing and Sharing Photos Captured with Canon Mirrorless R Camera
After capturing stunning photos with your Canon Mirrorless R Camera, it’s time to edit and share them with the world. With various software options and online platforms, you can enhance your images and showcase your creativity. Here are a few steps to help you get started:
|
Step 1: Importing Your Photos Connect your camera to your computer using a USB cable or remove the SD card and insert it into your computer’s card reader. Open the photo editing software of your choice and import the photos from your camera or SD card. |
|
Step 2: Enhancing Colors and Exposure After importing your photos, you can begin editing them. Adjust the exposure, brightness, contrast, and saturation to ensure that the colors in your images pop. Experiment with different settings to achieve the desired look. |
|
Step 3: Cropping and Straightening If necessary, crop or straighten your photos to remove distractions or correct any tilted horizons. This will give your images a polished and professional appearance. |
|
Step 4: Applying Filters and Effects Add filters or effects to your photos to enhance their mood or create a specific style. Experiment with black and white, vintage, or creative filters to add a unique touch to your images. |
|
Step 5: Saving and Exporting Once you are satisfied with your edits, save your photos in a high-quality format. JPEG is a popular choice for sharing online, while TIFF or RAW formats are ideal for printing. Export your images to a folder or directly share them on social media platforms. |
|
Step 6: Showcasing Your Work Share your edited photos with the world. Create an online portfolio, join photography communities, or participate in competitions to gain exposure and connect with fellow photographers. |
Remember, editing is a subjective process, so feel free to experiment and develop your own editing style. The Canon Mirrorless R Camera offers tremendous image quality and flexibility, allowing you to capture unforgettable moments and transform them into works of art.
Troubleshooting Common Issues with Canon Mirrorless R Camera
If you are experiencing difficulties with your Canon Mirrorless R Camera, here are some common issues and troubleshooting steps that can help resolve them:
Camera Does Not Turn On
- Make sure the battery is inserted correctly and fully charged.
- Check if the battery compartment is clean and free from any debris.
- Try using a different battery to see if the issue is with the battery itself.
- If none of the above steps work, contact Canon customer support for further assistance.
Blurred or Out of Focus Images
- Ensure that the lens is properly attached to the camera.
- Check if the auto-focus is turned on and the camera settings are appropriate for the shooting conditions.
- Clean the lens and camera sensor to remove any dust or smudges that may affect the image quality.
- If the issue persists, try using a different lens to determine if it is a lens-specific problem.
- Consider sending your camera and lens to a professional for calibration if needed.
Overheating
- Avoid using the camera in hot environments or direct sunlight for extended periods.
- Turn the camera off when not in use to prevent overheating.
- Remove any accessories or attachments that may contribute to the heat build-up.
- If the camera becomes too hot, allow it to cool down before using it again.
Memory Card Errors
- Check if the memory card is properly inserted into the camera.
- Format the memory card using the camera’s formatting function.
- Try using a different memory card to see if the issue is with the card itself.
- Make sure the memory card is compatible with your camera model.
- Contact the memory card manufacturer for further assistance if necessary.
If you have tried these troubleshooting steps and are still experiencing issues with your Canon Mirrorless R Camera, it may be necessary to seek professional repair or contact Canon customer support for additional help.
FAQ
What are the benefits of using a Canon mirrorless R camera?
Using a Canon mirrorless R camera has several benefits. Firstly, mirrorless cameras are generally lighter and more compact than DSLR cameras, making them easier to carry around. Additionally, the lack of a mirror mechanism allows for faster continuous shooting speeds and silent shooting. Canon mirrorless R cameras also come with advanced autofocus systems and electronic viewfinders that provide a real-time preview of the image, making it easier to compose shots.
How do I set up my Canon mirrorless R camera?
Setting up your Canon mirrorless R camera is a relatively straightforward process. First, insert a fully charged battery and a memory card into the respective slots. Next, attach the desired lens to the camera body by aligning the red dot on the lens with the red dot on the camera mount and twisting it clockwise. Turn on the camera by pressing the power button, and you are ready to start shooting. However, it is recommended to consult the camera’s manual for specific instructions and settings.
What types of lenses are compatible with Canon mirrorless R cameras?
Canon mirrorless R cameras use the RF lens mount, which requires RF lenses. However, Canon offers compatibility with EF and EF-S lenses through the use of a lens adapter. The adapter maintains full functionality and allows EF and EF-S lenses to be mounted and used on Canon mirrorless R cameras. It is worth noting that while EF lenses can be used with full autofocus and image stabilization capabilities, EF-S lenses will have a cropped field of view due to the difference in sensor size.
How do I transfer photos from my Canon mirrorless R camera to a computer?
To transfer photos from your Canon mirrorless R camera to a computer, you have a few options. Firstly, you can connect the camera to the computer using a USB cable and then use Canon’s EOS Utility software to download the images. Alternatively, you can remove the memory card from the camera and insert it into a card reader connected to the computer. From there, you can copy the images directly from the memory card onto the computer’s hard drive.
What are some recommended settings for shooting with a Canon mirrorless R camera?
Recommended settings may vary depending on the specific shooting situation, but here are some general tips. For autofocus, you can set it to “One Shot” for static subjects and “Servo AF” for moving subjects. Use the appropriate metering mode (evaluative, partial, spot) based on the lighting conditions and desired exposure. Set the desired white balance (auto, daylight, etc.) to achieve accurate color reproduction. Additionally, consider shooting in RAW format for more flexibility in post-processing. Experiment and adjust the settings to suit your shooting style and preferences.


