Analog HD security cameras are a popular choice for home and business surveillance systems. They provide high-quality video footage and are easy to install and operate. One of the main advantages of analog HD cameras is that they can be easily connected to a TV, allowing you to monitor the live feed or review recorded footage on a larger screen.
In this article, we will guide you through the process of connecting an analog HD security camera to a TV. Whether you want to keep an eye on your property, deter potential intruders, or simply have peace of mind, this step-by-step guide will help you set up your surveillance system with ease.
Before we start, make sure you have the necessary equipment:
- An analog HD security camera
- A compatible coaxial cable
- A TV with an available HDMI or VGA input
- An HDMI or VGA cable (depending on the type of input on your TV)
Now that you have all the required equipment, let’s move on to the connection process.
Step 1: Mount the camera
Choose a suitable location to mount the camera. Make sure it provides a clear view of the area you want to monitor. Drill holes if necessary and securely attach the camera in place.
Step 2: Connect the camera to the DVR
Connect one end of the coaxial cable to the camera’s BNC output and the other end to the DVR’s BNC input. Ensure a tight and secure connection.
Step 3: Connect the DVR to the TV
If your TV has an HDMI input, connect one end of the HDMI cable to the DVR’s HDMI output and the other end to the TV’s HDMI input. If your TV has a VGA input, use the VGA cable instead. Ensure a firm connection.

Step 4: Power up the system
Plug in the power adapters for both the camera and the DVR. Make sure they are properly connected to an electrical outlet. Wait for the devices to power up and establish a connection.
Step 5: Select the input source on your TV
Using your TV’s remote control, select the appropriate input source (HDMI or VGA) that corresponds to the connection you made in Step 3.
Step 6: Adjust the settings

Use the DVR’s remote control to navigate through the settings menu and adjust any necessary camera or recording settings. Consult the user manual for detailed instructions.
Step 7: Enjoy the live feed or review recorded footage
You’re all set! Sit back, relax, and enjoy monitoring your property on the big screen. Use the DVR’s interface to access the live feed or review recorded footage as needed.
Remember to keep your surveillance system properly maintained and regularly check for any potential issues. With this simple setup guide, you can now connect an analog HD security camera to a TV and enhance the security of your home or business.
Connecting Analog HD Security Camera to TV
If you have an analog HD security camera and want to connect it to your TV to view the footage, you can do so by following a few simple steps. This process will allow you to monitor your camera’s feed directly on your TV screen in real-time.

Here’s how you can hook up your analog HD security camera to your TV:
- First, make sure that your TV has the necessary ports for connecting the security camera. Most modern TVs have HDMI, VGA, or composite AV ports.
- Locate the output port on your analog HD security camera. It may have HDMI, BNC, or RCA connectors.
- Choose the appropriate cable or adapter to connect the camera’s output port to your TV’s input port. For HDMI, use an HDMI cable. For VGA, use a VGA cable. For composite AV, use an RCA or BNC cable.
- Connect one end of the cable to the camera’s output port and the other end to the corresponding input port on your TV.
- Turn on your TV and select the input source that matches the port you connected the camera to (e.g., HDMI 1, VGA, AV).
- Once connected, you should see the camera’s feed on your TV screen. You can now monitor the area covered by the security camera directly on your TV.
It’s important to note that the steps may vary depending on the specific models of your security camera and TV. Refer to the user manuals of both devices for detailed instructions on how to connect them.
By connecting your analog HD security camera to your TV, you can conveniently monitor the camera’s feed without the need for a separate monitor or a computer. This setup is especially helpful if you want to view the footage on a larger screen and in real-time.
Choosing the Right Camera
When it comes to hooking up an analog HD security camera to your TV, it is important to choose the right camera for your specific needs. There are a few factors to consider to ensure that you are getting the best camera for your setup.
Resolution
The resolution of the camera is a crucial factor to consider. Higher resolution cameras will provide clearer and more detailed images, making it easier to identify objects and individuals in the footage. Look for cameras with at least 1080p resolution for optimal results.

Field of View
The field of view offered by the camera is another important consideration. It determines how much area the camera can capture and monitor. A wider field of view is beneficial when you need to cover a larger area or multiple angles. Consider the specific area you want to monitor and choose a camera with an appropriate field of view.
Weather Resistance
If you plan to install the camera outdoors, it is important to choose a camera that is weather-resistant. Look for cameras with an IP rating, which indicates their level of protection against dust and water. This will ensure that your camera can withstand the elements and continue to provide reliable surveillance in any weather conditions.
These are just a few factors to consider when choosing the right camera for hooking up an analog HD security camera to your TV. By taking these factors into account, you can ensure that you select a camera that meets your specific requirements and provides the best possible surveillance footage.
Understanding Analog HD System
Analog HD system refers to the technology used in analog high-definition (HD) security cameras. These cameras capture video footage in higher resolution compared to standard analog cameras, providing clearer and more detailed images.
The analog HD system includes various components that work together to ensure seamless monitoring and recording of video footage:

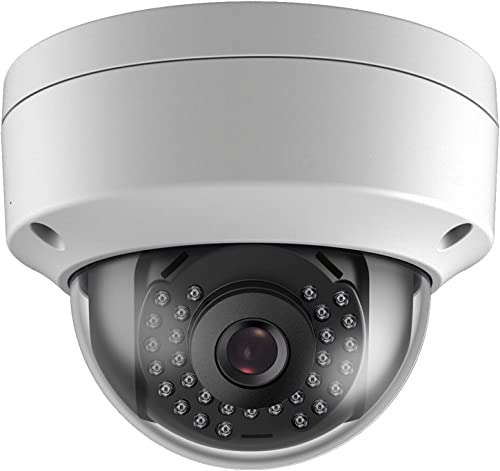
1. Analog HD Camera:
Analog HD cameras are the primary component of the system. They are designed to capture video in high definition, usually at resolutions of 720p or 1080p. These cameras use coaxial cables to transmit video signals to the recording device.
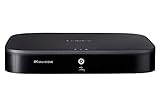
2. Digital Video Recorder (DVR):
The DVR acts as the central hub for the analog HD system. It receives the video signals from the cameras and processes them for storage and live viewing. The DVR also provides various features, such as motion detection, remote access, and video playback.
3. Coaxial Cable:

Coaxial cables are used to transmit video signals from the analog HD cameras to the DVR. These cables provide a reliable and long-distance transmission, ensuring that the video quality remains intact. The coaxial cables also carry power to the cameras, eliminating the need for separate power cables.
4. Power Supply:
The analog HD system requires a power supply to provide electricity to the cameras and DVR. This power supply can be either a separate adapter for each camera or a centralized power distribution system.
Overall, understanding the analog HD system is crucial for successfully hooking up an analog HD security camera to a TV. By ensuring proper installation and configuration of the components, users can enjoy high-quality video surveillance and enhance their security measures.
Gathering the Necessary Equipment
Before hooking up your analog HD security camera to your TV, you will need to gather a few essential pieces of equipment. Here is a list of what you will need:
Analog HD Security Camera: Make sure you have an analog HD security camera that is compatible with your TV. Check the camera’s specifications to ensure it has the necessary outputs.
RCA Cable: You will need an RCA cable to connect your security camera to your TV. This cable has three plugs: red, white, and yellow. Make sure the cable is long enough to reach from your camera to your TV.
Power Adapter: Most analog HD security cameras require a power source to function. Make sure you have a power adapter that is compatible with your camera. Plug it into an electrical outlet near your TV.
TV with RCA Input: Check if your TV has an RCA input. It is usually located on the back or side of the TV and labeled “AV In” or “Video In.” You will need this input to connect your security camera.
Dedicated Power Supply: In some cases, you may need a separate power supply for your camera. Check the camera’s specifications to see if it requires a dedicated power supply.
Once you have gathered all the necessary equipment, you will be ready to connect your analog HD security camera to your TV and begin monitoring your surroundings.
Connecting Camera to TV
Connecting your analog HD security camera to your TV is a straightforward process that requires a few simple steps. By following these instructions, you will be able to view the feed from your camera on your TV screen.
Step 1: Check Camera Compatibility
Before you begin, make sure that your analog HD security camera is compatible with your TV. Check the camera’s specifications or user manual for details on the supported TV connections. Most cameras support HDMI or AV connections, which are commonly found on modern TVs.
Step 2: Gather Necessary Cables
Depending on the camera and TV models, you may need different cables to establish a connection. The most common cables used for this purpose are HDMI and AV cables. Ensure that you have the appropriate cables on hand before proceeding.
Step 3: Connect Camera to TV
Once you have the necessary cables, connect one end of the cable to the camera’s output port and the other end to the corresponding input port on your TV. For HDMI connection, simply insert the HDMI cable into the camera’s HDMI output and the HDMI input on your TV. For AV connection, plug the AV cables into the camera’s AV output and connect the other end to the AV input on your TV.
Ensure that the cables are securely connected to both the camera and the TV to avoid any loose connections.
Step 4: Power on the Camera and TV
After making the physical connections, power on both the camera and the TV. Depending on your camera model and TV settings, you may need to switch the input source on your TV to the corresponding HDMI or AV input. Consult your TV’s user manual if you are unsure how to change the input source.
Step 5: Adjust Camera Settings
Once the camera is connected and the TV is displaying the camera feed, you may need to adjust some camera settings. Refer to the camera’s user manual for instructions on configuring the display settings, such as resolution or aspect ratio, to ensure the best viewing experience on your TV.
And that’s it! By following these steps, you can easily hook up your analog HD security camera to your TV and enjoy monitoring your property or keeping an eye on your surroundings.
Adjusting Camera Settings
Once you have successfully connected your analog HD security camera to your TV, you may want to adjust the camera settings to optimize the image for your viewing needs. Most analog HD security cameras come with a built-in OSD (On-Screen Display) menu that allows you to control various settings such as brightness, contrast, color, and resolution.
To access the OSD menu and adjust the camera settings, follow these steps:
| Step 1: | Using your TV’s remote control, navigate to the “Menu” or “Settings” option. |
| Step 2: | Scroll down or across the menu options until you find the “Camera” or “Video” settings. |
| Step 3: | Select the camera input or channel that corresponds to the analog HD security camera you have connected to your TV. |
| Step 4: | Once you have selected the camera input, you should see the OSD menu options on the screen. Use the arrow keys or navigation buttons on your TV’s remote control to navigate through the menu options. |
| Step 5: | Find the settings that allow you to adjust the brightness, contrast, color, and resolution of the camera. Each camera may have different terminology or menu options, so refer to the user manual of your specific camera model for accurate instructions. |
| Step 6: | Make adjustments to the settings based on your preferences. It is recommended to start with the default settings and make small changes to avoid over- or under-exposing the image. |
| Step 7: | Once you have made the necessary adjustments, save the settings and exit the OSD menu. |
By adjusting the camera settings, you can ensure that the image captured by the analog HD security camera is clear, sharp, and accurately represents the scene you are monitoring.
Troubleshooting Tips
If you are experiencing any issues while hooking up your analog HD security camera to your TV, here are some troubleshooting tips to help you resolve them:
1. Check the connections:
- Ensure that the camera is properly connected to the TV using the appropriate cables, such as HDMI or RCA.
- Make sure that all the cable connections are tight and secure.
- Verify that the cables are not damaged or frayed.
2. Confirm power supply:
- Check if the camera is receiving power by checking the power cable connection.
- Ensure that the power source for the camera is functioning correctly.
- If using batteries, make sure they are not drained and are properly inserted.
3. Adjust TV input:
- Ensure that your TV is set to the correct input source to display the camera feed.
- Press the “Input” or “Source” button on your TV remote to cycle through the available input options.
- Refer to your TV’s user manual for instructions on selecting the correct input source.
4. Check camera settings:
- Verify that the camera is set to output the video in a compatible format with your TV.
- Access the camera’s settings menu and adjust the output resolution, if necessary.
- Refer to the camera’s user manual for instructions on changing the output settings.
5. Test with a different TV or camera:
- Try connecting the camera to a different TV to see if the issue persists.
- If possible, test a different camera with your TV to determine if the problem lies with the camera or the TV.
- This will help you identify whether the fault is with the camera or the TV.
If none of the troubleshooting steps above resolve your issue, it may be best to consult the user manuals for both your camera and TV or contact the manufacturers for further assistance.
Enhancing Security with Analog HD Cameras
Installing analog HD cameras is a great way to enhance your security system. These cameras offer high-definition monitoring, providing crystal clear images and videos of your premises. With their advanced features and ease of installation, analog HD cameras have become a preferred choice for many homeowners and businesses.
Benefits of Analog HD Cameras
1. High Resolution: Analog HD cameras capture videos in high resolution, ensuring that every detail is visible. This allows for better identification of people or objects, aiding in investigations if an incident occurs.
2. Wide Coverage: These cameras offer a wide viewing angle, covering a larger area compared to traditional cameras. This allows for a comprehensive surveillance of your premises, reducing blind spots and increasing security coverage.
3. Night Vision: Analog HD cameras are equipped with infrared LEDs, enabling clear monitoring even in low-light or no-light conditions. This makes them ideal for use both during the day and night, ensuring round-the-clock protection.
4. Easy Installation: Analog HD cameras are designed for easy installation, making them suitable for DIY enthusiasts. They can be simply connected to a compatible recording device or monitor, eliminating the need for complex wiring or professional assistance.
Tips to Maximize Security with Analog HD Cameras
1. Strategic Placement: To maximize the effectiveness of your analog HD cameras, ensure they are strategically placed to cover all potential entry points and high-risk areas. This includes entrances, driveways, backyards, and areas with valuable assets.
2. Regular Maintenance: Regularly clean the lenses of your analog HD cameras to ensure clear images and videos. Additionally, check the camera’s positioning and adjust if needed to maintain optimal coverage.
3. Remote Viewing: Take advantage of the remote viewing capabilities of analog HD cameras. Many models offer mobile apps or software that allow you to access the camera feed from anywhere, providing real-time monitoring and peace of mind.
4. Backup Storage: Invest in a reliable backup storage solution to store the footage captured by your analog HD cameras. This will help in preserving the evidence in case of an incident and ensure that no crucial footage is lost.
In conclusion, analog HD cameras offer a significant enhancement to your security system. With their high resolution, wide coverage, night vision, and ease of installation, they provide comprehensive surveillance and peace of mind. By strategically placing the cameras, maintaining them regularly, utilizing remote viewing, and implementing backup storage, you can maximize the effectiveness of these cameras and ensure the highest level of security for your premises.
FAQ,
Can I connect an analog HD security camera to my TV?
Yes, you can connect an analog HD security camera to your TV. You will need a BNC to RCA adapter to connect the camera’s BNC video output to the RCA video input on your TV.
What cables do I need to connect an analog HD security camera to my TV?
To connect an analog HD security camera to your TV, you will need a BNC cable to transmit the video signal from the camera to your TV, and an RCA cable to connect the video output on your TV.
Do I need any special equipment to connect an analog HD security camera to my TV?
You will need a BNC to RCA adapter to connect the camera’s BNC video output to the RCA video input on your TV. Additionally, you may need a power supply for the camera if it does not receive power through the same cable used for the video signal.
Can I use an HDMI cable to connect an analog HD security camera to my TV?
No, you cannot use an HDMI cable to connect an analog HD security camera to your TV. HDMI is a digital signal, while analog HD cameras use a BNC connection for video output.
What is the advantage of connecting an analog HD security camera to my TV?
Connecting an analog HD security camera to your TV allows you to view the camera’s video feed directly on the TV screen, providing a larger, more detailed display compared to viewing on a computer or mobile device.


