
Installing a security camera is a smart move to ensure the safety and protection of your property. Swann security cameras are known for their reliability and high-quality performance. However, simply installing a security camera is not enough. To maximize its effectiveness, you need to adjust it properly to get the best possible video coverage and ensure that it captures the necessary footage.
Adjusting a Swann security camera involves several important steps. First, you need to determine the ideal position for your camera. This usually means finding an area that provides a clear view of the area you want to monitor, while also avoiding obstacles such as trees or buildings that may obstruct the view. Once you have identified the ideal location, you can proceed to mount the camera securely.
After mounting the camera, it’s time to adjust the camera angle. This is crucial to ensure that the camera captures the desired view and records the necessary details. You can adjust the camera angle by loosening the mounting bracket and tilting it up or down. It’s important to remember that the camera angle should be set to capture the desired area without any blind spots.
Additionally, it’s recommended to adjust the camera’s focus to enhance image clarity. Swann security cameras usually come with a manual focus feature, allowing you to adjust the focus manually. To do this, simply rotate the lens until the image becomes clear and sharp. It’s advisable to test the focus by reviewing the recorded footage to ensure that it meets your expectations.
By following these steps, you can effectively adjust your Swann security camera and optimize its performance. Remember to periodically check and readjust the camera if necessary to ensure that it continues to provide optimal video coverage and fulfill its purpose of safeguarding your property.

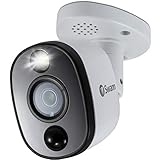
What is Swann security camera?
Swann security cameras are a popular choice for home and business security. They are designed to provide round-the-clock surveillance and keep your property safe.
Swann offers a wide range of security cameras that are suitable for both indoor and outdoor use. These cameras are equipped with high-definition video capabilities, allowing you to capture clear and detailed footage.
Swann security cameras come with various features, such as night vision, motion detection, and two-way audio. This allows you to monitor your property even in low-light conditions and communicate with individuals near the camera.
Swann security cameras are easy to install and can be connected to your smartphone or computer, allowing you to access the live feed from anywhere at any time. You can also set up alerts and notifications to receive updates when motion is detected.
Whether you want to monitor your home, office, or any other property, Swann security cameras offer a reliable and efficient solution for your security needs.

Why adjust Swann security camera?
Adjusting your Swann security camera is essential for ensuring optimal performance and maximizing the effectiveness of your surveillance system. By properly adjusting your camera, you can:
- Enhance the viewing angle: Adjusting the camera’s position allows you to cover a wider area, reducing blind spots and improving overall coverage.
- Improve image quality: Proper camera adjustment helps to eliminate issues such as glare, washed-out images, or overly dark areas, resulting in clearer and more accurate video recordings.
- Optimize detection capabilities: Adjusting the camera’s angle and sensitivity settings can enhance its ability to detect and capture motion accurately, reducing false alarms and ensuring that important events are captured.
- Minimize obstructions: By adjusting the camera’s position, you can avoid any physical obstructions such as trees, walls, or other objects that may obstruct the camera’s field of view.
- Ensure privacy and security: Adjusting the camera’s position and angle helps to prevent capturing unintended areas, such as neighboring properties or private spaces, ensuring privacy and maintaining compliance with legal requirements.
Overall, adjusting your Swann security camera is vital for optimizing its performance and ensuring that you have a reliable and effective surveillance system in place.
Adjusting Swann Security Camera
Swann security camera is a popular choice for many homeowners and businesses. It provides peace of mind by offering surveillance and monitoring capabilities. However, it’s important to properly adjust the camera to ensure optimal performance. Here are some steps to help you adjust your Swann security camera.
1. Positioning
Start by determining the best location for your Swann security camera. Consider the area you want to monitor and any potential obstructions, such as trees or walls. Mount the camera in a position that provides a clear view of the targeted area. The camera should be installed at a height and angle that covers the desired field of vision and minimizes blind spots.
2. Angle Adjustment
Once you have positioned the camera, you may need to adjust the angle. Swann security cameras usually offer flexibility in adjusting the camera angle. Use the camera’s mounting bracket or swivel mechanism to fine-tune the angle. This will allow you to capture the desired view and ensure the camera is not pointing too high or too low.
3. Focus Adjustment
To adjust the focus of your Swann security camera, start by accessing the camera’s settings or control panel. Look for the focus adjustment option and follow the on-screen instructions. Use the controls to achieve a clear and sharp image. It may take some trial and error to find the ideal focus setting, so make sure to test the image quality after each adjustment.
4. Lighting
Consider the lighting conditions in the area where the Swann security camera is installed. If the camera has infrared capabilities, ensure that there is enough lighting for the camera to capture clear images in low-light conditions. Adjust the camera’s sensitivity to motion and light to customize its performance according to your specific needs.
| Troubleshooting Tip: |
|---|
| If you are having difficulties adjusting your Swann security camera, refer to the camera’s user manual or contact Swann’s technical support for assistance. They will be able to provide further guidance and troubleshooting tips specific to your camera model. |
By following these steps, you can ensure that your Swann security camera is properly adjusted for the best possible performance. Remember to regularly check and maintain your camera to keep it in optimal working condition.
Step 1: Mounting the camera
Properly mounting your Swann security camera is an essential step in ensuring optimal surveillance coverage. Follow these steps to mount your camera:
-
Select the desired location
Choose a location for your camera that provides the best view of the area you want to monitor. Consider factors such as potential obstacles and the camera’s viewing angle.
-
Prepare the mounting surface
Ensure that the mounting surface is clean, level, and sturdy enough to support the weight of the camera. Use a stud finder if necessary to locate a suitable mounting point.
-
Mark the mounting holes
Hold the camera mounting bracket against the chosen surface and mark the locations for the mounting holes using a pencil or marker.
-
Drill pilot holes
Using an appropriate drill bit, carefully drill pilot holes at the marked locations. Be sure to choose a drill bit size that matches the type of screws or anchors you will be using.
-
Attach the mounting bracket
Align the mounting bracket with the pilot holes and secure it to the wall using screws or anchors. Ensure that the bracket is securely attached and level.
-
Mount the camera
Attach the camera to the mounting bracket using the provided hardware. Make sure the camera is positioned correctly and tightened securely.
By following these steps, you will have successfully mounted your Swann security camera and can proceed with the further adjustments and setup.

Step 2: Positioning the camera
Once you have installed the Swann security camera, the next step is to position it in the desired area. Proper positioning is crucial to ensure optimal surveillance coverage. Follow these steps to position your Swann security camera:
- Choose the location: Identify the areas that require monitoring and select appropriate locations for the camera installation. Consider factors such as visibility, accessibility, and proximity to power sources or networking equipment.
- Mount the camera: Use the mounting brackets and screws provided with your Swann security camera to securely attach it to the chosen location. Ensure that it is mounted at a proper height and angle for maximum coverage.
- Adjust the viewing angle: Swann security cameras generally offer adjustable viewing angles. Use the provided tools or knobs on the camera to adjust the angle and direction of the lens. This will help you achieve the desired field of view.
- Test the camera’s view: Before finalizing the positioning, check the camera’s view on the connected monitor or mobile device. Make any necessary adjustments to ensure that the camera captures the desired area without any obstructions or blind spots.
By carefully positioning your Swann security camera, you can ensure that it effectively monitors your desired areas and provides clear footage for your security needs.
Step 3: Adjusting the angle
Once you have installed your Swann security camera, it is important to adjust the angle to ensure you have the best view of the area you want to monitor. Follow these steps to adjust the angle:
- Locate the adjustment screws on the camera’s mounting bracket. These screws are used to tilt and rotate the camera.
- Loosen the screws by turning them counterclockwise.
- Hold the camera and adjust its position by tilting it up, down, left, or right, depending on your preference.
- Tighten the adjustment screws by turning them clockwise to secure the camera in place.
- Double-check the camera’s angle and adjust it further if necessary. Make sure the camera is pointing at the desired area and there are no obstacles blocking the view.
- Use the live view feature on your Swann security system’s monitor or mobile app to verify that the camera is capturing the desired area effectively.
Remember that proper adjustment of the camera’s angle is crucial to ensure effective surveillance and maximize its coverage. It is recommended to perform regular checks on the camera’s angle and adjust it as needed to maintain optimal security monitoring performance.
Troubleshooting
If you’re experiencing issues with your Swann security camera, try the following troubleshooting steps to resolve the problem:

1. Check the power source: Ensure that the camera is properly connected to a power source and that the outlet or power supply is working. Try plugging the camera into a different outlet or using a different power supply.
2. Verify the camera connections: Make sure that all the cables and connections between the camera and the recorder are securely plugged in. Check for any loose or damaged cables and replace them if necessary.
3. Reset the camera: If you’re still experiencing issues, try resetting the camera to its default settings. This can usually be done by pressing and holding the reset button on the camera for a few seconds. Refer to the camera’s manual for specific instructions.
4. Check the camera’s settings: Ensure that the camera’s settings are properly configured. Check the camera’s resolution, frame rate, and other settings to ensure they match your requirements. Make sure that any motion detection or recording settings are enabled if desired.
5. Clean the camera lens: If the image quality is poor or blurry, clean the camera lens with a soft cloth. Dust, dirt, or smudges on the lens can affect the image quality.

6. Test the camera with a different device: To determine if the issue is with the camera or the monitoring device, connect the camera to a different device, such as a smartphone or computer, and test if it functions correctly.
7. Contact Swann support: If none of the above steps resolve the issue, contact Swann’s customer support for further assistance. Provide them with the details of the problem and any troubleshooting steps you’ve already taken.
By following these troubleshooting steps, you should be able to resolve most common issues with your Swann security camera and ensure that it functions properly.
Problem 1: Blurry or distorted image
If you are experiencing a blurry or distorted image on your Swann security camera, there could be several reasons for this issue. Follow the steps below to troubleshoot and resolve the problem:
Step 1: Clean the camera lens
The first thing you should do is clean the camera lens. Dust, dirt, or smudges on the lens can cause blurriness or distortion in the image. Gently wipe the lens with a soft, lint-free cloth to remove any debris. Make sure you don’t press too hard to avoid scratching the lens.

Step 2: Adjust the focus
If cleaning the lens doesn’t resolve the issue, you may need to adjust the focus of the camera. Most Swann security cameras have a focus adjustment ring or button located near the lens. Refer to your camera’s manual to locate the focus adjustment feature and make necessary adjustments until the image is clear and sharp.
It’s important to note that some Swann security cameras may have a fixed focus, meaning they do not have a focus adjustment feature. In this case, you can try moving the camera closer to or further away from the subject to improve the image clarity. Experiment with different distances to find the optimal position.
If neither cleaning the lens nor adjusting the focus improves the image quality, there may be other underlying issues with the camera. Consider contacting Swann technical support for further assistance or consider consulting a professional for camera repairs or replacement if necessary.
Problem 2: Inadequate Coverage
If you’re experiencing inadequate coverage with your Swann security camera, there are a few steps you can take to try and improve the situation:
- Check the camera’s positioning: Ensure that the camera is positioned correctly and not obstructed by any objects or other cameras. Adjust the angle and tilt of the camera if necessary to cover the desired area.
- Consider the camera’s range: Swann security cameras have a specified range, so if you’re experiencing inadequate coverage, it’s possible that the camera is located too far from the area you want to monitor. Consider relocating the camera closer to the area or installing additional cameras to cover a larger area.
- Check for Wi-Fi signal strength: If you’re using a wireless Swann security camera, inadequate coverage could be due to weak Wi-Fi signal strength. Make sure that the camera is within range of your Wi-Fi router and consider installing a Wi-Fi extender to boost the signal in that particular area.
- Inspect the camera’s lens: Sometimes, inadequate coverage can be caused by a dirty or damaged camera lens. Clean the lens carefully with a soft, lint-free cloth and inspect it for any signs of damage. If the lens appears scratched or cracked, consider replacing it with a new one.
If you’ve tried these steps and are still experiencing inadequate coverage with your Swann security camera, it may be worth reaching out to Swann’s customer support for further assistance.
Problem 3: Poor nighttime visibility
If you are experiencing poor nighttime visibility with your Swann security camera, there are a few things you can try to improve the situation:
1. Check the camera’s night vision settings
Make sure the camera’s night vision settings are properly configured. You can access the camera’s settings through the Swann security app or the camera’s web interface. Ensure that the night vision feature is enabled, and adjust the sensitivity and distance settings if necessary.
2. Clean the camera lens
If the camera lens is dirty or smudged, it can greatly impact nighttime visibility. Use a clean, lint-free cloth to gently wipe the lens clean. Avoid using any abrasive materials or harsh chemicals that could damage the lens.
3. Remove any obstructions
Check for any objects or obstructions that may be blocking the camera’s view at night. Branches, spider webs, or other debris can interfere with the camera’s night vision capabilities. Clear any obstructions to improve the camera’s performance.
By following these troubleshooting steps, you should be able to improve the nighttime visibility of your Swann security camera. If the issue persists, consider contacting Swann support for further assistance.


