
Welcome to our step-by-step guide on how to install the Defender Guard 4MP IP Security Bullet Camera. Whether you are a seasoned DIY enthusiast or a beginner, this tutorial will help you set up your new security camera with ease. Follow these simple instructions to ensure your property is protected.
The Defender Guard 4MP IP Security Bullet Camera is a reliable and advanced surveillance solution that offers high-definition video quality and remote viewing capabilities. With its durable construction, weatherproof design, and night vision functionality, this camera is perfect for both indoor and outdoor installations.
To begin the installation process, make sure you have all the necessary tools and equipment, including a ladder, power drill, screwdriver, Ethernet cable, and a power supply. It is also advisable to consult the camera’s user manual for additional guidance and specific instructions.
Start by determining the optimal mounting location for your camera. Consider factors such as coverage area, visibility, and accessibility. Once you have chosen the spot, use the power drill and screws to secure the mounting bracket in place. Ensure that it is stable and can support the weight of the camera.
Step-by-step guide for installing Defender Guard 4MP IP Security Bullet Camera
Installing a Defender Guard 4MP IP Security Bullet Camera can help you enhance the security of your property. Follow these step-by-step instructions to ensure a successful installation:
Before you begin:
- Ensure you have all the necessary tools and equipment, including a ladder, power drill, screws, and a network cable.
- Choose the ideal location for mounting the camera, considering factors like visibility, coverage area, and accessibility to power and network connections.
- Make sure you have a stable internet connection for remote viewing and configuring the camera.
Installation steps:
-
Mount the camera: Use a ladder and position the camera at the chosen location. Mark the spots for drilling pilot holes.
-
Drill pilot holes: Use a power drill to create pilot holes at the marked spots. Ensure the holes are appropriate for the size of the screws that come with the camera.
-
Attach the camera: Securely mount the camera using the screws provided. Ensure it is straight and stable.
-
Connect the network cable: Connect one end of the network cable to the camera’s network port and the other end to your router or network switch. Make sure the connection is secure.
-
Connect the power cable: Connect the power cable to the camera’s power input and plug the other end into a power outlet. Ensure a stable power supply.
-
Configure the camera: Download and install the manufacturer’s software or app on your computer or mobile device. Follow the instructions to set up the camera, including assigning an IP address and configuring desired settings.
-
Test the camera: Ensure the camera is properly connected and functioning by accessing the live feed through the software or app. Adjust the camera angle and settings if necessary.
-
Secure the cables: Use cable clips or conduit to neatly organize and secure the network and power cables, minimizing exposure and potential damage.
-
Monitor and maintain: Regularly check the camera’s functionality, position, and visibility to ensure continuous security coverage. Clean the lens if it becomes dirty or obstructed.
Following these installation steps will help you effectively install the Defender Guard 4MP IP Security Bullet Camera and optimize its performance to keep your property secure.
Unboxing and checking the contents
When you receive your Defender Guard 4MP IP Security Bullet Camera, it’s important to unbox it carefully and check the contents to ensure everything is included. Here’s what you should expect to find inside:
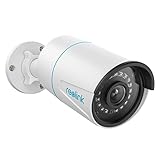
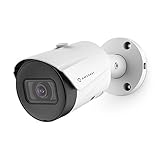
1. Defender Guard 4MP IP Security Bullet Camera: The main component of the package is the camera itself. It has a durable bullet-shaped design, made with high-quality materials to withstand different weather conditions.
2. Mounting Bracket: Along with the camera, you will find a sturdy mounting bracket. This bracket allows you to easily install the camera in the desired location, providing a secure and adjustable mount.
3. Power Adapter: The package includes a power adapter that connects to the camera, providing the necessary power supply. This adapter is designed to work with standard power outlets.

4. Ethernet Cable: To connect the camera to your network, an Ethernet cable is included in the package. This cable ensures a stable and reliable connection between the camera and your router or network switch.
5. Quick Start Guide: For easy installation, a Quick Start Guide is provided. This guide includes step-by-step instructions on how to set up and configure your camera, ensuring a hassle-free installation process.
Before proceeding with the installation, make sure to carefully read the Quick Start Guide and familiarize yourself with the camera’s features and capabilities. This will ensure that you make the most out of your Defender Guard 4MP IP Security Bullet Camera.
Mounting the camera
Before mounting the Defender Guard 4MP IP security bullet camera, make sure you have chosen an optimal location that provides the best view of the area you want to monitor. Follow these steps to properly mount the camera:
- Locate a suitable mounting surface: Choose a sturdy surface where you want to mount the camera. It should be free from any obstructions and provide a clear line of sight.
- Mark the mounting holes: Hold the camera up against the chosen surface and use a pencil or marker to mark the spots where you will drill the mounting holes.
- Drill the holes: Use an appropriate drill bit to drill pilot holes at the marked spots. Make sure the holes are deep enough to hold the mounting screws securely.
- Secure the mounting bracket: Attach the mounting bracket to the mounting surface using the provided screws. Ensure the bracket is level and securely fastened.
- Attach the camera to the bracket: Align the screw holes on the camera with the holes on the mounting bracket. Insert the screws and tighten them securely using a screwdriver.
- Adjust the camera angle: Once the camera is mounted, adjust its angle to achieve the desired view. Use the adjustable bracket or holder to position the camera as needed.
- Check the camera’s view: Power on the camera and check the live feed on your connected device to ensure the camera is capturing the desired area effectively.
By following these steps, you can securely mount your Defender Guard 4MP IP security bullet camera and optimize its performance for monitoring your property.

Connecting the cables
Before you start connecting the cables for your Defender Guard 4MP IP Security Bullet Camera, make sure you have all the necessary components and tools ready. You will need the camera, the power adapter, an Ethernet cable, and a network video recorder (NVR) if you are using one.
1. Mount the camera
Select a suitable location to mount your camera. Ensure that it provides a clear view of the area you want to monitor. Use the mounting screws and brackets included with the camera to securely attach it to the desired location.
2. Connect the power adapter
Locate the power input port on your camera and plug one end of the power adapter into it. Connect the other end of the power adapter to a power outlet. Ensure that the power supply is stable and reliable.
3. Connect the Ethernet cable
Take one end of the Ethernet cable and plug it into the camera’s LAN port. Connect the other end of the Ethernet cable to the LAN port on your NVR or directly to your router if you are not using an NVR. This will enable network connectivity for remote viewing and recording.
4. Verify the connections
Once all the cables are connected, double-check the connections to ensure they are secure and properly seated. Make sure the power and network cables are not twisted or stretched excessively.

Important: It is highly recommended to use surge protectors to safeguard your camera and NVR from power surges or fluctuations.
With the above steps completed, you have successfully connected the cables for your Defender Guard 4MP IP Security Bullet Camera. You can now proceed with the camera setup and configuration according to the manufacturer’s instructions.
Configuring the Camera Settings
After successfully installing the Defender Guard 4MP IP Security Bullet Camera, it’s important to configure the camera settings to ensure optimal performance and security. Here are the steps to follow:
Step 1: Connecting to the Camera
To configure the camera settings, you need to connect to the camera’s web interface. Open a web browser on your computer and enter the camera’s IP address in the address bar. The IP address can be found in the camera’s user manual or by using a network scanning tool. Press Enter to load the camera’s web interface.
Step 2: Logging In
You will be prompted to enter the camera’s username and password. By default, the username is typically “admin” and the password is “123456” or “admin”. It is highly recommended to change the default username and password to enhance security.

Step 3: Configuring Basic Settings
Once logged in, the web interface will provide access to various camera settings. Start by configuring the basic settings such as date and time, video resolution, frame rate, and compression format. Set the date and time accurately to ensure correct timestamps on recorded footage.
Choose the desired video resolution based on your requirements. Higher resolutions provide more detailed images but may require more storage space. Adjust the frame rate according to your needs, keeping in mind that higher frame rates result in smoother video playback but may consume more network bandwidth and storage.
Select a compression format, such as H.264 or H.265, depending on the camera’s capabilities and the compatibility with your recording device. Each compression format has its own advantages and disadvantages in terms of video quality and storage efficiency.
Step 4: Setting Up Motion Detection
Motion detection is a useful feature that allows the camera to start recording whenever motion is detected within its field of view. Enable and configure motion detection settings to receive alerts and ensure important events are captured. Adjust the sensitivity level and define the detection area to reduce false alarms.
Step 5: Configuring Network Settings
To enable remote access and monitoring, configure the camera’s network settings. Set a static IP address if required or configure DHCP settings if your network supports automatic IP assignment. Ensure that the camera’s IP address is within the same subnet as your computer or recording device for proper communication.
If you plan to access the camera remotely over the internet, configure port forwarding on your router to allow incoming connections to the camera’s IP address and port number. Consult your router’s user manual or seek technical support for guidance on setting up port forwarding.
These are the basic steps to configure the camera settings of the Defender Guard 4MP IP Security Bullet Camera. Refer to the camera’s user manual for detailed instructions on specific settings and features. Regularly review and update the camera settings to maintain optimal performance and security.
Installing the necessary software
Before you can start using your Defender Guard 4MP IP Security Bullet Camera, you will need to install some software on your computer. This software will allow you to access and manage your camera’s settings, view live video feed, and record and store footage.
Step 1: Downloading the software
To begin, visit the official Defender Guard website and navigate to the “Support” or “Downloads” section. Look for the software specifically designed for your camera model and operating system. Click on the download link to start the download process.
Step 2: Installing the software
Once the download is complete, locate the downloaded file and double-click on it to begin the installation process. Follow the on-screen instructions to install the software on your computer.

Step 3: Connecting your camera
After the software installation is complete, connect your Defender Guard 4MP IP Security Bullet Camera to your computer using the provided USB or Ethernet cable. Make sure the camera is powered on.
Step 4: Configuring the camera
Launch the installed software on your computer. The software should automatically detect the connected camera. Follow the software’s instructions to set up your camera, including configuring network settings and creating a username and password for accessing the camera’s feed.
Once the configuration is complete, you should be able to access and control your Defender Guard 4MP IP Security Bullet Camera through the software on your computer.
Testing and Troubleshooting
Once you have successfully installed your Defender Guard 4MP IP Security Bullet Camera, it is important to test and troubleshoot to ensure it is functioning properly. Here are some steps you can take:
- Check the Power Connection: Make sure that the camera is receiving power by inspecting the power cable and connection. Ensure that it is securely plugged into a working power outlet.
- Verify Network Connection: Confirm that the camera is properly connected to your network. Check the Ethernet cable connection and ensure it is securely plugged into both the camera and your network router or switch.
- Access Camera Configuration: To access the camera’s configuration settings, open a web browser and enter the camera’s IP address. This information can usually be found in the camera’s user manual or on the packaging.
- Adjust Camera View and Settings: Once you have accessed the camera settings, make any necessary adjustments to the view angle, resolution, motion detection, and other settings to suit your needs.
- Test Camera Recording and Playback: Push the record button or enable scheduled recording to test if the camera is properly recording video. Additionally, verify that you can easily playback recorded footage.
- Check Night Vision Mode: If your camera has night vision capabilities, test this feature in a low lighting condition to ensure that it is providing clear and detailed images.
- Monitor Remote Access: If you plan to access your camera remotely, for example through a smartphone or computer, make sure you can successfully connect to the camera using the appropriate software or app.
- Verify Alert Notifications: If your camera provides alert notifications for motion detection or other events, test these notifications to ensure you are receiving them as expected.
- Consult the Troubleshooting Guide: If you encounter any issues during the testing process, refer to the camera’s user manual or troubleshooting guide for assistance in resolving common problems.
By following these steps, you can ensure that your Defender Guard 4MP IP Security Bullet Camera is working properly and will provide you with reliable surveillance and peace of mind.
FAQ,
What are the specifications of the Defender Guard 4MP IP Security Bullet Camera?
The Defender Guard 4MP IP Security Bullet Camera has a resolution of 4 megapixels, a weatherproof housing, and infrared night vision. It also features motion detection and remote access capabilities.
Can I install the Defender Guard 4MP IP Security Bullet Camera myself or do I need professional help?
The Defender Guard 4MP IP Security Bullet Camera is designed for easy installation and can be installed by homeowners themselves. However, if you are not comfortable with DIY installation, it is always recommended to seek professional help to ensure proper setup and configuration.


