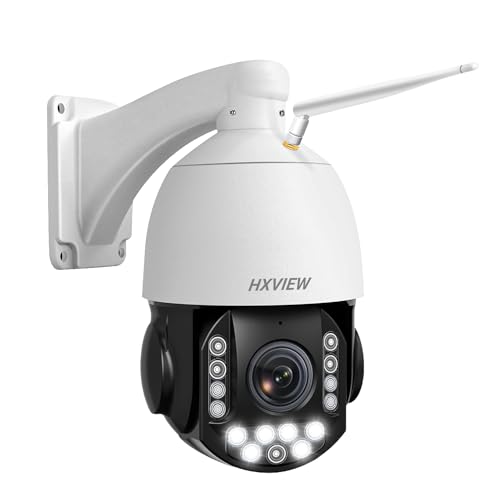
Installing a security camera is an essential step towards ensuring the safety and security of your home or business. Cox Security Camera is a reliable and trusted option that offers high-quality video surveillance. By following a few simple steps, you can easily install the Cox Security Camera system and have peace of mind knowing that your property is protected.
Step 1: Determine the ideal location for your security camera
Before installing the Cox Security Camera, it is crucial to find the perfect spot for it. Consider areas that are vulnerable to break-ins or where you need extra surveillance. Make sure the camera is mounted at a suitable height and angle, providing optimal coverage of the desired area.
Tip: Choose a spot that is easily accessible for maintenance and cleaning.
Step 2: Mount the camera
Once you have chosen the ideal location, mount the Cox Security Camera using the provided hardware and instructions. Ensure that the camera is securely attached to the surface and is aligned correctly for capturing the desired field of view.
Tip: It is beneficial to test the camera’s view before permanently mounting it to make any necessary adjustments.
Step 3: Connect the camera to the power source and network
After mounting the Cox Security Camera, connect it to a power source and the network. Follow the manufacturer’s instructions to properly connect the camera’s cables. Make sure the power source is reliable and stable to avoid any interruptions in surveillance.
Tip: Consider using a surge protector or an uninterruptible power supply (UPS) for added protection.

Step 4: Set up the camera and configure the settings
Once the camera is connected, access the camera’s settings through the provided app or software. Follow the on-screen instructions to set up the camera, including Wi-Fi configuration, camera name, and any additional features or settings.
Tip: Choose a unique camera name and set a strong password to enhance security.
By following these simple steps, you can install the Cox Security Camera and enjoy the benefits of having a reliable and effective video surveillance system. Remember to regularly maintain and clean your camera for optimal performance.
Step-by-step guide for installing Cox security camera
Installing a Cox security camera is a great way to enhance the security of your home or office. With the right tools and following these step-by-step instructions, you can have your Cox security camera up and running in no time.

Step 1: Choose the installation location
Prior to installing your Cox security camera, decide on the location where you want to mount it. It should be a place that provides a clear view of the area you want to monitor. Make sure that the camera will be secure and protected from harsh weather conditions.
Step 2: Install the mounting bracket
Using a drill and screws, install the mounting bracket in the chosen location. Make sure it is securely fastened to the wall or ceiling.
Step 3: Connect the camera to power

After mounting the bracket, connect the Cox security camera to a power source. Make sure to use the appropriate power adapter provided with the camera.
Step 4: Position the camera
Adjust the camera angle to ensure optimal coverage of the area you want to monitor. You can typically do this by rotating or tilting the camera within its mounting bracket.
Step 5: Connect the camera to the internet
Using an Ethernet cable, connect the Cox security camera to your home or office router. This will allow you to access the camera’s feed remotely using a smartphone or computer.

Step 6: Install the camera software
Download and install the Cox security camera software from the Cox website or app store. Follow the instructions provided to set up the camera and customize the settings according to your preferences.
Step 7: Test the camera
Once you have completed the installation and setup process, test the camera to ensure it is functioning properly. Check the live feed and adjust any settings as necessary to achieve the desired results.
Congratulations! You have successfully installed your Cox security camera. You can now enjoy enhanced surveillance and peace of mind knowing that your property is protected.

Choose the right location
Installing your Cox security camera starts with choosing the right location. This is an important step that ensures optimal performance and coverage. Here are some factors to consider when selecting the location:
- Visibility: Choose a spot with a clear view of the area you want to monitor. Make sure there are no obstructions such as trees, buildings, or other objects that could block the camera’s field of view.
- Height: Mount the camera at a height that provides an optimal perspective. A higher installation point can provide a broader view, while a lower position can capture more details.
- Power and Connectivity: Ensure that there is access to a power source and a reliable Wi-Fi connection near the chosen location. This will ensure uninterrupted power supply and enable the camera to transmit video footage seamlessly.
- Weather Resistance: If you plan to install the camera outdoors, make sure it is weather-resistant. Look for cameras that have an IP65 or higher rating to withstand various weather conditions.
- Accessibility: Consider ease of access when choosing the location, especially if you will need to frequently adjust camera settings or perform maintenance tasks. Installing the camera in a location that is easily reachable can save time and effort in the long run.
By taking these factors into account, you can select the best location for your Cox security camera, ensuring maximum coverage and effectiveness.
Gather the necessary tools
Before you start installing your Cox security camera, make sure you have all the necessary tools within your reach. Having these tools ready will make the installation process much smoother and more efficient. Here is a list of tools you will need:
- A ladder or step stool, depending on the height you need to reach.
- A power drill with drill bits to create holes for mounting the camera.
- Screwdrivers for attaching the camera and making adjustments.
- A level to ensure that the camera is properly aligned.
- Measuring tape for precise measurements.
- A cable crimper for securing the camera cables.
- An Ethernet cable or Wi-Fi connection for connecting the camera to your network.
- A smartphone or computer to access the camera’s settings and view the footage.
- Cable clips or adhesive clips for neatly securing the camera’s cables.
- Mounting brackets or screws for attaching the camera to the desired location.
Having these tools ready before you start the installation process will help ensure a successful and efficient setup of your Cox security camera system.
Mount the camera
Once you have selected the ideal location for your Cox security camera, it’s time to mount it. Follow these simple steps:
- Gather the tools: You will need a drill, screws, and anchors to mount the camera. Make sure you have the appropriate size and type based on the surface you are mounting on.
- Mark the spots: Use a pencil or marker to mark the spots where you will be drilling holes for the screws. Double-check the placement to ensure it aligns with your desired angle and view.
- Drill the holes: With your drill and the appropriate drill bit, carefully drill holes into the marked spots. If you are mounting the camera on a harder surface, you may need to use a masonry drill bit.
- Insert anchors: If your camera requires anchors, insert them into the drilled holes. Gently tap them with a hammer until they sit flush with the surface.
- Attach the camera: Line up the mounting holes on the camera with the drilled holes or anchors. Secure the camera to the wall by inserting screws through the holes and tightening them with a screwdriver or drill.
- Adjust the camera angle: Once the camera is securely mounted, adjust the camera angle to fit your desired field of view. Make sure the camera is level and facing the right direction to cover the intended area.
Remember to refer to the camera’s manual for any specific mounting instructions or considerations, as different cameras may have slightly different installation requirements.
Connect the camera to power source
Before installing the Cox security camera, you need to connect it to a power source.
Here are the steps to connect the camera to a power source:
1. Locate the power adapter:
Find the power adapter that came with your Cox security camera. It usually comes in the camera package.
2. Connect the power adapter to the camera:
Plug one end of the power adapter into the power port on the camera. Make sure it fits securely.
3. Plug the power adapter into an outlet:
Find a nearby power outlet and plug the other end of the power adapter into it. Ensure that the outlet is functional and provides a stable power supply.
4. Verify power connection:
Once the camera is connected to the power source, ensure that the camera’s indicator light is on. This indicates that it is receiving power.
Note: It is important to connect the camera to a power source that is not easily accessible to unauthorized individuals to prevent tampering or disconnection.
By following these steps, you have successfully connected your Cox security camera to a power source and can proceed with the installation process.
Connect the camera to the network
To install your Cox security camera and ensure it is properly connected to your network, follow the steps below:
- Start by connecting the camera to a power source using the provided power adapter.
- Locate the Ethernet port on the camera and connect one end of an Ethernet cable to the camera.
- Connect the other end of the Ethernet cable to an available Ethernet port on your router or network switch.
- Ensure that the camera and your router or network switch are powered on.
- Wait for a few moments to allow the camera to boot up and establish a connection with your network.
- Once the camera is connected, you can proceed with configuring its settings and accessing the live video feed.
Note: It is important to refer to the camera’s user manual for any specific instructions or troubleshooting tips related to your model. Additionally, make sure that your network has a stable internet connection to ensure the camera operates effectively.
Configure camera settings
Once you have installed your Cox security camera, you will need to configure the camera settings to ensure it is set up correctly and meets your specific needs. Follow the steps below to configure the camera settings:
Step 1: Access camera settings
To access the camera settings, open the Cox security camera app on your mobile device or access the camera’s web interface through a computer. Log in with your username and password to access the camera settings menu.
Step 2: Set up Wi-Fi connection
If your camera connects to your Wi-Fi network, navigate to the Wi-Fi settings in the camera menu. Select your Wi-Fi network from the available list and enter your Wi-Fi password to establish a connection. Ensure the camera is connected to the same network as your mobile device or computer.
Step 3: Adjust camera angles
Position your camera in the desired location and adjust the camera angles to cover the areas you want to monitor. Use the pan, tilt, and zoom settings to adjust the camera view as needed. Test the camera angles and make any necessary adjustments before finalizing the configuration.
Step 4: Customize camera settings
Explore the camera settings menu to customize advanced settings such as motion detection, night vision, recording schedules, and notifications. Adjust these settings to suit your preferences and security needs. You can also set up alerts to be notified via email or push notifications when the camera detects motion or other events.
Step 5: Save and apply settings
Once you have configured all the camera settings, save the changes and apply them. This will ensure that the camera functions according to your customized preferences. Take note of any additional instructions or prompts provided by the camera app or web interface during the saving process.
By following these steps, you can successfully configure the settings of your Cox security camera and optimize its performance for your specific security needs.
Test the camera
After installing your Cox security camera, it is important to test whether it is functioning properly. Here are a few steps to help you test the camera:
Step 1: Connect the camera
Make sure the camera is properly connected to the power source and the network. Check all the cables and connections to ensure they are securely in place.
Step 2: Access the camera
Open the Cox security camera app or access the camera through the web portal using the provided login credentials.
Step 3: View live stream
Navigate to the “Live Stream” section of the app or web portal to see if the camera is capturing and streaming video properly. You should be able to see a clear and stable live feed from the camera.
Step 4: Test camera functionality
Try out different features and functionalities of the camera, such as pan, tilt, zoom, and audio. Make sure all the features are working as expected.
Step 5: Check for alerts
Monitor for any motion or sound alerts triggered by the camera and check if the notifications are being sent to your device or email.
Step 6: Adjust camera settings
If necessary, adjust camera settings such as resolution, sensitivity, or recording options to meet your specific needs.
By following these steps, you can ensure that your Cox security camera is installed correctly and functioning properly, providing you with peace of mind and enhanced security.
| Step | Description |
|---|---|
| 1 | Connect the camera |
| 2 | Access the camera |
| 3 | View live stream |
| 4 | Test camera functionality |
| 5 | Check for alerts |
| 6 | Adjust camera settings |
Securely mount the camera
Properly mounting your Cox security camera is crucial for ensuring optimal surveillance coverage and minimizing the risk of theft or damage. Here are the steps to securely mount your camera:
1. Determine the ideal location
Before mounting the camera, carefully select the location where it will provide the best view of the area you want to monitor. Consider factors such as the height, angle, and obstructions that could hinder the camera’s field of vision.
2. Gather the necessary tools
Be sure to gather all the tools required for the installation, such as a drill, screws, wall anchors, and any additional mounting accessories that may come with your Cox security camera. This will make the installation process smoother and more efficient.
3. Prepare the mounting surface
Clean the area where you plan to mount the camera to ensure that the surface is free from dust, debris, and any other contaminants that could affect the camera’s performance or adhesion.
4. Securely attach the mounting bracket
Follow the manufacturer’s instructions to securely attach the mounting bracket to the desired location. Use the necessary screws and wall anchors to ensure that the bracket is firmly secured to the wall or surface.
5. Attach the camera to the mounting bracket
Once the bracket is securely attached, carefully attach the camera to the bracket, ensuring that it is properly aligned and facing the desired direction. Use the provided screws or locking mechanisms to ensure a secure connection.
6. Test the camera’s positioning and adjust if necessary
After mounting the camera, test its positioning by checking the live feed on your monitoring device or app. Make any necessary adjustments to the camera’s tilt, pan, or angle to ensure optimal coverage and visibility.
7. Conceal cables and wires
If applicable, carefully conceal any visible cables or wires connected to the camera to prevent tampering or damage. Use cable clips or adhesive hooks to secure the cables along the mounting surface or nearby walls.
By following these steps, you can securely mount your Cox security camera and enhance your home or business surveillance system for improved safety and peace of mind.
Monitor and manage your security camera
Once you have successfully installed your Cox security camera, it’s important to know how to monitor and manage it effectively. Here are some steps to help you get started:
1. Download the security camera app: Cox provides a dedicated app for managing your security camera. Download it from the App Store or Google Play Store based on your device’s operating system.
2. Create an account: Open the app and follow the instructions to create a new account. You will need to provide your contact details and set up a password.
3. Log in to your account: Once your account is created, log in using your credentials. This will give you access to your security camera’s live feed and other features.
4. Access the live feed: Tap on the camera icon or select the live feed option to view a real-time video stream from your security camera. This allows you to monitor your property or keep an eye on your loved ones.
5. Customize camera settings: Explore the app to access various settings for your security camera. This may include motion detection sensitivity, notifications, recording options, and more. Adjust these settings according to your preferences.
6. View recordings: In addition to the live feed, you can also access recorded footage from your security camera. This is useful for reviewing past events or incidents. Use the app’s playback feature to easily navigate and view recordings.
7. Receive notifications: Set up the app to receive push notifications whenever your security camera detects motion or any other activity. This allows you to stay informed of any potential security concerns in real-time.
8. Share access: If you want to grant access to your security camera to someone else, navigate to the user management section in the app. Here, you can invite family members or trusted individuals to monitor the camera or receive notifications.
By following these steps, you will be able to effectively monitor and manage your Cox security camera, ensuring the safety and security of your home or business.
FAQ,
Do I need any special tools to install a Cox security camera?
No, you don’t need any special tools to install a Cox security camera. All you need is the camera itself, a stable internet connection, and a smartphone or tablet to download the Cox Homelife app. The camera usually comes with a power cord and mounting hardware, so you won’t need any additional tools to set it up. Just follow the instructions provided by Cox and you should be able to install the camera easily.
Can I install a Cox security camera outside?
Yes, you can install a Cox security camera outside as long as you have a stable internet connection in that area. Cox offers both indoor and outdoor security cameras, so make sure to choose the appropriate model for your needs. When installing the camera outside, make sure to protect it from harsh weather conditions by placing it in a sheltered location or using a weatherproof housing. Follow the same installation steps as you would for an indoor camera, and you should be able to set it up without any issues.
Is it possible to install multiple Cox security cameras?
Yes, it is possible to install multiple Cox security cameras. The exact number of cameras you can install will depend on the specific Cox Homelife package you have and the capabilities of your internet connection. You can add additional cameras to your Cox Homelife account through the app. Simply follow the instructions provided by Cox to add each camera to your system. Make sure to position the cameras strategically to cover the desired areas and adjust their settings as needed.
Can I access the Cox security camera on my computer?
Yes, you can access your Cox security camera on your computer. Cox provides a web portal that allows you to view and manage your security cameras from any computer with an internet connection. Simply log in to your Cox Homelife account through the web portal using your credentials. From there, you can view live footage, adjust camera settings, and access any other features provided by Cox. This can be convenient if you prefer to monitor your cameras from a larger screen or if you don’t have your smartphone or tablet with you.