
In today’s world, security is a top concern for both individuals and businesses. One effective way to increase security is by installing a security camera. While there are many expensive options available on the market, you can actually make a simple security camera yourself with just a few basic supplies.
First, you will need a camera module. This can be easily sourced online or from a local electronics store. Make sure to choose a module that has good resolution and night vision capabilities if you want to capture clear footage in any lighting conditions.
Next, you will need a Raspberry Pi. This small, affordable computer will act as the brains of your security camera. It can handle the camera module and store the video footage, making it an ideal choice for this project. If you’re not familiar with Raspberry Pi, don’t worry – the setup is quite simple and there are plenty of online tutorials available to guide you through the process.
Once you have your camera module and Raspberry Pi, you will need to connect them together. This typically involves attaching the camera module to the designated port on the Raspberry Pi. Again, this process may vary depending on the specific models you are using, so it’s important to refer to the manufacturer’s instructions.
After connecting the camera module to the Raspberry Pi, you will need to install the necessary software. There are several open-source software options available, such as MotionEyeOS and ZoneMinder, that can turn your Raspberry Pi into a fully functional security camera system. These software packages allow you to configure settings, view live video feeds, and even receive alerts when motion is detected.
Once you have installed the software, you can mount your security camera in the desired location. Make sure to choose a spot that provides a good vantage point and covers the area you want to monitor. You may need to use screws or adhesive to secure the camera in place.
With your camera securely mounted, you can now connect it to a power source and begin configuring the settings. This may involve setting up a Wi-Fi connection, adjusting video resolution, and enabling motion detection. Once everything is set up, you can start using your DIY security camera to keep an eye on your home or business.
While this DIY security camera may not have all the advanced features of commercial options, it is a cost-effective solution that can still provide valuable surveillance and peace of mind. Plus, building your own security camera can be a fun and rewarding project for anyone interested in electronics and home security.
What is a Security Camera
A security camera, also known as a closed-circuit television (CCTV) camera, is a device that records and monitors an area to enhance safety and security. It is commonly used in both residential and commercial settings.
Security cameras are designed to capture and transmit video footage to a recording device or a monitor in real-time. They are typically connected to a network or a digital video recorder (DVR) for storage and remote viewing.

These cameras are becoming more advanced with the incorporation of high-definition video quality, night vision capabilities, and intelligent features such as motion detection and facial recognition. They can be placed both indoors and outdoors, depending on the desired surveillance area.
Having security cameras installed has several benefits. They act as a deterrent to potential criminals, providing a sense of safety to the occupants and visitors. In case of any criminal activity, the footage recorded by the security camera can serve as evidence for identification and prosecution.
Modern security cameras often come with mobile applications or software interfaces, allowing users to remotely access live footage and recordings from their smartphones or computers. This provides convenience and peace of mind to users who can monitor their homes or businesses from anywhere at any time.
Overall, security cameras are essential components of a comprehensive security system. Their presence alone can significantly increase the safety and security of an area, acting as a proactive measure to prevent potential threats or incidents.
The Importance of Security Cameras
Security cameras play a crucial role in ensuring the safety and security of both residential and commercial properties. These devices are designed to monitor and record activities happening in and around a building, providing valuable evidence in the event of a security breach.

One of the key benefits of security cameras is deterrence. The presence of cameras can deter potential criminals from committing unlawful acts, as they are aware that their actions are being monitored and recorded. This can help prevent incidents such as burglaries, vandalism, and trespassing.
1. Increased Safety
By acting as a constant watchful eye, security cameras help create a safer environment for both occupants and visitors of a property. By capturing any suspicious activity or potential hazards, they enable prompt response and intervention, minimizing the risk of accidents or criminal activities.
2. Evidence Collection
In the unfortunate event of a security breach or criminal activity, security cameras provide valuable evidence for law enforcement agencies and insurance companies. The recorded footage can help identify culprits, aid in investigations, and increase the chances of successful prosecution.
Moreover, security cameras can also be used to resolve disputes or conflicts arising within a property. By reviewing the recorded footage, property owners or managers can ascertain the facts and take appropriate action.
To effectively utilize security cameras, it is essential to set up a monitoring system with trained personnel who can actively monitor the live feeds and respond promptly to any suspicious activities. Additionally, regular maintenance and updating of the cameras and recording systems are crucial to ensure optimal functionality.

| Benefits of Security Cameras: | Key Considerations: |
| Deterrence of criminal activities | Human monitoring and response |
| Increased safety and security | Maintenance and updating |
| Evidence collection for investigations | Proper positioning and coverage |
Choosing the Right Camera
When it comes to making a simple security camera, choosing the right camera is an essential step. There are several factors to consider before making your final decision:
Resolution
The resolution of the camera determines the level of detail it can capture. Higher resolution cameras can provide clearer and more detailed images, which can be crucial in identifying potential threats or intruders.
Field of View
The field of view refers to the area that the camera can capture. It’s important to choose a camera with a wide enough field of view to cover the desired surveillance area. Consider the size and layout of the area you want to monitor to ensure that the camera’s field of view is sufficient.
Connectivity
Decide whether you want a wired or wireless camera. Wired cameras require a physical connection to a power source and a central monitoring system. Wireless cameras, on the other hand, are easier to install and can be accessed remotely through a network connection. Consider the pros and cons of each option based on your specific requirements.
Low-Light Performance
If you plan to use the camera in low-light conditions or at night, consider a camera with good low-light performance. Look for features such as infrared (IR) capabilities or low-light sensors that can capture clear images even in challenging lighting conditions.

By considering these factors, you can choose the right camera that suits your needs and helps you create an effective and simple security camera system.
Essential Components for a DIY Security Camera
Building your own DIY security camera can be an affordable and effective solution to securing your home or office. To get started, you will need a few essential components that are crucial for the functionality of your security camera system.
1. Camera Module
The camera module is the primary component of your DIY security camera system. It captures the video feed and allows you to monitor and record footage. When choosing a camera module, consider factors such as resolution, field of view, night vision capabilities, and connectivity options.
2. Single Board Computer
To process and manage the video feed from the camera module, you will need a single board computer (SBC). The SBC acts as the brain of the system and handles tasks such as video encoding, storage, and network connectivity. Popular SBC options for DIY security cameras include Raspberry Pi and Arduino.
3. Power Supply
A reliable power supply is essential to keep your security camera system running continuously. Depending on the power requirements of your camera module and SBC, you will need to choose an appropriate power supply. Consider using a power adapter or a battery pack with sufficient capacity to ensure uninterrupted operation.

4. Storage Device
To store the recorded video footage, you will need a storage device. This can be an SD card, USB flash drive, external hard drive, or network-attached storage (NAS) device. Choose a storage device with sufficient capacity to accommodate your recording needs and consider options for remote access and backup.
It’s important to note that these components provide the foundation for your DIY security camera system. Depending on your requirements, you may also need additional components such as cables, connectors, housing, and mounting hardware.
By understanding and selecting the essential components for your DIY security camera, you can build a cost-effective and customized surveillance solution for your home or office.
Step-by-Step Guide: Building Your Own Security Camera
Introduction
Building your own security camera can be a cost-effective and rewarding project. With a few simple materials and some basic knowledge of electronics, you can create a camera that will help keep your home or office safe.
Materials Needed
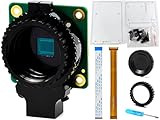
Before getting started, gather the following materials:

| 1 Raspberry Pi | 1 Raspberry Pi camera module |
| 1 microSD card | 1 power supply |
| 1 Ethernet cable | 1 USB Wi-Fi adapter (optional) |
Step 1: Set Up Raspberry Pi
Begin by setting up your Raspberry Pi. Install the operating system (such as Raspbian) onto the microSD card, insert it into the Pi, and connect the power supply.
Step 2: Connect Camera Module
Attach the camera module to the Raspberry Pi. Insert the ribbon cable into the camera slot, making sure it is securely connected.
Step 3: Configure Raspberry Pi
Next, configure your Raspberry Pi by accessing the terminal. Update the software and enable the camera interface by running the necessary commands.
Step 4: Install Streaming Software
Install streaming software (such as Motion) on your Raspberry Pi. This will enable the camera to capture and stream video.
Step 5: Set Up Network Connection
If you are using an Ethernet cable, connect it to the Raspberry Pi. If you prefer wireless connectivity, insert the USB Wi-Fi adapter and configure the network settings.
Step 6: Configure Motion
Configure the Motion software by editing its configuration file. You can adjust various settings, such as the video resolution, frame rate, and motion detection sensitivity.
Step 7: Test the Camera
Finally, test the camera by accessing the video stream on a computer or mobile device. Make sure the camera is capturing footage and streaming it successfully.
Conclusion
By following these steps, you can build your own security camera using a Raspberry Pi and a camera module. This DIY project allows you to have a reliable surveillance system that you can customize to suit your needs.
Setting Up and Positioning Your Security Camera
Setting up a security camera is an essential step in ensuring the safety and security of your property. By strategically positioning your camera, you can monitor specific areas and deter potential intruders. Here are some tips to help you set up your security camera effectively:
1. Determine the Purpose and Coverage Area
Before installing your camera, identify the purpose and the specific area you want to cover. It could be the front entrance, backyard, or other vulnerable spots. This will help you choose the right camera and decide on the optimum placement.
2. Consider the Field of View
When selecting a location for your camera, consider its field of view. The field of view determines the area that the camera can capture. Ensure that the camera’s position allows for a wide enough view to cover the desired area effectively.
3. Positioning the Camera
Place the camera at a height that provides a clear view of the area without any obstructions. Wall mounting or ceiling mounting is commonly used for security cameras. Ensure that the camera is securely attached to prevent tampering or theft.
4. Install in a Weatherproof Enclosure
If you plan to install the camera outdoors, make sure it is weatherproof and can withstand varying weather conditions. A protective enclosure will provide added durability and protect the camera from dust, rain, and extreme temperatures.
5. Assess Lighting Conditions
Consider the lighting conditions of the area you want to monitor. If the area is poorly lit, choose a camera with advanced low-light capabilities or consider installing additional lighting to improve visibility.
6. Test the Camera’s View and Range
Before finalizing the camera’s placement, test its view and range. Adjust the camera angle if necessary to eliminate blind spots and ensure it captures the desired area effectively. Test the camera’s range to ensure it can cover the required distance.
7. Secure Wiring and Power
Properly secure the camera’s wiring to prevent accidental damage or interference. Depending on the camera type, you may need to connect it to a power source or utilize wireless technologies for power and data transmission.
By following these guidelines, you can effectively set up and position your security camera to maximize its surveillance capabilities and enhance your property’s safety and security.
Monitoring and Recording Options
When it comes to monitoring and recording the footage captured by your security camera, there are several options available to consider.
1. Live Viewing
You can monitor your security camera’s feed in real-time through a variety of devices, such as smartphones, tablets, or computers. By accessing the camera’s IP address or using a dedicated app, you can keep an eye on your property no matter where you are.
2. Remote Access
With remote access capabilities, you can view your camera’s live feed anywhere with an internet connection. This is especially useful if you need to monitor your property while traveling or when you’re away from home.
3. Motion Detection
To save storage space and reduce the time spent reviewing footage, many security cameras offer motion detection capabilities. When motion is detected, the camera will automatically start recording, alerting you to any potential intruders or activity.
4. Recording Options
There are various ways to record the footage captured by your security camera. Some cameras come with built-in storage options, such as SD cards, while others allow you to connect an external hard drive or use cloud storage services for easy access and backup.
5. Time-Lapse Recording
Time-lapse recording is another option that allows you to condense hours or days of footage into a much shorter video. This can be useful when reviewing long periods of inactivity or when you want to capture specific events over an extended period.
In conclusion, monitoring and recording options play a crucial role in maximizing the effectiveness of your security camera. Choose the options that best fit your needs and provide you with the peace of mind knowing that your property is protected.
Remote Access and Control
Once you have set up your simple security camera, you may wonder how to access and control it remotely. With remote access, you can monitor your camera feed from anywhere in the world, as long as you have an internet connection.
To enable remote access, you need to ensure that your camera is connected to the internet. Most modern security cameras come with built-in Wi-Fi capabilities, making it easy to connect them to your home network.
Once your camera is connected to the internet, you can access it through a web browser or a dedicated mobile app. The manufacturer of your camera may provide a web portal or an app specifically designed for their cameras. Alternatively, you can use generic IP camera viewer software that supports a wide range of camera models.
When accessing your camera remotely, it is essential to secure your connection to protect your privacy. Make sure to use a strong, unique password for your camera and enable encryption whenever possible.
Remote Control
Remote control allows you to adjust the camera’s settings and angles without physically being near it. You can pan, tilt, and zoom the camera remotely, making it convenient to view different areas or explore a larger area in detail.
Some cameras even allow for two-way audio communication, enabling you to talk and listen through the camera. This feature can be handy if you want to communicate with people near the camera or scare away intruders.
With remote access and control, you can always keep an eye on your property, loved ones, or pets, no matter where you are.
Important: Before enabling remote access, make sure to familiarize yourself with the applicable laws and regulations regarding surveillance and privacy rights in your area.
Tips for Maximizing Your Security Camera’s Effectiveness
Investing in a security camera system is an important step towards protecting your property and enhancing overall safety. To ensure you get the most out of your security camera, consider these tips:
1. Strategic Placement
Where you position your security cameras plays a crucial role in their effectiveness. Identify key areas that require surveillance, such as entrances, windows, and blind spots. Mount the cameras at an optimal height and angle to capture clear footage.
2. Adequate Lighting
Proper lighting is essential for capturing high-quality images day and night. Install outdoor lighting to eliminate dark shadows and improve image clarity. For night vision cameras, ensure that external light sources do not interfere with their infrared capabilities.
3. Regular Maintenance
Perform routine maintenance checks to ensure your security cameras are in good working condition. Clean the lenses to prevent dirt or dust build-up, and inspect all cables and connections for any signs of damage. Regular maintenance will help prevent issues and ensure optimal performance.
4. NVR or Cloud Storage
Choose the right storage option for your security camera footage. Consider using a Network Video Recorder (NVR) for local storage or opt for cloud storage services. Both options come with their own advantages and must be chosen based on your needs and budget.
By following these tips, you can maximize the effectiveness of your security camera system and enhance the overall security of your property.
Common Troubleshooting Issues with Security Cameras
Security cameras are an important tool for surveillance and ensuring the safety of your property. However, like any technology, they can sometimes experience issues. Here are some common troubleshooting issues you may encounter with security cameras:
No Power or Signal
If your security camera is not receiving power or there is no signal, there could be a few reasons for this. First, check that the power supply is connected properly and working. Ensure that all cables are securely connected and not damaged. If you are using a wireless camera, make sure that the signal is not being blocked by obstructions or interference from other devices. Sometimes, resetting the camera or checking the settings can resolve power or signal issues.
Poor Image Quality
If you are experiencing poor image quality on your security camera, there are a few troubleshooting steps you can take. First, check the camera lens for any dust or debris and clean it if necessary. Ensure that the camera is focused correctly and adjust the focus if needed. If you are using a digital camera, check the image settings to make sure they are not set too low. Additionally, poor lighting conditions can affect the image quality, so consider adding supplemental lighting or adjusting the camera’s exposure settings.
If the problem persists, it’s possible that the camera’s sensor or lens may be damaged and require repair or replacement. Consulting the camera’s manual or contacting the manufacturer’s support team can provide further guidance.
Camera Not Recording
If your security camera is not recording, there could be a few reasons for this. First, check that the storage device, such as an SD card or hard drive, is properly connected and has enough space to store recordings. Ensure that the camera’s recording settings are configured correctly, including setting up motion detection if desired. If the camera has a motion detection feature, test it to ensure that it is functioning properly. Sometimes, a simple restart or firmware update can resolve recording issues.
If all else fails, reach out to the camera’s manufacturer or consult their support resources for further troubleshooting steps specific to your camera model.
By following these troubleshooting steps, you can address common issues that may arise with security cameras and ensure that they are functioning optimally to provide the desired level of surveillance and security.
FAQ,
What materials do I need to make a simple security camera?
To make a simple security camera, you will need a Raspberry Pi, a camera module, a microSD card, a power adapter, and an Ethernet cable.
How do I connect the camera module to the Raspberry Pi?
To connect the camera module to the Raspberry Pi, you will need to insert the flat cable from the camera module into the CSI (Camera Serial Interface) port on the Raspberry Pi board.
What software should I use to set up the security camera on the Raspberry Pi?
You can use different software options to set up the security camera on the Raspberry Pi, such as Raspbian OS with the Raspicam package, or motionEyeOS which is a dedicated operating system for surveillance cameras.
How can I access the security camera remotely?
To access the security camera remotely, you can set up port forwarding on your router and then use the public IP address of your network to access the camera from a remote location. Alternatively, you can use a service like ngrok to create a secure tunnel to your Raspberry Pi.


