Setting the date on your mc1 mini security camera is an essential step in ensuring accurate and reliable surveillance. With the correct date and time displayed on your camera, you can easily identify and organize footage, making it easier for you to review specific events and incidents.
In this guide, we will walk you through the step-by-step process of setting the date on your mc1 mini security camera.
Firstly, ensure that your mc1 mini security camera is connected to a stable power source. This can be done by plugging the camera into a power outlet or using a compatible power adapter.
Next, locate the settings menu on your mc1 mini security camera. This can typically be accessed by navigating through the camera’s on-screen display or through a dedicated app.
Once you have entered the settings menu, look for the “Date and Time” or “Date/Time” option. Select this option to proceed with setting the date.

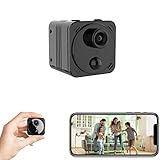
Overview of MC1 Mini Security Camera
The MC1 Mini Security Camera is a compact and versatile surveillance device that offers high-quality video recording for various security applications. With its small size and discreet design, this camera can be easily concealed and mounted in any location, providing effective monitoring without drawing attention.
Key Features
The MC1 Mini Security Camera comes with a range of features that make it a reliable and efficient surveillance solution:
- HD Video Recording: This camera records high-definition video footage, capturing clear and detailed images.
- Wide-Angle Lens: The camera is equipped with a wide-angle lens, allowing it to cover a broader field of view and capture more details.
- Motion Detection: With its built-in motion detection feature, the camera can automatically start recording when any movement is detected, ensuring you never miss any important events.
- Loop Recording: The camera supports loop recording, meaning that once the storage is full, it will automatically overwrite the oldest recordings, ensuring continuous and uninterrupted recording.
- Easy Setup: Setting up the MC1 Mini Security Camera is straightforward and hassle-free. Simply follow the provided instructions to connect the camera to your preferred monitoring device or network.
Applications
The MC1 Mini Security Camera can be used in various security scenarios, including:
- Home Security: Monitor your home and keep an eye on your family and belongings, even when you are away.
- Office Surveillance: Enhance the security of your office or workplace by monitoring entrances, hallways, and sensitive areas.
- Store Monitoring: Keep an eye on your retail store to prevent theft, monitor customer behavior, and ensure employee safety.
- Pet Monitoring: Check on your pets and make sure they are safe and well-behaved while you are not at home.
Overall, the MC1 Mini Security Camera is a reliable and versatile surveillance solution that offers high-quality video recording and easy setup, making it an ideal choice for various security applications.
Step 1: Unboxing the MC1 Mini Security Camera
Before getting started with setting the date on your MC1 Mini Security Camera, it is important to unbox and inspect the contents of the package to ensure everything is included and undamaged.
What You Will Need
Before unboxing the camera, make sure you have the following items:
| MC1 Mini Security Camera | USB cable |
| Mounting bracket and screws | Power adapter |
| User manual | Memory card (optional) |
Unboxing Process
Follow these steps to properly unbox the MC1 Mini Security Camera:
- Open the package of the MC1 Mini Security Camera.
- Remove all the contents from the package and place everything on a clean, flat surface.
- Inspect each item for any signs of damage or defects.
- Read through the user manual to familiarize yourself with the camera and its features.
Make sure to keep all the accessories and packaging in a safe place in case you need them in the future.
Once you have completed the unboxing process, you are ready to move on to the next step of setting the date on your MC1 Mini Security Camera.
Step 2: Installing the MC1 Mini Security Camera
After setting the date and time on your MC1 Mini Security Camera, it’s time to install the camera itself. Follow these steps to ensure a proper installation:

- Choose the installation location: Select a suitable location for the MC1 Mini Security Camera. Make sure it is near a power source and has a clear view of the area you want to monitor.
- Mount the camera: Use the included mounting bracket to securely attach the camera to a wall or ceiling. Ensure that the camera is level and facing the desired direction.
- Connect the power: Plug the power adapter into the camera’s power port, and then connect the adapter to a power outlet. Make sure the power source is stable and reliable.
- Adjust the camera angle: Use the adjustable angle feature of the camera to set the desired viewing angle. You can rotate and tilt the camera to capture the best view of the monitored area.
- Connect to Wi-Fi: If your MC1 Mini Security Camera supports Wi-Fi connectivity, follow the instructions provided in the user manual to connect the camera to your home network. This will allow you to access the camera’s live feed remotely.
- Test the camera: Once the installation is complete, test the camera to ensure it is functioning properly. Check the live feed on your smartphone or computer to verify that the camera is capturing clear and crisp images.
By following these steps, you can easily install your MC1 Mini Security Camera and start monitoring your property with ease and convenience.
Step 3: Connecting the MC1 Mini Security Camera to Wi-Fi
After successfully powering on the MC1 Mini Security Camera and setting the date and time, the next step is to connect it to your Wi-Fi network. This will allow you to remotely monitor the camera’s feed and access its various features from your smartphone or computer.
Before You Begin:
Before proceeding with the Wi-Fi connection setup, make sure you have the following:
- Wi-Fi network name (SSID) and password: You will need this information to connect the camera to your network.
- Mobile device or computer: You will need either a smartphone or a computer to complete the setup process.
Connecting to Wi-Fi:
- On your mobile device or computer, open the Wi-Fi settings menu.
- Look for the network named “YourNetworkName“. This is the Wi-Fi network created by the MC1 Mini Security Camera for initial setup.
- Connect to the “YourNetworkName” Wi-Fi network using the password “YourNetworkPassword“.
- Once connected to the camera’s Wi-Fi network, open a web browser and enter the following IP address: “192.168.1.1“.
- You will be directed to the camera’s web interface. Enter the default username and password, which is usually “admin” for both fields. If this does not work, consult your camera’s manual for the correct login credentials.
- In the camera’s web interface, navigate to the Wi-Fi settings page.
- Select your Wi-Fi network from the available list of networks.
- Enter your Wi-Fi network password and click on the “Connect” button.
- Wait for the camera to connect to your Wi-Fi network. This may take a few moments.
- Once the camera is successfully connected, you will be prompted to close the browser and reconnect to your regular Wi-Fi network on your mobile device or computer.
After completing these steps, the MC1 Mini Security Camera will be connected to your Wi-Fi network. You can now access its features and monitor the camera’s feed remotely using your smartphone or computer.
Step 4: Setting the Date and Time on the MC1 Mini Security Camera
Once you have successfully connected and powered on your MC1 Mini security camera, it is important to set the correct date and time. Follow the steps below to ensure accurate timestamps on your recordings:

- Access the camera’s settings menu by logging into the camera’s web interface using your preferred web browser. Enter the camera’s IP address into the address bar and press Enter.
- Enter your login credentials, including the username and password, to access the camera’s settings.
- Navigate to the “System” or “Device” tab in the settings menu. This tab may vary depending on the camera’s software version or interface design.
- Look for the “Date and Time” or “Time Settings” option and click on it.
- Choose your preferred time zone from the drop-down menu. You can also manually set the correct date and time by inputting the values in the designated fields.
- Click on the “Save” or “Apply” button to save the changes made to the date and time settings.
- Verify that the date and time on your MC1 Mini security camera are updated and accurate by checking the timestamp on a recorded video or image.
By following these steps, you can ensure that any recordings made by your MC1 Mini security camera have the correct date and time information, enhancing their usefulness for security purposes.
Step 5: Configuring Motion Detection Settings
Once you have successfully set the date on your MC1 Mini Security Camera, the next step is to configure the motion detection settings. These settings will allow the camera to alert you whenever it detects any movement in its field of view.
Follow these steps to configure the motion detection settings:
- Open the camera’s settings menu by navigating to the “Settings” tab on the camera’s home screen.
- Select the “Motion Detection” option from the menu.
- Enable the motion detection feature by toggling the switch to the “On” position.
- Adjust the motion detection sensitivity level to fine-tune how the camera detects motion. Higher sensitivity levels may result in more frequent alerts.
- Set the detection area by selecting the desired areas on the camera’s live view screen. You can choose to monitor specific areas or the entire view.
- Configure the notification settings by selecting the “Notification” option in the motion detection menu. Here, you can choose to receive alerts on your smartphone or via email.
- Save the settings by clicking the “OK” or “Save” button.
With the motion detection settings properly configured, your MC1 Mini Security Camera will be able to detect any movement and notify you accordingly. This feature is especially useful for monitoring your home or office when you are away.
Step 6: Accessing Live Footage on the MC1 Mini Security Camera
Once you have set the date on your MC1 Mini Security Camera, you are ready to access the live footage. Follow these simple steps:
- Make sure the camera is connected to a power source and turned on.
- Connect your smartphone or tablet to the same Wi-Fi network as the camera.
- Download and install the MC1 Mini Security Camera app from the App Store or Google Play Store.
- Launch the app and create an account, if prompted.
- Tap on the “Add New Camera” button in the app.
- Follow the on-screen instructions to connect the camera to your app.
- Once the camera is successfully connected, you will be able to view the live footage on your smartphone or tablet.
- You can also access the camera’s settings through the app to adjust various options such as motion detection sensitivity and video quality.
- To view recorded footage, simply tap on the “Playback” or “Recordings” option in the app and select the desired date and time.
By following these steps, you can easily access the live footage and recordings on your MC1 Mini Security Camera, giving you peace of mind and ensuring the safety of your home or office.

Troubleshooting: Common Issues with the MC1 Mini Security Camera
If you are experiencing any issues with your MC1 Mini Security Camera, here are some common problems and troubleshooting steps you can take:
1. Camera Not Turning On
If your camera is not turning on, first make sure that it is properly connected to a power source. Check if the power cable is securely plugged into the camera and the power outlet. If the camera still does not turn on, try using a different power cable or power adapter to eliminate the possibility of a faulty cable or adapter.
2. No Video Footage
If you are not getting any video footage from your MC1 Mini Security Camera, there are a few things you can check. First, ensure that the camera is properly connected to your network. Check the Ethernet cable connection and make sure it is securely plugged into both the camera and your router or modem. Additionally, make sure that your network is active and functioning properly. Restart your router if necessary. If you have multiple cameras, check if the issue is specific to one camera or affecting all of them. If it is specific to one camera, try resetting the camera to its factory settings.
3. Camera Not Recording
If your MC1 Mini Security Camera is not recording video footage, first check if you have enabled the motion detection feature. The camera will only record when it detects motion within its field of view. Make sure that the sensitivity and detection area settings are properly configured. If motion detection is enabled and the camera still does not record, check if the storage card is inserted properly and has enough free space. If the storage card is full, delete some files or replace it with a new one.
4. Forgot Password
If you have forgotten the password for your MC1 Mini Security Camera, you can reset it to its factory settings. To do this, locate the reset button on the camera and press and hold it for about 10 seconds. The camera will reset and the default password will be restored. Please note that resetting the camera will erase all previous settings.

If none of the above troubleshooting steps resolve your issue, it may be necessary to contact the manufacturer’s customer support for further assistance.