
With the rapid advancement of technology, it’s becoming increasingly common to find affordable and versatile solutions for home security. One of the most popular choices today is using a Raspberry Pi as a security camera. The Raspberry Pi is a credit card-sized computer that offers a wide range of functionalities while being incredibly affordable.
So, can you really use a Raspberry Pi as a security camera? The answer is a resounding yes! Thanks to its powerful processing capabilities and a variety of available accessories, the Raspberry Pi can be turned into a fully functional security camera system.
But why choose a Raspberry Pi over traditional security camera systems? Well, for starters, the Raspberry Pi provides a cost-effective solution. With its low price point, you can set up multiple cameras without breaking the bank. Additionally, the Raspberry Pi offers flexibility and customization options that are often lacking in off-the-shelf security camera systems, allowing you to tailor the system to your specific needs.
Advantages of using a Raspberry Pi for a security camera
There are several advantages of using a Raspberry Pi for a security camera:
1. Cost-effective:
Raspberry Pi is an affordable and cost-effective solution compared to traditional security camera systems. With a Raspberry Pi, you can build your own security camera setup using open-source software and minimal hardware components.
2. Customizability:
Raspberry Pi provides a high level of customizability, allowing you to tailor your security camera system to your specific needs. You can choose from a wide range of open-source security camera software, such as MotionEyeOS or ZoneMinder, and customize the settings according to your preferences.
3. Flexibility:
Raspberry Pi offers flexibility in terms of camera options and placement. You can connect different types of cameras, including USB cameras and Raspberry Pi Camera Modules, to the board. This allows you to choose cameras with varying resolutions and features. Additionally, since the Raspberry Pi is compact and lightweight, you can easily place it in various locations to get the desired camera angle.
4. Remote access:
With a Raspberry Pi security camera, you can access live camera feeds remotely. By connecting your Raspberry Pi to the internet, you can view the camera footage from any device with an internet connection. This feature is particularly useful if you want to monitor your property while you are away or check on your pets at home.
5. Integration with other systems:
Raspberry Pi can be easily integrated with other smart home systems or automation tools. You can connect your security camera system to a home automation hub, such as Home Assistant, and automate tasks based on camera triggers. For example, you can set up the system to turn on the lights when motion is detected or send notifications to your smartphone when an event occurs.
In conclusion, using a Raspberry Pi for a security camera offers cost-effectiveness, customizability, flexibility, remote access, and integration capabilities. These advantages make it a popular choice for DIY security camera setups.

Choosing the right Raspberry Pi Model for your Security Camera Project
When it comes to setting up a security camera system using a Raspberry Pi, choosing the right model is essential. Different Raspberry Pi models offer varying capabilities, and selecting the one that suits your security camera project requirements can ensure optimum performance and functionality.
Considerations for choosing a Raspberry Pi model:
1. Processing power: The processing power of the Raspberry Pi model determines its ability to handle tasks such as video encoding and streaming. Higher-end models like Raspberry Pi 4 offer more powerful processors, which can handle multiple camera feeds and higher video resolutions.
2. Memory: The amount of RAM on a Raspberry Pi model affects its multitasking capabilities. Models with higher RAM can handle running multiple security camera streams concurrently, ensuring smooth operation.
3. Connectivity: Consider the connectivity options provided by the Raspberry Pi model. Look for models with Ethernet or USB ports if you plan to connect the security cameras using wired connections. Additionally, built-in Wi-Fi capability can eliminate the need for additional adapters.
4. Video output: Some security camera projects may require the ability to connect a monitor or display for live viewing or configuration purposes. In such cases, ensure the Raspberry Pi model has an HDMI or composite video output port.

Recommended Raspberry Pi models:
1. Raspberry Pi 4 Model B: This model offers the highest processing power and RAM, making it suitable for demanding security camera projects. It has multiple USB 3.0 ports and supports dual 4K video output.
2. Raspberry Pi 3 Model B+: This model provides a balance between processing power and affordability. It has built-in Wi-Fi and includes an Ethernet port for connectivity. It also supports video output through HDMI.
3. Raspberry Pi Zero W: This model is compact and affordable, making it suitable for small-scale security camera projects. It has built-in Wi-Fi and supports video output through a mini HDMI adapter.
Ultimately, the choice of Raspberry Pi model for your security camera project depends on your specific needs and budget. Ensure to consider factors such as processing power, memory, connectivity options, and video output capabilities to select the ideal model for your project.
Setting up a Raspberry Pi Security Camera System
Using a Raspberry Pi for a security camera system is a cost-effective and customizable solution. The Raspberry Pi’s small size, low power consumption, and versatility make it an ideal choice for creating a DIY security camera setup.

Hardware Requirements
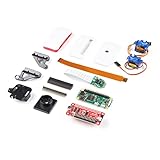
Before getting started, you will need the following hardware:
| Hardware | Description |
|---|---|
| Raspberry Pi | A Raspberry Pi board with the necessary peripherals (power supply, microSD card, etc.) |
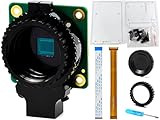
| Raspberry Pi Camera Module | A Raspberry Pi camera module for capturing video and images |
| SD Card | A microSD card with enough storage capacity for your application |
| Internet Connection | An internet connection for remote access and notifications |
| Mounting Hardware | Mounting hardware to secure the Raspberry Pi and camera module in place |
Software Setup
Once you have all the necessary hardware, follow these steps to set up your Raspberry Pi security camera system:
- Install a compatible operating system on the microSD card, such as Raspbian.
- Connect the Raspberry Pi camera module to the Raspberry Pi board.
- Configure the Raspberry Pi for remote access and notifications, if desired.
- Install and configure the security camera software. There are several options available, such as MotionEyeOS and ZoneMinder.
- Set up any additional features you want, such as motion detection, recording schedules, or live streaming.
- Mount the Raspberry Pi and camera in the desired location using the provided mounting hardware.
- Connect the Raspberry Pi to a power source and ensure it has a stable internet connection.
- Access the camera’s live feed and recordings remotely using a computer, smartphone, or tablet.
With a Raspberry Pi security camera system, you can monitor your home or office, receive notifications of possible intrusions, and take action if necessary. The flexibility and affordability of the Raspberry Pi make it an excellent choice for DIY security projects.
Choosing the appropriate camera module for your raspberry pi security camera
When setting up a security camera using a Raspberry Pi, choosing the right camera module is essential to ensure optimal performance and functionality. There are several factors to consider when choosing the appropriate camera module for your project.
Resolution
The resolution of the camera module determines the level of detail and clarity in the captured images or videos. Higher resolution modules, such as those with 5MP or more, will provide sharper images and better overall quality. However, higher resolution modules also require more processing power and storage space, so it is important to balance your needs accordingly.
Field of View
The field of view (FOV) of a camera module determines the area that will be captured by the camera. Modules with a wide FOV cover a larger area, while modules with a narrow FOV focus on a smaller region in greater detail. Consider the specific area you want to monitor and choose a camera module with an appropriate FOV to ensure optimal coverage.
Connectivity
Ensure that the camera module you choose is compatible with the Raspberry Pi model you are using. Most camera modules should be compatible with the Raspberry Pi’s CSI (Camera Serial Interface) port. Additionally, consider the availability of compatible software and APIs for controlling and accessing the camera module.
Additional Features
Some camera modules may offer additional features that can enhance your security camera setup. These features may include night vision capabilities, adjustable focus, pan-tilt-zoom functionality, or even built-in motion detection. Assess your specific needs and prioritize the features that are most important for your security camera project.
In conclusion, choosing the appropriate camera module for your Raspberry Pi security camera is crucial for achieving the desired results. Consider the resolution, field of view, connectivity, and additional features to ensure that the camera module meets your requirements and enhances the overall security of your setup.

Selecting the Best Software for Your Raspberry Pi Security Camera
When it comes to setting up a security camera using a Raspberry Pi, choosing the right software is crucial. The software you select will determine the features and functionality of your camera, as well as the level of security it provides. Here are some options to consider:
| Software | Description |
|---|---|
| Raspberry Pi OS | This is the official operating system for Raspberry Pi and a popular choice for security camera projects. It is a lightweight and customizable Linux distribution that provides a solid foundation for running camera software. |
| motionEyeOS | motionEyeOS is a dedicated operating system for video surveillance, designed to work with Raspberry Pi. It offers a user-friendly web interface for managing and monitoring multiple cameras, motion detection, and various other features. |
| Kerberos.io | Kerberos.io is an open-source video surveillance system that can run on Raspberry Pi. It supports multiple cameras, motion detection, live streaming, and image analysis. It also provides cloud storage and integration with other services. |
| Zoneminder | Zoneminder is another popular open-source video surveillance software that can be installed on Raspberry Pi. It offers advanced features like motion detection, event notifications, camera management, and remote access through a web interface. |
| Shinobi | Shinobi is a lightweight and efficient video surveillance software that can be installed on Raspberry Pi. It provides live streaming, motion detection, email and push notifications, and supports multiple cameras and users. |
Each software has its own advantages and features, so it’s important to evaluate them based on your specific requirements and preferences. Consider factors like ease of use, reliability, performance, and community support when making your decision.
Regardless of the software you choose, the Raspberry Pi provides a cost-effective and versatile platform for setting up a security camera. With the right software, you can turn your Raspberry Pi into a powerful surveillance system and enhance the security of your home or workplace.
Configuring motion detection for your Raspberry Pi security camera
One of the key features of a Raspberry Pi security camera is the ability to detect and capture motion. By configuring your camera to detect motion, you can ensure that any movement is recorded and stored for later review. In this guide, we will walk through the steps to set up and configure motion detection for your Raspberry Pi security camera.
Step 1: Install Motion
The first step is to install the Motion software on your Raspberry Pi. Motion is an open-source software that provides motion detection functionality for your camera. To install Motion, open a terminal and run the following command:

sudo apt-get install motion
Step 2: Configure Motion
Once Motion is installed, you need to configure it to work with your camera. The configuration file for Motion is located at /etc/motion/motion.conf. Open this file in a text editor and make the following changes:
| Configuration Parameter | Recommended Value |
|---|---|
| daemon | on |
| webcam_localhost | off |
| stream_localhost | off |
| stream_port | 8081 |
| webcontrol_port | 8080 |
These configuration parameters ensure that Motion runs as a daemon, allows access from external devices, and sets the ports for streaming and web control.
Step 3: Start Motion
After configuring Motion, you can start the service by running the following command:
sudo service motion start
This will start the Motion service and enable motion detection for your camera. You can now access the Motion web interface by navigating to http://<your_raspberry_pi_ip_address>:8080 in a web browser.
From the Motion web interface, you can configure additional settings such as motion sensitivity, video quality, and file storage. Make sure to save your changes and test the motion detection to ensure it is working as expected.
With motion detection configured, your Raspberry Pi security camera is now ready to capture and record any movement it detects. This feature makes your camera an effective tool for monitoring and securing your home or workspace.
Remote access and monitoring for your Raspberry Pi security camera
Once you have set up and configured your Raspberry Pi security camera, you might want to be able to access and monitor it remotely. Remote access allows you to view live video feeds, manage recordings, and receive notifications from anywhere in the world.
1. Setting up remote access
To enable remote access for your Raspberry Pi security camera, you can use various methods:
- Port forwarding: By forwarding the appropriate ports on your router, you can access your camera’s interface over the internet using its public IP address.
- VPN: Setting up a virtual private network (VPN) allows you to securely access your Raspberry Pi’s network and camera from any location.
- Dynamic DNS: If you have a dynamic IP address, you can use a dynamic DNS service to assign a domain name to your camera, making it easier to access remotely.
2. Monitoring your security camera remotely
Once you have remote access set up, you can monitor your Raspberry Pi security camera using various methods:
- Browser-based interface: Many Raspberry Pi security camera software solutions provide a web-based interface that allows you to view live video feeds, playback recordings, and adjust camera settings using a standard web browser.
- Mobile apps: Some security camera applications offer mobile apps for iOS and Android devices, allowing you to access your camera’s feeds and settings on the go.
- Email notifications: You can configure your Raspberry Pi security camera to send email notifications when motion is detected, providing you with instant alerts wherever you are.
By setting up remote access and monitoring for your Raspberry Pi security camera, you can have peace of mind knowing that you can keep an eye on your property or loved ones from anywhere in the world.
Powering your Raspberry Pi security camera system
When setting up a Raspberry Pi security camera system, it is important to consider how to effectively power your devices. Powering your Raspberry Pi and camera modules correctly ensures stable operation and reliable surveillance. Here are some key considerations for powering your security camera system:
| Power source | Advantages | Disadvantages |
|---|---|---|
| USB power adapter | Convenient and widely available | Possible power fluctuations |
| Power over Ethernet (PoE) | Allows for both power and data transmission over a single cable | Requires a PoE splitter or PoE switch |
| Battery power | Portable and independent from power outlets | May require frequent charging or battery replacement |
| Solar power | Environmentally friendly and renewable | Requires proper setup and sufficient sunlight |
It is essential to choose a power source that is suitable for your specific security camera system requirements. Some factors to consider include the number of cameras, power consumption of the Raspberry Pi and camera modules, and the availability of power outlets in your desired camera locations.
Additionally, it is recommended to use a reliable power supply that can handle the power requirements of your Raspberry Pi and cameras. This helps to prevent power-related issues such as voltage drops or unstable performance. Make sure to select a power adapter or source that can deliver sufficient power to all components without causing undue strain.
Lastly, consider incorporating a power backup solution to ensure uninterrupted surveillance in the event of power outages or failures. This can be achieved by using uninterruptible power supply (UPS) devices or backup batteries.
By carefully selecting and implementing a suitable power solution, you can ensure the smooth and continuous operation of your Raspberry Pi security camera system for optimal security and peace of mind.
Tips for optimizing the performance of your Raspberry Pi security camera
When using a Raspberry Pi for a security camera setup, it’s important to optimize its performance to ensure smooth and reliable operation. Here are some tips to help you achieve the best results:
1. Choose the right Raspberry Pi model
Make sure you’re using a Raspberry Pi model that is capable of handling the demands of a security camera system. The newer models like Raspberry Pi 4 offer more processing power and memory and are better suited for this purpose.
2. Use a dedicated power supply
Provide your Raspberry Pi security camera with a dedicated power supply to ensure stable power delivery. Avoid using a USB port on another device as it may not provide enough power, leading to performance issues.
3. Optimize your camera settings
Adjust the camera settings, such as resolution and frame rate, to strike a balance between video quality and system performance. Higher resolutions and frame rates require more processing power, so find the optimal settings for your needs.
4. Utilize external storage
Save your camera footage to an external storage device, such as a USB drive or network-attached storage (NAS), instead of the SD card used for the Raspberry Pi’s operating system. This frees up resources and prevents SD card wear and tear.
5. Enable hardware acceleration
Utilize hardware acceleration features available on your Raspberry Pi to offload tasks like video encoding and decoding. This can significantly improve performance by utilizing the built-in hardware capabilities efficiently.
6. Consider using motion detection
Instead of continuously recording, enable motion detection on your camera to only capture video when motion is detected. This reduces the amount of data to process and store, saving system resources and storage space.
7. Monitor system temperature
Raspberry Pis can generate heat during extended periods of usage, which can affect performance. Regularly check the system temperature and ensure it stays within the recommended range by using a heatsink or a fan if necessary.
By following these tips, you can optimize the performance of your Raspberry Pi security camera and enhance its reliability and functionality.
FAQ
Can I use a Raspberry Pi for a security camera?
Yes, you can use a Raspberry Pi for a security camera. The Raspberry Pi is a versatile single-board computer that can be used for various purposes, including setting up a security camera system. You can connect a camera module or a USB camera to the Raspberry Pi, install appropriate software, and configure it to capture and store video footage. With the right setup, a Raspberry Pi can serve as an affordable and flexible solution for home or small business security.
What are the requirements for using a Raspberry Pi as a security camera?
To use a Raspberry Pi as a security camera, you will need a Raspberry Pi board, a camera module or a USB camera, a power supply, an SD card with an operating system, and a computer monitor or TV for viewing the camera feed. Additionally, you will need to install and configure software on the Raspberry Pi to capture and store video footage. There are various software options available, such as motionEyeOS, RPi-Cam-Web-Interface, and ZoneMinder, which provide different features and capabilities for setting up a security camera system.
Are there any limitations or drawbacks to using a Raspberry Pi as a security camera?
While a Raspberry Pi can be a cost-effective and flexible option for a security camera, there are some limitations and drawbacks to consider. Firstly, a Raspberry Pi is not as powerful as dedicated security camera systems, so it may not be able to handle multiple high-resolution camera feeds or advanced video processing tasks. Additionally, the performance of the Raspberry Pi as a security camera can be affected by the quality of the camera module or USB camera used. Lastly, the storage capacity of the SD card used in the Raspberry Pi may limit the amount of video footage that can be stored, and regular backups may be necessary to prevent data loss.


