
As a photographer who often works in low-light conditions, capturing the warm glow of lamplight can be a beautiful and challenging task. Finding the right camera settings to make the most of this unique lighting situation can greatly enhance the mood and atmosphere of your photos.
When shooting in lamplight, it’s important to adjust your camera settings to achieve the best results. One key setting to consider is the ISO, which controls the camera’s sensitivity to light. In low-light situations like lamplight, you may need to increase the ISO to capture more light and reduce the risk of blurry images.
Additionally, adjusting the aperture and shutter speed can help you achieve the desired effect in lamplight photography. By choosing a wider aperture, you can create a shallow depth of field and isolate your subject against the soft glow of the lamplight. Experimenting with different shutter speeds can also help you capture the movement and ambiance of the scene.
Best Camera Settings for Capturing Lamplight
Lamplight photography can create a warm and cozy atmosphere in your photos, but capturing the right balance of light can be challenging. Here are some tips on the best digital camera settings to use when shooting in lamplight.
ISO Setting
When shooting in low light conditions like lamplight, it’s important to adjust your camera’s ISO setting to a higher value to capture more light. Start by setting your ISO to around 800 to 1600 to avoid excessive noise in your photos.

- Set ISO: 800-1600
Aperture Setting
For lamplight photography, choose a wider aperture (lower f-stop number) to allow more light to enter your camera. A wide aperture like f/2.8 or f/4 will help you achieve a blurred background while keeping your subject well-lit.
- Aperture: f/2.8 or f/4
Shutter Speed Setting
To avoid camera shake and blur in your lamplight photos, set your shutter speed to a faster value. Aim for a minimum shutter speed of 1/60s or higher to ensure sharp images, especially if you’re shooting handheld.
- Shutter Speed: 1/60s or higher
Understanding the Impact of Lamplight on Photography
When shooting in lamplight, it’s crucial to understand how this type of lighting can affect your photography. Lamplight tends to be warm and can create a cozy, intimate atmosphere in your photos. However, it can also cast strong shadows and create a yellowish tint in your images.
One of the key considerations when working with lamplight is white balance. Since lamplight has a warmer colour temperature, adjusting your camera’s white balance settings can help ensure that your photos appear more natural and true to life. Experimenting with different white balance presets or manually adjusting the white balance can help you achieve the desired look.
Here are some tips for capturing stunning photos in lamplight:

- Use a wider aperture to let in more light and create a shallow depth of field.
- Adjust your ISO to a higher setting to compensate for the low light conditions.
- Consider using a tripod to avoid camera shake and ensure sharp images.
- Experiment with different angles and compositions to make the most of the unique lighting provided by lamplight.
Choosing the Right White Balance Setting
When capturing photos in lamplight, selecting the appropriate white balance setting is crucial to achieving accurate and natural-looking colors. The white balance setting on your camera determines how it interprets the color temperature of the light source, ensuring that whites appear white and other colors are rendered correctly.
Experimenting with different white balance presets, such as tungsten or incandescent, can help you find the best setting for your lamplight photography. Keep in mind that each lighting situation may require a different white balance adjustment to produce the most pleasing results.
- Auto White Balance: This setting allows the camera to automatically adjust the white balance based on the light conditions. While convenient, it may not always provide the most accurate color representation in lamplight.
- Custom White Balance: For more precise color control, consider setting a custom white balance by using a white or neutral gray card under the lamplight you will be shooting in. This method ensures accurate color reproduction in your photos.
- Daylight or Tungsten: Depending on the type of lamplight you are shooting under, selecting the appropriate preset like daylight or tungsten can help correct the color temperature for more natural-looking images.
Adjusting ISO for Low Light Conditions
When shooting in low light conditions, adjusting the ISO settings on your digital camera is crucial to capturing clear and well-exposed photos. In dimly lit environments, increasing the ISO sensitivity can help you achieve brighter images without the need for a flash.
As the ISO setting goes higher, the camera becomes more light-sensitive, allowing you to capture images in low light with less noise. However, it’s important to find a balance as higher ISO settings can also introduce graininess or digital noise to your photos. Experiment with different ISO values to find the optimal setting for the specific lighting conditions you are shooting in.
- Low ISO: Use a low ISO setting (e.g., ISO 100-400) for well-lit environments or when you want to minimize noise in your images.
- Medium ISO: Opt for a medium ISO setting (e.g., ISO 400-800) for indoor settings with moderate lighting or when shooting in twilight conditions.
- High ISO: Increase the ISO setting (e.g., ISO 800-3200) for low light situations such as evening or indoor photography without a flash.
Setting the Aperture for Lamplight Photography
When capturing images in lamplight, adjusting the aperture setting on your camera is crucial to achieve the desired results. The aperture controls the amount of light that enters the camera lens, affecting the exposure and depth of field in your photos.

To enhance the quality of your lamplight photography, consider using a wide aperture setting, such as f/2.8 or lower. This setting allows more light to enter the camera, resulting in brighter and more vibrant images. Additionally, a wide aperture creates a shallow depth of field, making the subject stand out against a blurred background, adding a touch of creativity to your photos.
- Wide Aperture: Opt for a low f-stop number like f/2.8 for well-exposed, bright images.
- Shallow Depth of Field: Create a blurred background for a more artistic touch.
- Experiment: Try different aperture settings to find the perfect balance between light and focus.
Optimizing Shutter Speed for Lamplight Shots
When capturing images in lamplight, adjusting the shutter speed is crucial to achieving the best results. One of the key considerations is finding the right balance between the length of time the shutter is open and the amount of light entering the camera.
To optimize shutter speed for lamplight shots, start by setting a slower shutter speed to allow more light to reach the camera sensor. This will help brighten the image and capture the warm glow of the lamplight. Experiment with different shutter speeds to find the optimal setting for your specific shooting conditions.
- Low Light Situations: In low light situations, a slower shutter speed, such as 1/30 or 1/15 of a second, may be necessary to capture enough light for a well-exposed image.
- Handheld Shooting: If you are shooting handheld in lamplight, be mindful of camera shake at slower shutter speeds. Consider using a tripod or stabilizing your camera to avoid blurry images.
- Creative Effects: Adjusting the shutter speed can also create unique effects in lamplight photography. Experiment with long exposures to capture light trails or motion blur for artistic results.
Utilizing Exposure Compensation in Lamplight
When shooting in lamplight, it’s crucial to understand how exposure compensation can help improve your photos. Lamplight can often lead to underexposed images, as the camera’s metering system may struggle to accurately gauge the light levels. This is where exposure compensation comes in handy.
Exposure compensation allows you to adjust the exposure settings of your camera to ensure that your photos are properly exposed in challenging lighting conditions. In lamplight, you may need to use positive exposure compensation to brighten up your images and capture more detail in the shadows.

Using Exposure Compensation Effectively
- Experiment with different exposure compensation values to find the right balance between highlights and shadows.
- Check your camera’s histogram to ensure that you are not losing detail in either the highlights or shadows.
- Consider using spot metering to meter for the brightest part of the scene and then apply exposure compensation accordingly.
Focusing Techniques for Shooting in Lamplight
When shooting in lamplight, achieving proper focus is crucial to capturing clear and sharp images. I have found that using manual focus can be more effective than relying on autofocus in low-light situations. By manually adjusting the focus ring on the lens, I can ensure that the subject is sharp and in focus, even in dimly lit environments.
Another useful technique for focusing in lamplight is to use the camera’s magnification feature to zoom in on the subject and fine-tune the focus. This allows me to see more details and make precise adjustments to achieve the desired focus. Additionally, using a tripod can help stabilize the camera and avoid any blurriness caused by hand movements, especially when shooting at slower shutter speeds.
- Use manual focus for better control
- Utilize the camera’s magnification feature
- Consider using a tripod for stability
Enhancing Lamplight Photos with Filters
When capturing photos in lamplight, using filters can significantly enhance the quality and mood of your images. Filters are versatile tools that can help you achieve different effects and make your photos stand out. Here are some tips on how to effectively use filters to enhance your lamplight photos:
- Neutral Density Filter: A neutral density filter can help reduce the amount of light entering the camera, allowing you to achieve longer exposure times without overexposing your images. This can create a beautiful softness in your lamplight photos, enhancing the ambiance and highlighting the warm glow of the light sources.
- Warming Filter: Adding a warming filter to your lens can enhance the golden tones of lamplight, making your photos appear cozier and more inviting. This filter can help intensify the warm glow of the light sources, giving your images a rich and intimate feel.
- Soft Focus Filter: Using a soft focus filter can create a dreamy and ethereal effect in your lamplight photos. This filter can help blur the edges and soften the details, giving your images a romantic and nostalgic look. It can enhance the mood of your photos and add a touch of magic to the scene.
Experimenting with Different Camera Modes
As I delved into capturing lamplight scenes with my digital camera, I found that experimenting with various camera modes was crucial in achieving the perfect shot. One mode that I frequently used was the aperture priority mode, allowing me to control the depth of field and capture the intricate details of the lamplight.
Another mode that proved to be valuable was the manual mode, which gave me full control over both the aperture and shutter speed. This allowed me to adjust the settings according to the intensity of the lamplight and the desired effect I wanted to achieve in my photos.
- Aperture Priority Mode: Use this mode to control the depth of field and capture detailed lamplight scenes.
- Manual Mode: Take full control over aperture and shutter speed to adjust settings based on the intensity of lamplight and desired effect.
Summary
In conclusion, capturing stunning lamplight images can be a rewarding experience for photographers. By using the right camera settings and techniques, you can create mesmerizing and atmospheric photos that showcase the beauty of lamplight. Remember to adjust your white balance, use a low ISO setting, experiment with exposure compensation, and consider using a tripod for stability. Additionally, don’t be afraid to play around with different angles and compositions to truly capture the essence of lamplight.
With practice and experimentation, you can master the art of photographing lamplight and create captivating images that tell a unique story. So next time you find yourself in a dimly lit setting with beautiful lamplight, grab your camera and apply these tips and tricks to capture stunning images that stand out.
Best digital camera settings for lamplight

RALENO 19.5W LED Video Soft Light Panel, 650Lux/m Camera Panel Light Built-in 2* 4000mAh Batteries, CRI>95 3200-5600K Photography Studio Lights for TikTok YouTube Video Recording Photography Streaming
$59.99
Features
| Part Number | PLV-S192 |
| Model | PLV-S192 |
| Warranty | 1 Year |
| Color | Black |
| Size | S192 Video light |


| Price history for RALENO 19.5W LED Video Soft Light Panel, 650Lux/m Camera Panel Light Built-in 2* 4000mAh Batteries, CRI>95 3200-5600K Photography Studio Lights for TikTok YouTube Video Recording Photography Streaming | |
|---|---|
|
Latest updates:
|
|
Didn't find the right price? Set price alert below


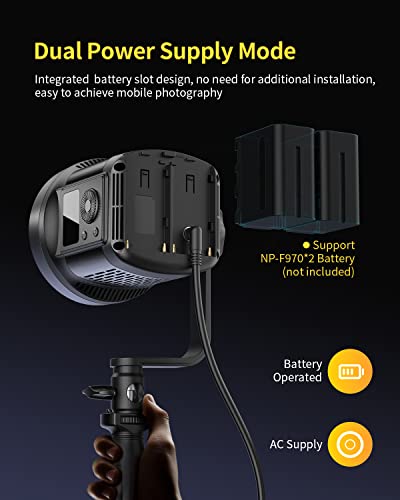
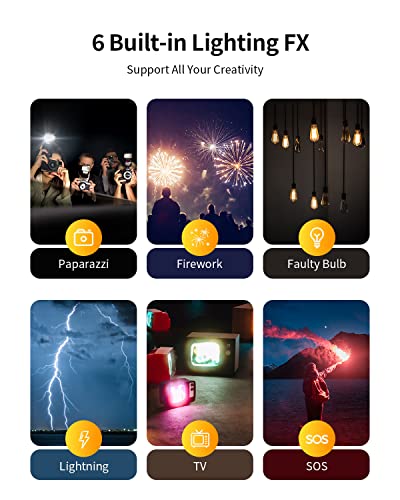
RALENO 80W LED Video Light with 2.4G Remote Control, 7200Lux CRI95+ Studio Lights with Cooling Fan and Bowens Mount, Photography Light on Continuous Output Lighting for YouTube TikTok Video Recording
$85.99
Features
| Part Number | PLV-C80 |
| Model | PLV-C80 |
| Warranty | 1 year |
| Size | 7.44*5.12*5.12in |
| Language | German |


| Price history for RALENO 80W LED Video Light with 2.4G Remote Control, 7200Lux CRI95+ Studio Lights with Cooling Fan and Bowens Mount, Photography Light on Continuous Output Lighting for YouTube TikTok Video Recording | |
|---|---|
|
Latest updates:
|
|
Didn't find the right price? Set price alert below

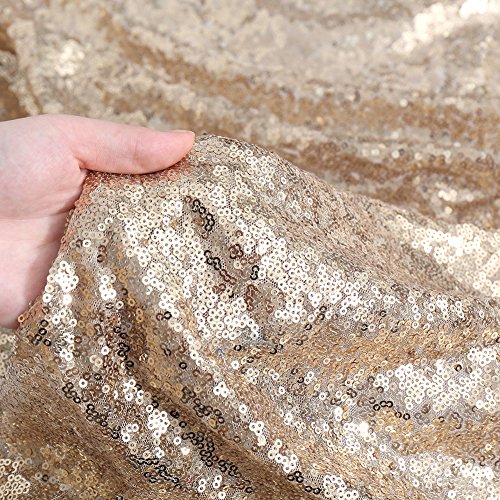
Poise3EHome 90×156'' Rectangle Light Gold Sequin Tablecloth for Party Cake Dessert Table Exhibition Events, Light Gold
Features
| Part Number | STO-R01-90x156-LGOLD |
| Color | Light Gold |
| Size | 90×156'' |


Didn't find the right price? Set price alert below

Liphontcta LED Video Soft Light Panel, for Studio Photography | Video Recording | Conference | YouTube,2700K-5700K CRI95+ | with Remote Control & Mini Tripod (Camera Light with Mini Tripod)
Features
| Part Number | RA96+ |
| Color | black, white |
| Size | Camera Light with Mini Tripod |


