When it comes to securing your property, installing a security camera is one of the best decisions you can make. However, mounting a security camera to a brick surface can be a bit challenging.
Brick is a durable and sturdy material, which makes it difficult to drill into without the right tools and techniques. But don’t worry, there are several effective ways to mount a security camera to a brick wall or surface.
One of the most common methods is using masonry screws or anchors. These specialized screws are designed to grip into the brick and provide a secure hold. To install the camera, you’ll need to pre-drill holes into the brick using a masonry drill bit, then insert the screws or anchors and tighten them securely. This method ensures a strong and reliable mount for your security camera.
Best Way to Mount Security Camera to Brick
When it comes to mounting a security camera to brick, there are a few key factors to consider. As someone who has dealt with this issue before, I can offer some advice on the best way to tackle this task.
1. Use a masonry drill bit: The first step in mounting a security camera to brick is to drill the necessary holes. To ensure a secure and stable installation, it is essential to use a masonry drill bit. This specialized bit is designed to penetrate brick effectively and reduce the risk of cracks or damage to the surface.

2. Use anchors or screws: Once the holes are drilled, it is crucial to choose the right method for securing the camera to the brick. Using anchors or screws specifically designed for masonry is highly recommended. These hardware options provide the necessary stability and durability to keep the camera securely in place.
3. Consider cable management: In addition to mounting the camera itself, it is also essential to consider cable management. Running the camera’s cables along the brick surface can help keep them hidden and protected from potential damage. Utilizing cable clips or conduits can provide a neat and organized appearance.
4. Test the camera’s positioning: Before finalizing the installation, it is crucial to test the camera’s positioning and angle. Ensuring that the camera captures the desired field of view and provides optimal visibility is essential for effective security monitoring. Adjust the camera as needed to achieve the desired results.
5. Regular maintenance: Once the security camera is mounted to the brick, it is essential to perform regular maintenance. Regularly check the camera’s positioning, clean the lens, and ensure that all connections are secure. This will help maintain the camera’s effectiveness and longevity.
By following these steps, you can confidently mount a security camera to brick and enhance the security of your property. Remember to prioritize safety and precision throughout the installation process.

Determine the ideal location for the security camera
When determining the ideal location for your security camera, there are several important factors to consider. Firstly, you need to identify the areas of your property that require monitoring. This could include entry points such as doors and windows, as well as high-traffic areas or valuable assets that you want to keep an eye on.
Once you have identified the areas that need surveillance, you should consider the best vantage point for the camera. Ideally, the camera should be positioned at a height that allows for a wide and clear view of the area. This could be achieved by mounting the camera on a wall or pole, ensuring it is angled correctly to capture the desired field of view.
In addition to the vantage point, it is important to consider the camera’s exposure to the elements. If the camera will be mounted outdoors, it should be placed in a location that provides protection from rain, snow, and direct sunlight, as these can affect the camera’s performance. You may also want to consider any potential obstructions, such as trees or other buildings, that could block the camera’s view.
Overall, determining the ideal location for your security camera is crucial for maximizing its effectiveness. By carefully considering the areas that need monitoring, the camera’s vantage point, and its exposure to the elements, you can ensure that your camera provides optimal surveillance coverage for your property.
Gather the necessary tools and materials
Before starting the process of mounting a security camera to a brick wall, it is important to gather all the necessary tools and materials. Having everything prepared beforehand will make the installation process smoother and more efficient.

Here is a list of the tools and materials you will need:
- Security camera: Choose a high-quality camera that suits your specific needs and requirements.
- Mounting bracket: This is the device that will securely hold the camera in place on the brick wall.
- Drill: A power drill will be required to create holes in the brick wall for mounting the camera.
- Masonry drill bit: Use a masonry drill bit specifically designed for drilling into brick or concrete.
- Anchors and screws: These will be used to secure the mounting bracket to the brick wall.
- Screwdriver or wrench: Depending on the type of screws or bolts used, you may need a screwdriver or wrench to tighten them.
- Cable management system: Consider using a cable management system to keep the camera cables organized and hidden.
- Level: Use a level to ensure that the camera is mounted straight and level on the wall.
- Measuring tape: Measure and mark the desired location for mounting the camera on the brick wall.
- Pencil: Use a pencil to mark the drill holes and any other necessary measurements on the brick wall.
Preparing the brick surface for mounting
Before mounting a security camera to a brick surface, it is important to properly prepare the area to ensure a secure and long-lasting installation. Here are some steps to follow:
1. Clean the brick surface
The first step is to clean the brick surface where the camera will be mounted. Use a stiff brush or a power washer to remove any dirt, dust, or debris that may be present. This will help ensure proper adhesion of the mounting hardware.
2. Determine the mounting location
Next, determine the optimal location for mounting the security camera. Consider factors such as the desired field of view, accessibility for wiring, and potential obstructions. Use a pencil or marker to mark the exact spot where the camera will be installed.
3. Prepare the drilling area
Before drilling into the brick, it is important to protect the surrounding area. Place a piece of masking tape over the mark to prevent the drill from scratching or chipping the brick. Additionally, use a masonry drill bit that is suitable for brick to ensure clean and precise holes.

4. Drill pilot holes
Drill pilot holes into the brick at the marked locations. Start with a smaller bit and gradually increase the size until the hole is the appropriate diameter for the mounting hardware. This will help prevent the brick from cracking or splitting during the installation process.
5. Insert anchors
Once the pilot holes are drilled, insert plastic or metal anchors into the holes. These anchors will provide a secure base for the mounting screws. Make sure the anchors are flush with the surface of the brick.
6. Mount the camera
Finally, use the mounting hardware provided with the security camera to attach it to the brick surface. Follow the manufacturer’s instructions for proper installation. Make sure the camera is securely fastened and adjusted to the desired angle and position.
By following these steps, you can properly prepare the brick surface for mounting a security camera, ensuring a strong and reliable installation.
Selecting the appropriate mounting hardware
When it comes to mounting a security camera to a brick wall, selecting the appropriate hardware is crucial for a secure and stable installation. There are several factors to consider when choosing the right mounting hardware for your specific needs.

Material and weight capacity: The first thing to consider is the material of the mounting hardware. Make sure it is suitable for brick walls and can withstand the weight of your security camera. Look for durable materials such as stainless steel or galvanized steel, which are resistant to rust and corrosion.
Type of mount: There are various types of mounts available for security cameras, including wall mounts, ceiling mounts, and pole mounts. Consider the location and angle at which you want to install your camera and choose a mount that allows for easy adjustment and positioning.
Security features: Look for mounting hardware that offers additional security features to prevent tampering or theft. Some mounts come with lockable brackets or anti-vandal screws to ensure the camera remains securely in place.
Weather resistance: If your security camera will be exposed to the elements, it’s important to choose mounting hardware that is weather resistant. Look for mounts with a high IP rating, which indicates their resistance to dust, water, and other environmental factors.
Installation method: Finally, consider the installation method of the mounting hardware. Some mounts require drilling into the brick, while others use adhesive or clamps for a non-invasive installation. Choose a method that suits your preferences and the specific requirements of your brick wall.
By taking these factors into account, you can select the appropriate mounting hardware for your security camera, ensuring a secure and reliable installation on your brick wall.
Drilling Holes into the Brick
When it comes to mounting a security camera to a brick wall, drilling holes is often necessary. However, it is important to approach this task with caution and the right tools to ensure a secure and professional installation.
1. Choose the right drill bit: Brick is a hard material, so using a regular drill bit may not be effective. Look for a masonry drill bit, which is specifically designed for drilling into hard materials like brick. Make sure the drill bit is the appropriate size for the screws or anchors you will be using to mount the camera.
2. Mark the drilling spots: Before drilling into the brick, it is crucial to mark the spots where the holes will be made. Use a pencil or chalk to mark the exact location where the camera will be mounted. Double-check the measurements and ensure the marks are level and aligned properly.
3. Use a hammer drill: A regular drill may not be powerful enough to drill through brick effectively. Consider using a hammer drill, which combines rotation and a hammering action to penetrate hard materials. This will make the drilling process easier and quicker.

4. Start drilling: Place the drill bit on the marked spot and apply steady pressure as you start drilling. It is important to keep the drill perpendicular to the wall to ensure straight and clean holes. Use a slow and steady speed, allowing the drill bit to do the work. Avoid excessive force, as it can damage the brick or the drill bit.
5. Insert anchors or screws: Once the holes are drilled, you can insert anchors or screws to securely mount the camera. Depending on the weight of the camera, you may need to use wall anchors to provide additional support. Make sure the anchors or screws are tightened securely while being careful not to overtighten and damage the brick.
Remember to always wear safety goggles and gloves when drilling into brick to protect yourself from any flying debris. If you are unsure about drilling into the brick or don’t have the necessary tools, it is recommended to consult a professional for assistance.
Mounting the security camera to the brick
When it comes to mounting a security camera to a brick wall, there are a few important steps to follow to ensure a secure and stable installation. As someone who has experience with this, I can offer some insights on the best way to do it.
Firstly, it is crucial to choose the right mounting hardware. I recommend using heavy-duty masonry screws or anchors specifically designed for brick walls. These will provide the necessary strength and stability to hold the camera securely in place. It’s important to make sure the screws or anchors are long enough to penetrate the brick and reach the solid structure behind it.
Next, it’s important to determine the optimal location for the camera. Consider factors such as the field of view, lighting conditions, and potential obstructions. Once you have identified the ideal spot, mark the positions for the mounting holes on the brick using a pencil or marker.
After marking the holes, use a masonry drill bit to create pilot holes in the brick. This will help prevent the brick from cracking or splitting when inserting the screws or anchors. Make sure to drill the holes slightly smaller in diameter than the screws or anchors to ensure a tight fit.
Once the pilot holes are drilled, insert the screws or anchors into the holes and tighten them using a screwdriver or drill. Make sure they are firmly secured in place, but be careful not to overtighten and risk damaging the brick.
Finally, attach the camera to the mounting bracket or plate, making sure it is level and aligned correctly. Double-check all the connections and ensure that the camera is securely attached to the mounting hardware.
Mounting a security camera to a brick wall may require some extra effort, but by following these steps, you can ensure a strong and reliable installation that will provide optimal security coverage for your property.
Testing and Adjusting the Camera’s Position
Once you have mounted your security camera to the brick, it is important to test and adjust its position to ensure optimal coverage and functionality. Follow these steps to ensure your camera is positioned correctly:
- Test the camera’s field of view: Connect the camera to a monitor or your smartphone and check the live feed. Walk around the area you want to monitor to ensure that the camera captures the desired view. Make adjustments as necessary.
- Check for obstructions: Look for any objects, trees, or buildings that may obstruct the camera’s view. Adjust the camera’s position or angle to minimize any potential blind spots.
- Consider lighting conditions: Test the camera in different lighting conditions, such as daytime and nighttime. Ensure that the camera captures clear footage in both situations. Adjust the camera’s position and angle to avoid glare or shadows that may obstruct the view.
- Monitor the camera’s performance: Keep an eye on the camera’s performance over a period of time. Check if there are any areas that consistently have poor visibility or if there are any technical issues. Make adjustments as necessary.
By thoroughly testing and adjusting the camera’s position, you can ensure that it provides the best possible coverage and performance. Remember to periodically check and readjust the camera to account for any changes in the environment, such as new construction or landscaping.
Best way to mount security camera to brick

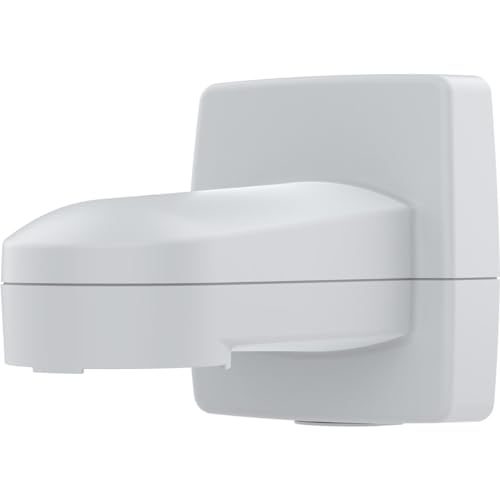
BOSCH SECURITY VIDEO VDA-PMT-DOME Mounting Bracket for Surveillance Camera
1 used from $26.98
Features
| Part Number | VDA-PMT-DOME |
| Model | VDA-PMT-DOME |
| Color | White |
| Size | 1 |

| Price history for BOSCH SECURITY VIDEO VDA-PMT-DOME Mounting Bracket for Surveillance Camera | |
|---|---|
|
Latest updates:
|
|
Didn't find the right price? Set price alert below


ZUMIMALL 5MP 5G Security Camera Outdoor, 24/7 Recording Security Camera, WiFi Cameras for Home Security Outdoor, Plug-in Power, 360° Auto Tracking, Noise Detect, SD Card&Cloud, Works with Alexa, IP66
Features
| Part Number | BK05 |
| Model | BK05 |
| Color | White |
| Size | 5G+5MP |


| Price history for ZUMIMALL 5MP 5G Security Camera Outdoor, 24/7 Recording Security Camera, WiFi Cameras for Home Security Outdoor, Plug-in Power, 360° Auto Tracking, Noise Detect, SD Card&Cloud, Works with Alexa, IP66 | |
|---|---|
|
Latest updates:
|
|
Didn't find the right price? Set price alert below

JideTech 4K POE PTZ 8MP Camera Outdoor, 5X Optical Zoom Dome Camera with Smart IR Night Vision, IP Security Camera with Microphone/Audio, Human/Vehicle Detection, Auto Tracking, SD Card Slot, IP66
Features
| Color | 8MP |


| Price history for JideTech 4K POE PTZ 8MP Camera Outdoor, 5X Optical Zoom Dome Camera with Smart IR Night Vision, IP Security Camera with Microphone/Audio, Human/Vehicle Detection, Auto Tracking, SD Card Slot, IP66 | |
|---|---|
|
Latest updates:
|
|
Didn't find the right price? Set price alert below

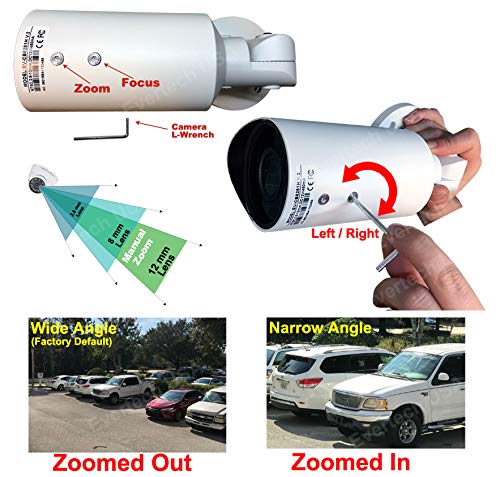
Evertech 1080P HD Bullet Security Camera Day Night Vision Outdoor Indoor 2.8-12 mm Manual Zoom Compatible w/AHD TVI CVI and Traditional Analog DVRs
Features
| Part Number | EV-C942 V.10 |
| Model | EV-C942 V.10 |


Didn't find the right price? Set price alert below

BOSCH SECURITY VIDEO EXMB.007B Wall Mount for Surveillance Camera
Features
| Part Number | EXMB.007B |
| Model | EXMB.007B |
| Color | black |
| Price history for BOSCH SECURITY VIDEO EXMB.007B Wall Mount for Surveillance Camera | |
|---|---|
|
Latest updates:
|
|
Didn't find the right price? Set price alert below

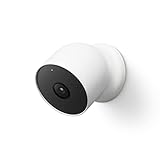
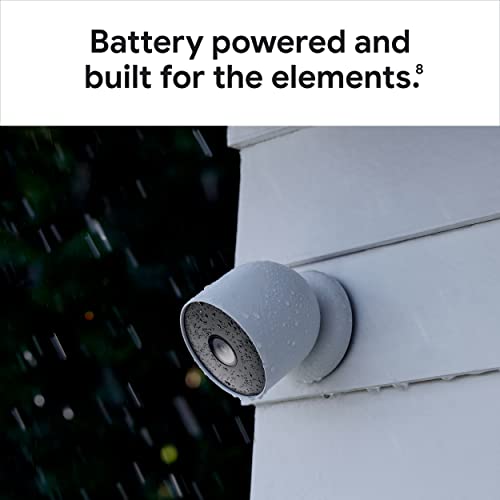
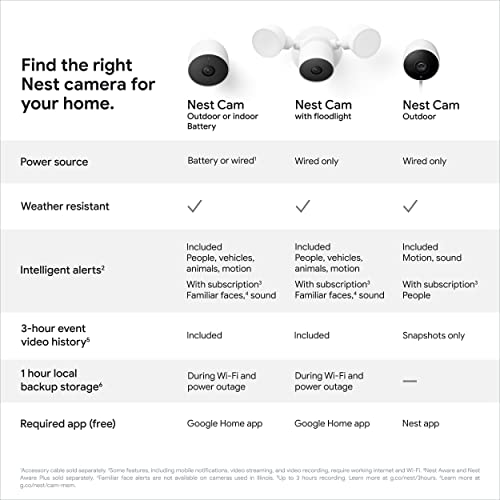
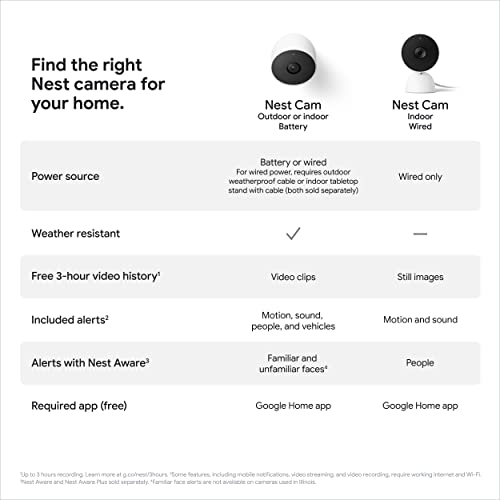
Google Nest Cam Outdoor or Indoor, Battery - 2nd Generation - 1 Pack
$129.99
33 used from $94.79
Features
| Part Number | G3AL9 |
| Model | GA01317 |
| Warranty | 1 year manufacturer |
| Color | White - Nest Cam (Outdoor or Indoor, Battery) |
| Release Date | 2022-04-19T00:00:01Z |
| Size | 1 Count (Pack of 1) |


| Price history for Google Nest Cam Outdoor or Indoor, Battery - 2nd Generation - 1 Pack | |
|---|---|
|
Latest updates:
|
|
Didn't find the right price? Set price alert below

YuanLey 24 Port PoE Switch with 2 Gigabit Ethernet Uplink, 2 SFP Port, 400W PoE+ Port Support 802.3af/at, Unmanaged Network Switch with AI Watchdog, VLAN, Extend to 250m, Rackmount Plug and Play
Features
| Part Number | AI-YS2422FS-P |
| Model | 28 Port PoE Switch |
| Warranty | 1 year |


Didn't find the right price? Set price alert below

Driveway Alarm- USA Engineered IP65 Commercial Grade 433MHZ, 3/4 Mile Range Driveway Sensor, Wireless Outdoor Weatherproof Motion Sensor & Adjustable Detection- 90dB 12 Tune Wireless Driveway Monitor
Features
| Part Number | ERA DRIVEWAY INFORMER PRO |
| Model | ERA DRIVEWAY INFORMER PRO |
| Color | White |


| Price history for Driveway Alarm- USA Engineered IP65 Commercial Grade 433MHZ, 3/4 Mile Range Driveway Sensor, Wireless Outdoor Weatherproof Motion Sensor & Adjustable Detection- 90dB 12 Tune Wireless Driveway Monitor | |
|---|---|
|
Latest updates:
|
|
Didn't find the right price? Set price alert below

August Home Smart Keypad, Pair with Your August Smart Lock - Grant Guest Access with Unique Keycodes, Dark Gray
$52.83
7 used from $41.99
Features
| Part Number | AK-R1 |
| Model | AK-R1 |
| Warranty | 1 year limited manufacturer |
| Color | Dark Gray |
| Size | Оne Расk |


| Price history for August Home Smart Keypad, Pair with Your August Smart Lock - Grant Guest Access with Unique Keycodes, Dark Gray | |
|---|---|
|
Latest updates:
|
|
Didn't find the right price? Set price alert below

C. Crane CC Vector Extended Long Range WiFi Receiver System - Works with All Devices - Receives Distant WiFi and Repeats to All WiFi Devices in a New Location 2.4GHz
Features
| Part Number | VEC3 |
| Model | ANT WIFI VECT LONG |
| Warranty | 1 Year Limited Pars & Labor |
Didn't find the right price? Set price alert below
Questions and answers:
What is the best way to mount a security camera to brick?
The best way to mount a security camera to brick is by using masonry screws or anchors. These are specifically designed to secure objects to brick or masonry surfaces. You will need to drill pilot holes into the brick, insert the screws or anchors, and then attach the camera mount to them. Make sure to use a level to ensure the camera is properly aligned.
Can I use adhesive to mount a security camera to brick?
While adhesive might seem like a convenient option, it is not recommended to use it to mount a security camera to brick. The adhesive may not hold up well against the weight and external factors such as weather conditions. It is better to use masonry screws or anchors for a more secure and reliable attachment.
What tools do I need to mount a security camera to brick?
To mount a security camera to brick, you will need a drill with masonry drill bits, a level, masonry screws or anchors, and a screwdriver or drill bit for the screws. You may also need a hammer and a wrench, depending on the specific camera mount and hardware you are using.
Are there any special considerations when mounting a security camera to brick?
Yes, there are a few special considerations when mounting a security camera to brick. Firstly, make sure to choose a location that provides the desired view and coverage. Secondly, be cautious of any electrical wires or plumbing behind the brick that you may need to avoid when drilling. Lastly, consider weatherproofing the connections and cables to protect them from the elements.