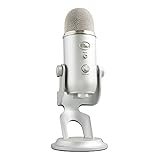
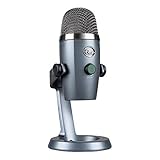
Welcome to the world of audio and video production! If you’re wondering whether you can use a Yeti microphone with a DSLR camera, you’ve come to the right place. The Yeti microphone is a popular choice among podcasters, streamers, and content creators for its excellent audio quality and versatility.
However, when it comes to connecting the Yeti microphone to a DSLR camera, things get a bit tricky. Unlike traditional microphones, the Yeti microphone doesn’t have a direct connection to a camera. It’s designed to connect to a computer or audio interface via USB. So, using it with a DSLR camera requires some additional equipment and knowledge.
The good news is that it is possible to connect a Yeti microphone to a DSLR camera. To do so, you will need a separate audio recorder or a mixer that can capture the audio signal from the Yeti microphone and output it to your DSLR camera. This setup allows you to record high-quality audio from the Yeti microphone while capturing video with your DSLR camera.
Keep in mind that using a separate audio recorder or mixer adds complexity to your setup and may require additional cables and adapters. It’s essential to ensure that all the equipment is compatible and set up correctly. Additionally, it’s crucial to monitor the audio levels during recording to ensure optimal sound quality.

In conclusion, while it is possible to use a Yeti microphone with a DSLR camera, it requires additional equipment and setup. If you’re serious about improving the audio quality of your videos, investing in a separate audio recorder or mixer is worth considering. With the right setup, you can achieve professional-level audio for your DSLR camera recordings.
Overview
The Yeti microphone is a popular choice for capturing high-quality audio for various recording needs, including podcasting, music production, and voiceovers. While the Yeti microphone is primarily designed for use with computers, it is possible to connect it to a DSLR camera for recording audio directly during video shoots.
The Yeti microphone features a USB output, which is not compatible with most DSLR cameras that typically have a 3.5mm microphone input. Therefore, to connect the Yeti microphone to a DSLR camera, you will need additional equipment, such as an audio interface or a preamp with a Line Out or XLR output.
First, connect the Yeti microphone to the audio interface or preamp using a USB cable. Ensure that the audio interface or preamp is powered on and properly connected to the DSLR camera. Next, connect the audio interface or preamp to the DSLR camera using a suitable cable, such as a 3.5mm TRS cable or an XLR cable.
Once the connections are established, adjust the audio levels on both the audio interface or preamp and the DSLR camera to ensure optimal sound quality. It is recommended to do a sound check before starting the actual recording to ensure that the audio is clear and balanced.
Using a Yeti microphone with a DSLR camera can provide high-quality audio for video shoots, allowing you to capture professional-grade sound directly from the source. However, it is important to note that the audio quality may still depend on various factors, such as the recording environment and microphone placement.
Important note: Always make sure to check the compatibility and requirements of your specific DSLR camera and audio equipment before attempting to connect the Yeti microphone.
Benefits of Using a Yeti Mic
A Yeti microphone offers several benefits when used with a DSLR camera. Whether you are a filmmaker, vlogger, or content creator, investing in a Yeti mic can enhance the audio quality of your videos and recordings.
- Superior Sound Quality: The Yeti mic features advanced audio technology, delivering professional-grade sound quality. Its high-resolution capabilities ensure crisp and clear audio recordings, making it ideal for capturing dialogue, vocals, and musical performances.
- Versatility: The Yeti mic offers multiple polar pattern options, allowing you to adjust the directionality of the microphone. You can choose from cardioid, stereo, omnidirectional, or bidirectional patterns depending on your recording needs. This versatility makes it suitable for various recording scenarios, including interviews, podcasts, voice-overs, and ambient sound capture.
- Easy to Use: The Yeti mic is designed with user-friendliness in mind. It features a plug-and-play setup, which means you can simply connect it to your DSLR camera and start recording without any complicated configurations. Its adjustable microphone stand and built-in headphone output also make it convenient to monitor your audio in real-time.
- Compatibility: The Yeti mic is compatible with most DSLR cameras. Whether you have a Canon, Nikon, Sony, or any other brand of DSLR, you can easily connect the Yeti mic using the appropriate adaptor or cable. This compatibility allows you to upgrade your audio recording capabilities without the need for additional equipment.
- Durability: Yeti microphones are known for their sturdy construction and durability. Made with high-quality materials, they are built to withstand the demands of professional use. Whether you are shooting indoors or outdoors, you can rely on the Yeti mic to deliver consistent and reliable performance.
In conclusion, using a Yeti mic with your DSLR camera can significantly improve the audio quality of your recordings. With its superior sound quality, versatility, ease of use, compatibility, and durability, the Yeti mic is a valuable tool for any filmmaker or content creator looking to enhance their audio production.
Considerations for Using a Yeti Mic with a DSLR Camera
If you are looking to improve the audio quality of your DSLR camera videos, using a Yeti mic can be a great option. The Yeti mic is known for its high-quality sound recording capabilities, making it a popular choice for podcasters, musicians, and content creators. However, there are a few considerations you should keep in mind when using a Yeti mic with a DSLR camera.

Compatibility
Before using a Yeti mic with your DSLR camera, it’s important to check if they are compatible. Some DSLR cameras have an external microphone input, which allows you to connect the Yeti mic directly. However, not all DSLR cameras have this feature, so you may need an adapter or an audio interface to connect the Yeti mic.
Mounting
Mounting the Yeti mic on your DSLR camera can be a challenge. The Yeti mic is a desktop microphone that is designed to sit on a desk or a microphone stand. It does not have a built-in hot shoe mount or a thread for attaching it to a camera. You may need to use a separate mounting solution, such as a shock mount with a cold shoe adapter, to attach the Yeti mic to your DSLR camera.
Sound Quality
The Yeti mic is known for its excellent sound quality, but using it with a DSLR camera can present some issues. DSLR cameras are primarily designed for capturing video, not recording high-quality audio. They may have limitations in terms of preamp quality, noise levels, and audio bitrate. To ensure the best sound quality, it is recommended to use an external audio recorder or a dedicated audio interface with your Yeti mic.
Ambient Noise
DSLR cameras are often used in outdoor or noisy environments where capturing clear audio can be challenging. The Yeti mic has a cardioid polar pattern, which means it primarily captures sound from the front and rejects sound from the sides and rear. However, it is still susceptible to picking up ambient noise. Consider using a deadcat windscreen or a shotgun microphone to reduce wind noise and improve audio clarity when using a Yeti mic with your DSLR camera outdoors.
- Check compatibility between your DSLR camera and Yeti mic
- Find a suitable mounting solution for the Yeti mic
- Consider using an external audio recorder or audio interface
- Use a deadcat windscreen or shotgun microphone for outdoor use
By considering these factors, you can enhance the audio quality of your DSLR camera videos and achieve professional-sounding results with your Yeti mic.

Connecting a Yeti Mic to a DSLR Camera
If you’re looking to improve the audio quality of your DSLR camera videos, connecting a Yeti microphone can be a great option. The Yeti microphone is known for its high-quality audio capture and versatility, and with the right setup, you can easily connect it to your DSLR camera.
Here are the steps to connect a Yeti microphone to a DSLR camera:
- Check the compatibility: Before attempting to connect the Yeti microphone to your DSLR camera, make sure that your camera has an external microphone input. Some DSLR cameras come with a built-in microphone, but they may lack the external input option.
- Get the necessary adapters: In order to connect the Yeti microphone to your DSLR camera, you may need to purchase additional adapters or cables. This will depend on the specific inputs and outputs of your camera and microphone.
- Connect the microphone: Once you have the necessary adapters, you can start connecting the Yeti microphone to your DSLR camera. Usually, this involves plugging the microphone’s output jack into the camera’s external microphone input. Make sure the connections are secure.
- Adjust the settings: After connecting the Yeti microphone to your DSLR camera, you may need to adjust the camera’s audio settings. This could include selecting the external microphone as the audio input source and adjusting the microphone’s gain settings.
- Test and monitor the audio: Before starting your video recording, it’s important to test and monitor the audio to ensure everything is working correctly. Check the camera’s audio levels and listen for any unwanted noise or distortion. Make any necessary adjustments before recording.
By following these steps, you should be able to connect a Yeti microphone to your DSLR camera and enhance the audio quality of your videos. Keep in mind that specific camera and microphone models may have different connection requirements, so referring to the user manuals or seeking professional assistance might be necessary in some cases. Enjoy capturing high-quality audio with your DSLR camera and Yeti microphone!
Audio Settings for Using a Yeti Mic on a DSLR Camera
When it comes to recording audio for your DSLR camera, using a Yeti microphone can greatly improve the sound quality of your videos. However, it’s important to properly configure the audio settings to ensure the best results. Here are some recommended audio settings for using a Yeti mic on a DSLR camera:
1. Connect the Yeti Mic to Your DSLR Camera
Start by connecting the Yeti microphone to your DSLR camera using the appropriate adapter or cable. Make sure the connection is secure before proceeding to the next step.

2. Adjust the Gain Control on the Yeti Mic
The Yeti microphone features a gain control knob that allows you to adjust the microphone’s sensitivity. Set the gain control to an appropriate level based on your recording environment. Avoid setting the gain too high, as it may introduce unwanted noise or distortion.
3. Enable Manual Audio Levels on Your DSLR Camera
Some DSLR cameras offer manual control over audio levels. Enable this feature in your camera settings to have greater control over the audio recording. This will allow you to adjust the audio levels to match the volume and environment of your recording.
4. Monitor the Audio Levels
While recording, keep an eye on the audio levels on your DSLR camera’s display. Make sure the audio levels are peaking at an appropriate level, neither too low nor too high. Adjust the gain control on the Yeti mic or the audio levels on the camera accordingly to achieve optimal audio quality.
5. Use a Windscreen or Pop Filter
If you’re recording in a windy or noisy environment, consider using a windscreen or a pop filter with your Yeti mic. These accessories can help reduce wind noise and plosive sounds, resulting in clearer audio recordings.
6. Test and Adjust as Needed
Before starting your actual recording, it’s always a good practice to do a test recording and listen to the playback. Make any necessary adjustments to the audio settings based on the test recording results to ensure the best sound quality for your videos.
| Setting | Recommendation |
|---|---|
| Gain Control | Set to an appropriate level based on the recording environment |
| Audio Levels | Monitor and adjust as needed on the DSLR camera |
| Windscreen or Pop Filter | Consider using in windy or noisy environments |
By following these recommended audio settings, you can ensure that your videos recorded with a Yeti microphone on a DSLR camera have clear and high-quality sound.
Tips for Using a Yeti Mic with a DSLR Camera
If you are looking to improve the audio quality of your videography, using a Yeti microphone with a DSLR camera can be a great solution. Here are some tips to help you get the best results:
1. Use an audio adapter: Since DSLR cameras usually have a 3.5mm microphone input, you will need an audio adapter to connect your Yeti microphone. This will ensure compatibility and optimal audio performance.
2. Position the microphone correctly: Proper positioning of the Yeti microphone is important for capturing clear and high-quality audio. Place the microphone close to the sound source, such as the subject speaking, to ensure clear and crisp sound without any unwanted background noise.
3. Set the microphone gain: Adjusting the microphone gain is crucial to prevent audio distortion. Experiment with different gain levels to find the perfect balance between capturing clear audio and avoiding any clipping or distortion.

4. Monitor audio levels: Keep an eye on the audio levels while recording to ensure that the input signal is within a suitable range. This will help you avoid any sudden increase in volume that might result in distorted audio.
5. Use a windscreen: If you are recording outdoors or in a windy environment, using a windscreen can help minimize wind noise and improve the overall audio quality. This will prevent unwanted gusts of wind from affecting the clarity of the sound.
6. Consider using a separate audio recorder: While DSLR cameras can capture decent audio, using a separate audio recorder can provide even better sound quality. You can connect the Yeti microphone to the audio recorder and sync the audio with your video during post-production.
7. Test and adjust settings before recording: Before starting your actual recording, it is essential to test the microphone and adjust the settings accordingly. Perform some test recordings and listen back to them to ensure that the audio quality is satisfactory.
8. Edit and enhance audio during post-production: Once you have finished recording, you can further enhance the audio quality during post-production. Use audio editing software to remove any background noise, adjust levels, and make any necessary improvements to ensure that your audio sounds professional and clear.
By following these tips, you can effectively use a Yeti microphone with your DSLR camera to capture high-quality audio for your videos.
Common Issues and Troubleshooting
Using a Yeti microphone with a DSLR camera can sometimes present challenges. Here are some common issues and troubleshooting tips:
1. Compatibility Issues
Not all DSLR cameras support external microphones, so it’s important to check if your camera has a microphone input. Additionally, some cameras may have specific requirements or limitations for compatible microphones. Refer to your camera’s manual or website for compatibility information.
2. Connectivity Problems
Ensure that the microphone is securely connected to the camera’s microphone input. Some cameras may require the use of an adapter or cable to connect the Yeti mic. Double-check all connections and try using a different cable or adapter if necessary.
3. Audio Levels and Quality
If you’re experiencing low audio levels or poor sound quality, check the microphone’s gain settings. Adjust the gain control on the microphone or the camera settings to find the optimal level. Also, make sure that any background noise or interference is minimized by using a suitable environment and proper microphone positioning.
4. Power and Battery Management
Depending on the model of your DSLR camera, it may not provide power to the Yeti microphone. In this case, you’ll need to use an external power source for the microphone, such as batteries or a USB power bank. Check the Yeti microphone’s power requirements and use the appropriate power source.
5. Audio Monitoring
If you’re unable to monitor the audio while recording, consider using headphones by connecting them to the camera’s headphone jack if available. This allows you to monitor the microphone’s input and ensure that the audio is being captured properly.
If you continue to experience issues with using a Yeti microphone on your DSLR camera, it’s recommended to consult the camera’s manufacturer or the Yeti microphone support team for further assistance.
Alternatives to Using a Yeti Mic on a DSLR Camera
If you are looking for alternatives to using a Yeti microphone on your DSLR camera, there are several options available that can help you achieve high-quality audio for your videos. While the Yeti microphone is a popular choice for its versatility and ease of use, these alternatives offer different features that may suit your needs.
1. External Shotgun Microphone
One alternative is to use an external shotgun microphone that can be mounted on top of your DSLR camera. Shotgun microphones are highly directional, meaning they capture audio from the front and reject sound from the sides and rear. This can help in reducing unwanted background noise and focusing on the sound you want to capture. Some popular options include the Rode VideoMic Pro and the Sennheiser MKE 400.
2. Wireless Lavalier Microphone System
Another option is to use a wireless lavalier microphone system, which allows you to clip a small microphone to your subject while capturing their audio wirelessly. This can be beneficial if you are filming interviews or other situations where having a microphone directly on the camera is not practical. Some well-known wireless lavalier microphone systems include the Rode Wireless Go and the Saramonic UwMic9.
Keep in mind that both the external shotgun microphone and the wireless lavalier microphone system require you to sync the audio separately with your video footage during post-production.
These are just a few alternatives to using a Yeti microphone on a DSLR camera. It’s important to consider your specific needs and the type of content you are creating when choosing the right microphone setup. Whether it’s a shotgun microphone or a wireless lavalier system, finding the right audio solution can greatly improve the quality of your videos.
Question-answer:
Can I use a Yeti mic on a DSLR camera?
Yes, you can use a Yeti mic on a DSLR camera. However, you will need an audio interface or an adapter to connect the USB output of the Yeti mic to the audio input of the DSLR camera.
What do I need to connect a Yeti mic to a DSLR camera?
To connect a Yeti mic to a DSLR camera, you will need an audio interface or an adapter. The audio interface acts as a bridge between the USB output of the Yeti mic and the audio input of the DSLR camera. The adapter, on the other hand, allows you to connect the USB output of the mic directly to the audio input of the camera. Both options will allow you to use the Yeti mic for recording audio on your DSLR camera.
Is it possible to use a Yeti mic without an audio interface on a DSLR camera?
No, you cannot use a Yeti mic directly on a DSLR camera without an audio interface or an adapter. The Yeti mic has a USB output, which is not compatible with the audio input of a DSLR camera. You will need an audio interface or an adapter to convert the USB output of the mic into a format that can be accepted by the camera.
Can I use a different USB microphone on a DSLR camera?
Yes, you can use a different USB microphone on a DSLR camera, as long as you have an audio interface or an adapter to connect the USB output of the microphone to the audio input of the camera. The process of connecting a different USB microphone to a DSLR camera is similar to using a Yeti mic.