
Embarking on an African safari is a once-in-a-lifetime experience that many people dream of. The stunning landscapes, diverse wildlife, and captivating cultural heritage make it an adventure like no other. As you prepare for this exciting journey, you may wonder if your trusty iPhone camera is up to the task of capturing all the incredible moments that lie ahead.
The answer is a resounding yes! With the advancements in smartphone camera technology, iPhones have become powerful tools that can produce breathtaking images. Whether you’re an amateur photographer or a seasoned pro, your iPhone camera is more than capable of capturing the beauty and majesty of the African wildlife.
Equipped with features such as HDR (High Dynamic Range), portrait mode, and advanced image stabilization, iPhones allow you to take stunning photos with ease. The dynamic range of the camera enables you to capture the vibrant colors of the African landscape, from the golden savannah to the lush greenery of the national parks.
Moreover, the iPhone’s portrait mode allows you to achieve professional-looking shots with a blurred background, making your subjects stand out. This is especially useful for capturing up-close shots of the magnificent wildlife that you’ll encounter on your African safari. With the help of your iPhone camera, you can immortalize the grace of a lioness, the curiosity of a giraffe, or the playfulness of a herd of elephants.
Using iPhone Camera on African Safari: All You Need to Know
African safaris provide incredible opportunities to capture breathtaking moments and stunning wildlife photography. If you’re planning to use your iPhone camera during your African safari, here’s all you need to know.

Image Quality:
The latest iPhone models offer exceptional image quality, thanks to advanced camera technology. With features like optical zoom, image stabilization, and high megapixels, you can expect to capture detailed and vibrant photos on your African safari.
Preparing Your iPhone:
Prior to your safari, make sure your iPhone is fully charged and has enough storage for capturing multiple photos and videos. It’s also advisable to carry a power bank for backup charging, as safaris can span over long periods.
Camera Settings:

Experiment with different camera settings to enhance your wildlife photography. Use the HDR (High Dynamic Range) mode to capture better detail in high contrast scenes and turn on the gridlines to help with composition. Additionally, utilize the burst mode for capturing fast-paced wildlife moments.
Optical Zoom vs. Digital Zoom:
When zooming in on wildlife, utilize the optical zoom feature rather than the digital zoom. Optical zoom offers better image quality as it physically adjusts the lens, while digital zoom crops the image and decreases its quality.
Focus and Exposure:
Tap and hold on the screen to manually adjust the focus and exposure. This technique helps you capture sharp images of wildlife in various lighting conditions.

The Right Accessories:
Consider investing in additional accessories to enhance your iPhone photography experience on safari. A telephoto lens attachment can bring you closer to distant wildlife, while a stabilizer or tripod can help capture steady shots.
Respect Wildlife:
While using your iPhone camera on an African safari, remember to prioritize the well-being and conservation of wildlife. Keep a safe distance, never disturb their natural behavior, and follow the guidance of your safari guide or ranger.
By following these tips, you can make the most of your iPhone camera and capture unforgettable memories of your African safari.

Choosing the Right iPhone for Safari
When planning an African safari, having a reliable camera to capture the breathtaking landscapes and wildlife is essential. Instead of investing in an expensive DSLR camera, many travellers choose to rely on their smartphones for photography. If you’re considering using your iPhone for your safari adventure, here are a few things to consider before you go:
- Camera Quality: One of the most important factors to consider when choosing an iPhone for safari is the camera quality. Look for models with advanced camera features, such as optical zoom, image stabilization, and high megapixel count. These features will help you capture clear and detailed photos of distant wildlife.
- Battery Life: Safari days can be long, and you don’t want to miss out on capturing extraordinary moments due to a dead battery. Be sure to choose an iPhone model with a long battery life or consider investing in an external battery pack for extended use.
- Storage Capacity: Safari trips often involve capturing a large number of photos and videos. To ensure you have enough space to store all your precious memories, opt for an iPhone with ample storage capacity. Models with 128 GB or more are recommended.
- Durability: Safaris can be dusty, hot, and bumpy. It’s important to choose an iPhone that can withstand these conditions. Look for models that are dust and water-resistant or consider investing in a durable case to protect your device.
- Accessories: Consider investing in additional accessories to enhance your iPhone photography experience. Tripods, lenses, and camera apps can help you capture professional-quality photos during your safari adventure.
By considering these factors and choosing the right iPhone for your safari, you can ensure that you capture all the extraordinary moments of your African adventure in stunning detail.
Must-Have Camera Accessories for Safaris
When going on an African safari, capturing the wildlife and scenic landscapes with your iPhone camera can be an incredible experience. However, to ensure that you capture the best possible shots, it’s important to have the right camera accessories with you. Here are some must-haves:
1. Telephoto Lens: A telephoto lens is essential for capturing wildlife from a distance. It allows you to zoom in and get close-up shots of animals without disturbing them. Look for a telephoto lens that is compatible with your iPhone model for optimal image quality.
2. Tripod: A sturdy tripod is a must-have accessory for any safari. It helps you keep your iPhone steady, especially when taking long-exposure or low-light shots. Look for a lightweight and portable tripod that can handle the rugged terrain of the safari.

3. Lens Filters: Lens filters can help enhance the colors and contrast of your safari photos. Consider investing in a polarizing filter to reduce glare from water or the sky, or a neutral density filter for long-exposure shots of flowing water or moving animals.
4. Extra Batteries and Memory Cards: Safaris can last for several hours or even days, and you don’t want to run out of battery or storage space at a crucial moment. Make sure to carry extra batteries and memory cards to ensure you never miss a shot.
5. Lens Cleaning Kit: Safaris can be dusty and dirty, and your lens may get dirty or smudged quickly. A lens cleaning kit with a microfiber cloth, lens cleaning solution, and brush will help you keep your lens clean and free from spots or debris.
6. iPhone Camera App: While the default camera app on your iPhone is great, consider downloading a dedicated camera app that offers more advanced features. Look for apps that allow manual control over settings like focus, exposure, and white balance.
7. Camera Bag: Lastly, make sure to have a durable and waterproof camera bag to protect your iPhone and camera accessories during the safari. Look for a bag with enough compartments to keep everything organized and easily accessible.
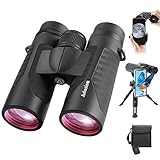
Remember, preparation is key when it comes to capturing stunning safari photos with your iPhone camera. With the right camera accessories, you can enhance your photography skills and create lasting memories of your African adventure.
Understanding Lighting Conditions in African Safaris
When embarking on an African safari, it is essential to understand the unique lighting conditions you will encounter. Whether you are using an iPhone camera or any other photography equipment, lighting plays a crucial role in capturing stunning images of wildlife and landscapes.
1. Natural Light
One of the key factors that contributes to the success of your safari photographs is the availability and quality of natural light. The golden hours, which are the first hour after sunrise and the last hour before sunset, offer soft, warm light that can enhance the mood and details in your images. During these times, wildlife is often more active, making it an ideal opportunity to capture dynamic shots.
However, wildlife sightings can happen at any time of the day, so it’s essential to understand how light changes throughout the day. The harsh midday sun can create strong shadows and wash out colors, making it challenging to capture vibrant and well-exposed images. To overcome this, consider using your iPhone camera’s exposure compensation feature or seeking shaded areas to achieve balanced exposure.
2. Weather Conditions
The weather in African safaris can be unpredictable, with sudden changes from bright sunshine to cloudy or overcast skies. Cloudy conditions can provide diffused lighting, which can be advantageous for capturing details, minimizing shadows, and reducing glare. Experimenting with different compositions and angles can help you make the most of these lighting conditions.
On the other hand, rainy conditions can create moody and dramatic scenes, adding depth and texture to your images. Be sure to protect your iPhone camera from water damage by using protective casings and waterproof covers.
3. Artificial Light
While natural light is often preferred for capturing wildlife and landscapes, there may be instances where artificial light becomes necessary. For campfire scenes or capturing the nightlife in Safari lodges, artificial light sources such as campfires or ambient lighting can create unique and atmospheric images. Use the manual settings of your iPhone camera to adjust the exposure and white balance accordingly.
Additionally, in certain situations, you may encounter low-light conditions during night drives or game viewing. Be prepared by using a tripod or stabilizing your iPhone camera to avoid blurry images. Experiment with long exposure techniques to capture stunning starry skies or nocturnal wildlife.
Understanding the lighting conditions in African safaris is crucial to capture impactful and visually appealing images. Whether you are using an iPhone camera or any other photography equipment, adapt and experiment with different lighting situations to create stunning photographs that truly reflect the beauty of African wildlife and landscapes.
Tips for Capturing Wildlife with Your iPhone Camera
If you are going on an African safari and want to capture stunning wildlife photographs, your iPhone camera can be a great tool. Here are some tips to help you make the most out of your iPhone camera:
1. Use Burst Mode
Burst mode is a great feature on the iPhone camera that allows you to capture multiple photos in quick succession. When photographing wildlife, it can be challenging to get the perfect shot. Using burst mode ensures that you capture the right moment even if the animals are moving quickly.
2. Get Close, But Be Safe
Getting close to the wildlife will help you capture more detailed shots. However, it is important to prioritize safety. Make sure to maintain a safe distance and respect the animals’ boundaries. Always follow the guidance of your safari guide and local regulations.
3. Use Natural Light
The best time to capture wildlife photographs is during the golden hours, which are the first hour after sunrise and the last hour before sunset. The soft, warm light during these times will enhance your photos and bring out the natural colors of the wildlife.
4. Avoid Using Flash
Using flash can startle and disturb the animals. It can also create harsh lighting and unnatural shadows in your photos. Instead, rely on natural light and adjust your settings accordingly.
5. Use the Rule of Thirds
The rule of thirds is a basic photography principle that can help you compose more visually appealing shots. Imagine your photo divided into a grid of nine equal parts, and place the main subject of your photo along the lines or at the intersection points. This will create a more balanced and interesting composition.
6. Patience is Key
Wildlife photography requires patience. Animals may not always be in the perfect position or light, so be prepared to wait for the right moment. Picking the right spot and being patient will greatly increase your chances of capturing amazing wildlife shots.
With these tips, you can make the most out of your iPhone camera and capture memorable wildlife photographs during your African safari. Remember to respect the animals and their natural habitat while enjoying your photography experience.
Best Camera Settings for Safari Photography
When going on an African safari, having the right camera settings is crucial to capture the wildlife and stunning landscapes. Here are some recommended camera settings to ensure you get the best possible shots:
1. Shutter Speed: Use a fast shutter speed to freeze the motion of fast-moving animals. A setting of 1/500th of a second or faster is a good starting point. Adjust the speed based on the speed of the subject and the amount of light available.
2. Aperture: Setting the aperture correctly can help you achieve a desired depth of field. For wildlife photography, it’s often recommended to use a large aperture (small f-number) to create a shallow depth of field, which will blur the background and bring the subject into focus.
3. ISO: The ISO determines the camera’s sensitivity to light. In safari photography, it’s best to use a low ISO setting (around 100-400) when shooting in good lighting conditions. Increase the ISO if you need to shoot in low light, but be cautious as higher ISO settings can introduce noise into your images.
4. White Balance: The correct white balance ensures accurate color reproduction. Use the “daylight” or “sunny” white balance setting when shooting in natural light. If you’re shooting during the golden hour or in different lighting conditions, you may need to adjust the white balance accordingly.
5. Focus Mode: Choose the appropriate focus mode for your subject. For wildlife photography, using the continuous focus mode (AI Servo for Canon cameras, AF-C for Nikon cameras) will track the subject as it moves, ensuring sharp focus.
6. Burst Mode: Wildlife can be unpredictable, so it’s helpful to use burst mode to capture multiple frames in quick succession. This increases your chances of getting the perfect shot and allows you to select the best image later on.
7. RAW Format: Shooting in RAW allows for more control over post-processing and provides higher-quality images. It captures all the data from the camera’s sensor, giving you more flexibility when adjusting settings like exposure, white balance, and sharpness.
Remember, it’s important to familiarize yourself with your camera and practice using these settings before your safari adventure. Additionally, always respect the wildlife and follow any rules or guidelines set by the safari operator to ensure a safe and memorable experience.
Editing and Enhancing Safari Photos on Your iPhone
When you go on an African safari, you will likely want to capture the stunning wildlife and beautiful landscapes with your iPhone camera. Luckily, the iPhone’s camera capabilities are impressive, allowing you to take high-quality photos that rival those taken with professional cameras.
After you have taken your safari photos, you may want to edit and enhance them to bring out their full potential. The iPhone has a range of powerful editing tools built-in, making it easy to tweak your photos and create stunning final images.
Here are some tips on how to edit and enhance your safari photos on your iPhone:
1. Crop and Straighten:
Use the crop tool to remove any unwanted elements from your photo and focus on the main subject. You can also use the straighten tool to fix any crooked horizons or tilted angles.
2. Adjust Exposure and Contrast:
Use the exposure and contrast sliders to lighten or darken your photo and improve its overall contrast. This can help bring out details in both the shadows and highlights.
3. Enhance Colors:
Use the saturation and vibrancy sliders to enhance the colors in your photo. This is particularly useful for bringing out the vibrant hues of the African wildlife and landscapes.
4. Apply Filters:
The iPhone offers a range of filters that can instantly transform the mood and tone of your photo. Experiment with different filters to find the one that best suits the subject and atmosphere of your safari photo.
5. Sharpen and Noise Reduction:
Use the sharpen tool to enhance the details and clarity in your photo, particularly important for capturing the fine textures of wildlife. Additionally, the noise reduction tool can help reduce any unwanted grain or noise in low-light conditions.
Remember, the key to editing and enhancing your safari photos is to enhance their natural beauty without going overboard. Experiment with different adjustments and edits, but always aim to maintain the authenticity and essence of your original photo.
By using your iPhone to capture and edit your safari photos, you can easily create stunning images that will help you relive those unforgettable moments on your African adventure.
Sharing Your Safari Photos on Social Media
Going on an African safari is an exciting and unforgettable experience. One of the best ways to capture those memories is by using your iPhone camera. With its advanced features and high-quality image resolution, you can take stunning photos of the magnificent wildlife and breathtaking landscapes.
Once you have taken your safari photos, it’s time to share them with your friends and family on social media. Here are some tips to make your safari photos stand out:
1. Choose the Best Photos
Before sharing your safari photos, take some time to select the best ones. Look for images that capture the essence of the safari, such as close-ups of animals, dramatic sunsets, or stunning landscapes. Choose photos that tell a story and evoke emotions.
2. Edit and Enhance
To make your safari photos even more appealing, consider editing them using photo editing apps. You can adjust the brightness, contrast, and saturation to enhance the colors and make the details stand out. Be careful not to over-edit your photos, as natural-looking pictures are often more captivating.
3. Write Engaging Captions
Once you have selected and edited your photos, it’s time to write engaging captions to accompany them. Captions can help to provide context, share interesting facts, or even tell a story about your safari experience. Be creative and use hashtags related to safari or wildlife to attract a wider audience.
4. Share on Multiple Platforms
To reach a wider audience, consider sharing your safari photos on multiple social media platforms. Instagram, Facebook, and Twitter are popular options for showcasing your photography skills. You can also use photo-sharing platforms such as Flickr or 500px, where you can connect with other photography enthusiasts.
Sharing your safari photos on social media not only allows you to relive those incredible moments but also inspire others to experience the beauty and wonders of African wildlife. So, don’t hesitate to share your extraordinary safari adventure with the world!
Storing and Backing Up Your Safari Photos
When you go on an African safari, you want to capture every breathtaking moment with your iPhone’s camera. However, it’s important to have a plan in place for storing and backing up your safari photos to ensure they are safe and easily accessible.
1. Utilize Cloud Storage
One of the most convenient ways to store your safari photos is by using cloud storage platforms such as iCloud, Google Drive, or Dropbox. These services allow you to upload your photos to the cloud, making them accessible from any device with an internet connection.
Before your safari, ensure that you have enough storage space on your chosen cloud storage platform. If not, consider upgrading your storage plan or deleting unnecessary files to make room for all your photos.
2. Carry Extra External Storage
Another option is to bring extra external storage devices, such as a portable hard drive or a USB flash drive. These devices can be connected to your iPhone using an adapter or lightning cable, allowing you to transfer and store your photos directly.
Make sure to choose an external storage device with sufficient capacity to accommodate all your safari photos. Additionally, consider investing in a rugged and waterproof storage device to protect your photos from dust, moisture, or accidental damage during your safari.
If you decide to use external storage, remember to regularly back up your photos to your computer or another storage device. This will provide an additional layer of protection in case your external storage device gets lost or damaged.
3. Make Use of Photo Management Apps
There are numerous photo management apps available for iPhone that can help you organize and backup your safari photos. These apps offer features such as automatic photo syncing, image editing, and even facial recognition.
Some popular photo management apps include Google Photos, Adobe Lightroom, and Apple’s own Photos app. Research and choose an app that suits your needs and preferences before your safari adventure.
| Pros | Cons |
|---|---|
| Convenient and accessible from any device with an internet connection | May require an internet connection to upload and access photos |
| Provides additional storage space for your photos | May require a subscription or additional cost for more storage |
| Automatically syncs and organizes your photos | Dependent on the reliability and security of the chosen cloud storage platform |
Regardless of the method you choose, it is essential to regularly back up your safari photos to ensure their preservation. Safeguarding these precious memories will allow you to relive your African safari experience for years to come, even if you encounter any unexpected incidents along the way.
Preserving Memories: Printing Safari Photos and Creating Albums
Going on an African safari is an experience of a lifetime. The stunning landscapes, diverse wildlife, and unique encounters make for incredible photographs. While capturing these moments using your iPhone camera is convenient, printing and creating physical albums can bring your safari memories to life. Here are some tips to help you preserve those precious moments:
1. Select the Best Shots
Start by going through your safari photos and selecting the best shots. Look for images that are well-composed, in focus, and capture the essence of your safari experience. Consider factors like lighting, animal behavior, and landscape composition when choosing your photographs.
2. Edit and Enhance
Once you’ve selected your favorite safari photos, take the time to edit and enhance them. Crop out any unnecessary elements, adjust the exposure and colors, and experiment with filters to enhance the overall look of the photos. Editing your images will help to bring out their true beauty and make them stand out in your printed album.
3. Choose High-Quality Printing Services
When it comes to printing your safari photos, it’s important to choose a high-quality printing service. Look for a reputable printing company that specializes in photo printing and offers a range of options for paper types and sizes. Consider factors like color accuracy, sharpness, and durability of the prints when making your choice.
Additionally, some printing services offer the option to create custom photo albums. These albums can be personalized with captions, designs, and layouts that complement your safari theme. Take advantage of these features to create a unique and visually appealing album that tells the story of your African adventure.
4. Organize and Preserve
Once you have your printed safari photos, it’s important to organize and preserve them properly. Consider using acid-free photo sleeves or albums to protect the prints from fading, moisture, and damage. Organize your photos based on themes, locations, or chronological order to create a cohesive narrative within your album.
It’s also a good idea to make digital backups of your safari photos. Store them on an external hard drive or cloud storage platform to ensure their long-term preservation. This way, even if something happens to your physical prints, you’ll still have digital copies to cherish.
By printing your safari photos and creating albums, you can relive the excitement of your African adventure for years to come. Whether displayed on your coffee table or shared with loved ones, these physical mementos will serve as a constant reminder of the incredible experiences you had during your safari.
Question-answer:
Is it possible to use an iPhone camera on an African safari?
Yes, it is possible to use an iPhone camera on an African safari. iPhones have high-quality cameras that can capture stunning images of wildlife and the African landscape.
Can I take professional-grade photos with an iPhone camera on an African safari?
While an iPhone camera may not offer the same level of control and image quality as a professional DSLR camera, it is still capable of capturing high-quality photos. With some skill and the right techniques, you can definitely take impressive and professional-looking photos on an African safari with an iPhone camera.
What are the advantages of using an iPhone camera on an African safari?
There are several advantages to using an iPhone camera on an African safari. Firstly, iPhones are compact and lightweight, making them easy to carry and convenient to use. Additionally, iPhones have advanced camera features and image processing capabilities that can result in stunning images. Finally, iPhones have the versatility of being able to instantly edit and share your photos right from the device.
Are there any limitations to using an iPhone camera on an African safari?
While iPhones can capture amazing photos on an African safari, there are some limitations to keep in mind. iPhones have a fixed lens, meaning you can’t zoom in as much as you could with a DSLR camera. The low-light performance of an iPhone camera may also be slightly inferior to a professional camera. However, with good lighting and some basic photography skills, these limitations can be overcome to capture stunning images.


