Having a security camera installed at your home or office is a great way to ensure the safety and security of your property. However, it can be frustrating when you are unable to connect your security camera to your WiFi router. This issue can prevent you from accessing live video feeds or receiving motion alerts on your smartphone or computer.
There can be several reasons why you are facing difficulty in connecting your security camera to your WiFi router. The most common reason is incorrect WiFi password or network settings. Make sure that you are entering the correct password and that your router’s WiFi settings are properly configured.
Another possible reason is signal interference. WiFi signals can be affected by various factors such as walls, distance, and other electronic devices. Ensure that your security camera is within range of your WiFi router and that there are no obstacles blocking the signal. Additionally, try to minimize the number of devices connected to your WiFi network to reduce signal congestion.
If you have checked the password, network settings, and signal strength and are still unable to connect your security camera to your WiFi router, there may be compatibility issues between the camera and the router. Verify that your security camera is compatible with the WiFi router and check for firmware updates for both devices. Sometimes, a simple firmware update can resolve compatibility issues and improve the camera’s performance.
In conclusion, when you cannot connect your security camera to your WiFi router, it is important to verify your WiFi password, check for signal interference, ensure compatibility between the camera and the router, and consider firmware updates. By addressing these issues, you can hopefully resolve the connectivity problem and start using your security camera to keep your property safe and secure.
How to Troubleshoot Issues
If you are experiencing difficulties connecting your security camera to your WiFi router, here are some troubleshooting steps you can take to resolve the issue:
| Step 1: Check camera placement | Make sure the camera is within range of your WiFi signal and there are no obstacles blocking the signal. |
| Step 2: Verify WiFi password | Confirm that you are entering the correct WiFi password. Double-check for any typos or mistakes. |
| Step 3: Restart camera and router | Turn off both the camera and WiFi router. Wait for a few minutes, then turn them back on. This can help resolve any temporary software or hardware issues. |
| Step 4: Update camera firmware | Visit the manufacturer’s website and check if there are any firmware updates available for your camera. Updating the firmware can fix compatibility issues and improve performance. |
| Step 5: Reset the camera | If none of the previous steps work, try resetting the camera to its default settings. Refer to the user manual or manufacturer’s website for instructions on how to reset your specific camera model. |
| Step 6: Contact customer support | If the issue persists, reach out to the manufacturer’s customer support for further assistance. They may be able to provide specific troubleshooting steps or determine if there is a hardware problem with your camera. |
By following these troubleshooting steps, you should be able to diagnose and resolve most issues preventing your security camera from connecting to your WiFi router.
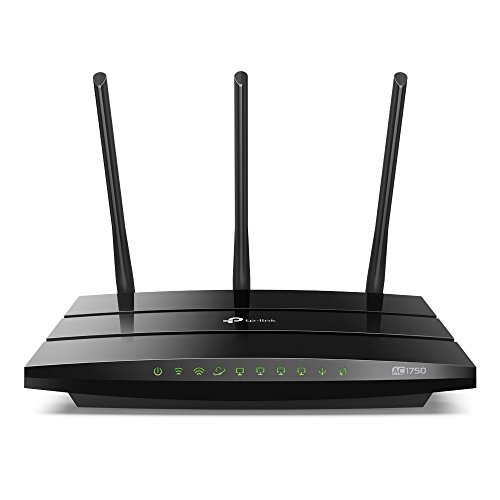
Check Camera and Router Compatibility
In order to connect your security camera to your WiFi router, it is important to ensure that the camera and router are compatible with each other. Here are a few steps you can follow to check the compatibility:
1. Refer to the user manual or documentation of your security camera to find out the supported WiFi standards and frequencies. Some cameras may only support certain WiFi bands, such as 2.4GHz or 5GHz. Make sure that your router supports the same WiFi bands as your camera.
2. Check the specifications of your WiFi router to see if it is compatible with the security camera. Look for information about the supported WiFi standards and frequencies. If your router supports the same WiFi bands as your camera, it should be compatible.

3. It is also important to check if your camera and router use the same WiFi security protocols, such as WPA2-PSK or WEP. If the security protocols are not compatible, you may need to update the firmware of either the camera or the router to ensure compatibility.
4. Check if your camera and router have the latest firmware updates installed. Sometimes, compatibility issues can be resolved by updating the firmware of the devices. Check the manufacturer’s website for any available firmware updates and follow the instructions to install them.
By following these steps, you can ensure that your camera and router are compatible with each other, which will help in successfully connecting your security camera to your WiFi network.
Make Sure the Camera is Within Range
One of the most common reasons why you can’t connect your security camera to your WiFi router is because the camera is not within range of the router’s signal. WiFi signals weaken over distance, so if the camera is too far away, it may not be able to establish a stable connection.
To ensure that the camera is within range, you can try the following:
- Check the distance between the camera and the WiFi router. Make sure they are not too far apart.
- Consider any obstacles that may be blocking the WiFi signal, such as walls, furniture, or appliances. Try to position the camera in a location where the signal can easily reach it.
- Verify that the camera supports the WiFi frequency band used by your router. Some cameras only support 2.4GHz, while others may also support 5GHz. Make sure your router and camera are both on the same frequency band.
- If possible, try moving the camera closer to the router to see if it can establish a connection. If it does, you may need to adjust the camera’s placement or consider using WiFi extenders or repeaters to improve the signal strength.
By ensuring that the camera is within range of the WiFi router, you increase the likelihood of successfully connecting the two devices and resolving any connection issues.
Verify the Wi-Fi Password
If you are unable to connect your security camera to your Wi-Fi router, it is possible that you may have entered the wrong Wi-Fi password. Follow these steps to verify and update your Wi-Fi password:
- Check the password you have entered: Double-check the Wi-Fi password you have entered on your security camera. Make sure there are no typos or incorrect characters.
- Reset your Wi-Fi password: If you are unsure about the Wi-Fi password, you can reset it on your router. Refer to the router’s documentation or contact your internet service provider for instructions on how to reset the Wi-Fi password.
- Update the Wi-Fi password on your security camera: Once you have reset the Wi-Fi password, you need to update it on your security camera. Refer to the camera’s manual to learn how to update the Wi-Fi settings. Usually, you will need to access the camera’s settings menu, navigate to the Wi-Fi settings, and enter the new password.
- Reconnect your camera to the Wi-Fi network: After updating the Wi-Fi password, you should be able to reconnect your security camera to the Wi-Fi network. Follow the camera’s instructions to establish a successful connection.
By verifying and updating the Wi-Fi password, you can ensure that your security camera is properly connected to your Wi-Fi router.
Reset Camera and Router
If you are having trouble connecting your security camera to your WiFi router, a possible solution is to reset both the camera and the router. Resetting these devices can help resolve any configuration or connectivity issues that may be causing the problem.
Here are the steps to reset your camera and router:
Resetting the Camera:
1. Locate the reset button on the camera. It is typically a small hole that can be pressed with a paperclip or a similar tool.
2. Insert the paperclip into the reset hole and press and hold the reset button for about 10 seconds.
3. Release the reset button and wait for the camera to restart. This may take a few minutes.
Resetting the Router:

1. Locate the reset button on the router. It is usually a small button that can be pressed with a paperclip or a similar tool.
2. Insert the paperclip into the reset hole and press and hold the reset button for about 10 seconds.
3. Release the reset button and wait for the router to restart. This may take a few minutes.
Once both the camera and the router have been reset, try connecting the camera to the WiFi network again. Make sure to follow the instructions provided by the camera manufacturer for the specific setup process.
If the issue still persists, you may need to contact the camera or router manufacturer for further assistance. They may be able to provide additional troubleshooting steps or recommend alternative solutions.
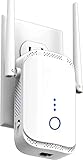
Ensure Wi-Fi Network is Stable
If you are unable to connect your security camera to your Wi-Fi router, it is essential to ensure that your Wi-Fi network is stable. Here are a few steps you can take to troubleshoot and improve the stability of your network:
- Check your Wi-Fi signal strength: Move closer to your router to see if the camera can connect. If the signal is weak, consider moving your router to a more central location or using a Wi-Fi extender to boost the signal.
- Reduce interference: Wi-Fi signals can be disrupted by other electronic devices, such as cordless phones and microwaves. Make sure your camera and router are not placed near these devices and try to minimize or eliminate any potential sources of interference.
- Update router firmware: Check if there are any firmware updates available for your Wi-Fi router. Outdated firmware can cause compatibility issues and may affect the stability of your network. Visit the manufacturer’s website for instructions on how to update the firmware.
- Change Wi-Fi channel: If there are many Wi-Fi networks in your area, they can interfere with each other. Use a Wi-Fi analyzer app to identify the least crowded channel and change your router’s settings accordingly.
- Reset router: If none of the above steps resolve the issue, you can try resetting your router to its factory settings. This will erase all the customized settings, so make sure you have the necessary information to set it up again.
By ensuring your Wi-Fi network is stable, you increase the chances of successfully connecting your security camera to your Wi-Fi router. If the problem persists, it may be necessary to contact your Internet Service Provider or the manufacturer of your camera for further assistance.
Update Camera Firmware
If you are having trouble connecting your security camera to your WiFi router, one possible solution is to update the firmware of your camera. Firmware is the software that is embedded in your camera’s hardware and controls its operation. Updating the firmware can address any bugs or compatibility issues that may be causing the connection problem. Here’s how you can update the firmware of your camera:
1. Check for firmware updates
Visit the manufacturer’s website and browse for the support or downloads section. Look for the firmware updates specifically for your camera model. Make sure to download the correct firmware version compatible with your camera.
2. Prepare for the update
Before updating the firmware, it is essential to ensure that your camera has sufficient power. Connect it to a power source or use a fully charged battery. Also, it’s recommended to use a stable internet connection during the process to avoid any interruptions.

3. Install the firmware update
- Transfer the downloaded firmware file to an SD card or a USB drive. Make sure the file is in the correct format mentioned in the manufacturer’s instructions.
- Insert the SD card or USB drive into your camera.
- Access the camera’s settings or menu and navigate to the firmware update section.
- Select the option to update the firmware from the external device (SD card or USB drive).
- Follow the on-screen instructions to initiate the firmware update process.
- Wait for the update to complete. Do not turn off the camera or disconnect it from the power source during the update.
After the firmware update is complete, the camera will typically restart automatically. You can then attempt to connect the camera to your WiFi router again and check if the connection issue is resolved.
Check for Interference
When you are unable to connect your security camera to your Wi-Fi router, one possible issue could be interference. Interference can disrupt the wireless signal and prevent your camera from establishing a stable connection.
To check for interference, follow these steps:
1. Move the Camera Closer to the Router
Try moving the camera closer to the Wi-Fi router to see if the signal strength improves. If the camera connects successfully when it’s closer, it could indicate that there is interference between the router and the camera at its original location.
2. Reduce Obstacles
Make sure there are no physical obstacles, such as walls or large objects, between the camera and the router. These obstacles can weaken the Wi-Fi signal, causing connectivity issues. Try repositioning the camera to get a clearer line of sight to the router.

3. Check for Devices or Appliances that Emit Interference
Electrical devices and appliances, such as microwave ovens or baby monitors, can emit signals that interfere with Wi-Fi signals. Check if there are any devices nearby that may be causing interference, and try turning them off or moving them further away from the camera and router.
4. Switch to a Different Wi-Fi Channel
Other Wi-Fi networks in your area can also cause interference if they are using the same Wi-Fi channel. Access your router’s settings and try switching to a different channel to avoid interference from neighboring networks.
By checking for interference and taking appropriate measures, you can improve the chances of successfully connecting your security camera to your Wi-Fi router.
Change Wi-Fi Channel
One solution to the problem of not being able to connect your security camera to your Wi-Fi router could be to change the Wi-Fi channel. The Wi-Fi channel is the frequency band that your router uses to transmit and receive data. Sometimes, the default channel that your router is set to may be crowded with other wireless devices, causing interference and making it difficult for your security camera to connect.
To change your Wi-Fi channel, you will need to access your router’s settings. You can usually do this by typing your router’s IP address into your web browser and entering your login credentials. Once you have accessed the settings, look for the wireless settings or Wi-Fi settings section.
In the wireless settings section, you should be able to see the current Wi-Fi channel that your router is using. It is usually set to “Auto” by default. You can try changing this to a specific channel, such as channel 1, 6, or 11, which are considered the least congested channels. Save the settings and restart your router.
After changing the Wi-Fi channel, try connecting your security camera to the Wi-Fi network again. Make sure to enter the correct Wi-Fi password when prompted. Hopefully, changing the Wi-Fi channel will resolve the connectivity issue and allow your security camera to connect to your Wi-Fi router successfully.
Consult the Camera Manufacturer
If you’re having trouble connecting your security camera to your WiFi router, the first step is to consult the manufacturer of your camera. They should have a customer support team that can provide you with specific instructions and troubleshooting tips for your particular camera model. They may also be able to tell you if there are any known issues or compatibility problems with your WiFi router.
When contacting the camera manufacturer, be sure to provide them with detailed information about your setup, including the make and model of your camera and WiFi router. This will help them better understand your specific situation and provide more accurate assistance.
It’s also worth checking the manufacturer’s website or support documentation for any FAQs, user guides, or forums that may provide helpful information or solutions to common issues. The manufacturer may have already addressed the problem you’re experiencing and provided step-by-step instructions on how to resolve it.
Remember, the camera manufacturer is the expert when it comes to their products, so don’t hesitate to reach out to them for guidance. They can provide you with the most accurate and up-to-date information to help you successfully connect your security camera to your WiFi router.
Contact Router Technical Support
If you are having trouble connecting your security camera to your Wi-Fi router, it could be due to a technical issue with your router. In such cases, it is recommended to contact your router’s technical support for assistance. Here are a few steps you can take to get in touch with them:
- Find the customer support number or email address for your router’s manufacturer. This information can usually be found in the documentation that came with your router.
- Call the customer support number or send an email explaining the issue you are facing with connecting your security camera to the router. Be sure to provide them with any relevant details, such as the make and model of your router, as well as the specific error messages you are encountering.
- Follow any troubleshooting steps or instructions provided by the technical support team. They may ask you to perform certain actions on your router or security camera settings to resolve the issue.
- If the initial troubleshooting steps do not resolve the problem, the technical support team might suggest a firmware update for your router or recommend other advanced troubleshooting methods.
- In case the technical support team is unable to resolve the issue, they might advise you to contact the manufacturer of your security camera for further assistance.
- Keep a record of the support ticket or case number provided by the technical support team. This will help in future communication or follow-ups.
By reaching out to your router’s technical support, you can ensure that you receive expert guidance in resolving the issue with connecting your security camera to your Wi-Fi router. Remember to be patient and provide all necessary information to assist the support team in troubleshooting the problem effectively.
FAQ
Why can’t I connect my security camera to my wifi router?
There could be several reasons why you are unable to connect your security camera to your wifi router. Some possibilities include incorrect wifi password, incompatible camera firmware, signal interference, or a faulty wifi router. It would be helpful to check if you are entering the correct wifi password and try resetting your camera or router. Additionally, make sure that your camera and router are compatible and that there are no other devices causing interference with the wifi signal.
What should I do if my security camera cannot connect to my wifi router?
If you are having trouble connecting your security camera to your wifi router, there are several steps you can take to troubleshoot the issue. First, make sure that your wifi password is correct and try entering it again. If that doesn’t work, try resetting both your camera and router. You can also check if there are any firmware updates available for your camera and install them if necessary. If all else fails, consider contacting technical support for your camera or router for further assistance.


