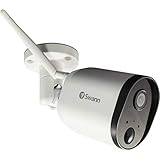
Swann security cameras provide a reliable and effective surveillance solution for homes and businesses. Connecting your Swann security camera to your Wi-Fi network allows you to access live video feeds and recordings remotely, enhancing the security of your property.
Before connecting your Swann security camera to Wi-Fi, ensure that you have a stable and reliable internet connection. This will ensure that your camera can transmit video feeds without interruptions. Additionally, make sure you have the necessary credentials to connect to your Wi-Fi network, such as the network name (SSID) and password.
To connect your Swann security camera to Wi-Fi, start by accessing the camera’s settings menu. This can usually be done by connecting the camera to a computer or mobile device using an Ethernet cable. Once connected, open the camera’s settings interface and navigate to the Wi-Fi settings section.
In the Wi-Fi settings section, you will need to enter the credentials for your Wi-Fi network. This includes the network name (SSID) and password. Once you have entered the correct credentials, save the settings, and the camera will attempt to connect to your Wi-Fi network. You may need to wait a few moments for the camera to establish a connection.
After the camera has successfully connected to Wi-Fi, you can disconnect the Ethernet cable and place the camera wherever you need it. To ensure optimal performance, make sure the camera is within range of your Wi-Fi router and that there are no physical obstructions that could interfere with the signal.

Once your Swann security camera is connected to Wi-Fi, you can access its live video feeds and recordings remotely through the Swann mobile app or a web browser. This allows you to monitor your property from anywhere, providing you with peace of mind and enhanced security.
By following these steps, you can easily connect your Swann security camera to Wi-Fi and enjoy the benefits of remote surveillance. Ensure that you regularly update your camera’s firmware and password to maintain the security of your system and protect your privacy from potential threats.
Step-by-step guide: Connecting your Swann security camera to WiFi
Follow these steps to connect your Swann security camera to WiFi:
- Check requirements: Make sure you have a Swann security camera that supports wireless connection and a WiFi network to connect to.
- Download the Swann Security app: Search for the Swann Security app on your mobile device’s app store and install it.
- Create a Swann account: Open the Swann Security app and create a new account if you haven’t already.
- Add your camera to the app: Follow the on-screen instructions to add your Swann security camera to the app. This usually involves scanning a QR code on the camera or entering its serial number.
- Connect to your home WiFi: In the app, go to the settings or network section and select the option to connect your camera to WiFi.
- Select your WiFi network: Choose your home WiFi network from the list of available networks.
- Enter your WiFi password: Enter the password for your WiFi network when prompted.
- Wait for the connection: The app will attempt to connect your camera to the selected WiFi network. Wait for a few moments until the connection is established.
- Test the connection: Once connected, you can test the connection by accessing your Swann security camera’s live video feed through the app.
- Adjust settings (if necessary): If you want to change any settings or customize the camera’s behavior, you can do so through the app. This may include adjusting motion detection, recording schedules, or notifications.
By following these steps, you should be able to successfully connect your Swann security camera to your WiFi network and start monitoring your property remotely through the Swann Security app. Enjoy the peace of mind that comes with having a connected security system!
Note: The exact steps may vary slightly depending on the model of your Swann security camera and the version of the Swann Security app you are using. Refer to the camera’s manual or the app’s documentation for specific instructions.

Checking camera compatibility
Before attempting to connect your Swann security camera to your Wi-Fi, it’s important to check if your camera is compatible with a wireless connection. Not all Swann cameras have Wi-Fi capability, so it’s important to verify this before proceeding.
To determine if your camera is Wi-Fi compatible, refer to the camera’s user manual or product specifications. Look for terms such as “Wi-Fi enabled” or “wireless connectivity”. You can also contact Swann’s customer support for assistance in confirming whether your camera supports wireless connectivity.
If your camera is not Wi-Fi compatible, you may need to use alternative methods to connect it to your network, such as using an Ethernet cable or a wireless bridge.
Ensuring compatibility between your camera and your Wi-Fi network is crucial in successfully connecting your camera to Wi-Fi. By verifying compatibility beforehand, you can save time and avoid any potential frustration that may arise from attempting to connect an incompatible camera.
Gathering necessary equipment
In order to connect your Swann security camera to wifi, you will need to gather the following equipment:

- Swann security camera
- Wifi-enabled device (such as a smartphone, tablet, or computer)
- Wi-Fi router
- Internet connection
- Power supply for the camera
- Ethernet cable (optional, for initial setup)
Make sure you have all of these items ready before proceeding to the next steps. Having the necessary equipment will ensure a smooth and successful connection process.
Connecting the camera to a power source
To connect your Swann security camera to a power source, follow these steps:
1. Locate the power adapter that came with your Swann security camera.
2. Plug one end of the power adapter into a nearby electrical outlet.
3. Connect the other end of the power adapter to the power input on the back of the camera.

4. Ensure that the camera is securely connected to the power source.
5. Turn on the camera by using the power switch or button, if applicable.
Your camera should now be successfully connected to a power source and ready to be set up and connected to your WiFi network.
Accessing the camera settings
To connect your Swann security camera to Wi-Fi, you will need to access the camera settings. Follow these steps to access the camera settings:
Step 1: Connect to the camera
Ensure that your camera is powered on and connected to a power source. Use the provided Ethernet cable to connect the camera to your router or modem.

Step 2: Determine the camera’s IP address
To access the camera settings, you will need to know its IP address. You can find the IP address by checking the camera’s documentation or using the SwannView Link app on your smartphone.
Step 3: Access the camera settings
| 1. | Open a web browser on your computer or smartphone. |
| 2. | Type the camera’s IP address in the address bar of the web browser. |
| 3. | Press Enter or Go to load the camera’s web interface. |
| 4. | You will be prompted to enter the camera’s username and password. Refer to the camera’s documentation or default settings for these credentials. |
| 5. | Once logged in, you will have access to the camera’s settings and configuration options. |
From the camera settings page, you can configure the Wi-Fi network, SSID, and password to connect your Swann security camera to your Wi-Fi network. Remember to save any changes you make before exiting the settings page.
By accessing the camera settings, you can successfully connect your Swann security camera to Wi-Fi and enjoy remote viewing and monitoring capabilities on your smartphone or computer.
Entering WiFi network information
After you have successfully connected your Swann security camera to power and turned it on, the next step is to connect it to your WiFi network. Follow these steps to enter your WiFi network information:
- Connect the camera to your router: Ensure that your camera is within the range of your WiFi network. Use an Ethernet cable to connect the camera to your router’s LAN port. This will provide a stable connection during the setup process.
- Access the camera settings: Open a web browser on your computer or mobile device and enter the camera’s IP address. You can find the IP address in the camera’s user manual or on the manufacturer’s website.
- Log in to the camera: When prompted, enter the correct username and password to access the camera’s settings. By default, the username is usually “admin” and the password may be either “admin” or blank. Refer to the camera’s user manual for the correct login information.
- Navigate to the WiFi settings: Once logged in, find the WiFi settings or network settings section in the camera’s interface. This section may be labeled differently depending on the camera model.
- Select your WiFi network: In the WiFi settings, scan for available networks and select your WiFi network from the list. Ensure that the correct network is selected.
- Enter your WiFi network credentials: Once you have selected your WiFi network, you will need to enter your network credentials. This includes the WiFi network name (SSID) and the WiFi password. Make sure to double-check the information to avoid any typos.
- Save the changes: After entering the correct WiFi network information, save the changes to apply the settings. The camera will now attempt to connect to the WiFi network using the provided credentials.
- Confirm the WiFi connection: Wait for a few moments while the camera attempts to establish a connection with your WiFi network. If the connection is successful, the camera’s LED indicator or status light will turn solid or change color.
- Disconnect the Ethernet cable: Once the camera is successfully connected to your WiFi network, you can disconnect the Ethernet cable from the camera and router. The camera should now be fully connected and accessible wirelessly.
By following these steps, you will be able to enter your WiFi network information and connect your Swann security camera to your WiFi network for remote monitoring and access.
Verifying the connection status
Once you have successfully connected your Swann security camera to WiFi, you need to verify the connection status to ensure it is working correctly. Here are the steps to follow:
- Access the Swann security camera’s settings through the designated mobile app.
- Navigate to the “Camera settings” or “Network settings” section.
- Look for a “Connection status” or “WiFi status” option.
- Tap on the option to view the current status of the WiFi connection.
- Verify that the status indicates a successful connection to the desired WiFi network.
If the connection status shows as “Connected” or “Active,” then your Swann security camera is successfully connected to WiFi. You can proceed to use the camera’s features and access it remotely through the mobile app.
If the connection status shows as “Disconnected” or “Not connected,” follow these troubleshooting steps:
- Check the WiFi network name and password entered during the setup process. Make sure they are correct.
- Move the camera closer to the WiFi router to improve the signal strength.
- Reset the camera’s WiFi settings and repeat the WiFi setup process.
- If the issue persists, restart the WiFi router and try connecting the camera again.
- Contact Swann customer support for further assistance if the problem continues.
Verifying the connection status is crucial to ensure the stability and functionality of your Swann security camera’s WiFi connection. By following the steps outlined above, you can easily check and troubleshoot any WiFi connection issues to enjoy a reliable and secure surveillance system.
Testing the camera’s functionality
After you have successfully connected your Swann security camera to Wi-Fi, it is important to test its functionality to ensure that it is working properly. Here are a few steps you can follow to test your camera:

-
Check the camera feed
First, access the camera feed to see if the live video is displaying correctly. This can usually be done through the Swann app on your smartphone or tablet. Make sure the camera is properly positioned and that the feed is clear and not glitchy.
-
Test the motion detection
Most Swann security cameras have motion detection capabilities. Test this feature by walking in front of the camera’s field of view and see if it detects your movement and starts recording. You should be able to receive alerts on your smartphone or via email when motion is detected.
-
Check the night vision
If your Swann security camera has night vision functionality, test this feature in a low-light or dark environment. Make sure the camera switches to night vision mode and that you can see objects clearly in the camera’s field of view.
-
Verify remote access
Ensure that you can access the camera remotely through the Swann app or web portal when you are not connected to your home Wi-Fi network. This will allow you to monitor the camera and view live footage from anywhere.
-
Test the recording and playback
Check if the camera is properly recording and storing footage. Trigger the camera’s recording functionality manually or set it to record at scheduled times. Then, review the recorded footage to make sure it is saved correctly and can be played back without any issues.
By following these steps, you can ensure that your Swann security camera is working correctly and providing you with the necessary surveillance and peace of mind.
Securing the camera’s connection
Ensuring the security of your Swann security camera’s connection is vital to protect your privacy and prevent any unauthorized access. Here are some steps you can take to secure your camera’s connection:
1. Change the default username and password: One of the first things you should do is change the default username and password that came with your Swann security camera. Use a strong, unique password that is not easily guessed.
2. Enable encryption: Swann security cameras support encryption protocols such as WPA2 (Wi-Fi Protected Access 2). Make sure to enable encryption on your camera’s Wi-Fi connection to protect against unauthorized access.
3. Update the firmware: Regularly check for firmware updates for your Swann security camera and install them when available. These updates often include security patches that can help safeguard your camera’s connection.
4. Use a strong Wi-Fi password: Protect your Wi-Fi network with a strong password to prevent unauthorized devices from connecting to your camera. Avoid using easily guessable passwords and consider using a combination of letters, numbers, and special characters.
5. Disable remote access: If you do not need remote access to your Swann security camera, it is recommended to disable this feature. Remote access increases the risk of unauthorized access, so disabling it can enhance the security of your camera’s connection.
6. Enable two-factor authentication: Some Swann security cameras offer two-factor authentication, which adds an extra layer of security. Enable this feature if available to further protect your camera’s connection.
By following these steps, you can enhance the security of your Swann security camera’s connection and ensure that only authorized users can access the camera and its footage.