
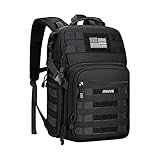
When it comes to photography, a DSLR camera is an essential tool for capturing high-quality images. And if you’re a passionate photographer who likes to carry their gear around, having a reliable camera backpack is a must. While there are many options available on the market, why not try making your own?
Creating your own DSLR camera backpack allows you to customize it to your exact needs and preferences. You can choose the size, layout, and features that will best suit your camera equipment and accessories. Plus, it can also be a fun and rewarding DIY project that allows you to showcase your creativity.
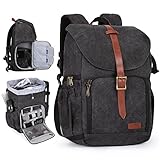
Before you start making your own camera backpack, it’s important to plan and gather all the necessary materials. You’ll need a suitable backpack or bag that provides enough space and padding for your camera gear. Make sure it has compartments, dividers, and straps to keep your equipment organized and secure.
Next, consider what additional features you want to include in your backpack. For example, you may want to add extra pockets for storing memory cards, batteries, and other accessories. You could also incorporate padding or cushions to further protect your camera and lenses from any potential damage.
Remember, the key to a successful camera backpack is functionality and protection. Your gear should be easily accessible when you need it, and the backpack should provide adequate cushioning to keep everything safe during transportation. So, think about the layout and design that will provide the best comfort and usability for you.

Once you have all your materials and a clear plan, it’s time to start assembling your DSLR camera backpack. Begin by positioning the dividers and compartments according to your needs. Secure them in place using stitching or adhesive, making sure they are sturdy and won’t move around.
Additionally, consider incorporating straps, hooks, or other attachments to hold your tripod safely. You may also want to include a rain cover or waterproof lining to protect your equipment from any unexpected weather conditions.
Finally, don’t forget about comfort. If you plan on carrying your camera backpack for extended periods, make sure the shoulder straps and back padding are comfortable and adjustable. Test it out with some weight to ensure it distributes the load evenly and doesn’t strain your back and shoulders.
By making your own DSLR camera backpack, you can create a one-of-a-kind accessory that suits your photography needs perfectly. Not only will it protect your gear, but it will also showcase your personal style and DIY skills. So, grab your materials and start crafting the camera backpack of your dreams!
Why Should You Make Your Own DSLR Camera Backpack?
When it comes to protecting your valuable DSLR camera and accessories, having a reliable camera backpack is crucial. While there are plenty of pre-made camera bags available on the market, making your own DSLR camera backpack can offer several advantages.
1. Customization
Making your own DSLR camera backpack allows you to customize it according to your specific needs and preferences. You can choose the size, compartments, and materials that best suit your equipment. This level of customization ensures that your camera and accessories are well-organized and protected.
2. Cost-effective
Creating your own DSLR camera backpack can be a cost-effective option compared to purchasing a ready-made bag. By using materials you already have or can find at an affordable price, you can significantly reduce the overall cost. This allows you to invest in higher-quality materials for added durability and protection.
Additionally, making your own backpack means you can repurpose an old backpack or bag, saving even more money. This DIY approach not only saves you money but also gives you the satisfaction of creating something unique.
3. Personalized Design
When you make your own DSLR camera backpack, you have the opportunity to add personal touches and design elements that reflect your style. Whether it’s choosing your favorite colors, adding patches or embroidery, or incorporating other decorative details, a handmade camera backpack can showcase your creativity and personality.

Moreover, a personalized camera backpack can also help you distinguish your gear from others, reducing the risk of mix-ups or theft, especially in crowded photography events or locations.
In conclusion, making your own DSLR camera backpack offers customization, cost-effectiveness, and a personalized design. By crafting your own bag, you can ensure that your camera equipment is adequately protected while adding a personal touch. So why not give it a try and unleash your creativity?
Choosing the Right Materials for Your DIY DSLR Camera Backpack
When it comes to creating your own DIY DSLR camera backpack, choosing the right materials is crucial. It’s important to select materials that are durable, provide sufficient protection, and can comfortably carry the weight of your camera gear. Here are a few key materials to consider:
| Material | Benefits | Considerations |
|---|---|---|
| Nylon | Strong and durable, water-resistant, lightweight | May lack some padding or cushioning |
| Canvas | Durable, provides excellent protection, can be waterproofed | May be heavier and bulkier than nylon |
| Polyester | Lightweight, water-resistant, offers good protection | May not be as durable as nylon or canvas |
| Neoprene | Excellent cushioning, water-resistant | May be less durable and offer less protection from impacts |
| Polypropylene | Durable, lightweight, water-resistant | May lack some padding or cushioning |
| Memory Foam | Provides excellent cushioning and shock absorption | May add bulk and weight to the backpack |
Additionally, consider the quality of zippers, buckles, and straps when choosing materials for your backpack. Opt for sturdy and reliable hardware to ensure that your backpack will last and securely hold your camera gear.
Remember, the materials you choose for your DIY DSLR camera backpack will have a significant impact on its overall functionality and durability. Carefully assess your needs and preferences to select the materials that best suit your requirements.
Designing the Exterior of Your DIY DSLR Camera Backpack
When creating your own DSLR camera backpack, not only is the functionality important, but so is the design of the exterior. A well-designed backpack will not only protect your camera and equipment, but it will also reflect your personal style and taste.
1. Choosing the Right Material:
One of the first decisions you’ll need to make is selecting the material for the exterior of your camera backpack. You’ll want to choose a durable and waterproof material that can withstand different weather conditions. Popular choices include nylon, polyester, or even waxed canvas for a more vintage look.
2. Considering the Aesthetics:
Besides functionality, aesthetics play a significant role in the design of your backpack. You can choose from various colours and patterns to match your personal style or even incorporate your brand colours if you are a professional photographer. This will give your backpack a unique and personalized touch.

3. Adding Protective Features:
The exterior design should not only look good but also provide sufficient protection for your camera and equipment. Consider adding padding or foam inserts to protect delicate items from accidental bumps or drops. Additionally, include secure fastenings and zippers to keep everything in place during transportation.
4. Enhancing Accessibility:
The exterior design should also prioritize accessibility. Consider adding external pockets or compartments for quick and easy access to frequently used items like memory cards, batteries, or lens caps. This will save you time and effort when out in the field and needing to quickly grab your essentials.
5. Customizing with Straps and Patches:

If you want to add a personal touch to your backpack, consider customizing it with straps and patches. Adjustable straps will allow you to secure your backpack and distribute weight evenly, while patches can be used to display your name, logo, or any other design that represents you.
Conclusion:
Designing the exterior of your DIY DSLR camera backpack is an exciting part of the process. By carefully considering the material, aesthetics, protective features, accessibility, and any personal customization, you can create a backpack that not only protects your equipment but also showcases your style and personality.
Creating the Interior Compartments for Your DIY DSLR Camera Backpack
When designing your own DSLR camera backpack, it is essential to create a well-organized and protective interior compartment system. This will ensure that your camera and accessories are stored securely and are easily accessible, making it convenient for you to carry and use your camera equipment on the go.
1. Assess Your Equipment
Before designing the interior compartments, take some time to assess the equipment you will be carrying in your camera backpack. Consider the size and shape of your DSLR camera, additional lenses, flashes, batteries, memory cards, and any other accessories you frequently use.

2. Choose the Right Padding
Investing in high-quality padding is crucial to protect your camera gear from any potential damage. Pick foam inserts or dividers that are specially designed for camera equipment and are customizable to fit your specific gear.
3. Plan the Layout
Draw a rough sketch of the interior space of your backpack and plan where each piece of equipment will fit. Consider dividing the space into sections for different types of gear, such as a designated area for your camera body, lens compartments, and accessory pockets.
4. Utilize Modular Dividers
Modular dividers are an excellent choice for creating customizable compartments in your backpack. These dividers usually have Velcro attachments, allowing you to adjust and move them around as needed to fit different gear combinations.
5. Accessory Pouches and Pockets
Make use of small accessory pouches or pockets to store smaller items like memory cards, batteries, lens filters, and cleaning supplies. These can be attached to the interior walls of your backpack or within the compartments themselves.
6. Secure Fastenings
Ensure that the dividers and pouches you use have secure fastenings to keep your gear in place, even when the backpack is on the move. This will prevent your equipment from shifting and potentially colliding with each other, reducing the risk of damage.
7. Consider Accessibility
When arranging the compartments, think about how easily you’ll be able to access your camera and other frequently used gear. Keep the items you’ll need most often within reach, while less frequently used equipment can be placed deeper in the backpack.
By following these steps and customizing the interior compartments of your DIY DSLR camera backpack, you can ensure that your gear is both protected and easily accessible, making your photography adventures more enjoyable and hassle-free.
Adding Padded Protection to Your DIY DSLR Camera Backpack
When carrying your valuable DSLR camera and equipment, it is crucial to ensure that they are adequately protected from any potential damage. Adding padded protection to your DIY DSLR camera backpack is a great way to achieve this. Here are some steps to follow:
Step 1: Choose the Right Padding Material
Start by selecting a suitable padding material that will provide sufficient cushioning for your camera gear. Foam padding or bubble wrap can be viable options. Make sure the material is thick enough to absorb shocks and vibrations while keeping your equipment safe.
Step 2: Measure and Cut the Padding
Measure the dimensions of your backpack compartments and the equipment you plan to carry. Use these measurements to carefully cut the padding material into pieces that fit snugly within the compartments. Pay extra attention to the camera body, lenses, and any other fragile accessories.
Step 3: Create Separators
If your backpack lacks compartments, consider creating separators using the padding material. These separators will help organize and secure each piece of equipment. Cut additional pieces of padding to fit vertically or horizontally inside the backpack, creating individual compartments for each item.
Step 4: Customize the Padding
To further enhance the protection, consider customizing the padding. This can be accomplished by creating cutouts or indentations in the padding pieces to perfectly fit specific pieces of equipment. This will prevent them from moving or colliding with each other.
Step 5: Secure the Padding
To prevent the padding from shifting or slipping inside your backpack, use adhesive strips or hook and loop fasteners to secure them in place. Ensure that the padding is firmly fixed and doesn’t obstruct the opening or closing of the backpack.
Step 6: Test the Protection
Before using your DIY camera backpack, test the effectiveness of the added padding by gently shaking the bag and observing if anything inside moves or makes noise. If everything remains secure and well-protected, you can trust your backpack to keep your DSLR camera and equipment safe during your adventures.
Remember, while adding padded protection to your DIY DSLR camera backpack can greatly reduce the risk of damage, it is still important to handle your equipment with care and avoid subjecting it to unnecessary shocks or impacts.
| Benefits of Adding Padded Protection |
|---|
| 1. Prevents scratches and dents on your camera and lenses |
| 2. Absorbs shocks and vibrations to keep your equipment safe |
| 3. Customizable to fit your specific gear |
| 4. Provides peace of mind when carrying your camera |
| 5. Ensures longevity of your expensive camera equipment |
Making Your DIY DSLR Camera Backpack Weatherproof
When it comes to protecting your expensive DSLR camera and lenses from the elements, having a weatherproof backpack is essential. While there are many commercially available options on the market, you can also create your own DIY weatherproof camera backpack. Here are some steps to make your DIY DSLR camera backpack weatherproof:
1. Choose a waterproof backpack:
Start by selecting a backpack that is already designed to be waterproof or made from a water-resistant material. Look for backpacks with a high denier rating and sealed seams to ensure the best protection against water.
2. Use a waterproof cover:
If your chosen backpack is not waterproof, you can still make it weatherproof by using a waterproof cover. These covers are available in various sizes and can easily be slipped over your backpack to protect it from rain and moisture.
3. Seal the zipper:
The zipper is one of the most vulnerable areas on a backpack when it comes to keeping out water. To make it more waterproof, apply a waterproofing wax or liquid sealant along the zipper to create a barrier against water intrusion.
4. Reinforce the seams:
To further enhance the waterproofing of your DIY camera backpack, reinforce the seams with waterproof tape or sealant. This will help prevent any water from seeping through the stitched areas of your backpack.
5. Use a rain cover for extra protection:
In addition to waterproofing your backpack, consider using a rain cover specifically designed for camera backpacks. These covers often come with additional features such as access points for your camera and lens, allowing you to shoot in the rain without exposing your gear to water damage.
6. Keep moisture-absorbing packets:
Moisture-absorbing packets, like silica gel packs, can help keep the inside of your backpack dry and free from moisture. Place a few of these packets inside your backpack to absorb any humidity that may accumulate and cause damage to your camera equipment.
7. Regularly maintain your backpack:
Check the condition of your DIY DSLR camera backpack regularly to ensure its weatherproofing remains intact. Look for signs of wear and tear, such as cracks in the waterproof sealants or tape, and make any necessary repairs or replacements to maintain its weatherproof capabilities.
By following these steps, you can create your own DIY DSLR camera backpack that is weatherproof and provides excellent protection for your valuable camera gear. Remember to always take extra precautions when shooting in extreme weather conditions and ensure your backpack is properly closed and secured.
Adding Easy Access Features to Your DIY DSLR Camera Backpack
When designing your own DIY DSLR camera backpack, it’s important to consider easy access features that will make your photography experience more convenient and efficient. Here are a few ideas to help you incorporate these features into your design:
1. Adjustable Dividers: Utilize adjustable dividers within the interior of your backpack to create custom compartments for your camera body, lenses, and accessories. This will allow you to easily access and organize your equipment.
2. Side Pockets: Add side pockets to your backpack to provide quick and easy access to smaller items such as memory cards, batteries, lens filters, and cleaning supplies. These pockets can be closed with secure zippers or elastic bands to keep your items safe.
3. Quick Release Buckles: Incorporate quick release buckles as closure mechanisms for your backpack compartments. This will allow you to open and close the backpack quickly, without the need for complex zippers or clasps.
4. Tripod Straps: Install adjustable tripod straps on the exterior of your backpack to securely hold your tripod while traveling. This will allow you to easily attach and detach your tripod without hassle.
5. Padded Laptop Compartment: If you frequently work with your laptop while on a photography session, consider adding a padded compartment specifically designed to fit your laptop. This will protect your device while providing easy access for editing and transferring your photos.
6. Rain Cover: To protect your precious camera equipment from unexpected rain or moisture, incorporate a detachable rain cover into your backpack design. This will ensure that your gear stays dry and ready to use.
7. Front Pocket Organization: Create a front pocket with various slots, mesh pockets, and elastic bands to organize smaller items such as lens caps, lens cloths, and filters. This will make it easier for you to find what you need without having to search through the entire backpack.
By adding these easy access features to your DIY DSLR camera backpack, you’ll be able to conveniently access and protect your equipment while on the go. Enjoy your photography adventures!
Designing Adjustable Straps for Your DIY DSLR Camera Backpack
When designing your own DSLR camera backpack, one of the most important considerations is the design and functionality of the straps. Adjustable straps will allow you to customize the fit and ensure that your camera backpack is comfortable to wear, even when carrying heavy equipment.
Materials Needed
Before you begin designing your adjustable straps, you will need the following materials:
| – Webbing or nylon straps |
| – Buckles or sliders |
| – Thread |
| – Sewing machine or needle and heavy-duty thread for hand sewing |
| – Scissors |
Step 1: Measure and Cut the Straps
Start by measuring the length of the straps you will need. These will depend on your body size and preferences. Consider how you want the backpack to sit on your body and make sure to leave enough excess length for adjustability.
Once you have determined the length, use scissors to cut the webbing or nylon straps to the desired size.
Step 2: Attach the Buckles or Sliders
Next, attach the buckles or sliders to the ends of the straps. Buckles will allow you to easily adjust the length of the strap, while sliders will provide a more seamless and adjustable fit.
If using buckles, thread one end of the strap through the buckle’s opening and fold it back on itself. Sew across the strap multiple times to secure it in place. Repeat this process for both ends of the strap.
If using sliders, thread the strap through the slider and fold it back on itself, similar to the buckle method. Sew across the strap multiple times to ensure it is securely attached to the slider.
Step 3: Attach the Straps to Your Backpack
Finally, determine where you want to attach the straps to your DIY DSLR camera backpack. This will depend on the overall design of your backpack and your preferred carrying position.
Sew the free ends of the straps to your backpack, making sure to reinforce the stitching for added durability. You can sew the straps directly onto the backpack fabric or use D-rings or other attachment points for added versatility.
Once the straps are securely attached, you can adjust their length to fit your body and gear. Test out the fit and make any necessary adjustments to ensure the backpack sits comfortably and securely on your back.
Remember, the comfort and functionality of your DIY DSLR camera backpack will greatly depend on the design of the straps. Take the time to measure, cut, and attach them properly to ensure a comfortable and secure fit.
Adding Extra Storage Options to Your DIY DSLR Camera Backpack
Creating your own DIY DSLR camera backpack allows you to customize the storage options according to your specific needs. Here are a few ideas for adding extra storage to your backpack:
1. Padded Dividers: One of the important aspects of a camera backpack is the ability to organize your equipment safely. Adding padded dividers inside the backpack creates separate compartments for your camera body, lenses, and other accessories. These dividers can be easily made by cutting foam sheets to fit the size of your equipment.
2. External Pockets: Sewing or attaching external pockets on the sides or front of the backpack provides additional storage for smaller items such as batteries, memory cards, filters, and cleaning supplies. These pockets can be made from sturdy fabric or repurposed pockets from old backpacks.
3. Tripod Holder: If you frequently use a tripod, adding a dedicated tripod holder to your backpack can be very useful. This can be accomplished by attaching adjustable straps or a support system to securely hold your tripod in place.
4. Laptop Compartment: To accommodate your laptop or tablet, consider adding a padded laptop compartment to your DIY camera backpack. This will allow you to safely carry and access your digital files, edit photos, and upload content on the go.
5. Elastic Mesh Pockets: Sewing elastic mesh pockets inside the backpack provides a convenient storage solution for smaller items that need to be easily accessible. These pockets can stretch to accommodate various sizes of cables, lens filters, and other small accessories.
6. Chest and Waist Straps: To distribute the weight of your backpack more evenly and enhance comfort, consider adding chest and waist straps. These straps help stabilize the backpack and prevent it from shifting while hiking or walking, especially if you have heavy camera equipment.
Remember, when adding extra storage options to your DIY DSLR camera backpack, it’s important to distribute the weight evenly and ensure the backpack remains comfortable to carry for extended periods. Regularly test and adjust the design to suit your changing needs.
Personalizing Your DIY DSLR Camera Backpack
Once you’ve finished making your own DSLR camera backpack, you can further personalize it to suit your needs and reflect your personal style. Here are some ideas to get you started:
- Customize the exterior: Consider adding patches, pins, or logos to the outside of your backpack. You can use iron-on patches or sew them on for a secure fit.
- Add a name tag: Attach a name tag or label to your backpack to make it easily identifiable. This is especially useful if you plan on using your backpack in crowded environments.
- Use different compartments: Experiment with different configurations and sizes of the internal compartments to create a layout that works best for you. You can use dividers or foam inserts to separate and protect your camera gear.
- Include personal touches: Insert photos, quotes, or small mementos inside the backpack. This can be a great way to add a personal touch to your DIY creation.
- Add adjustable straps: Consider adding adjustable straps to the outside of your backpack to carry a tripod or other larger accessories securely.
- Consider comfort: If you plan on carrying your backpack for long periods of time, add extra padding or a waist strap to distribute the weight and reduce strain on your back.
Remember, the key is to make your DIY DSLR camera backpack functional and unique to your own needs and style. Have fun customizing it!
Question-answer:
What materials do I need to make my own DSLR camera backpack?
To make your own DSLR camera backpack, you will need materials such as sturdy fabric, padding, zippers, straps, buckles, and a sewing machine. Additionally, you may also need foam inserts, dividers, and extra pockets for organizing your camera gear.
Is it difficult to make a DSLR camera backpack on my own?
It can be a bit challenging if you are not familiar with sewing or working with fabrics. However, with proper planning, measurements, and some basic sewing skills, you can definitely make your own DSLR camera backpack. There are also tutorials and patterns available online to help guide you through the process.
Can I customize my DIY DSLR camera backpack to fit my specific needs?
Yes, one of the advantages of making your own DSLR camera backpack is that you can customize it to fit your specific needs and preferences. You can choose the size, design, and organization of the backpack based on the gear you have and how you prefer to use it. This allows for a more personalized and tailored solution for carrying and protecting your camera equipment.


