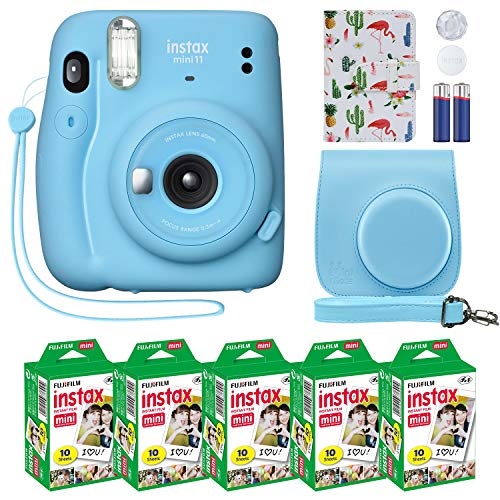
Taking photos with an instant camera 7s is a fun and nostalgic experience that allows you to capture memories instantly, without the need for editing or printing. Whether you’re a photography enthusiast or just someone looking to capture candid moments, the instant camera 7s is easy to use and provides instant gratification.
To take a picture with the instant camera 7s, start by making sure you have the correct film loaded in the camera. The instant camera 7s uses Polaroid 600 film, which is widely available and easy to find. Simply open the back of the camera and insert the film cartridge, ensuring that it locks into place.
Once the film is loaded, turn on the instant camera 7s by twisting the lens barrel until it clicks into place. Look through the viewfinder to frame your shot, making sure to adjust the focus if necessary. The instant camera 7s has a fixed focus lens, so you’ll need to estimate the distance between you and your subject to get a clear shot.
When you’re ready, press the shutter button located on the front of the camera. This will release the shutter and capture the photo. After taking the picture, wait for a few seconds for the image to develop. The instant camera 7s uses self-developing film, so you’ll be able to see the photo appear right before your eyes.
Once the photo has fully developed, gently remove it from the camera and allow it to dry. The instant camera 7s produces vibrant, retro-style prints that can be cherished for years to come. Whether you display them in a photo album, on your refrigerator, or in a frame, these instant photos are a tangible reminder of special moments captured in time.

So, grab your instant camera 7s and start capturing memories instantly with this user-friendly and stylish camera. It’s a fantastic way to relive the joy of instant photography!
Choosing the right instant camera
When it comes to capturing moments instantly, having the right instant camera can make all the difference. Whether you are a seasoned photographer or just starting out, considering a few key factors can help you make the best decision.
1. Picture Quality: One of the most important factors to consider is the picture quality. Look for an instant camera that offers sharp and vibrant photos. Check customer reviews and sample photos to get a better understanding of the image quality.
2. Film Type: Instant cameras use different types of film, such as classic Polaroid film or Instax film. Consider the availability and cost of the film, as well as the different formats available, such as color or black and white.
3. Ease of Use: If you are new to instant photography, choosing a camera that is easy to use can help you get started quickly. Look for features like automatic exposure control and simple controls to ensure a smooth experience.

4. Additional Features: Some instant cameras offer additional features like built-in flash, selfie mode, or multiple exposure capabilities. Consider your specific needs and preferences when choosing a camera with these additional features.
5. Design and Portability: Instant cameras come in various designs and sizes. Consider the design that suits your personal style and the portability of the camera if you plan to carry it around often.
6. Price: Set a budget for your instant camera purchase. Instant cameras can range in price, so it’s essential to find a balance between the features you want and the price you can afford.
In conclusion, choosing the right instant camera involves considering factors such as picture quality, film type, ease of use, additional features, design and portability, and price. By carefully evaluating these factors, you can find an instant camera that suits your needs and captures those special moments with ease and style.
Familiarizing yourself with the camera settings
Before taking a picture with the instant camera 7s, it’s important to familiarize yourself with its different settings. This will ensure that you capture the best possible photos and make the most out of your camera.

1. On/Off switch
The first thing to familiarize yourself with is the On/Off switch. Locate this switch, usually found on the side or top of the camera, and make sure the camera is turned on before starting.
2. Flash settings
Most instant cameras, including the 7s model, have flash settings to adjust the amount of light emitted by the flash. You can typically choose between auto, fill-in, or off. Depending on the lighting conditions, you may want to experiment with these settings to achieve the desired effect.
If you’re shooting in a brightly lit environment, the auto flash setting may work well. In low-light situations, the fill-in flash setting can help illuminate the subject. However, if you prefer to capture natural light or the scene doesn’t require flash, you can set it to off.
3. Light/dark setting
Another useful feature to familiarize yourself with is the light/dark setting. This setting allows you to control the exposure of your photos, preventing overexposure or underexposure. You can typically adjust it using a dial, with options like light, normal, or dark. Depending on the lighting conditions and desired effect, you can experiment with different settings to find what works best for your photo.

4. Distance settings
Most instant cameras, including the 7s model, have distance settings to help you capture subjects at different distances correctly. These settings are typically labeled with icons like a mountain, group of people, and a close-up object. Depending on the distance between you and the subject, select the appropriate setting to ensure the clarity of your photo.
By familiarizing yourself with the various camera settings, you can confidently use your instant camera 7s to capture high-quality photos. Remember to experiment with different settings and lighting conditions to get the best results!
Handling the film properly
When using the instant camera 7s, it is important to handle the film properly to ensure the best results. Here are some tips:
1. Store the film correctly
Make sure to store the film in a cool and dry place, away from direct sunlight. Extreme temperatures and moisture can damage the film and affect the quality of the prints.

2. Load the film properly
Before loading the film into the camera, make sure your hands are clean, dry, and free from any substances that could damage the film. Follow the instructions provided with the film pack to load it properly.
3. Handle the film gently
Avoid bending or damaging the film while handling it. Hold it by the edges to prevent fingerprints or scratches. Remember that the film is sensitive to light, so minimize its exposure to ensure high-quality prints.
4. Store the used film carefully
After taking a photo, remove the used film from the camera and store it in a light-tight bag or box. This will prevent any accidental exposure of the film, which could result in ruined prints.
5. Develop the film correctly
Follow the instructions provided with the film pack to develop the film correctly. Make sure to give the film enough time to develop properly before removing it from the pack. Avoid touching the developing film to prevent smudging or distorting the image.
By handling the film properly, you can ensure that your instant camera 7s captures beautiful moments and produces high-quality prints.

Composing your shot
Before you take a picture with your instant camera 7s, it’s important to compose your shot carefully. Here are a few tips to help you capture the perfect moment:
1. Consider the subject: Think about what you want to capture in your photo. Is it a person, a landscape, or an object? Make sure you position your subject in the frame in a way that highlights its features.
2. Rule of thirds: The rule of thirds is a compositional guideline that suggests dividing your frame into nine equal parts using two horizontal and two vertical lines. Place your subject along one of these lines or at one of the intersection points to create a balanced and visually pleasing composition.
3. Use leading lines: Leading lines are lines within the frame that draw the viewer’s attention to your subject. Look for natural lines such as roads, fences, or architecture that can guide the viewer’s eye towards your subject.
4. Pay attention to background: Check what’s in the background before taking your shot. Make sure there are no distracting elements that could take away from your subject. Adjust your position or angle if necessary to eliminate any unwanted objects.

5. Experiment with angles and perspectives: Get creative with your shots by trying different angles and perspectives. This can add depth and interest to your photos. You can shoot from a low angle to make your subject appear larger or from a bird’s eye view for a unique perspective.
Remember to have fun and experiment with different compositions to find your own unique style. With the instant camera 7s, you can capture special moments and memories in an instant!
Taking care of the camera
To ensure that your Instant Camera 7s stays in good working condition and continues producing high-quality photos, it is important to take proper care of it. Here are some tips to help you maintain your camera:
| Clean the lens: | Regularly wipe the lens with a soft, microfiber cloth to remove any fingerprints or smudges. Clear lens ensures clear photos. |
| Store in a cool, dry place: | Avoid exposing the camera to extreme temperatures or humidity, as this can damage the internal components and affect its performance. |
| Keep away from water: | Avoid using the camera in rainy conditions or near water bodies. Water can cause serious damage to the camera’s electronics. |
| Protect from drops and impacts: | Handle the camera with care and avoid dropping it or subjecting it to rough handling. Using a protective case can help prevent accidental damage. |
| Use recommended film: | Make sure to use the recommended instant film for your camera model. Using incompatible or expired film can result in poor image quality or damage the camera. |
Developing and preserving your instant photos
After taking a picture with your instant camera 7s, you will need to develop the photo to see the final result. The development process for instant photos is different from regular film photography. Here are the steps you can follow:
Step 1: Wait for the photo to develop
Once you press the shutter button on your instant camera 7s, the photo will begin to develop immediately. It is important to let the photo develop completely before handling it.
Step 2: Protect the photo from light
Instant photos are sensitive to light, so it is crucial to protect them while they are developing. Keep the photo shielded from direct sunlight or bright artificial light to ensure proper development.
| Tip | Not to do |
|---|---|
| Store the photo in a dark place to prevent overexposure. | Do not expose the photo to light until it is fully developed. |
Step 3: Handle the photo properly
Once the photo has fully developed, you can carefully remove it from the camera. Avoid touching the surface of the photo, as it can be easily damaged or smudged. Hold the photo by its edges to preserve its quality.
Step 4: Store the photo correctly
To preserve your instant photos for a longer period, it is important to store them properly. Here are some tips:
| Tips for storing instant photos |
|---|
| Avoid exposing the photos to direct sunlight or high temperatures, as it can cause fading or discoloration. |
| Use acid-free photo albums or archival boxes to protect the photos from dust, moisture, and damage. |
| Keep the photos away from substances that can harm them, such as adhesives, tape, or rubber bands. |
By following these steps, you can ensure that your instant photos taken with the instant camera 7s will develop properly and be preserved for a long time.
Question-answer:
What is an instant camera 7s?
The instant camera 7s is a type of camera that allows you to take pictures and instantly develop them into physical prints. It is a popular choice for those who want a tangible copy of their memories.
How do you load film into an instant camera 7s?
To load film into an instant camera 7s, open the back of the camera by sliding the latch or pressing the release button. Insert the film cartridge into the film compartment and ensure it is securely in place. Close the back of the camera and advance the film to the first frame by turning the film advance knob until it stops.
How do you take a picture with an instant camera 7s?
Taking a picture with an instant camera 7s is simple. Look through the viewfinder to compose your shot and press the shutter button to capture the image. After taking the picture, wait for a few seconds for the photo to develop and then remove it from the camera. Take caution not to shake or bend the photo during the development process.
Can you adjust the settings on an instant camera 7s?
No, the instant camera 7s does not have adjustable settings. It is designed to provide a simple and straightforward photography experience. The camera automatically adjusts the exposure and focus, allowing for easy point-and-shoot operation.