If you are tired of the limitations of your compact digital camera’s built-in microphone, you might want to consider adding wireless audio capabilities to enhance your photography experience. With wireless audio, you can capture high-quality sound with greater flexibility, whether you are recording videos or taking photos with audio annotations.
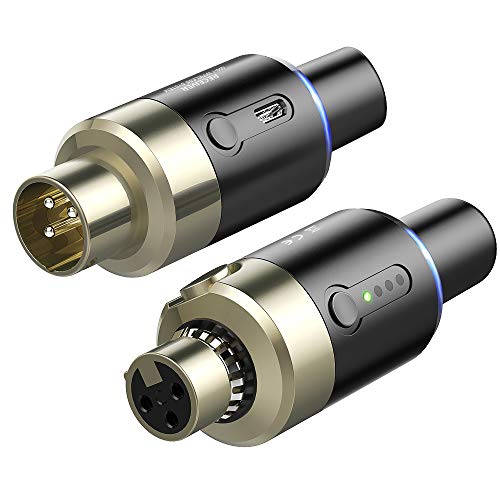
One of the easiest ways to add wireless audio to your compact digital camera is by using a wireless microphone system. These systems consist of a transmitter that you attach to the camera and a receiver that picks up the audio signal from a wireless microphone. By connecting the receiver to your camera’s audio input, you can achieve clear and reliable audio recordings without the need for cumbersome cables.
When choosing a wireless microphone system for your compact digital camera, make sure to look for one that offers a range suitable for your photography needs. Consider the environment in which you will be shooting and the distance between your subject and the camera. Additionally, check for features such as adjustable gain control, so you can fine-tune the audio levels to match your recording preferences.
Another option to add wireless audio to your compact digital camera is by using a Bluetooth-enabled microphone. These microphones connect directly to your camera without the need for a separate transmitter and receiver. They offer the convenience of wireless audio without the hassle of additional equipment. With a Bluetooth microphone, you can enjoy the freedom to move around while recording, ensuring that you capture every important moment with crystal-clear sound.
Whether you choose a wireless microphone system or a Bluetooth-enabled microphone, adding wireless audio to your compact digital camera can greatly enhance your creative possibilities. It allows you to capture not only stunning visuals but also immersive audio, bringing your photographs and videos to life. So why settle for mediocre sound when you can easily upgrade your camera’s audio capabilities and take your photography to the next level?

Why do you need wireless audio?
Wireless audio can greatly enhance the quality of your videos captured with a compact digital camera. It allows you to capture high-quality audio without the need for cables or wired microphones, giving you more freedom and flexibility while shooting.
Here are a few reasons why you may want to consider adding wireless audio to your compact digital camera:
- Improved sound quality: Whether you’re recording interviews, vlogs, or family videos, using a wireless audio system can significantly improve the sound quality of your recordings. Unlike the built-in microphones of most compact digital cameras, wireless audio systems capture audio from a dedicated microphone, resulting in clearer and more professional-sounding audio.
- Reduced background noise: Wireless audio systems typically allow you to position the microphone closer to the sound source, which helps to reduce background noise. This can be especially useful in noisy environments or when capturing audio outdoors.
- Flexible recording options: With wireless audio, you can easily capture audio from multiple sources simultaneously. This is particularly beneficial if you need to record interviews or conversations involving multiple people. Some wireless audio systems also offer the option to connect multiple microphones, allowing you to capture audio from different angles or perspectives.
- Convenience and mobility: Wireless audio systems are portable and easy to use, making them ideal for on-the-go videography. You can move around freely while recording video, without worrying about tripping over cables or limiting your range of motion.
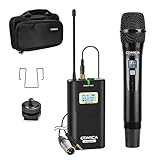
- Compatibility with accessories: Many wireless audio systems are compatible with a variety of accessories, such as lavalier microphones, handheld microphones, or shotgun microphones. This flexibility allows you to choose the best microphone for your specific recording needs.
Overall, wireless audio offers numerous advantages when it comes to capturing high-quality audio with your compact digital camera. By adding wireless audio to your setup, you can elevate the overall quality of your videos and create a more engaging and professional viewing experience for your audience.
Choosing the right wireless audio system
When it comes to choosing a wireless audio system for your compact digital camera, there are several factors to consider. Here are some important things to keep in mind when making your decision:
- Compatibility: Make sure the wireless audio system you choose is compatible with your camera model. Some systems are designed specifically for certain cameras, while others are more universal.
- Range: Consider the range of the wireless audio system. If you plan to use it for outdoor photography or in large spaces, a system with a longer range would be more suitable for your needs.
- Audio Quality: Look for a system that provides high-quality audio. The last thing you want is for your recordings to be distorted or full of static.
- Battery Life: Check the battery life of the wireless audio system. You don’t want to run out of power in the middle of an important shoot.
- Ease of Use: Consider how user-friendly the system is. Look for one with simple controls and easy pairing options.
- Size and Weight: If you’re looking for a system that is lightweight and portable, make sure to choose one that won’t add bulk to your camera setup.
- Price: Finally, consider your budget. Compare prices and features of different systems to find one that offers the best value for your money.
By taking these factors into consideration, you’ll be able to choose the right wireless audio system for your compact digital camera that meets your needs and enhances your photography experience.

Compatibility with your camera
Before adding wireless audio to your compact digital camera, you need to ensure that your camera is compatible with the necessary equipment.
Check your camera’s specifications
Start by checking the specifications of your camera to see if it has the necessary ports or capabilities for wireless audio. Look for features such as a microphone input, a hot shoe, or built-in Wi-Fi.
Consider the type of wireless audio
There are different types of wireless audio systems available, such as Bluetooth or Wi-Fi enabled microphones. Make sure to choose a system that is compatible with your camera’s audio input options.
- If your camera has a microphone input, you can use a wireless microphone system that connects directly to the camera.
- If your camera does not have a microphone input but has Wi-Fi capabilities, you can use a separate wireless microphone system that connects to your smartphone or tablet via Wi-Fi and then syncs the audio with the camera during editing.
- If your camera does not have a microphone input or Wi-Fi capabilities, you can use a portable audio recorder with wireless capabilities and sync the audio with the video during editing.
Check for compatibility with accessories
Once you have chosen a wireless audio system, check if any additional accessories are needed, such as an adapter or cable, to connect the system to your camera. Ensure that these accessories are compatible with your camera’s make and model.
By taking these compatibility factors into consideration, you can ensure that you select the right wireless audio system that works seamlessly with your compact digital camera.
Range and signal quality
When considering adding wireless audio to your compact digital camera, it is important to understand the range and signal quality of the wireless audio system you choose. The range refers to the maximum distance at which the audio transmitter and receiver can maintain a strong connection without any drop in signal quality.
The range of wireless audio systems can vary depending on factors such as the frequency band used, the power output of the transmitter, and the presence of any obstacles that might interfere with the signal, such as walls or other electronic devices.
It is recommended to choose a wireless audio system that offers a range suitable for your needs. For example, if you plan to use the wireless audio system for recording interviews or events in a large conference hall, you will want a system with a longer range to ensure a reliable connection throughout the venue.
Signal quality is another important factor to consider when choosing a wireless audio system. The signal quality can affect the clarity and fidelity of the audio captured by your camera. It is important to choose a system that offers a high signal-to-noise ratio (SNR) to minimize any unwanted background noise and interference.
Wireless audio systems with digital transmission technology tend to offer better signal quality compared to analog systems. Digital systems can transmit audio signals without loss of quality, resulting in clearer and more accurate sound reproduction.

When researching wireless audio systems, it is advisable to read reviews and compare specifications to get an idea of the range and signal quality they offer. Additionally, it can be helpful to test the system in different environments and conditions to ensure it meets your requirements before relying on it for important recordings.
Battery life and power options
When adding wireless audio to your compact digital camera, it’s important to consider battery life and power options. Using wireless audio can drain the camera’s battery more quickly, so it’s crucial to have a plan in place to ensure you don’t miss any important shots.
Firstly, make sure you have enough spare batteries or a reliable power source. It’s always a good idea to carry extra batteries when using wireless audio, especially if you’re planning on shooting for an extended period of time. Consider investing in high-quality rechargeable batteries, as they will provide longer-lasting power and are a more sustainable option.
Additionally, you can explore power options such as USB or AC adapters. Some cameras have the option to connect directly to a power source, which can be useful if you’re shooting in a controlled environment. This way, you won’t have to worry about running out of battery during a shoot.
Managing your camera’s power settings is another important aspect to consider. Adjusting the camera’s sleep mode or turning off unnecessary features can help conserve battery life. Be mindful of how often you use the camera’s LCD screen and try to limit its use when possible.

To summarize, battery life and power options are crucial when adding wireless audio to your compact digital camera. Always carry spare batteries or have access to a reliable power source, explore power options such as USB or AC adapters, and manage your camera’s power settings to ensure uninterrupted shooting. With careful planning, you can enjoy the benefits of wireless audio while capturing stunning photos and videos.
Installing the wireless audio system
To add wireless audio to your compact digital camera, you will need to follow a few simple steps. Here’s a step-by-step guide on how to install the wireless audio system:
Step 1: Check compatibility
Before purchasing a wireless audio system, make sure it is compatible with your camera model. You can check the camera’s specifications or consult the manufacturer’s website for compatibility information.
Step 2: Purchase the wireless audio system
Once you’ve confirmed compatibility, you can purchase a wireless audio system that suits your needs. There are various options available, ranging from basic audio transmitters to more advanced systems with multiple microphones and receivers.
Step 3: Charge or insert batteries
Most wireless audio systems come with built-in rechargeable batteries or require standard batteries. Make sure to fully charge the system or insert the appropriate batteries before proceeding.
Step 4: Connect the audio transmitter
Locate the audio transmitter, which is usually a small device that connects to your camera. Depending on the system, you may need to connect it via a cable or use a wireless connection. Follow the manufacturer’s instructions to properly connect the audio transmitter to your camera.
Step 5: Connect the audio receiver
Next, you’ll need to connect the audio receiver to your headphones or external speakers. Again, this can be done using a cable or wirelessly, depending on the system. Refer to the manufacturer’s instructions for the correct setup.
Step 6: Test the wireless audio
Once everything is connected, turn on your camera and the audio receiver. You should now be able to hear the audio wirelessly through your headphones or speakers. Test the system by playing a video or recording some audio and listening to the playback.
That’s it! You have successfully installed a wireless audio system for your compact digital camera. Now you can enjoy the convenience of wire-free audio capture during your photography or videography sessions.
Connecting the transmitter to your camera
Once you have obtained a wireless audio transmitter that is compatible with your compact digital camera, you can begin the process of connecting it to your camera.

Here are the steps to follow:
Step 1: Turn off your camera
Before connecting any devices to your camera, it is important to turn it off to avoid any potential damage.
Step 2: Locate the audio input port
Next, you need to locate the audio input port on your camera. This port is typically labeled with a small microphone icon.
Step 3: Connect the transmitter to the audio input port
Take the audio cable that came with your wireless audio transmitter and connect one end to the audio output jack on the transmitter itself. Then, plug the other end of the cable into the audio input port on your camera.
Make sure the cable is securely plugged in on both ends to ensure a strong connection.
Step 4: Power on the transmitter
Once the transmitter and camera are connected, you can power on the transmitter. Follow the instructions provided by the manufacturer to turn on the device.
It is usually a simple process of pressing a power button or switch.
Step 5: Check the audio levels
After the transmitter is powered on, you should check the audio levels on your camera to ensure you are receiving a strong and clear signal.
Refer to your camera’s user manual for instructions on how to adjust the audio levels.
It is important to note that some compact digital cameras may require additional settings to enable external audio input.
Refer to your camera’s user manual or consult the manufacturer’s website for specific instructions on how to enable this feature.
Once you have completed these steps, you should have successfully connected the wireless audio transmitter to your compact digital camera.
You can now enjoy the convenience of wireless audio recording with your camera, capturing clearer and more professional audio for your videos.
Pairing the transmitter and receiver
After you have acquired a compatible wireless audio transmitter and receiver, you will need to pair them together to establish a connection. The process may vary slightly depending on the specific models you are using, but generally, the steps are as follows:
|
Step 1: |
Turn on both the transmitter and receiver devices. |
|
Step 2: |
Ensure that both devices are within close proximity of each other, ideally within a few feet. |
|
Step 3: |
On the transmitter device, navigate to the wireless settings or pairing menu. |
|
Step 4: |
Select the option to search for available wireless devices or start a new pairing process. |
|
Step 5: |
On the receiver device, enter pairing mode or make it discoverable to other devices. |
|
Step 6: |
The transmitter device should detect the receiver device and display it as an available option. |
|
Step 7: |
Select the receiver device from the list of available options on the transmitter device. |
|
Step 8: |
Follow any additional on-screen prompts or instructions to complete the pairing process. |
|
Step 9: |
Once the pairing is successful, you should see a confirmation message or indicator on both devices. |
It’s worth noting that some wireless audio systems may require you to enter a passcode or PIN during the pairing process to ensure a secure connection. Refer to the user manual or documentation provided with your specific devices for detailed instructions on how to pair them together.
Once the transmitter and receiver are successfully paired, you can start using them to wirelessly transmit audio from your compact digital camera to external speakers or other audio devices.
Adjusting audio settings
When adding wireless audio to your compact digital camera, it’s important to adjust the audio settings to ensure optimal sound quality and clarity. Here are some key steps to follow:
1. Access the camera’s menu: Start by accessing the menu settings on your camera. This can usually be done by pressing a dedicated menu button or navigating through the camera’s touchscreen interface.
2. Find the audio settings: Look for the audio settings option within the camera’s menu. It is typically located under the “Settings” or “Audio” section.
3. Select the audio input source: Choose the appropriate audio input source for the wireless audio integration. This can include options such as “Internal Microphone,” “External Microphone,” or “Wireless Audio” depending on your camera model.
4. Adjust the audio levels: Once you have selected the correct audio input source, you may need to adjust the audio levels. This can usually be done using a slider or numerical value to increase or decrease the volume levels.
5. Enable audio recording: Make sure that the audio recording feature is enabled. This is usually a simple toggle switch located within the audio settings. If it is disabled, you won’t be able to capture any audio while shooting.
6. Test the audio: Before you start shooting, it’s always a good idea to test the audio settings. You can do this by recording a short test clip and then playing it back to ensure that the sound is clear and without any distortion or interference.
7. Fine-tune if necessary: If the audio quality is not satisfactory, you can fine-tune the audio settings by adjusting the levels or choosing a different audio input source. Repeat the testing process until you are satisfied with the results.
Remember: Each camera model may have slightly different menu options and terminology, so refer to your camera’s user manual for specific instructions on adjusting the audio settings.
Volume and gain control
When adding wireless audio to your compact digital camera, it’s important to have control over the volume and gain settings to ensure optimal audio quality. Volume control allows you to adjust the overall loudness of the audio, while gain control regulates the sensitivity of the microphone.
Volume control
The volume control feature allows you to adjust the sound level of the audio captured by your camera’s microphone. This is especially useful in situations where the audio is too loud or too soft. By increasing the volume, you can make the audio more audible, and by decreasing it, you can reduce any distortion or unwanted noise.
It’s important to note that increasing the volume too much can potentially cause clipping, where the audio becomes distorted due to exceeding the maximum level that the microphone can handle. On the other hand, decreasing the volume too much may result in the audio being too quiet and difficult to hear.
Gain control
Gain control allows you to adjust the sensitivity of the microphone. By increasing the gain, you can make the microphone more sensitive to pick up softer sounds, while decreasing it can make the microphone less sensitive, focusing on louder sounds. This is especially useful in environments where there may be significant variations in sound levels.
It’s important to be cautious when adjusting the gain, as increasing it too much can lead to unwanted noise and distortion, while decreasing it too much may result in low volume and insufficient audio capture.
In conclusion, having volume and gain control when adding wireless audio to your compact digital camera is crucial for achieving optimal audio quality in your recordings. Experimenting with these settings will allow you to find the right balance for capturing clear and balanced audio.
Monitoring audio levels
When capturing audio with your compact digital camera, it’s important to monitor the audio levels to ensure you’re getting the best sound quality. Monitoring audio levels allows you to adjust the microphone sensitivity and position to avoid distortion or background noise.
To monitor audio levels, you can use the built-in display on your camera if it has one. This display will typically show a visual representation of the audio levels, with a meter indicating the strength of the sound. Make sure to familiarize yourself with the display settings and learn how to interpret the audio levels.
Alternatively, you can connect a wireless audio monitoring device to your camera. These devices usually consist of a small receiver that can be attached to your camera’s hot shoe, and a set of headphones. The receiver picks up the audio signal wirelessly from a microphone, allowing you to listen to the sound in real time.
When using a wireless audio monitoring device, it’s important to position the microphone correctly and adjust its sensitivity. Experiment with different microphone placements to find the best position for capturing clear audio. You can also adjust the microphone sensitivity to avoid picking up unwanted background noise.
Keep in mind that monitoring audio levels is especially important when recording in noisy environments or when capturing audio from a distance. By regularly checking and adjusting the audio levels, you can ensure that your recordings have the best possible sound quality.
Question-answer:
Can I add wireless audio to my compact digital camera?
Yes, you can add wireless audio to your compact digital camera by using an external microphone equipped with wireless capabilities.
What are the benefits of adding wireless audio to my compact digital camera?
Adding wireless audio to your compact digital camera allows you to capture high-quality audio without the limitations of a wired microphone. It gives you more freedom of movement and flexibility in capturing audio from a distance.
How do I connect a wireless microphone to my compact digital camera?
To connect a wireless microphone to your compact digital camera, you will need a compatible wireless microphone system. First, attach the wireless receiver to your camera’s hot shoe mount or connect it to the camera’s audio input. Then, turn on both the microphone and the receiver, and they should automatically pair and transmit audio wirelessly.
What type of wireless microphone should I use for my compact digital camera?
For a compact digital camera, it is recommended to use a compact wireless microphone system that is lightweight and easy to carry. Look for a microphone that has good range and audio quality, and is compatible with your camera’s audio input or hot shoe mount.


