
Are you concerned about the security of your home or office? Installing a security camera system can provide you with peace of mind, knowing that you have an extra set of eyes on your property at all times. In this step-by-step guide, we will walk you through the process of assembling a security camera system, so you can start monitoring your surroundings with ease.
Before you begin, it’s important to gather all the necessary equipment: security cameras, cables, power supplies, a monitor or DVR, and any necessary tools. Additionally, make sure you have a clear understanding of your property’s layout and the areas you want to cover with the cameras. Once you have everything you need and a plan in place, you’re ready to get started on assembling your security camera system.
Step 1: Determine the camera locations
Take a walk around your property and identify the areas where you want to install the security cameras. These may include entrances, hallways, driveways, or any other vulnerable spots. Keep in mind that the placement of your cameras should provide optimal coverage while ensuring they are discreetly hidden from potential intruders.
Step 2: Mount the cameras

Using the provided mounting brackets and screws, secure the cameras to the desired locations. Make sure they are firmly attached and do not wobble. It is important to mount the cameras at a suitable height and angle to capture clear footage.
Step 3: Connect the cameras
Run the camera cables from each camera to the monitor or DVR. Make sure you use the appropriate connectors and follow the manufacturer’s instructions for a secure connection. Check that all cables are properly plugged in and secured.
Step 4: Power up the system
Connect the power supplies to the cameras and the monitor or DVR. Ensure that each camera is receiving power and that the monitor or DVR is properly connected to a power source. Turn on the system and check that all cameras are functioning correctly.

By following these steps, you can successfully assemble a security camera system and enhance the safety of your surroundings. Remember to regularly maintain and inspect your system to ensure optimal performance. Now you can enjoy the added security and peace of mind knowing that you have a reliable surveillance system in place.
Required materials for assembling security camera
In order to assemble a security camera system, you will need the following materials:
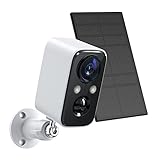
1. Security Camera:
You will need a security camera that meets your specific requirements. There are many different types of security cameras available, including dome cameras, bullet cameras, and PTZ cameras. Choose a camera that best suits your needs and budget.
2. Mounting Bracket:
A mounting bracket is essential for installing the security camera. It provides stability and allows you to adjust the angle and position of the camera. Make sure to choose a sturdy mounting bracket that can support the weight of the camera.
3. Power Supply:
A power supply is needed to provide electrical power to the security camera. This can be in the form of a power adapter that plugs into a standard electrical outlet or a power over Ethernet (PoE) switch.

4. Network Cable:
If you are using a PoE security camera, you will need a network cable to connect the camera to the PoE switch. Make sure to use a high-quality Ethernet cable that can transmit data and power efficiently.
5. DVR/NVR:
If you want to record and store the video footage from your security camera, you will need a digital video recorder (DVR) or network video recorder (NVR). These devices allow you to manage and access the recorded footage.
6. Hard Drive:
In order to store the recorded video footage, you will need a hard drive. Choose a hard drive with enough storage capacity to meet your needs.
7. Monitor:
A monitor is required to view the live and recorded video footage from the security camera. Choose a monitor with the appropriate resolution and size for your setup.
8. Cables and Connectors:
You will need various cables and connectors to connect the security camera, power supply, DVR/NVR, and monitor. Make sure to use high-quality cables and connectors to ensure a reliable and secure connection.
9. Tools:
Lastly, you will need a set of tools to help with the installation process. This may include a drill, screwdrivers, pliers, and cable management tools.
By ensuring that you have all the necessary materials before starting the assembly process, you can ensure a smooth and successful installation of your security camera system.
Choosing the right location for your security camera
When it comes to setting up a security camera, one of the most important factors to consider is the location. The right location for your camera can greatly enhance its effectiveness in monitoring and recording activity. Here are a few tips to help you choose the perfect spot for your security camera:
1. Assess your property’s vulnerabilities
Before you start installing your security camera, take some time to assess your property’s vulnerabilities. Consider areas that are more prone to break-ins or trespassing. These areas may include entrances, windows, garages, or low visibility spots. By identifying these vulnerabilities, you can determine the most strategic locations to install your cameras.
2. Cover high-traffic areas
Aim to cover high-traffic areas with your security cameras. These areas may include driveways, walkways, and entrances. By doing so, you can keep a close eye on anyone entering or exiting your property, as well as have a record of any suspicious activity.

3. Ensure proper lighting
Good lighting is crucial for effective security camera footage. Install your cameras in well-lit areas or consider adding additional lighting to the area. Proper lighting not only helps capture clear images but also acts as a deterrent for potential intruders.
Remember to avoid pointing your cameras directly at a light source, as this can cause glare and interfere with the captured footage.
4. Protect your cameras from the elements
When selecting the location for your security camera, make sure to choose a spot that is protected from the elements. Exposure to rain, harsh sunlight, or extreme temperatures can damage your cameras and affect their performance. Look for areas that provide some form of shelter, such as under eaves or in waterproof housings.
5. Consider privacy concerns
Be mindful of privacy concerns when installing your security cameras. Avoid pointing your cameras directly into neighboring properties or areas where people have a reasonable expectation of privacy, such as bedrooms or bathrooms. Respect privacy boundaries to ensure you comply with local laws and regulations.
By carefully choosing the right locations for your security cameras, you can maximize their effectiveness and better protect your property and loved ones.

Mounting the security camera
Once you have gathered all the necessary tools and equipment, it’s time to mount the security camera to ensure optimal coverage and functionality. Follow these steps to properly mount your security camera:
1. Choose the right location: Identify the area where you want to install your security camera. Consider factors such as the field of view, lighting conditions, and accessibility. This will help you determine the best location for mounting.
2. Check for sturdy mounting surfaces: Ensure that the surface where you plan to mount the camera is secure and can support the weight of the camera. It is recommended to use a mounting bracket for added stability.
3. Mark the mounting holes: Using a pencil or marker, mark the location of the mounting holes on the chosen surface. This will serve as a guide during the installation process.
4. Drill pilot holes: Using an appropriate drill bit, drill pilot holes into the marked locations. Be cautious not to drill too deep or damage any wiring or insulation behind the surface.

5. Attach mounting bracket: If using a mounting bracket, secure it onto the surface using screws or other provided fasteners. Make sure the bracket is level and aligned with the pilot holes.
6. Connect and secure the camera: Attach the camera to the mounting bracket by aligning the screw holes and securing it with screws or other provided fasteners. Ensure the camera is firmly attached and positioned correctly.
7. Adjust the camera angle: Once the camera is securely mounted, adjust the camera angle by loosening any tilt or pan adjustment screws. This will allow you to position the camera to the desired angle and field of view.
8. Test the camera: Before fully securing the camera, make sure it is functioning properly by connecting it to the power source and checking the video feed. Adjust the camera angle if necessary to achieve the desired coverage.
9. Secure the camera and cables: Tightly secure any loose cables or wiring to prevent damage or interference. Use cable clips or zip ties to organize and secure the cables for a clean and professional installation.
10. Verify camera coverage: Finally, test the camera’s coverage by monitoring the video feed from a connected device. Ensure that the camera captures the intended area and provides clear and reliable footage.
Keep in mind that the specific instructions may vary depending on the brand and model of your security camera. Always refer to the manufacturer’s instructions for the most accurate and detailed installation guidelines.
Connecting and powering the security camera
Once you have unpacked your security camera and positioned it in the desired location, the next step is to connect and power it. This section will walk you through the process of connecting and powering your security camera.
1. Check the power requirements
Before connecting your security camera, it is important to check its power requirements. Most security cameras use DC power, so you will need to ensure that you have the correct power adapter or power supply.
2. Connect the power adapter
Start by plugging the power adapter into a nearby electrical outlet. Make sure the outlet is grounded and can provide enough power for your security camera.
3. Connect the camera to the power adapter
Locate the power input on your security camera, usually on the back or bottom of the device. Take the other end of the power adapter and plug it into the camera’s power input. Ensure a secure connection.
4. Connect the camera to the network
If your security camera is an IP camera, you will need to connect it to your network in order to access its features remotely. Refer to the camera’s manual for instructions on how to connect it to your network.
5. Mount the camera securely
After connecting the power and network, make sure to mount the camera securely to your desired location. This may involve drilling holes, using mounting brackets, or other methods depending on your camera and mounting surface.
Once you have completed these steps, your security camera should be connected and powered. You can now proceed with configuring and setting up the camera according to the manufacturer’s instructions to start monitoring your premises.
Adjusting the camera settings
Once you have assembled your security camera, it is important to adjust the camera settings to ensure optimal performance. Here are some steps to help you adjust the settings:
1. Position the camera: Before proceeding with the settings, make sure that the camera is placed in the desired location with a clear view of the area you want to monitor.
2. Connect to the camera: Use the provided cables to connect the camera to your computer or monitoring device. Make sure the connection is secure.
3. Access the camera interface: Open a web browser on your computer and enter the IP address of the camera in the address bar. This will take you to the camera interface.
4. Login to the camera: Enter the username and password for the camera to access the settings. This information is usually provided in the user manual or on the camera itself.
5. Adjust the image settings: In the camera interface, navigate to the image settings section. Here, you can customize parameters such as brightness, contrast, saturation, and sharpness to achieve the desired image quality.
6. Configure motion detection: Many security cameras offer motion detection capabilities. You can set up areas to monitor and define sensitivity levels to trigger alerts when motion is detected.
7. Set up recording options: Determine how you want to store and access recorded footage. You may choose to record to a local device, such as an SD card, or use cloud storage options.
8. Test the camera: After adjusting the settings, it is important to test the camera to ensure everything is working correctly. Walk around the monitored area and check the captured footage for any issues or adjustments that may be needed.
Note: It is recommended to consult the user manual provided by the camera manufacturer for detailed instructions on adjusting the specific settings of your security camera.
Testing and troubleshooting your security camera
After assembling your security camera, it is important to thoroughly test and troubleshoot it to ensure it is functioning correctly. This will help to guarantee that your camera is capturing clear and reliable footage, providing you with the security you need. Follow the steps below to properly test and troubleshoot your security camera.
Step 1: Power on your camera
Make sure your camera is properly connected to a power source and turned on. Verify that the power LED indicator on the camera is illuminated, indicating that it is receiving power.
Step 2: Check video feed
Connect your camera to a monitor or a recording device and check the video feed. Make sure the camera is capturing clear and high-quality images. If the video appears blurry, adjust the focus using the camera’s lens or lens adjustment tool.
Step 3: Adjust camera angle
Ensure that the camera is angled correctly and capturing the desired area. Adjust the camera mount or reposition the camera if necessary. Verify that the camera is not obstructed by any objects or obstructions that may affect its field of view.
Step 4: Test night vision
If your security camera is equipped with night vision capabilities, test it in a dark or low-light environment. Check if the camera is able to capture clear images in these conditions. If the night vision is not functioning properly, check the camera’s infrared LED lights and make sure they are working correctly.
Step 5: Verify motion detection
If your camera has motion detection features, test it by walking in front of the camera. Ensure that the camera is detecting motion and recording or alerting you as expected. Adjust the sensitivity settings if necessary to avoid false alarms or missed events.
Step 6: Check network connectivity
If your security camera is connected to a network, verify that it is properly connected and able to transmit data. Check the network settings and ensure that the camera’s IP address matches your network configuration. Test remote access to the camera’s live feed or recorded footage to ensure that it can be accessed from outside your local network.
| Issue | Solution |
|---|---|
| No power to the camera | Check power connections and power source. Replace power cables or adapters if necessary. |
| Blurry or distorted video feed | Adjust camera focus. Clean the lens if it is dirty or obstructed. |
| Poor night vision quality | Check infrared LED lights. Replace faulty LEDs if needed. |
| Motion detection not working | Adjust motion detection sensitivity. Ensure that motion detection is enabled. |
| Network connectivity issues | Check network settings. Restart the camera or router if necessary. Verify port forwarding settings for remote access. |
By following these steps and troubleshooting any issues that arise, you will have peace of mind knowing that your security camera is functioning properly and providing the required level of protection for your premises.
FAQ,
What tools do I need to assemble a security camera?
To assemble a security camera, you will need a screwdriver, a power drill, a ladder or step stool (if you need to install the camera at a higher level), and a cable crimper (if you need to secure the cables).
Can I install a security camera without professional help?
Yes, it is possible to install a security camera without professional help. Many security cameras come with detailed instructions and video tutorials that can guide you through the installation process. However, if you are not comfortable with DIY projects or if you are unsure about any part of the installation process, it is always recommended to seek professional help to ensure the camera is installed correctly and functioning properly.


