Capturing the wonders of the night sky has never been easier with the advent of digital cameras. If you have a telescope and want to take breathtaking photos of celestial objects, attaching your digital camera to it can open up a world of possibilities. In this guide, we will walk you through the process of attaching a digital camera to a telescope and give you some tips to maximize your results.
Step 1: Choosing the right adapter
The first thing you need to do is select the right adapter for your digital camera and telescope. There are various types of camera adapters available on the market, so it’s important to choose one that is compatible with your camera’s mounting system and the diameter of your telescope’s eyepiece. Make sure to do some research or consult with a professional to find the most suitable adapter for your specific setup.
To ensure a secure attachment, it’s recommended to opt for an adapter that has a sturdy construction and provides a snug fit between your camera and telescope. This will help minimize vibrations and movement during long exposure shots.
Choosing the Right Telescope and Camera
When it comes to attaching a digital camera to a telescope, selecting the right telescope and camera combination is crucial for achieving high-quality astrophotography results. Here are some important factors to consider:
Telescope
First and foremost, you need to choose a telescope that meets your specific astrophotography needs. Consider the following:
- Aperture: The aperture size determines the telescope’s ability to collect light. A larger aperture allows for better image quality and captures more detail.
- Focal Length: The focal length influences the telescope’s magnification. A longer focal length provides higher magnification but may require a longer exposure time.
- Mounting Type: Ensure that your telescope has a sturdy mount that can support the weight of both the telescope and the camera without vibrations or other disturbances.
Consider consulting with experts or doing thorough research to find a telescope that suits your needs and budget.
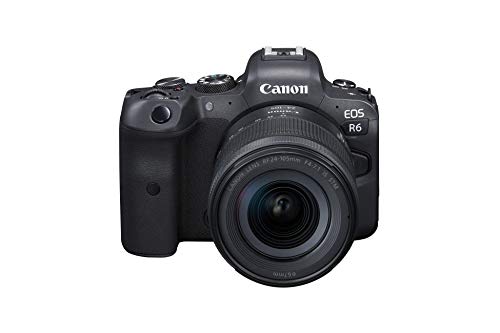
Camera
The camera you choose is just as important as the telescope. Here are a few factors to consider:
- Sensor Size: A larger sensor allows for better image quality, especially in low-light conditions.
- Resolution: Higher resolution cameras capture more detail, enhancing overall image quality.
- ISO Range: Look for a camera with a wide ISO range to handle different lighting conditions.
- Compatibility: Ensure that the camera you choose can be easily connected to your telescope. Some cameras may require additional adapters or accessories.
Additionally, consider the ease of use, availability of manual controls, and any specific features that may enhance your astrophotography experience.
Remember, selecting the right telescope and camera combination requires careful consideration of your astrophotography goals, budget, and expertise level. Investing time in research and seeking advice from experienced photographers can greatly benefit your astrophotography journey.
Understanding the Telescope Setup
Attaching a digital camera to a telescope can open up a whole new world of astrophotography possibilities. However, before you can start capturing stunning images of celestial objects, it’s important to understand the basic setup of your telescope system.
Telescope Types
There are various types of telescopes available, but the most common ones used for astrophotography are refractor and reflector telescopes. A refractor telescope uses lenses to gather and focus light, while a reflector telescope uses mirrors. Understanding which type you have will help you choose the appropriate camera attachment.
Mount System
The mount system is crucial for a stable and accurate tracking of celestial objects during long exposure photography. There are two types of mounts commonly used: the alt-azimuth mount and the equatorial mount. The alt-azimuth mount moves in vertical (altitude) and horizontal (azimuth) directions, while the equatorial mount aligns with Earth’s rotation for precise tracking.
When attaching a camera to a telescope, it’s important to ensure the mount is capable of supporting the additional weight.
Focal Length and Aperture
The focal length of the telescope determines the magnification and field of view you can achieve. A longer focal length will provide higher magnification but a narrower field of view, while a shorter focal length will provide a wider field of view but lower magnification.
The aperture of the telescope refers to the diameter of its main optical component, which determines the amount of light it can gather. A larger aperture allows for more light gathering, resulting in brighter and more detailed images.
Understanding the focal length and aperture of your telescope will help you choose the right camera adapter and lenses for your astrophotography setup.
Focusing and Tracking
Proper focusing is crucial for capturing sharp and clear images. Most telescopes have a focusing mechanism that allows you to adjust the focus manually. It’s important to take your time and ensure precise focus before capturing any images.
Tracking is also essential to prevent star trails during long exposures. Equatorial mounts with motorized tracking capabilities are highly recommended for astrophotography, as they automatically compensate for Earth’s rotation and keep the telescope aligned with celestial objects.
By understanding the telescope setup and its various components, you’ll be better equipped to attach your digital camera and start capturing stunning astrophotography images.
Mounting the Camera on the Telescope
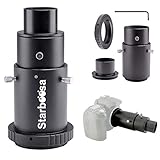
To attach your digital camera to a telescope, you will need a camera adapter that is compatible with both your camera and telescope. This adapter acts as a connecting bridge between the camera and the telescope’s eyepiece.
First, determine the type of camera mount your telescope has. There are two common types: Prime Focus and Eyepiece Projection. Prime Focus involves attaching the camera directly to the telescope using a T-ring adapter. Eyepiece Projection utilizes an eyepiece and an adapter to project the image onto the camera sensor.
For Prime Focus, you will need to remove the eyepiece from the telescope’s focuser and connect the T-ring adapter to the camera’s lens mount. Next, attach the T-ring adapter to the telescope’s focuser, ensuring it is securely fastened.
If you are using Eyepiece Projection, start by selecting the appropriate eyepiece for your desired magnification. Insert the eyepiece into the telescope’s focuser and attach the camera adapter to the eyepiece. Then, carefully align the camera’s lens with the adapter and secure it in place.
Before capturing any images, make sure the camera is in Manual mode, as this allows you to adjust the settings for optimal results. It is also recommended to use a remote shutter release or a self-timer to avoid any camera shake.
Once everything is securely attached and set up, you can begin your astrophotography session with your camera connected to the telescope!
Aligning the Camera with the Telescope
Once you have attached your digital camera to the telescope, it is essential to align them properly to ensure accurate imaging. Here is a step-by-step guide on how to align your camera with your telescope:
- Start by mounting your camera securely to the telescope using the appropriate camera mount or adapter.
- Make sure that the camera is parallel to the optical axis of the telescope. Use a bubble level or spirit level to ensure the camera is level.
- Turn on your camera and adjust the settings according to your specific imaging requirements. This may include selecting the appropriate exposure time, ISO settings, and white balance.
- Next, look through the telescope eyepiece and locate a bright star or object in the sky.
- Adjust the focus of your telescope until the star or object appears sharp and clear in the eyepiece.
- Using the camera’s Live View mode or electronic viewfinder, carefully adjust the focus on your camera lens until the image appears sharp on the camera’s display.
- Fine-tune the focus by zooming in on the star or object in the camera’s display and manually adjusting the focus ring on the lens.
- Once you are satisfied with the focus, use the camera’s viewfinder or display to frame your desired target.
- When framing, consider the field of view of your camera and telescope combination to ensure that the target is properly centered.
- Finally, double-check the alignment by taking a test shot or capturing a short video. Review the image or video on your camera’s display to confirm that the target is properly aligned.
Following these steps should help you align your camera with your telescope effectively, allowing for successful astrophotography and celestial observations.
Adjusting the Camera Settings
Before attaching your digital camera to the telescope, it is important to adjust the camera settings to ensure optimal results. Here are some steps to follow:
- Switch your camera to manual mode to have full control over the settings.
- Set the ISO to a low value, such as ISO 100 or 200, to reduce noise in the images.
- Choose a long exposure time to capture more light. This will depend on the light conditions and the subject you are photographing.
- Adjust the aperture to control the depth of field. A smaller aperture (higher f-number) will result in a larger depth of field, while a larger aperture (lower f-number) will produce a shallower depth of field.
- Adjust the white balance to ensure accurate colors in your photos. You can either set it manually or use the camera’s auto white balance feature.
- Activate the mirror lock-up feature if your camera has it. This will reduce vibrations caused by the camera’s mirror movement.
- Enable the RAW file format if your camera supports it. This format preserves more details and allows for better post-processing.
- Disable any image stabilization or vibration reduction settings, as they may interfere with the stability of the camera on the telescope.
- Finally, take a few test shots and check the results on your camera’s display. Adjust the settings as needed until you are satisfied with the outcome.
By following these steps and adjusting the camera settings accordingly, you will be well-prepared to attach your digital camera to the telescope and capture stunning astronomical images.
Focusing the Camera
Once you have attached your digital camera to your telescope, the next step is to focus the camera to ensure clear and sharp images. Here are some steps to help you with the focusing process:
1. Start with Manual Focus
Switch your camera to manual focus mode. This will give you more control over the focusing process and prevent the camera from automatically adjusting the focus.
2. Choose a Bright Star or Object
Select a bright star or high-contrast object in the night sky as your focusing target. This will make it easier to see the changes in focus during the adjustment process.
3. Use Live View Mode
Activate the live view mode on your camera if it is available. This will display the image on the camera’s LCD screen, allowing you to see the changes in focus directly and make fine adjustments.
4. Adjust the Focus Ring
Start by adjusting the focus ring on your telescope to bring the object into focus. Turn the focus ring slowly and carefully until the object appears sharp and well-defined on the camera’s screen.
5. Zoom In for Precision
If your camera has a zoom function, use it to zoom in on the object for more precise focusing. This will help you identify any remaining blurriness or focus errors that need to be corrected.
Remember that the focusing process may require some trial and error, so don’t be afraid to make adjustments and experiment with different settings to achieve the best focus. With practice, you will become more familiar with how your camera and telescope work together to capture stunning images of the night sky.
Taking Astrophotography Shots
Taking astrophotography shots is a thrilling and rewarding experience for any amateur astronomy enthusiast. Capturing the stunning beauty and mysteries of the night sky can be achieved with the right equipment and techniques. Here are some essential tips and tricks to help you get started on your astrophotography journey:
1. Choose the Right Time and Location
Timing is crucial when capturing astrophotography shots. Plan your photography sessions during clear nights with minimal light pollution. Check the weather forecast and avoid shooting on nights with high humidity or during a full moon when the sky is too bright. Find a remote location away from city lights for a darker sky and clearer view of celestial objects.
2. Necessary Equipment
To capture stunning astrophotography shots, you will need the following equipment:
- A digital camera with manual controls
- A sturdy tripod to keep your camera stable
- A telescope with an appropriate mount or a camera lens with a long focal length
- Remote shutter release or intervalometer for long exposures
- Astronomy apps or star charts to help you find celestial objects
Make sure your camera and telescope are properly attached and aligned for accurate tracking and focus.
3. Camera Settings
Set your camera to manual mode to have full control over the settings. Use these recommended settings as a starting point:
- ISO: Start with a low ISO (around 800) to minimize noise, and increase it if needed
- Aperture: Choose a wide aperture (low f-number) to gather as much light as possible
- Shutter Speed: Experiment with longer exposures to capture faint objects, but be cautious of star trails
- White Balance: Set it to auto or adjust it according to the ambient light conditions
Consider shooting RAW files for better post-processing capabilities.
4. Focusing and Framing
Use the live view function on your camera to manually focus on a bright star or planet. Adjust the focus until the object appears crisp and sharp. Once focused, frame your shot accordingly, considering the composition and placement of celestial objects within the frame.
5. Taking the Shot
Use a remote shutter release or an intervalometer to avoid camera shake during long exposures. Start with shorter exposure times and gradually increase them to capture more details, while keeping an eye on the histogram to avoid overexposure. Take multiple shots and experiment with different settings to find the perfect balance between exposure and clarity.
Remember, astrophotography requires patience and practice. Don’t get discouraged if your first shots don’t turn out as expected. Keep learning, experimenting, and exploring the wonders of the night sky!
Processing the Images
Once you have successfully attached your digital camera to the telescope and captured the images, the next step is to process them. Processing the images will enhance the clarity and detail, allowing you to fully appreciate the celestial objects you have captured.
1. Transfer the Images: The first step in processing the images is to transfer them from your digital camera to your computer. Connect your camera to the computer using a USB cable, and follow the instructions provided by your camera’s manufacturer to transfer the images.
2. Sort and Select: After transferring the images, take some time to sort through them and select the ones you want to process. Look for images that have good focus, minimal blurring, and interesting subject matter.
3. Image Editing Software: To process the images, you will need image editing software. There are many options available, both free and paid, with various levels of complexity and features. Some popular choices include Adobe Photoshop, GIMP, and PixInsight. Choose one that suits your needs and level of expertise.
4. Basic Adjustments: Start by making basic adjustments to the images, such as cropping, straightening, and adjusting the levels of brightness, contrast, and saturation. These adjustments will help enhance the overall appearance of the images.
5. Fine-tuning: Once you have made the basic adjustments, you can move on to fine-tuning the images. This may involve applying advanced editing techniques, such as sharpening, noise reduction, and color correction. Experiment with different settings to achieve the desired results.
6. Saving and Exporting: Finally, save the processed images in a high-quality format, such as JPEG or TIFF. If you plan to share the images online, consider resizing them to a smaller file size without compromising too much on the image quality. You can also consider exporting the images in different formats, such as PNG or GIF, depending on your specific needs.
By following these steps and using the right tools and techniques, you can transform your raw astronomical images into stunning visuals that showcase the beauty of the cosmos.
Troubleshooting Tips
If you are experiencing difficulties when attaching your digital camera to a telescope, consider the following troubleshooting tips:
1. Camera Connection: Ensure that your camera is properly connected to the telescope. Check all cables and connections to make sure they are secured tightly.
2. Camera Settings: Verify that your camera settings are correctly adjusted. Set your camera to manual mode or a long exposure setting to capture clear images of celestial objects.
3. Telescope Focus: Double-check the focus of your telescope. Use the telescope’s focus knob to ensure that the image is sharp and clear before taking photos.
4. Mount Stability: Make sure that your telescope mount is stable and securely fastened. Any movement or vibrations can result in blurry photographs.
5. Lighting Conditions: Consider the lighting conditions when capturing images. Avoid bright lights and aim for darker sky conditions for better results.
Remember that practice makes perfect, so don’t get discouraged if your first few attempts are not ideal. Keep trying, adjusting your camera settings and experimenting with different techniques until you achieve the desired results.
Question-answer:
Can I attach any digital camera to a telescope?
No, not all digital cameras are suitable for attaching to a telescope. You need to choose a camera that has a removable lens and allows for manual control of settings like exposure and focus.
What is the benefit of attaching a digital camera to a telescope?
Attaching a digital camera to a telescope allows you to capture high-quality, detailed images of celestial objects such as the moon, planets, and stars. It allows you to explore and document the wonders of the night sky.