If you are a filmmaker or a vlogger, you know that high-quality audio is just as important as stunning visuals. The built-in microphone on your DSLR camera may not capture the crisp and clear sound you desire. That’s where attaching an external microphone comes in.
Attaching a microphone to your DSLR camera is a simple process that can greatly improve the audio quality of your videos. There are a few different types of microphones you can use, including shotgun microphones, lavalier microphones, and stereo microphones. The type of microphone you choose will depend on your specific needs and the type of content you create.
To attach a microphone to your DSLR camera, you will need a hot shoe mount or a cold shoe mount. The hot shoe mount attaches to the top of your camera and allows you to securely fasten the microphone. Some DSLR cameras come with a built-in hot shoe mount, while others may require you to purchase one separately.
Once you have the hot shoe mount, you can attach the microphone by sliding it into the mount and tightening the screw to secure it in place. Make sure the microphone is facing the right direction, towards the subject you want to capture. It’s also important to check the compatibility of the microphone with your camera to ensure they are able to communicate and work together seamlessly.

By attaching an external microphone to your DSLR camera, you can significantly enhance the audio quality of your videos. Whether you’re filming interviews, vlogs, or short films, a good microphone can make a world of difference. So take the time to find the right microphone for your needs and start capturing professional-grade audio today!
Guide to Attaching a Microphone to Your DSLR Camera
Investing in a high-quality microphone for your DSLR camera can greatly enhance the audio quality of your videos. Whether you’re shooting a vlog, interview, or any other type of video content, having a good microphone is essential for capturing clear and professional-sounding audio.
Step 1: Choose the Right Microphone
There are various types of microphones available for DSLR cameras, each with its own advantages and use cases. The three most common types are shotgun microphones, lavalier microphones, and stereo microphones.
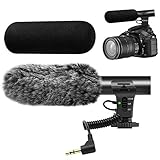
Shotgun microphones are highly directional, capturing audio primarily from the front and minimizing surrounding noise. They are ideal for capturing audio in outdoor settings or when you need to focus on a specific sound source.
Lavalier microphones, also known as lapel microphones, are small and discreet. They are commonly clipped onto the speaker’s clothing, allowing for hands-free operation and capturing clear audio even when the camera is at a distance.
Stereo microphones are designed to create a sense of space and depth in audio recordings. They capture sound from multiple directions and are perfect for capturing ambient sounds or creating immersive audio experiences.
Step 2: Check Your Camera’s Compatibility
Before attaching a microphone to your DSLR camera, make sure it has a microphone input. This is typically a 3.5mm audio jack located on the side or bottom of the camera. Some higher-end cameras may also have XLR inputs for professional-grade microphones.
If your camera doesn’t have a built-in microphone input, you may need to use an external audio recorder or invest in a camera with the necessary input.
Step 3: Attach the Microphone
Once you have chosen the right microphone and checked your camera’s compatibility, it’s time to attach the microphone.
If you’re using a shotgun microphone, attach it to the hot shoe mount on top of your camera. The hot shoe mount provides stability and allows for easy adjustment.
If you’re using a lavalier microphone, connect it to the microphone input on your camera using a compatible cable. Clip the microphone to the speaker’s clothing or hide it discreetly for optimal audio capture.
If you’re using a stereo microphone, attach it to the hot shoe mount or a separate microphone stand, depending on its design. Make sure it is positioned appropriately to capture the desired audio.
Tip: Always test the microphone before recording to ensure it is properly attached and functioning correctly. Adjust the audio levels on your camera to avoid clipping or distortion.
Step 4: Monitor and Adjust the Audio
While recording, it’s crucial to monitor the audio to ensure it is of high quality. Some DSLR cameras have a headphone jack that allows you to listen to the audio in real-time. If your camera doesn’t have this feature, consider using an external audio recorder or a separate audio monitoring device.
Additionally, you may need to adjust the audio levels on your camera to optimize the recording. Aim to have the audio levels peaking at around -12dB to -6dB to prevent distortion.

Follow this guide to attach a microphone to your DSLR camera and take your video content to the next level by capturing professional-grade audio!
Selecting the Right Microphone
When it comes to selecting the right microphone for your DSLR camera, there are a few factors you should consider. The quality of sound captured by your microphone can greatly impact the overall quality of your videos. Here are some important things to keep in mind:
1. Directionality: Consider the directionality of the microphone. A cardioid microphone, for example, picks up sound primarily from the front, making it a great choice for recording subjects in front of the camera. On the other hand, an omnidirectional microphone captures sound from all directions, which could be useful in certain situations.
2. Sensitivity: Check the sensitivity of the microphone. Ideally, you want a microphone that is sensitive enough to capture clear audio, but not so sensitive that it picks up excessive background noise. Consider the environment you will be filming in and choose a microphone with an appropriate sensitivity level.
3. Connectors: Determine what type of connectors your DSLR camera supports. Some cameras have a standard 3.5mm audio input, while others may require an adapter or have a different type of connector. Make sure the microphone you choose is compatible with your camera.

4. Size and Portability: Think about the size and portability of the microphone. If you plan on shooting on the go or in tight spaces, a compact and lightweight microphone may be more convenient. However, if you prioritize sound quality over portability, a larger microphone with more advanced features may be a better choice.
5. Budget: Finally, consider your budget. There are microphones available at various price points, so determine how much you are willing to invest in a microphone for your DSLR camera. Remember that a higher price does not always guarantee better quality, so do your research and read reviews before making a decision.
By carefully considering these factors and choosing the right microphone for your DSLR camera, you can greatly improve the audio quality of your videos and enhance the overall viewing experience for your audience.
Understanding the Audio Input on Your DSLR Camera
When it comes to recording high-quality video with your DSLR camera, having good audio is just as important as having a clear picture. To achieve this, you may need to connect an external microphone to your camera.
Types of Audio Inputs
DSLR cameras typically have three types of audio inputs:

- Built-in microphone: Most DSLR cameras come with a built-in microphone. While it can capture sound, the quality may not be as good as with an external microphone.
- 3.5mm microphone input: This is the most common audio input found on DSLR cameras. It allows you to connect a wide range of external microphones, including shotgun and lavalier microphones.
- XLR audio input: Some high-end DSLR cameras have XLR audio inputs, which are professional-grade connectors commonly used in the audio industry. XLR inputs provide better audio quality and the ability to use high-quality microphones.
Setting Audio Levels
Once you have connected an external microphone to your camera, it’s important to properly set the audio levels to ensure the best sound quality. Here are a few tips:
- Access the audio settings in your camera’s menu and locate the “Audio Input” or “Microphone” option.
- Adjust the audio levels to avoid any distortion or clipping. Start by setting the levels low and gradually increase until the audio is clear and free from distortion.
- Use headphones to monitor the audio while recording to ensure it is of high quality.
Remember that different microphones may require different audio level settings, so it’s important to test and adjust accordingly.
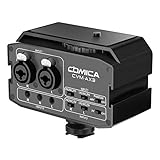
External Audio Recorders
If your DSLR camera’s audio input options are limited, or you require more advanced audio recording capabilities, you may consider using an external audio recorder. These devices can provide higher audio quality and more control over your audio recording settings.
When using an external audio recorder, make sure to sync the audio with your video during the editing process to ensure proper alignment.
Understanding the audio input options and settings on your DSLR camera is crucial for capturing high-quality audio. Whether you are recording interviews, vlogs, or cinematic videos, investing in a good microphone and understanding how to properly set up the audio will greatly enhance the overall quality of your videos.

Choosing the Correct Adapter
When it comes to attaching a microphone to your DSLR camera, one of the most important aspects is choosing the correct adapter. The adapter is what allows you to connect the microphone to your camera, so it is essential to choose the right one for your specific camera model and microphone.
First, you need to determine the type of adapter your camera requires. There are several different types of microphone adapters available, including XLR, TRS, and TRRS. XLR adapters are commonly used for professional-grade microphones and require a separate power source. TRS adapters are used for microphones that do not require extra power. TRRS adapters are typically used for smartphones and some DSLR cameras.
Once you know the type of adapter your camera requires, you need to consider the specific features and compatibility. Some adapters may have additional features such as gain controls, headphone outputs, or phantom power. You should also ensure that the adapter is compatible with your camera’s input and output ports.
When choosing an adapter, it is always recommended to opt for a branded adapter that is specifically designed for your camera model. This ensures maximum compatibility and minimizes the risk of any technical issues.
It is also important to consider the quality of the adapter. Poorly constructed adapters may introduce unwanted noise, interference, or reduce the overall audio quality. Reading reviews and researching reputable brands can help you make an informed decision and select a reliable adapter.

Lastly, consider your budget when choosing an adapter. There are options available at various price points, so it is essential to find a balance between quality and affordability. Remember that investing in a high-quality adapter can significantly improve the audio recording capabilities of your DSLR camera.
Overall, choosing the correct adapter for your DSLR camera is crucial for achieving high-quality audio recordings. Take the time to research and select an adapter that fits your camera model, supports the microphone type you intend to use, and offers the necessary features for your recording needs.
Attaching the Microphone to Your DSLR Camera
When it comes to recording high-quality audio for your DSLR videos, attaching a microphone to your camera is essential. With a microphone connected directly to your camera, you can capture clear and crisp sound while filming.
Step 1: Choose the Right Microphone
Before attaching a microphone to your DSLR camera, you need to choose the right one for your needs. There are several types of microphones available, including shotgun microphones, lavalier microphones, and stereo microphones. Consider factors such as the location of your shooting, the type of audio you want to capture, and your budget when selecting a microphone.
Step 2: Find the Microphone Input
Once you have selected a microphone, you need to find the microphone input on your DSLR camera. Most cameras have a 3.5mm microphone input jack located on the side or back of the camera body. Consult your camera’s manual if you are having trouble locating the input.
Step 3: Mount the Microphone
Now that you have located the microphone input, it’s time to mount the microphone on your camera. Depending on the type of microphone you have chosen, there are various mounting options available. For shotgun microphones, you can attach it directly to the hot shoe on top of your camera or use a shock mount. Lavalier microphones can be clipped onto your subject’s clothing.
Make sure the microphone is securely attached to your camera to prevent any unwanted noise or movement during filming.
Step 4: Connect the Microphone
Once the microphone is mounted, you need to connect it to your camera. Take the cable that came with your microphone and plug one end into the microphone itself. Then, insert the other end of the cable into the microphone input on your camera. Ensure that the connection is secure to avoid any audio interruptions.
Some microphones may require additional power, in which case you will need to turn on the microphone’s power source. This can usually be done by flipping a switch or adjusting settings on the microphone itself.
It is also a good idea to test the microphone before you start recording to ensure that it is functioning properly.

Attaching a microphone to your DSLR camera is a simple process that can greatly improve the audio quality of your videos. By following these steps, you can enhance your filmmaking and deliver professional-sounding results.
Adjusting the Audio Settings on Your DSLR Camera
When using a microphone with your DSLR camera, it’s important to adjust the audio settings properly to ensure quality sound recording. Here are some steps to help you adjust the audio settings on your DSLR camera:
Accessing the Audio Settings
1. Turn on your DSLR camera and navigate to the menu options.
2. Look for the “Audio Settings” or “Sound Recording” option in the menu. It may be located under the “Settings” or “Setup” section.
3. Select the “Audio Settings” option to access the audio settings menu.
Adjusting the Input Levels
1. Once in the audio settings menu, locate the “Input Levels” or “Microphone Level” option.
2. Use the arrow keys or dial to adjust the input levels. The goal is to set the input level so that the audio is not too loud or too soft, but clear and audible.
3. If your DSLR camera has a built-in audio meter, use it to monitor the input levels and make adjustments accordingly.
Selecting the Audio Source
1. In the audio settings menu, find the “Audio Source” or “Microphone Source” option.
2. Depending on your DSLR camera, you may have options such as “External Microphone,” “Built-in Microphone,” or “Auto.” Choose the appropriate audio source for your setup.
It’s worth noting that some DSLR cameras have limited audio settings options. In such cases, using an external audio recorder or a dedicated audio device might be a better option to ensure higher audio quality.
Once you have adjusted the audio settings on your DSLR camera, it’s a good practice to do a test recording and listen to the audio playback to ensure that the sound is clear and balanced.
Testing the Microphone and Troubleshooting Tips
After attaching a microphone to your DSLR camera, it is important to test its functionality to ensure optimal audio quality for your video recordings. Here are some tips for testing and troubleshooting your microphone:
1. Check the connections:
- Ensure that the microphone is securely plugged into the camera’s microphone input port.
- Verify that the camera’s microphone input port is not damaged or faulty.
2. Adjust the microphone settings:
- Access the camera’s menu system and navigate to the audio recording settings.
- Check if the microphone is selected as the audio input source and adjust the input level as needed.
3. Test the microphone:
- Record a short test video while speaking into the microphone.
- Sync the video with an external audio source to compare the audio quality.
- Listen to the recording and ensure that the audio is clear, without any distortions or background noise.
4. Troubleshoot audio issues:
- If the audio quality is poor, try adjusting the microphone’s position and distance from the sound source.
- Check if any external factors, such as wind or background noise, are affecting the audio recording.
- Consider using a foam windscreen or a furry wind muff to minimize wind noise.
5. Seek professional assistance:
- If you encounter persistent audio issues or are unsure about the microphone’s compatibility with your camera, it is advisable to consult with a professional audio technician or the camera manufacturer for further assistance.
Following these testing and troubleshooting tips will help ensure that your microphone is functioning properly and that your DSLR camera captures high-quality audio for your videos.
Question-answer:
What are the different types of microphones that can be attached to a DSLR camera?
There are several types of microphones that can be attached to a DSLR camera, including shotgun microphones, lavalier microphones, and handheld microphones. Shotgun microphones are great for capturing directional audio from a distance, while lavalier microphones are ideal for recording audio from a person in close proximity. Handheld microphones are often used for interviews or vlogging purposes.
How do I physically attach a microphone to my DSLR camera?
The method of attaching a microphone to a DSLR camera can vary depending on the specific model and the type of microphone. In general, you will need to locate the microphone input port on your camera, usually located on the side or front. Then, you can connect the microphone using a suitable cable, such as a 3.5mm audio jack or XLR cable. Make sure to secure the connection properly to prevent any audio interference or loose connections.
Do I need any additional equipment to attach a microphone to my DSLR camera?
It depends on the type of microphone you are using and the requirements of your camera. Some microphones may require a preamp or an audio interface to properly connect and capture audio. Additionally, you may need accessories like a shock mount or a windscreen to improve the audio quality and reduce unwanted noise. It’s always a good idea to check the user manual of both your microphone and camera for any specific requirements or recommendations.
What are the benefits of using an external microphone with a DSLR camera?
Using an external microphone with a DSLR camera can greatly improve the audio quality of your recordings. The built-in microphones on DSLR cameras are often limited in range and prone to picking up unwanted background noise. With an external microphone, you can have more control over the audio you capture and achieve clearer, more professional-sounding recordings. This is especially important when recording interviews, vlogs, or any content where high-quality audio is essential.