
If extreme sports and outdoor adventures are your thing, you probably already know how important it is to capture those thrilling moments on camera. And when it comes to action cameras, GoPro is the undisputed leader in the market. With its compact size, high-quality footage, and wide range of mounting options, a GoPro camera is the perfect choice for documenting your adrenaline-fueled exploits.
One of the most popular ways to use a GoPro camera is by attaching it to a helmet. This allows you to get a first-person perspective of the action, giving your viewers a thrilling and immersive experience. Whether you’re a skier, snowboarder, biker, or rock climber, attaching a GoPro to your helmet is a game-changer.
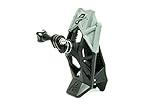
So, how do you attach a GoPro camera to your helmet? The process is surprisingly straightforward, and with a few simple steps, you’ll be ready to capture all those epic moments. First, you’ll need a helmet mount, which typically comes with your GoPro camera or can be purchased separately. Make sure your helmet mount is compatible with your specific helmet model.
Once you have your helmet mount, start by placing it on the desired spot on your helmet. Typically, the mount is attached on the top or side of the helmet, depending on the angle you want to capture. Use the adhesive pad provided with the mount to securely attach it to your helmet. Press firmly to ensure a strong bond.
Choosing the Right Mount
When it comes to attaching a GoPro camera to your helmet, selecting the right mount is crucial. The mount you choose will determine how securely the camera is attached, the stability of the footage, and the angle at which you capture your adventures. Here are some factors to consider when choosing a mount:
Type of Helmet
Before purchasing a mount, you need to consider the type of helmet you have. There are mounts specifically designed for different helmets, such as motorcycle helmets, ski helmets, or bike helmets. A mount that fits securely and snugly onto your helmet is essential for capturing stable and high-quality footage.
Mounting Location
The mounting location on your helmet will affect the perspective and stability of your footage. Consider where you want the camera to be positioned. Some popular mounting locations include the top of the helmet, side mount, or front mount. Each location provides a different point of view, so choose one that suits your needs and preferences.
Additionally, think about the type of activities you will be recording. For example, if you are into extreme sports, a top mount may be more suitable as it provides a broader field of view. On the other hand, if you are biking or motorcycling, a side mount might be better as it won’t obstruct your view.
Mounting Method
There are various mounting methods available, including adhesive mounts, strap mounts, and clamp mounts. Adhesive mounts are usually the most secure and provide a strong attachment, but they are also the most permanent. Strap mounts are versatile and adjustable but may not be as secure. Clamp mounts offer a sturdy grip but can be more cumbersome to attach and remove.

Consider the trade-offs between security, flexibility, and convenience when selecting the mounting method that best suits your needs.
Remember, always follow the manufacturer’s instructions when attaching the mount to ensure a secure fit and avoid any damage to your helmet or camera.
In conclusion, choosing the right mount for your GoPro camera is essential in obtaining stable and high-quality footage. Consider factors such as the type of helmet, the mounting location, and the mounting method, and make an informed decision that complements your adventurous spirit!
Preparing Your Helmet
Before attaching your GoPro camera to your helmet, there are a few things you need to do to ensure a secure and stable mount.
First, clean the surface of your helmet where you plan to attach the camera. Use a mild soap and water solution to remove any dirt or debris that may prevent the adhesive from sticking properly.
Next, dry the surface thoroughly using a clean cloth or towel. It is important to make sure the surface is completely dry, as moisture can affect the adhesive’s ability to bond.
Once the surface is clean and dry, you can apply the adhesive mount to your helmet. Make sure to position it in a spot that provides the best view and angle for your recordings.
Press firmly on the adhesive mount to ensure a strong bond with the helmet’s surface. You can also hold it in place for a few minutes to further enhance the adhesive’s grip.
Finally, let the adhesive cure for at least 24 hours before attaching your GoPro camera. This will give the adhesive enough time to fully bond with the helmet, ensuring a secure attachment.
By properly preparing your helmet before attaching the GoPro camera, you can ensure a stable and reliable mount that will capture all your exciting adventures.

Positioning the Mount
When attaching a GoPro camera to your helmet, the positioning of the mount is crucial to ensure the best possible footage. Here are some tips to help you position the mount correctly:
| 1. Helmet Position: | Before attaching the mount, make sure your helmet is positioned correctly on your head. The helmet should fit snugly and sit level on your head. |
| 2. Mount Location: | Choose the location on your helmet where you want to attach the mount. The most common spot is on the top of the helmet, near the front. This will provide a clear view of the action ahead. |
| 3. Mount Angle: | Consider the angle at which you want the camera to be positioned. You can adjust the angle by tilting the mount before attaching the camera. Experiment with different angles to find the one that best suits your needs. |
| 4. Mount Stability: | Ensure that the mount is securely attached to the helmet. Double-check for any loose fittings or weak adhesive. A stable mount will prevent the camera from shaking or falling off during activities. |
By carefully positioning the mount, you can capture amazing footage while keeping your hands free to enjoy your adventure!
Attaching the Mount
Attaching your GoPro camera securely to your helmet is essential to capturing great footage. Here is a step-by-step guide on how to attach the mount:
1. Choose the Right Mount:
There are various mount options available for attaching your GoPro camera to a helmet. Consider the type of helmet you have and the angle you want to capture before selecting the appropriate mount.
2. Clean the Surface:
Before attaching the mount, clean the surface of your helmet where you plan to place it. Remove any dirt, oil, or debris that may affect the adhesive’s grip. A clean surface ensures a strong and secure attachment.

3. Position the Mount:
Decide the ideal position for your GoPro camera on your helmet. Most mounts have a curved or flat adhesive pad that should align with the helmet’s surface. Ensure the mount is level and centered before moving on.
4. Apply Pressure:
Press the mount firmly against the helmet surface and apply even pressure for about 30 seconds. This helps the adhesive bond securely to the helmet material for a reliable attachment.
5. Let It Set:
After applying pressure, give the adhesive some time to set. This usually takes about 24 hours, but check the manufacturer’s instructions for specific recommendations. Avoid using the camera until the adhesive has fully bonded.
Now that the mount is securely attached to your helmet, you can confidently attach your GoPro camera and start capturing your adventures from unique perspectives!
Securing the Mount
Once you have selected the appropriate mount for your GoPro camera and helmet, securing it properly is essential to ensure the camera stays in place during your activities.

Before attaching the mount, clean the area on your helmet where you intend to mount the camera. Use a non-abrasive cloth and a cleaning solution that is safe for the helmet’s material.
Step 1: Prepare the Surface
Peel off the backing from the adhesive pad on the mount. Make sure your hands are clean and dry to avoid any dirt or moisture transferring onto the adhesive surface.
Step 2: Position and Press
Align the mount with the desired location on your helmet. Ensure that the angle and orientation are to your liking. Once you are satisfied with the placement, firmly press down on the mount to adhere it to the helmet surface.
Apply pressure evenly to the entire surface of the mount, ensuring a secure bond. Hold the mount in place for a few seconds to allow the adhesive to adhere properly.
For added security, you can use a hairdryer to heat the adhesive pad, which enhances its bonding strength. Be careful not to overheat the adhesive as it can damage your helmet.
Some mounts come with additional attachment options, such as straps or screws, which can provide further support and stability. Follow the manufacturer’s instructions to attach these secondary securing mechanisms if desired.
Double check the mount to ensure it is firmly attached and there are no loose areas. Gently tug on the mount to make sure it is secure before proceeding.
Remember to always follow the manufacturer’s instructions for attaching the mount to your specific helmet model, as different helmets may require different mounting techniques.
Testing the Stability
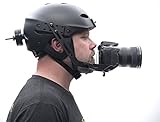
Once you have successfully attached your GoPro camera to your helmet using the appropriate mount, it is important to test the stability before using it in any extreme sports or activities. Testing the stability ensures that the camera remains securely attached to your helmet even when subjected to rapid movements or vibrations.
To test the stability, wear your helmet with the camera attached and engage in the activity or sport you intend to use it for. This could be skiing, snowboarding, biking, or any other activity that involves rapid movement. During the test, pay close attention to any movements or vibrations of the camera.

If the camera remains securely attached and there are no significant movements or vibrations, then it is stable and ready to use. However, if you notice any wobbling or shaking of the camera, it is important to reattach it and ensure a secure fit.
Keep in mind that different mounts and helmet types may offer varying levels of stability. It is always a good idea to choose a mount that is specifically designed for helmet attachment and to follow the manufacturer’s instructions for optimal stability.
Important Tip: It is recommended to test the stability of the camera in a controlled environment before attempting to use it during extreme activities. This will allow you to make any necessary adjustments and ensure a secure attachment.
By testing the stability of your GoPro camera attachment, you can have peace of mind knowing that your camera will stay in place even during intense sports or activities, allowing you to capture high-quality footage without any worries.
Mounting the GoPro Camera
Attaching a GoPro camera to your helmet can be done in a few simple steps. This guide will walk you through the process of securely mounting your camera to your helmet for stunning action shots and immersive footage.
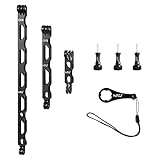
Materials needed:
- GoPro camera
- Helmet
- Helmet mount
- Mounting hardware (screws and adhesive)
Step 1: Choose a mounting position
Before attaching the camera, decide on the ideal mounting position on your helmet. It should offer a clear view of the action without obstructing your vision.
Step 2: Clean the helmet surface
Thoroughly clean the area of the helmet where you plan to attach the mount. Remove any dirt, dust, or debris to ensure a strong and secure bond.
Step 3: Adhesive or screw mount
Depending on the type of helmet mount you have, you can either attach it using adhesive or screws. Adhesive mounts are easy to use and provide a solid hold. Screw mounts offer additional security but may require drilling holes in your helmet.
Step 4: Attach the mount
Securely attach the helmet mount to the chosen position on your helmet. Follow the instructions provided with your mount for the best results.
Step 5: Mount the GoPro camera
Once the mount is securely attached to the helmet, mount your GoPro camera onto it. Ensure that the camera is firmly locked in place to prevent any accidental detachment during activities.

Step 6: Test the mount
Before using the camera to capture your adventures, perform a test to ensure the mount is firmly secured. Give it a gentle tug to verify its stability.
| Tips: |
|---|
| Always double-check the tightness of the mount and ensure it is securely fastened before using the camera. |
| If you’re using an adhesive mount, allow sufficient time for the adhesive to bond with the helmet surface before subjecting it to extreme conditions. |
| Consider using a tether or safety strap as an extra precaution to prevent the loss of your camera in case of accidental detachment. |
Adjusting Camera Angle
Once you have securely attached your GoPro camera to your helmet, it’s important to adjust the camera angle to ensure the best possible footage. The camera angle will depend on your personal preferences and the type of activity you are engaged in.
Here are a few steps to help you adjust the camera angle:
1. Evaluate the Position
Before making any adjustments, evaluate the initial position of the camera. Check if it is level and centered on your helmet. Make sure the camera lens is pointing straight ahead and not tilted to one side.
2. Test Different Angles
Mount the camera on your helmet and take a few test shots or record some short videos. Review the footage to see if the camera angle captures the desired view. If not, make small adjustments by loosening the mount and rotating the camera slightly. Repeat this process until you find the perfect angle.
3. Consider the Activity
Different activities may require different camera angles. If you are skiing or snowboarding, for example, you might want to tilt the camera downward to capture more of the action. If you are cycling, tilting the camera slightly upward can offer a better perspective of the road ahead.
Keep in mind that extreme adjustments may affect the stability of the camera mount, so it’s important to find a balance between the desired angle and the stability of the camera.
Remember to always double-check the camera angle before starting any activity to ensure that you are capturing the best footage possible.
| Advantages | Considerations |
|---|---|
| – Better perspective | – Camera stability |
| – Enhanced field of view | – Personal preferences |
| – Capturing dynamic action | – Activity-specific requirements |
Ensuring Proper Fastening
Properly fastening your GoPro camera to your helmet is crucial to ensure the safety of both yourself and the camera. Here are some essential tips to help you achieve a secure and reliable attachment:
- Choose a suitable mounting position on your helmet. Make sure it is flat and free of any dirt, oil, or debris that could affect the adhesive.
- Clean the mounting area using a mild detergent or alcohol wipe. This will remove any impurities and allow for better adhesion.
- Peel off the backing of the adhesive mount and firmly press it onto the chosen spot on your helmet. Hold it in place for a few seconds to ensure a good bond.
- Attach the GoPro camera to the adhesive mount securely. Ensure that it is properly aligned and locked in place.
- Check the attachment periodically, especially when participating in high-intensity activities. Ensure that it hasn’t loosened or shifted during use.
- Consider using a secondary retention system, such as a tether or safety strap, for added security. This will provide an extra layer of protection in case the adhesive fails.
- Always follow the specific instructions provided by GoPro for your specific helmet mount. Different models may have variations in attachment methods.
By following these steps, you can have peace of mind knowing that your GoPro camera is securely fastened to your helmet, allowing you to capture exciting footage without any worries.
Final Checklist and Precautions
Before you hit the road or embark on your adventure, make sure to follow this final checklist to ensure a successful and safe GoPro helmet mount:
- Double-check the stability: Ensure that the GoPro camera is securely attached to your helmet and that it is stable enough to withstand movement and vibrations.
- Test the camera angle: Adjust the camera angle to achieve the desired point of view and angle of view.
- Check the camera settings: Make sure the camera is set to the appropriate mode (video, photo, time-lapse, etc.) and the desired resolution and frame rate.
- Secure the camera cables: Tie up any loose cables to prevent them from tangling or getting caught on anything during your activities.
- Ensure proper helmet fit: Verify that the helmet fits snugly and comfortably on your head, and does not hinder your vision or movement.
- Verify the helmet’s integrity: Inspect the helmet for any signs of damage or wear that could compromise its structural integrity.
- Consider helmet laws and regulations: Familiarize yourself with any applicable laws or regulations in your area regarding helmet-mounted cameras.
- Practice safety: Always prioritize safety when using a helmet-mounted GoPro camera. Be aware of your surroundings and use common sense.
Remember, capturing incredible footage and memories is important, but your safety should always come first. Enjoy your adventure and have a great time with your GoPro helmet mount!
Question-answer:
What are the different ways to attach a GoPro camera to a helmet?
There are several ways to attach a GoPro camera to a helmet. One common method is to use adhesive mounts that stick directly onto the helmet. Another option is to use a helmet strap mount that wraps around the helmet. Additionally, there are helmet chin mounts or side mounts that provide different angles for capturing footage.
Are there any special considerations when attaching a GoPro camera to a helmet?
Yes, there are a few things to consider when attaching a GoPro camera to a helmet. First, make sure to thoroughly clean the helmet surface before attaching the adhesive mount to ensure a strong bond. It’s also important to position the camera in a way that doesn’t obstruct your line of sight or interfere with any safety gear. Lastly, always double-check the tightness of the mounts before using the camera to prevent it from falling off during activities.


