
Do you love watching birds? Imagine having your very own bird camera that allows you to capture stunning photos and videos of your feathered friends in action. With just your trusty iPhone, you can easily create a DIY bird camera that will bring you closer to nature and allow you to document the beautiful moments that often go unnoticed.
Building a bird camera with an iPhone doesn’t require any special technical skills or expensive equipment. All you need is your iPhone, some basic materials, and a passion for birdwatching. In this article, we will guide you through the step-by-step process of building your own bird camera that will allow you to capture incredible close-up shots of birds in their natural habitat.
Before we dive into the details, it’s important to note that the success of your bird camera project will greatly depend on your patience and determination. Birds are naturally skittish creatures, so it might take some time and effort to attract them to your camera set up. But with a little perseverance, you will be rewarded with stunning footage that will make all your hard work worthwhile.
Why build a bird camera with an iPhone?
Building a bird camera with an iPhone offers a convenient and cost-effective option for capturing photos and videos of birds in their natural habitats. There are several reasons why using an iPhone for bird photography can be advantageous:
1. Accessibility
The iPhone is a device that is readily available to many people. Whether you already own an iPhone or can borrow one from a friend or family member, it is an easy and accessible option for capturing bird sightings. This makes it a great choice for bird enthusiasts who want to document their observations without investing in specialized camera equipment.

2. Quality
iPhones have been praised for their impressive camera capabilities, with each new model typically offering improved image and video quality. The advanced features of the iPhone’s camera include high-resolution sensors, optical image stabilization, and various shooting modes. These features allow for the capture of sharp, detailed, and vibrant images of birds, even in challenging lighting conditions.
3. Versatility
An iPhone can serve multiple functions beyond bird photography. It is a versatile device that allows you to easily switch between capturing images, making calls, sending messages, and accessing other apps. This versatility is particularly useful for bird enthusiasts who want to quickly document and share their observations in real-time.
4. Connectivity
With an iPhone, you can share your bird photos and videos instantly. The device allows you to connect to the internet and share your images through social media platforms, email, or cloud storage services. This connectivity enables you to quickly spread awareness about bird species and contribute to citizen science projects.
5. Portability
Unlike traditional cameras, an iPhone is lightweight and compact, making it easy to carry around during birdwatching expeditions. Its portability means you can always have a capable camera on hand to capture spontaneous bird sightings or unexpected behaviors.
Overall, building a bird camera with an iPhone is a practical and effective choice for bird enthusiasts who want to document and share their love for these fascinating creatures. The accessibility, quality, versatility, connectivity, and portability of the iPhone make it an excellent tool for capturing memorable bird moments.
Benefits of using an iPhone for bird photography
Using an iPhone for bird photography offers numerous advantages and benefits. Here are some of the reasons why many photographers choose to use an iPhone:
- Portability: iPhones are compact and lightweight, making them easy to carry around when bird watching or traveling to different locations. You can have your bird photography gear with you at all times, allowing you to capture incredible photos whenever you encounter an amazing bird.
- Quality: iPhones are equipped with high-quality cameras capable of capturing stunning images. With advancements in technology, the cameras on iPhones have become more powerful over the years, allowing you to capture sharp, detailed, and vibrant bird photos.
- Versatility: iPhones offer a wide range of photography options and settings. You can adjust various parameters such as exposure, focus, and white balance to optimize your bird photography. Additionally, you can choose from a variety of lenses, filters, and editing apps to enhance your photos further.
- Convenience: With an iPhone, you have immediate access to your photos. You can review, edit, and share your bird photos right on your device, eliminating the need for additional equipment or transferring files to a computer.
- Connectivity: iPhones provide seamless connectivity to the internet and social media platforms. You can instantly share your bird photos with others, seek feedback, and engage with the birding community.
- Accessibility: The user-friendly interface and intuitive controls of iPhones make them accessible to photographers of all levels, from beginners to professionals. Whether you are just starting with bird photography or have years of experience, an iPhone can be a valuable tool.
Overall, using an iPhone for bird photography can greatly enhance your birding experience, allowing you to capture incredible moments and share them with others. With its portability, quality, versatility, convenience, connectivity, and accessibility, the iPhone has become a popular choice among bird photographers worldwide.
Choosing the Right Equipment
When it comes to building a bird camera with an iPhone, choosing the right equipment is essential to ensure high-quality footage and a successful bird-watching experience. Here are a few key considerations to keep in mind when selecting your equipment:
1. iPhone Model
First and foremost, you’ll need an iPhone with a camera capable of capturing high-resolution videos. Ideally, you’ll want to use the latest iPhone model, as they often feature advanced camera technology and improved image stabilization.
2. Mounting Option
To capture stable footage, you’ll need a secure and reliable mounting option for your iPhone. There are various mounts available, ranging from tripods to clamp-style attachments, that can help you achieve the desired stability while observing birds.

It’s important to choose a mount that offers flexibility in terms of positioning and angle adjustment, ensuring you can easily capture different bird movements and behaviors during your recordings.
Additionally, make sure the mount is sturdy enough to hold your iPhone securely in place, preventing any accidental drops or damage to your device.
3. Extra Accessories
Consider investing in extra accessories to enhance your bird camera setup. Some useful additions include:
- External microphones: These can help improve the audio quality of your recordings, allowing you to capture the sounds of birds chirping more clearly.
- Zoom lenses: These attachments can help you zoom in on birds that may be farther away, allowing for more detailed footage.
- Power banks: To ensure you don’t run out of battery during your bird-watching sessions, having a portable power bank can be a lifesaver.
- Waterproof cases: If you plan to capture birds in wet or rainy conditions, a waterproof case can protect your iPhone from any potential damage.
By carefully selecting the right equipment for your bird camera setup, you can enhance your bird-watching experience and capture stunning footage of our feathered friends in their natural habitats!
Selecting the ideal iPhone model for capturing bird images
When it comes to building a bird camera with an iPhone, choosing the right iPhone model is crucial for getting the best possible bird images. iPhones have consistently offered high-quality cameras with advanced features, making them a popular choice among amateur and professional photographers alike.

Below is a table comparing some of the latest iPhone models and their key camera specifications:
| iPhone Model | Camera Specs |
|---|---|
| iPhone 11 | 12 MP wide and 12 MP ultra-wide cameras, Night mode, Deep Fusion technology |
| iPhone 11 Pro | 12 MP triple-camera system (wide, ultra-wide, telephoto), Night mode, Deep Fusion technology |
| iPhone 12 | 12 MP dual-camera system (wide, ultra-wide), Night mode, Deep Fusion technology, Dolby Vision recording |
| iPhone 12 Pro | 12 MP triple-camera system (wide, ultra-wide, telephoto), Night mode, Deep Fusion technology, Dolby Vision recording |
These iPhone models offer excellent camera capabilities for capturing stunning bird images. The camera specs, including high megapixel count, advanced lens systems, and features like Night mode and Deep Fusion technology, ensure sharp and detailed images even in challenging lighting conditions.
Additionally, the latest iPhone models come with enhanced computational photography features that further enhance the image quality, such as Smart HDR and advanced image processing algorithms.
When choosing an iPhone model for your bird camera, it’s important to consider your budget, photography requirements, and desired features. The iPhone models listed above can serve as a good starting point, but it’s always recommended to research and read reviews to make an informed decision based on your specific needs.
Recommended accessories for iPhone bird photography
When it comes to capturing stunning bird photographs using your iPhone, having the right accessories can make a world of difference. Here are some recommended accessories that can enhance your bird photography experience:

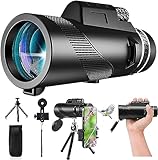
1. Telephoto lens attachment
A telephoto lens attachment is a must-have accessory for bird photographers. It allows you to zoom in closer to the birds without losing image quality. There are various telephoto lens attachments available in the market, ranging from affordable options to high-end professional lenses.
2. Tripod
A tripod provides stability and eliminates camera shake, allowing you to capture sharper images. When photographing birds, it’s important to have a steady hand to avoid blur. Using a tripod ensures that your iPhone stays still, enabling you to get crisp and focused shots.
3. Bird call app
A bird call app can be a useful tool for attracting birds to your desired location. These apps mimic the sounds of different bird species and can help you capture unique and intimate moments. Just make sure to use it responsibly and not disturb the natural behavior of the birds.
4. Portable power bank
Long bird photography sessions can drain your iPhone’s battery quickly, especially if you’re using resource-intensive apps. Having a portable power bank can ensure that your iPhone remains powered throughout your photography adventure, allowing you to capture amazing bird shots without worrying about running out of battery.
5. Protective case
A durable and protective case is essential to keep your iPhone safe during outdoor photography sessions. It protects your device from accidental drops, scratches, and other damages that can occur when you’re out in the field. Look for cases that provide both protection and easy access to your iPhone’s camera and controls.

By investing in these recommended accessories, you can take your iPhone bird photography to the next level. They will help you capture stunning shots and allow you to fully enjoy the experience of observing and photographing birds in their natural habitat.
Preparing Your iPhone
Before you can start building your bird camera with an iPhone, there are a few preparations you need to make. Here’s what you need to do:
1. Check your iPhone’s compatibility
Make sure your iPhone is compatible with the necessary features for building a bird camera. You will need an iPhone that has a high-resolution camera, as well as support for manual focus and exposure control. Check your iPhone’s specifications to ensure it meets these requirements.
2. Clear up storage space
Your iPhone will be capturing a lot of photos and videos when you use it as a bird camera, so it’s essential to have enough storage space. Delete any unnecessary apps, photos, and videos to free up space on your device. You can also consider transferring some files to iCloud or an external storage device to make more room on your iPhone.
3. Install a bird-watching app
To enhance your bird-watching experience, consider installing a bird-watching app on your iPhone. These apps can help you identify bird species, track sightings, and provide additional information about different species. Browse the App Store and choose an app that suits your preferences and needs.
4. Get a protective case or mount
When using your iPhone as a bird camera, it’s crucial to protect it from any potential damage. Invest in a sturdy protective case or mount that can be attached to a tripod or another stable surface. This will ensure that your iPhone remains secure while you capture images and videos of birds in their natural habitat.
By following these steps, you will be well-prepared to start building your bird camera with an iPhone. Now, let’s move on to the next step: gathering the necessary equipment.
Installing a high-quality camera app
One of the most important steps in building a bird camera with an iPhone is to have a high-quality camera app installed on your device. While the default camera app that comes with your iPhone is decent, there are many third-party camera apps available that offer advanced features and settings that can greatly enhance your bird photography experience.
When choosing a camera app, look for features such as manual controls, RAW support, burst mode, and advanced focus options. These features will give you greater control over the camera settings and allow you to capture stunning bird photos.
One highly recommended camera app for iPhone is ProCamera. It offers a wide range of professional-grade features, including a manual focus mode, exposure control, and advanced shooting modes. With ProCamera, you can easily adjust settings such as ISO, shutter speed, and white balance to get the perfect shot.
Another popular camera app is Camera+, which also provides manual controls, RAW support, and a macro mode for capturing close-up shots of birds. Camera+ also offers various filters and editing tools to enhance your photos right within the app.
Once you have selected a camera app, simply visit the App Store on your iPhone, search for the app by name, and tap the “Install” button to download and install it. After the installation is complete, you can find the app’s icon on your home screen and start using it to capture amazing bird photos.
It is important to note that while some camera apps offer a free version, they may come with limitations or watermarks on the photos. If you are serious about bird photography, it is worth considering investing in a paid version of a high-quality camera app for the best results.
Optimizing the iPhone Camera Settings for Bird Photography
1. Selecting the Right Camera App
When building a bird camera with your iPhone, it’s essential to choose a camera app that provides advanced settings and manual controls. Apps like ProCamera, Camera+, or Halide are excellent choices as they allow you to adjust crucial settings like ISO, shutter speed, and focus.
2. Adjusting the Exposure
Proper exposure is key to capturing detailed bird photos. To optimize exposure, tap on the bird to set focus, then swipe up or down on the screen to adjust the exposure level. Increase exposure for darker subjects or decrease it for brighter ones to ensure accurate and well-lit images.
3. Setting the Focus
For crisp bird photos, manually set the focus using the camera app. Tap on the bird or an area where you want the focus to be, and the camera will adjust accordingly. This helps ensure the bird remains sharp and well-defined in the image.
4. Using Burst Mode
Birds are often speedy and unpredictable, making burst mode a valuable feature to capture clear action shots. Enable burst mode by holding down the shutter button or using the volume up button to take multiple photos rapidly. This increases your chances of capturing the perfect moment.
5. Adjusting White Balance
To achieve accurate colors in your bird photographs, adjust the white balance settings on your iPhone. Use the camera app’s manual controls to set the appropriate white balance based on the lighting conditions. Selecting the correct preset, like daylight or cloudy, can greatly enhance the overall color accuracy.
6. Using Gridlines
Gridlines are helpful for composition and ensuring straight horizons in your bird photos. Enable the gridlines feature in your camera app settings, which divides the frame into thirds horizontally and vertically. Position the bird and other elements along the gridlines to create a well-balanced composition.
7. Stabilizing the iPhone
Shaky hands can result in blurry bird photos. Use a tripod or stable surface to keep the iPhone steady while capturing bird images. If a tripod is not available, try using a nearby object like a tree branch or railing to stabilize your device.
8. Utilizing HDR
High Dynamic Range (HDR) mode can greatly improve the exposure range in your bird photos. Enable HDR in your camera app settings to capture more details in both the highlights and shadows. However, be cautious as faster-moving birds may blur when using HDR mode, so it is best suited for stationary or slow-moving subjects.
9. Experimenting with Low Light Modes
Bird photography enthusiasts know that great photo opportunities can arise during low light conditions. Explore your camera app settings for modes like Night Mode or Low Light to capture unique bird images in challenging lighting situations.
10. Exploring Post-Processing Apps
After capturing bird photos on your iPhone, consider using post-processing apps like Snapseed or Adobe Lightroom to enhance and fine-tune your images further. These apps offer various editing tools and filters to improve colors, sharpness, and overall image quality.
By optimizing your iPhone’s camera settings, you can elevate your bird photography and capture stunning images of these beautiful creatures.
Setting Up Your Bird Camera
Once you have gathered all the necessary materials, it’s time to set up your bird camera. Here are the steps to follow:
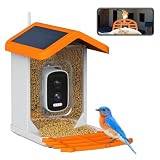
- Attach the iPhone to the tripod or any stable surface with the help of a phone mount. Make sure it is placed at a suitable height and angle for capturing bird activity.
- Position the bird feeder or birdhouse in front of the camera, ensuring that it is in focus and within the frame.
- Connect the external battery pack to the iPhone using the appropriate cables. This will ensure that your camera remains powered for an extended period.
- Set up the Birdwatching app on your iPhone. Follow the instructions provided by the app to customize the camera settings according to your preferences and needs.
- Test the camera setup by starting the live video feed on your Birdwatching app. Make any necessary adjustments to the camera position or settings to optimize the viewing experience.
- Once everything is set up and tested, leave the camera undisturbed in its position. This will allow you to capture uninterrupted footage of the birds visiting your bird feeder or birdhouse.
Remember to regularly check the camera and its batteries to ensure proper functioning and to review the captured footage to enjoy the wonderful world of birds in your own backyard!
Placing the iPhone securely to capture bird activity
Once you have downloaded the necessary apps and set up the iPhone to record bird activity, it is important to place the device securely to ensure optimal results. Here are some tips to help you position the iPhone for successful bird watching:
- Choose a strategic location: Find an area where you have observed frequent bird activity. This could be near a bird feeder, birdbath, or a natural habitat that birds tend to visit.
- Mount the iPhone: Use a sturdy tripod or clamp to secure the iPhone in place. This will prevent any movement or shaking that could blur the footage.
- Adjust the angle: Position the iPhone so that it is at the best vantage point to capture the birds. Experiment with different angles and heights to find the optimal view.
- Ensure stability: Make sure the iPhone is stable and won’t be easily knocked over by wind or other factors. You can use weights or additional supports to ensure stability.
- Protect from the elements: If you are placing the iPhone outdoors, consider using a protective case to shield it from rain, dust, or other weather conditions. This will help prolong the lifespan of your device.
By following these tips, you can ensure that your iPhone is securely placed to capture bird activity. Keep in mind that it may take some trial and error to find the perfect spot, so be patient and keep experimenting until you achieve the desired results.
Positioning the camera for the best bird shots
When setting up your bird camera with an iPhone, finding the right position is crucial to capturing the best bird shots. Here are some tips to help you position your camera effectively:
1. Choose a strategic location
Selecting the right location for your bird camera is essential. Look for an area with high bird activity, such as near bird feeders or nesting sites. Research the types of birds you want to capture and determine their preferred habitats, then position your camera accordingly.
2. Consider the angle
The angle at which you position your camera can greatly impact the quality of your bird shots. Experiment with different angles to find the best one for capturing birds in their natural environment. Placing the camera at eye level or slightly above can provide a more intimate and engaging perspective.
Pro tip: Using a tripod can help stabilize your camera and allow for easier adjustments to the angle.
3. Ensure a clear view
Make sure there are no obstructions between your camera and the birds you want to capture. Clear away any branches, leaves, or other objects that may obstruct the view. Be mindful of background clutter that may distract from the main subject.
Pro tip: Consider creating a dedicated bird perch or using existing perches to attract birds to a specific area in front of your camera for clearer shots.
By carefully positioning your camera, you can significantly enhance your chances of capturing stunning shots of birds in their natural habitat. Remember to be patient and allow the birds to become comfortable with the camera’s presence before expecting them to come close.
Question-answer:
What is a bird camera?
A bird camera is a device used to monitor and record the activities of birds. It allows you to capture high-quality images and videos of birds in their natural habitat.
How can I build a bird camera with my iPhone?
To build a bird camera with your iPhone, you will need to use a specialized bird camera app and attach some additional equipment such as a lens adapter, tripod, and external microphone. The app will allow you to control the camera settings, and the additional equipment will help you capture high-quality footage of the birds.
What are the benefits of using an iPhone as a bird camera?
Using an iPhone as a bird camera has several benefits. Firstly, iPhones have excellent camera quality, allowing you to capture high-resolution images and videos of the birds. Additionally, iPhones have a wide range of bird camera apps available, which provide advanced features and editing options. Finally, using an iPhone as a bird camera is convenient as it eliminates the need to carry around additional equipment.
What are some recommended bird camera apps for iPhone?
There are several recommended bird camera apps for iPhone, including “BirdsEye Bird Finding Guide,” “Merlin Bird ID,” and “Audubon Bird Guide: North America.” These apps provide bird identification, bird sound recognition, and bird watching features that can enhance your bird photography experience.
Can I use a bird camera to study bird behavior?
Yes, a bird camera is a great tool for studying bird behavior. By using a bird camera, you can observe birds in their natural habitat without disturbing them. This allows you to capture their natural behaviors and interactions, providing valuable insights into their lives and habits.


