
In today’s world, photography has become an integral part of our lives. Whether it’s capturing beautiful landscapes, documenting special moments, or even just taking a selfie – we can’t deny the importance of having a good camera. While most of us rely on our smartphones or standalone digital cameras, there is a niche community of photography enthusiasts who prefer to build their own cameras from scratch. One fascinating project that has caught the attention of many is building a digital camera back.
A digital camera back is essentially a device that can be attached to a film camera to transform it into a digital camera. It allows photographers to enjoy the benefits of digital technology while still using their beloved analog cameras. The process involves combining modern electronics with vintage camera bodies, resulting in a unique and customized photographic tool.
To build a digital camera back, you’ll need a basic understanding of electronics and camera mechanisms. The first step is to find a suitable film camera body that you’d like to convert. It could be an old camera you already own or one that you’ve purchased specifically for this project. It’s important to choose a camera body that is mechanically sound and visually appealing, as it will be the foundation of your digital camera back.
Once you have the camera body, the next step is to gather the necessary electronic components. This includes a high-resolution image sensor, a microcontroller, memory storage, and various connectors and cables. You’ll also need to invest in a power supply system to ensure your digital camera back operates effectively. It’s essential to research and choose components that are compatible with your camera body and offer the desired image quality.
Understanding the basics
Before diving into building a digital camera back, it’s important to have a good understanding of the basics of digital photography and camera technology. This knowledge will serve as a foundation for the project and help in making informed decisions along the way.

How does a digital camera work?
A digital camera works by capturing light through a lens and converting it into a digital image. It uses an image sensor, such as a CCD or CMOS sensor, to capture the light in the form of pixels. These pixels are then converted into digital data that can be processed and stored.
The camera’s lens plays a crucial role in focusing the light onto the image sensor. The aperture controls the amount of light that enters the camera, while the shutter speed determines how long the sensor is exposed to the light. The combination of these settings affects the overall exposure of the image.
What is a camera back?
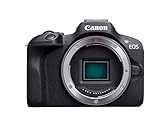
A camera back refers to the part of a camera that houses the image sensor and other components necessary for capturing and processing images. It is typically detachable and can be interchanged with different camera bodies.
A digital camera back is designed to convert a traditional film camera into a digital one by replacing the film with an image sensor. This allows photographers to take advantage of the benefits of digital technology while still using their existing camera equipment.
Digital camera backs come in different types and sizes, depending on the camera system they are intended for. They typically include features such as a built-in display for previewing and reviewing images, as well as various controls for adjusting settings and capturing images.
Building a digital camera back involves selecting a compatible camera system, acquiring the necessary components, and following a series of steps to install and configure the back. It requires a good understanding of camera technology and electronics, as well as some technical skills.
- Understanding the basics of digital photography and camera technology is essential before building a digital camera back.
- A digital camera works by capturing light through a lens and converting it into a digital image using an image sensor.
- The camera back houses the image sensor and other components necessary for capturing and processing images, and it can be interchanged with different camera bodies.
- Digital camera backs come in different types and sizes, and they include features such as a built-in display and various controls.
- Building a digital camera back involves selecting a compatible camera system, acquiring the necessary components, and following installation and configuration steps.
Gathering the necessary components
Before you can start building a digital camera back, you need to gather all the necessary components. Here is a list of essential components you will need:
- Image sensor: This is the heart of your camera back. Choose a high-resolution image sensor that fits your project requirements.
- Microcontroller: You will need a microcontroller to control the operation of your camera back. Arduino or Raspberry Pi are popular choices.
- Camera lens: Select a high-quality lens that suits your needs in terms of focal length, aperture, and image quality.
- Storage medium: Choose an appropriate storage medium, such as an SD card, to store the captured images.
- Power supply: Make sure to have a reliable power supply for your camera back. This can be a battery pack or a power adapter.
- Connectors and cables: You will need connectors and cables to connect the different components together.
- Enclosure or housing: Consider the design and functionality of the enclosure for your camera back. It should protect the components and provide easy access for maintenance.
It is also recommended to gather additional components, such as capacitors, resistors, and voltage regulators, depending on your specific design and requirements. Having a clear plan and understanding of your camera back’s specifications will help you in sourcing the right components for your project.
Preparing the camera body
Before you can start building a digital camera back, you need to prepare the camera body. This involves disassembling the camera and removing the film back if it exists. Here are the steps to follow:
Step 1: Gather the necessary tools
Make sure you have all the tools you need for the disassembly process. This typically includes a small screwdriver set, a precision knife, and tweezers.

Step 2: Remove the battery
Open the battery compartment and remove the battery from the camera body. This will prevent any accidental power-up or damage to sensitive components during the disassembly process.
Step 3: Remove the camera’s back cover or film back
If your camera has a removable back cover or a film back, carefully remove it using the appropriate tools. Be careful not to damage any connectors or cables attached to it.
Step 4: Detach the lens
Unscrew or unlock the lens from the camera body, depending on the type of camera you are working with. Set the lens aside in a safe place.
Step 5: Disassemble the camera body
Using the small screwdriver set, carefully remove any screws holding the camera body together. Take note of the locations of the screws as they may vary depending on the camera model. Gently separate the camera body into its main components.
Once you have completed these steps, the camera body will be ready for the next stage of the process, which involves adding the digital components. Make sure to keep track of all the screws and small parts removed during the disassembly process, as you will need them for reassembly.

Installing the sensor
To install the sensor in the digital camera back, you will need to follow these steps:
1. Begin by removing the protective covering from the sensor carefully to avoid any damage.
2. Locate the sensor placement area inside the camera back. This is typically a rectangular or square-shaped slot that is specifically designed to accommodate the sensor.
3. Gently place the sensor into the designated slot, making sure that it fits snugly and aligns with the connector pins inside the camera back. Take extra care not to force the sensor into place.
4. Once the sensor is properly aligned, secure it in place using any screws or fasteners provided with the camera back. Make sure that the sensor is firmly attached and does not move when gently shaken.
5. Double-check the connection between the sensor and the camera back’s circuit board. Ensure that all the connector pins are properly inserted and aligned.
6. Carefully reattach any cables or wires that were disconnected during the installation process. Ensure that they are securely connected and properly routed to avoid any interference or damage.
7. Finally, close the camera back and secure it using the appropriate screws or fasteners. Make sure that the camera back is tightly sealed to prevent any dust or moisture from entering.
By following these steps and taking the necessary precautions, you can successfully install the sensor in your digital camera back. This will allow you to capture high-quality images and enjoy the benefits of a DIY camera modification.
Connecting the electronics
Once you have assembled all the necessary electronic components for your digital camera back, it’s time to connect them together. This step is crucial to ensure that all parts work harmoniously and that your camera back functions properly.

Tools and materials
- Soldering iron
- Solder
- Wire cutters
- Wire strippers
- Heat shrink tubing
- Electrical tape
Before you start connecting the electronics, make sure to have all the required tools and materials on hand. These tools will assist you in creating secure and reliable connections between the different components.
Soldering the connections
Soldering is the process of joining two or more metal components by melting a filler metal, also known as solder, at their interface points. In the context of building a digital camera back, soldering is one of the most common methods used for connecting electronic components.
When soldering the connections, it is important to follow some best practices:
- Trim the wires to an appropriate length, leaving enough room for flexibility but avoiding unnecessary excess.
- Strip the wire insulation using wire strippers, ensuring that the bare wire ends are clean and free from any debris.
- Twist the stripped wires together for a secure connection, then apply heat to the twisted section using a soldering iron.
- Feed a small amount of solder into the joint, allowing it to flow around the wires and create a solid connection.
- After the solder has cooled, insulate the joint using heat shrink tubing or electrical tape to protect it from damage and ensure electrical conductivity.
Repeat the soldering process for each connection until all the necessary components are properly connected. Take your time and double-check each connection to ensure they are secure and well-made.
Remember to refer to the documentation and datasheets of your electronic components for specific instructions and guidelines on connecting them correctly. This will help you minimize the risk of damaging the components or encountering any compatibility issues.

Powering the camera back
When building a digital camera back, one crucial aspect to consider is how to power it. Without proper power supply, the camera back will not be able to function effectively. There are several options available for powering the camera back, depending on the specific requirements and preferences of the photographer.
Battery Power
One common method of powering a camera back is through the use of batteries. This provides a portable and convenient solution, allowing photographers to use their camera backs in various locations without the need for a constant power source. The type of batteries used will depend on the specific camera back model, but commonly used options include rechargeable lithium-ion batteries or disposable AA batteries.
External Power Source
For photographers who require extended shooting sessions or prefer not to rely on batteries, an external power source can be used. This can include options such as AC power adapters or external battery packs. AC power adapters connect the camera back directly to a power outlet, providing a continuous source of power. External battery packs, on the other hand, offer a portable and rechargeable solution, similar to batteries, but with extended power capacity.
When choosing an external power source, it is essential to ensure compatibility with the camera back model and consider factors such as voltage, current, and power capacity to ensure optimal performance.
Testing and calibrating
Once you have successfully built your digital camera back, it is important to test and calibrate it to ensure optimal performance and image quality. Here are some steps to follow:
1. Image quality testing
Take a series of test shots with your newly built digital camera back. Pay close attention to image sharpness, color accuracy, and noise levels. Evaluate the overall image quality and compare it to the expected results. This will help you identify any potential issues or areas for improvement.
2. Sensor alignment calibration
Proper sensor alignment is crucial for accurate image capturing. Use a calibration target or pattern to check for any misalignment or distortion. Adjust the sensor position or lens mount if necessary, ensuring the subject is properly captured without any aberrations.
3. Focus calibration
Verify and fine-tune the focus accuracy of your digital camera back. Capture test images of a subject with varying focus distances and carefully analyze the results. If the focus is consistently off, adjust the lens elements or focusing mechanism to achieve precise and sharp focus.
4. White balance calibration
Ensure accurate color reproduction by calibrating the white balance settings of your camera back. Use a neutral reference target or a known color chart to perform the calibration. Adjust the white balance settings until the captured images display correct and natural-looking colors.
5. ISO sensitivity calibration
Check the ISO sensitivity of your digital camera back by capturing test images at different ISO settings. Evaluate the noise levels and image quality at each ISO level. Make any necessary adjustments to the ISO calibration to achieve desired noise performance and image detail.
By thoroughly testing and calibrating your digital camera back, you can optimize its performance and ensure consistent and high-quality image results. Remember to document any changes or adjustments made during the calibration process for future reference.
Finishing touches and adjustments
After assembling the digital camera back, there are a few final touches and adjustments you will need to make to ensure optimal performance. These steps are crucial in achieving high-quality images and a seamless user experience.
- Check the sensor alignment: Use a sensor alignment tool to ensure that the image sensor is properly aligned with the camera lens. This will help avoid any focus or image distortion issues.
- Calibrate the autofocus system: Adjust the autofocus settings to ensure that the camera can accurately focus on subjects. Follow the manufacturer’s instructions for calibrating the autofocus system.
- Configure the camera settings: Set up the camera settings according to your preferences. This includes adjusting ISO, white balance, exposure compensation, and other settings that affect image quality and style.
- Test the shutter speed and aperture: Take test shots and analyze the results to determine the optimal shutter speed and aperture settings for different lighting conditions and subject matters.
- Perform firmware updates: Check for firmware updates for your camera back and install them if available. Firmware updates can bring improvements in performance, features, and address any known issues.
Remember to refer to the camera back’s user manual for detailed instructions on performing these finishing touches and adjustments. With these final steps, your digital camera back should be ready to capture stunning photographs!
Question-answer:
What is a digital camera back?
A digital camera back is a device that can be attached to a traditional film camera and convert it into a digital camera.
Why would someone want to build a digital camera back?
There are several reasons why someone might want to build a digital camera back. One reason is that it allows photographers to use their existing film cameras and lenses, while still enjoying the benefits of digital photography. Another reason is that it can be a fun and challenging DIY project for photography enthusiasts.
What are the basic components needed to build a digital camera back?
Building a digital camera back typically requires a few basic components, including an image sensor, a control board, a storage device, and a power source. Additionally, some knowledge of electronics and programming may be necessary to successfully build and operate a digital camera back.
Are there any commercial options available for digital camera backs?
Yes, there are several commercial options available for digital camera backs. Some companies offer pre-built digital camera backs that can be easily attached to traditional film cameras. These commercial options often include advanced features and functionality, but they can also be quite expensive compared to DIY options.


