
In today’s digital age, home security has become a top priority for many. And what better way to protect your home than with a Lego security camera? Yes, you heard it right. With a few simple steps, you can create your very own functioning security camera using nothing but Legos. Not only will it provide you with an added layer of protection, but it will also give you the satisfaction of building something from scratch.
Step 1: Gather Your Materials
The first step in building your Lego security camera is to gather all the necessary materials. You will need a selection of Legos, preferably in different colors to make it more visually appealing. You will also need a small camera module that can be easily connected to a computer or smartphone. Lastly, you will need some basic tools such as a screwdriver and wire cutters.
Pro tip: Before starting, make sure to familiarize yourself with the different types and sizes of Legos you have and plan your design accordingly.
Step 2: Design Your Camera Structure
The next step is to design the structure of your Lego security camera. This is where your creativity comes into play. You can design a simple rectangular box or get more elaborate with a dome-shaped design. The choice is yours.
Pro tip: Keep in mind that you will need to leave enough space inside the structure to accommodate the camera module and the necessary wiring.
Step 3: Build the Structure
Once you have finalized your design, start building the structure using the Legos. Remember to leave an opening for the camera lens and make sure the structure is sturdy enough to hold the camera module. Use strong Legos for the corners and any points of contact to ensure stability.
Pro tip: You can reinforce the structure by adding extra layers or using larger Legos for added stability.
Step 4: Attach the Camera Module
Now that you have built the structure, it’s time to attach the camera module. Carefully connect the camera to the inside of the structure using screws or adhesive, depending on the design of your camera module. Make sure the lens aligns with the opening you created in the structure so that it captures the desired field of view.
Pro tip: Test the camera module before attaching it permanently to ensure proper functionality.
Step 5: Connect and Test
Once the camera module is securely attached, connect it to your computer or smartphone using the necessary cables or wireless connections. Install any required software or apps, and test the camera to ensure it is functioning properly.

Pro tip: Consider adding additional features such as motion detection or live streaming capabilities to enhance the functionality of your Lego security camera.
With these simple steps, you can create your own Lego security camera and add a personal touch to your home security system. Let your imagination run wild as you combine the timeless fun of Legos with the practicality of a security camera.
Why build a lego security camera?
Security is important:
In today’s world, ensuring the safety and security of our homes and loved ones has become essential. With an increase in crime rates and security breaches, having a reliable security system has become a top priority for many homeowners. A lego security camera provides a cost-effective yet powerful solution to enhance your home security.
Creative and customizable:

Building a lego security camera allows you to unleash your creativity and customize it according to your preferred design and functionality. Lego bricks offer endless possibilities, allowing you to create a unique and personalized security camera that fits into the aesthetics of your home.
Educational value for children:
Building a lego security camera can be a fun and educational activity for both children and adults. It not only enhances their problem-solving skills and creativity but also introduces them to basic concepts of engineering and electronics. This hands-on experience cultivates a sense of accomplishment and encourages them to explore new ideas.
Cost-effective solution:
Purchasing a commercial security camera can be expensive, especially if you want multiple cameras to cover different areas of your property. By building a lego security camera, you can save a significant amount of money without compromising on functionality. Lego bricks are relatively affordable and easily available, making it a cost-effective alternative.

Fun and challenging project:
Building a lego security camera is not only a practical project but also a fun and challenging one. It requires problem-solving skills, patience, and attention to detail. Engaging in such projects can provide a sense of satisfaction and accomplishment as you witness your creation come to life.
Overall, building a lego security camera offers numerous benefits, including enhanced security, customization options, educational value, cost-effectiveness, and an enjoyable project for all ages. It’s a worthwhile endeavor that combines creativity and functionality in an innovative way.
Benefits of a lego security camera
A lego security camera offers numerous benefits that make it an excellent choice for home or small business surveillance. Here are some of the advantages:
1. Customizability
One of the key benefits of a lego security camera is its customizability. Lego bricks allow you to easily modify and design your camera according to your specific needs. You can build it to blend in with your existing decor or create a standout design that adds a touch of personality to your security setup.

2. Affordability
Compared to traditional security cameras, lego security cameras are often a more affordable option. Lego bricks are widely available and relatively inexpensive, making it a cost-effective solution for those on a budget. Additionally, you can repurpose existing lego bricks, saving you even more money.
3. Flexibility
Lego security cameras offer flexibility in terms of placement. As they are made from lego bricks, you can easily dismantle and move them to different locations. This makes them ideal for those who frequently rearrange their living or working spaces or need to change the camera’s position for optimal coverage.
4. Fun and Educational
Building a lego security camera can be a fun and educational project. It allows you to engage in hands-on construction and encourages creativity. This can be a great activity to involve children in, helping them develop problem-solving skills and fostering an interest in technology and engineering.
In conclusion, a lego security camera offers customizability, affordability, flexibility, and a fun learning experience. Consider building your own lego security camera to enhance your surveillance capabilities while enjoying the benefits it provides.
Choosing the right lego pieces
Building a lego security camera requires careful selection of the right lego pieces to ensure a sturdy and functional design. Here are some important considerations when choosing lego pieces:

- Brick size: Select lego bricks with appropriate sizes for the desired camera dimensions. Larger bricks may provide more stability while smaller ones allow for more intricate designs.
- Connectivity: Look for lego pieces with stud connections that can easily interlock and hold together. This will ensure a strong bond between the components of the camera.
- Specific pieces: Check if you need specific lego pieces such as camera lenses, hinges for adjustable angles, or technic gears for rotating parts. These specialty pieces can add functionality to your lego security camera.
- Colors: Consider the color scheme you want for your lego security camera. Choose lego pieces in colors that match your preferences or the environment where the camera will be placed.
- Extra accessories: Think about whether you want to add any extra accessories to your lego security camera, such as lights or a base for stability. Make sure to select pieces that can accommodate these additions.
By taking these factors into account, you can ensure that the lego pieces you choose will be suitable for building a functional and visually appealing security camera.
Essential LEGO Pieces for Building a Security Camera
When it comes to building a LEGO security camera, having the right pieces is crucial. Let’s take a look at some of the essential LEGO elements that you will need to create your own DIY surveillance camera.
1. Bricks: The foundation of any LEGO creation, bricks are essential for building the body and structure of your security camera. Make sure to have a variety of sizes and colors to add stability and creativity to your design.
2. Plates: Plates are thin, flat LEGO pieces that are perfect for creating the screen and base of your security camera. They can be used to add detail and functionality to your design, allowing you to attach other LEGO components easily.
3. Technic bricks and pins: These specialized LEGO pieces are ideal for adding movement and flexibility to your security camera. Technic bricks and pins can be used to create a rotating or tilting mechanism, allowing your camera to adjust its view.
4. Mini-figures and accessories: LEGO mini-figures can be used to add a playful touch to your security camera. You can include a security guard figure or even a sneaky intruder to make your camera more interesting and engaging.
5. Translucent bricks: Translucent LEGO bricks can be used to create the lens of your security camera. Their see-through nature gives them a realistic touch, allowing your camera to appear more authentic.
6. Decorative pieces: To add a touch of realism and creativity to your security camera, consider using decorative LEGO pieces. These can include stickers, tiles, or even custom decals that resemble buttons or control panels.
7. Wires and connectors: If you want to take your LEGO security camera to the next level, consider adding functional features such as LED lights or motion sensors. Wires and connectors will be needed to connect these electronic components and bring your camera to life.
8. Instructions: Although not a physical LEGO piece, having clear and detailed instructions is essential for building any LEGO project. Whether you follow a set of online instructions or create your own, having a step-by-step guide will help you stay organized and ensure a successful build.
By using these essential LEGO pieces, you’ll be well on your way to creating your very own LEGO security camera that not only looks impressive but also adds an extra layer of fun and creativity to your LEGO collection.
Recommended LEGO Sets
If you’re interested in building a LEGO security camera, there are a few sets that are especially recommended for creating the perfect surveillance setup. These sets provide the necessary parts and components to build a realistic and functional camera.
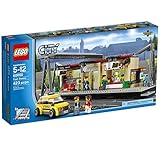
1. LEGO City Police Station Set (60141)
This set includes a police station building, vehicles, and various accessories. It’s a great option for creating a LEGO security camera because it offers a modular design with different sections that can be customized to fit your needs.
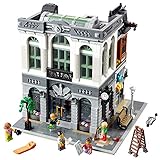
2. LEGO Creator Expert Detective’s Office (10246)
With its vintage detective theme, this set provides a unique aesthetic for your LEGO security camera. It features intricate details and a classic design, making it a great choice for those looking to add a touch of nostalgia to their surveillance setup.
3. LEGO Hidden Side Ghost Train Express (70424)
If you’re looking for a more creative and adventurous LEGO set, the Ghost Train Express is a great option. Its spooky theme offers a unique twist to your security camera setup, and the set includes various ghostly features that can be incorporated into your design.
4. LEGO Technic Porsche 911 GT3 RS (42056)
For those who enjoy a challenge, the Technic Porsche 911 GT3 RS set offers a complex and rewarding build experience. While it may not be directly related to security, its mechanical functions and attention to detail make it a great addition to any LEGO surveillance setup.
Note: It’s important to keep in mind that these sets may not include all the necessary components for building a fully functional LEGO security camera. Additional parts such as cameras, sensors, and wiring may need to be sourced separately.
Building the Lego Security Camera
Building your own Lego security camera is a fun and creative project that combines your love for Lego with the practicality of having a surveillance system. By using a few basic Lego bricks and some electronic components, you can construct a functioning security camera that will help protect your home or office.
Step 1: Gather your materials
Before you start building, make sure you have all the necessary materials. You will need Lego bricks of various sizes and colors, a small camera module, an Arduino board, a battery pack, and some wires for connecting the components.
Step 2: Design the camera housing
Start by designing the housing for your security camera. Use larger Lego bricks to create a sturdy and stable base, and build upwards to accommodate the camera module and any additional components you plan to include. You can add a roof or cover to protect the camera from the elements.
Step 3: Install the camera module
Once you have the housing ready, carefully install the camera module inside. Position it in a way that allows for optimal surveillance coverage. Make sure the camera lens is unobstructed and faces the desired direction.
Step 4: Connect the components
Now it’s time to connect the electronic components. Use the wires to connect the camera module to the Arduino board and the battery pack. Follow the manufacturer’s instructions to ensure proper connections.
Step 5: Program the Arduino board
After connecting the components, program the Arduino board to control the camera module and perform any desired surveillance actions. You can code it to take pictures or record videos at specific intervals, detect motion, or send alerts to your phone.
Step 6: Test and adjust
Once everything is connected and programmed, test your Lego security camera to ensure it functions as intended. Make any necessary adjustments to the camera angle, programming, or housing design to improve its performance.
Step 7: Place and monitor
Finally, find a suitable location to place your Lego security camera. It can be indoors or outdoors, depending on your needs. Make sure it is well-secured and has a clear view of the area you want to monitor. Keep an eye on the footage or configure it to send alerts to your device whenever it detects any suspicious activity.
By following these steps, you can build your very own Lego security camera that adds a touch of creativity to your surveillance needs. Enjoy building and creating while ensuring the safety and security of your space!
Step-by-step instructions:
Here are the step-by-step instructions on how to build a Lego security camera:
- Gather all the necessary Lego pieces for the camera and the base.
- Start by building the base of the camera. Connect the Lego bricks to create a sturdy and stable foundation.
- Once the base is complete, start building the body of the camera. Use different colored Lego pieces to make it look more realistic.
- Attach a small Lego piece with a stud to the top of the camera body. This will be where the camera lens will go.
- Build a lens for the camera using transparent Lego pieces. Make sure it fits securely on top of the small Lego piece on the camera body.
- Next, build a stand for the camera using Lego bricks. This will allow you to position the camera at different angles.
- Attach the camera body to the stand using Lego connectors. Make sure it is stable and secure.
- Finally, add any additional details or decorations to the camera, such as buttons or labels, to make it look more authentic.
Once you have finished building the Lego security camera, you can place it in your Lego city or use it as a fun decoration in your room. Enjoy!
Tips for assembling the lego security camera
1. Sort your Lego pieces: Before you start assembling the Lego security camera, it’s a good idea to sort your Lego pieces by size and color. This will make it easier to find the pieces you need as you build.
2. Follow the instructions: Lego sets come with detailed instructions that guide you step by step through the building process. It’s important to follow these instructions carefully to ensure that your security camera is assembled correctly.
3. Use a clean workspace: Make sure you have a clean and flat surface to assemble your Lego security camera on. This will prevent your Lego pieces from getting dirty or rolling away while you work.
4. Take your time: Building a Lego set can be a fun and rewarding experience, so there’s no need to rush. Take your time to enjoy the process and make sure each piece is securely attached before moving on to the next step.
5. Double check your work: Once you’ve completed the assembly of your Lego security camera, take a moment to double check your work. Make sure all the pieces are in the right place and securely connected. This will ensure that your security camera functions properly.
6. Customize your security camera: Legos are all about creativity, so don’t be afraid to add your own personal touch to your security camera. You can use different colored pieces or even modify the design to suit your needs and preferences.
7. Share your creation: Once you’ve finished assembling your Lego security camera, don’t forget to share your creation with others. You can post pictures online or show it off to your friends and family. Who knows, you might inspire someone to build their own Lego security camera!
Remember, building a Lego security camera is a fun and creative activity. With these tips, you’ll be well on your way to creating a unique and functional Lego security camera.
Enhancing the Lego Security Camera
Building a Lego security camera is a fun and creative way to protect your home or office. However, there are several ways you can enhance the functionality and effectiveness of your Lego security camera.
- Improved Motion Detection: Modify your Lego security camera to have a more sensitive motion detection system. This can be done by adding additional sensors or adjusting the existing ones.
- Remote Viewing: Set up a system that allows you to remotely view the footage from your Lego security camera. This can be achieved by connecting the camera to a computer or smartphone through Wi-Fi or Bluetooth.
- Support for Night Vision: Enhance your Lego security camera by adding night vision capabilities. This can be done by incorporating infrared lights or using a camera module that is specifically designed for low-light conditions.
- Integrate with Home Automation: Connect your Lego security camera to your home automation system. This will allow you to incorporate it into your smart home setup and take advantage of features such as automatic recording when you leave the house or remote monitoring through a voice assistant.
- Expandable Storage: Increase the storage capacity of your Lego security camera by adding a microSD card slot or connecting it to a cloud storage service. This will ensure that you have ample space to store the recorded footage.
By implementing these enhancements, you can take your Lego security camera to the next level and have a more advanced and reliable surveillance system for your home or office.
Adding motion detection capability to the lego camera
One of the key features of a security camera is its ability to detect motion and alert the user. To add this functionality to our lego camera, we can use a few additional components and some coding.
First, we will need a motion sensor such as a passive infrared (PIR) sensor. This sensor can detect changes in infrared radiation, which indicates movement. It can be easily connected to our lego camera using jumper wires.
Once the sensor is connected, we can write a simple code to detect motion. We can use a microcontroller such as Arduino or Raspberry Pi to run this code. The code will continuously monitor the output of the motion sensor and trigger an action when it detects motion.
The action can be anything we desire, such as taking a picture or recording a video. We can connect a camera module to the microcontroller and instruct it to capture an image or start recording when motion is detected.
To make our lego camera more user-friendly, we can also add an LED indicator that will light up when motion is detected. This way, we can easily see if any movement has been detected by our camera.
Additionally, we can enhance the functionality of our lego camera by adding remote access capabilities. By connecting the microcontroller to the internet, either through WiFi or Ethernet, we can enable remote viewing of the camera feed and receive motion alerts on our smartphone or computer.
With these simple additions, we have transformed our lego camera into a fully functional security camera with motion detection capability. Now we can easily monitor our surroundings and receive alerts whenever there is any suspicious activity.
Integrating a live video feed into the lego camera
Once you have built your Lego security camera, the next step is to integrate a live video feed into it. This will allow you to monitor the camera’s view in real-time and enhance the security capabilities of your Lego camera.
Components needed
To integrate a live video feed, you will need the following components:
- A small camera module
- A video transmitter
- A video receiver
- A display device
Connecting the camera module
Start by connecting the camera module to the Lego camera. This can be done by using jumper wires to connect the camera’s output pins to the Lego camera’s input pins. Make sure to follow the camera module’s documentation for the correct pin connections.
Setting up the video transmitter and receiver
Next, connect the video transmitter to the camera module. The video transmitter will transmit the camera’s video feed wirelessly to the video receiver. Connect the video output from the camera module to the video input of the transmitter using a suitable cable.
Connect the video receiver to the display device using another suitable cable. This will allow you to view the live video feed on the display device.
Adjusting the settings
Once all the connections are made, adjust the settings on the camera module and the display device to ensure optimal video quality and smooth transmission. This may involve adjusting the resolution, frame rate, and other video settings on both the camera module and the display device.
Monitoring your Lego security camera
With the live video feed integrated into the Lego camera, it is now ready to be used for monitoring purposes. You can place the camera in a desired location and view the live video feed on the display device, allowing you to keep an eye on your surroundings in real-time.
| Pros | Cons |
|---|---|
| Enhances the security capabilities of your Lego camera | Requires additional components |
| Provides real-time monitoring | May require troubleshooting during setup |
| Allows you to keep an eye on your surroundings remotely | Increased power consumption |
Setting up the LEGO Security Camera
Once you have completed building your LEGO security camera, it’s time to set it up and start monitoring your surroundings. This section will guide you through the process of setting up your LEGO security camera.
Materials needed:
- LEGO security camera
- LEGO baseplate or stand
- LEGO minifigure
- USB webcam
- Computer or Raspberry Pi
- Internet connection
Steps to set up the LEGO security camera:
Step 1: Find a suitable location for your LEGO security camera. It should provide a good view of the area you want to monitor.
Step 2: Place the LEGO baseplate or stand on a stable surface, such as a table or shelf. Attach the LEGO security camera to the baseplate or stand using LEGO bricks.
Step 3: Connect the USB webcam to your computer or Raspberry Pi. Make sure it is securely plugged in.
Step 4: Install any necessary software or drivers for your USB webcam. Follow the manufacturer’s instructions for installation.
Step 5: Position the USB webcam in front of the LEGO security camera, facing the area you want to monitor. Adjust the angle as needed.
Step 6: Power on your computer or Raspberry Pi. Make sure it is connected to the internet.
Step 7: Open the webcam software on your computer or Raspberry Pi. Most operating systems have built-in webcam software that you can use.
Step 8: Configure the webcam software to use the USB webcam as the video input source. Refer to the software’s documentation or settings menu for instructions.
Step 9: Test the camera feed to ensure it is working correctly. You should be able to see the live video feed from the LEGO security camera on your computer or Raspberry Pi screen.
Step 10: Set up any necessary recording or monitoring software to capture and store the camera feed. This will allow you to review the footage later if needed.
Congratulations! You have successfully set up your LEGO security camera. It is now ready to monitor your surroundings and provide you with peace of mind.
FAQ,
Can I use any type of camera for the Lego security camera?
Yes, you can use various types of cameras for your Lego security camera. You can use a Lego camera module specifically designed for Lego creations, or you can attach a small camera to the Lego bricks using various methods, like adhesive or Lego connectors. The choice of the camera will depend on your preferences, budget, and the features you want in your security camera.
How can I make the Lego security camera rotate?
To make your Lego security camera rotate, you can use a Lego motor or servo motor. Attach the motor to the base of the camera using Lego bricks or connectors. Connect the camera module or the camera to the motor using wires. Use a programming language or software to control the motor’s rotation. By sending commands to the motor, you can make the camera rotate horizontally or vertically, depending on how you attach the motor.


