Trail cameras are a valuable tool for wildlife enthusiasts, hunters, and security-conscious property owners. However, these cameras can be vulnerable to theft or damage from animals. To protect your investment and ensure the longevity of your trail camera, building a security box is a wise decision.
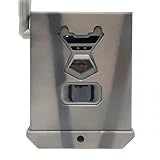
A security box serves as a protective enclosure that surrounds your trail camera, shielding it from potential thieves and wildlife. It is typically made of durable materials such as steel or aluminum, providing an additional layer of defense against tampering or destruction.
Building a security box for your trail camera doesn’t require advanced engineering skills or extensive experience. With some basic tools and materials, you can create a reliable and cost-effective solution that will greatly enhance the security and performance of your trail camera.
In this article, we will walk you through the step-by-step process of building a security box for your trail camera. We will provide detailed instructions along with helpful tips and tricks to ensure a successful construction. So, let’s get started and secure your trail camera with a robust security box!
Essential Tools for Building a Security Box for a Trail Camera
Building a security box for your trail camera is a great way to protect it from theft and damage. To create a sturdy and effective security box, you will need a few essential tools. Here are the tools you will need to get started:

1. Measuring Tape
A measuring tape is essential to accurately measure the dimensions of your trail camera. This will help ensure that the security box fits perfectly around the camera, providing maximum protection. Measure the height, width, and depth of the camera, and make note of the measurements for reference during the building process.
2. Power Drill
A power drill will be needed to create holes in the metal or wood materials you will be using for your security box. You will need to drill holes for screws, locks, and any additional features you might want to add. Make sure to use the appropriate drill bit size for the materials you are using, as this will ensure a secure and professional-looking finish.
3. Screwdriver Set
A set of screwdrivers will be necessary to tighten screws and assemble the security box. Make sure to have a variety of screwdriver sizes on hand, as some screws may require different sizes and heads. This will allow for precise and secure fastening of the materials.
4. Metal Cutter or Saw
If you are using metal materials for your security box, a metal cutter or saw will be required to cut the pieces to size. This tool will help you create precise cuts and ensure that the box fits your trail camera perfectly. Remember to wear appropriate safety equipment, such as gloves and goggles, when cutting metal to prevent any injuries.
5. File or Sandpaper
A file or sandpaper will be necessary to smooth any sharp edges or rough surfaces created during the cutting and drilling process. This will help prevent any accidental injuries when handling the security box and ensure a professional-looking finish. Take your time to carefully file or sand any rough edges until they are smooth and safe to touch.

By having these essential tools on hand, you will be well-prepared to build a secure and durable security box for your trail camera. Remember to follow any additional instructions or guidelines provided by the manufacturer of your camera and materials to ensure optimal results. Happy building!
Selecting the Right Materials for Your Security Box
When building a security box for your trail camera, it is important to select the right materials to ensure durability and effectiveness. Here are some considerations to keep in mind:
1. Metal: Opt for a strong and durable metal like steel or aluminum for the main body of the security box. These materials provide excellent protection against tampering and harsh weather conditions.
2. Thickness: Choose a material with a sufficient thickness to resist bending and breaking. A gauge of 16 or lower is recommended for steel, while 1/8-inch or thicker aluminum is a good choice.
3. Coating: Consider using a weather-resistant coating or paint for added protection against rust and corrosion. This will help prolong the lifespan of your security box.

4. Locking Mechanism: Invest in a high-quality, tamper-proof locking mechanism to secure the security box. Look for options like specialized locks or padlocks that are difficult to pick or break.
5. Ventilation: Ensure that the security box has proper ventilation holes or slots to prevent moisture buildup, which can damage the trail camera. These vents should be small enough to deter insects and critters from entering.
6. Mounting Options: Consider the location where you will be placing the security box and select materials that allow for easy mounting. Look for pre-drilled holes or brackets for convenient installation.
By carefully selecting the right materials for your security box, you can create a sturdy and reliable solution to protect your trail camera from theft and damage.
Measuring and Cutting the Pieces for Your Security Box
Before you can start building your security box for a trail camera, you need to measure and cut the pieces for it. This step is essential to ensure that your box fits perfectly around the camera and provides the necessary security.

1. Gather the Materials
First, gather all the materials you’ll need for this project. You’ll require a sturdy metal sheet, preferably steel, measuring tape, marker, straight edge, and a cutting tool such as a saw or an angle grinder with a metal cutting blade. Make sure to wear appropriate safety gear like gloves and goggles when working with metal.
2. Measure the Dimensions
Next, carefully measure the dimensions of your trail camera. Take into account its length, width, and height. Use a measuring tape and record the measurements accurately.
Note: Take extra care when measuring the camera’s height, as you need to consider any additional protruding features like antennas or buttons.
3. Mark the Metal Sheet
Using a marker and a straight edge, transfer the measurements onto the metal sheet. Make sure to double-check your measurements before marking to avoid any errors. Use a ruler or straight edge to ensure neat and straight lines.
4. Cut the Metal Pieces
Now, using your cutting tool, carefully cut along the marked lines to create the individual metal pieces for your security box. Take your time to make precise cuts and ensure that the edges are smooth.

Tips: If you’re using an angle grinder, use clamps to secure the metal sheet and reduce vibrations. If using a saw, choose a blade with fine teeth for cleaner cuts.
5. File the Edges
After cutting the metal pieces, use a file to smooth out any rough or sharp edges. This will prevent any accidental injuries and ensure a clean finish.
Note: Be cautious while filing and wear gloves to protect your hands from metal shavings and sharp edges.
Once you have measured and cut the pieces for your security box, you are ready to move on to the next step of assembling and securing the box around your trail camera.
Assembling the Frame of Your Security Box
Once you have gathered all the necessary materials for your security box, it’s time to start assembling the frame. The frame will provide the structure and support for your box, keeping your trail camera safe and secure.
Step 1: Measure and cut the metal mesh
Start by measuring the dimensions of your trail camera and add a few inches to each side. This will give you the dimensions for the front, back, and side walls of the security box. Using a pair of heavy-duty metal cutters, cut the metal mesh to the desired size.
Step 2: Bend the mesh into shape
Once the metal mesh is cut to size, use a pair of pliers to carefully bend each side of the mesh to form a rectangular shape. Make sure the corners are aligned and the edges are flush to create a sturdy frame.
Step 3: Secure the corners
Using a drill and metal screws, secure each corner of the frame by drilling through the overlapping edges of the mesh. This will prevent the frame from coming apart and add extra stability to the structure.
Step 4: Attach the top and bottom
Measure and cut additional pieces of metal mesh to create a top and bottom for your security box. Align the edges of the mesh with the corresponding sides of the frame, and secure them in place using metal screws.
Step 5: Add reinforcements
To make your security box even more robust, you can add additional reinforcements. Cut smaller pieces of metal mesh and attach them to the corners and edges of the frame using metal screws. This will provide extra strength and prevent the mesh from bending or warping under pressure.

Step 6: Test the stability
Once the frame is assembled with all the reinforcements, test its stability by gently shaking it. Make sure the frame is sturdy and there are no loose or weak spots. If you notice any issues, go back and reinforce the problematic areas.
By following these steps, you will have successfully assembled the frame of your security box. The next step will be to add a secure locking mechanism and a mounting bracket to attach your trail camera. Stay tuned for the next section of the guide.
Adding Reinforcements to Ensure the Durability of Your Security Box
When building a security box for your trail camera, it is important to consider the durability and strength of the materials used. By adding reinforcements to your security box, you can ensure that it will withstand harsh weather conditions and potential tampering attempts. Here are some ways to reinforce your security box for maximum protection:
|
1. Heavy-Duty Locks: |
Invest in high-quality, heavy-duty locks to secure the access points of your security box. Look for locks with hardened steel shackles and tamper-resistant mechanisms. |
|
2. Steel Plates: |
Reinforce the walls and lid of your security box with steel plates. These plates can be bolted or welded onto the box to provide an additional layer of protection against cutting or prying. |
|
3. Reinforced Corners: |
Strengthen the corners of your security box by using corner braces or angle iron. This will prevent the box from being easily crushed or deformed. |
|
4. Welded Joints: |
If you have access to a welder, consider welding the joints of your security box for added strength and durability. Welding creates a solid bond between the metal pieces, making it difficult for anyone to break or pry open the box. |
|
5. Weatherproof Sealant: |
Apply a weatherproof sealant to all the seams and joints of your security box. This will prevent moisture from seeping into the box, protecting your camera and other equipment from water damage. |
By implementing these reinforcement techniques, you can have peace of mind knowing that your trail camera and other valuable assets are well-protected from theft, vandalism, and the elements.
Creating an Access Panel for the Trail Camera
When building a security box for your trail camera, it’s important to include an access panel that allows you to easily check and retrieve the camera without compromising the security of the box. Here are the steps to create an access panel:
- Measure the dimensions of your trail camera and determine the size of the access panel needed. The panel should be large enough to comfortably fit your hand and allow for easy camera removal.
- Mark the dimensions of the access panel on one side of the security box. Use a ruler or measuring tape to ensure accurate markings.
- Using a drill and an appropriate-sized hole saw, drill a starter hole on one corner of the marked access panel area. This will make it easier to insert a jigsaw blade.
- Carefully cut along the marked lines using a jigsaw. Take your time and follow the lines as closely as possible to ensure a clean and accurate cut.
- Once the access panel has been cut out, smooth out any rough edges or burrs with sandpaper or a file. This will prevent any sharp edges that could cause injury when accessing the camera.
- If desired, create a latch or lock mechanism to secure the access panel. This can be achieved using hinges and a latch, or you can use a padlock or combination lock for added security.
- Test the access panel by opening and closing it to ensure smooth operation. Make any necessary adjustments or modifications if needed.
- Attach the access panel to the security box using screws or bolts, ensuring it is securely fastened.
With the access panel in place, you can easily check and retrieve your trail camera without compromising the security of the box. Remember to always follow local laws and regulations when using trail cameras for security purposes.
Installing the Trail Camera Inside the Security Box
After constructing the security box for your trail camera, the next step is to install the camera itself inside the box. This ensures that your camera is well-protected and less likely to be damaged or tampered with. Follow these steps to properly install the trail camera inside the security box:
1. Prepare the box
Open the security box and check its interior for any debris or sharp edges that could potentially damage the camera. Remove any loose debris and smooth out any rough edges using sandpaper or a file.
2. Secure the camera
Place the trail camera inside the security box, ensuring that it fits snugly. Use the provided mounting hardware or straps to secure the camera in place. Double-check that the camera is securely fastened to prevent it from shifting or falling inside the box.
It is advisable to position the camera in a way that allows it to capture the desired area while minimizing the risk of accidental triggering or interference from tree branches or other objects.
3. Connect the power source
If your trail camera requires a power source, such as batteries or a solar panel, connect it according to the manufacturer’s instructions. Ensure that the power source is securely connected and positioned in a way that does not obstruct the camera’s view or interfere with its operation.
Make sure to use high-quality batteries that provide sufficient power for your camera to operate reliably for an extended period. Replace the batteries promptly when they run out to ensure uninterrupted camera operation.
Once the camera is securely installed inside the security box and connected to a power source, close the box and lock it securely using the provided locks or fasteners. This will help prevent unauthorized access and protect your camera from theft.
Remember to position the security box and camera setup in a location that provides a clear view of the desired surveillance area while remaining discreet and hidden from potential intruders. Regularly check and maintain your camera and security box to ensure optimal performance and longevity.
Securing the Security Box to a Tree or Post
Once you have built the security box for your trail camera, the next step is to secure it to a tree or post in the desired location. This will ensure that the box is stable and not easily tampered with or stolen.
Materials Needed
Before you begin, gather the following materials:
- A sturdy security box with a mounting bracket
- Straps or chains
- Tree or post
- Lock or cable ties
Steps to Secure the Box
Follow these steps to securely attach the box to a tree or post:
- Choose a suitable location for your trail camera. Look for a sturdy tree or post that is located near the area you want to monitor.
- Position the security box against the tree or post, ensuring that the mounting bracket is aligned with the desired angle for capturing footage.
- Wrap straps or chains tightly around the box and the tree or post. Make sure they are secure and cannot be easily removed or cut.
- If using straps, adjust them so that the box is tightly secured but still has enough room for ventilation and the easy removal of the trail camera when needed.
- Use a lock or cable ties to further secure the straps or chains, making it even more difficult for someone to remove the box.
Considerations
When securing the security box to a tree or post, keep the following in mind:
- Choose a location that is well-concealed to minimize the chances of the box being noticed or targeted by thieves.
- Ensure that the tree or post you select is sturdy enough to support the weight of the security box.
- Check the box regularly to make sure it is still securely fastened and has not been tampered with.
| Pros | Cons |
|---|---|
| Provides extra protection for your trail camera by deterring theft and tampering | Requires regular maintenance and checking to ensure the security box remains in place and undamaged |
| Allows for proper positioning and angle adjustment of the trail camera | The security box may be visible to potential thieves, attracting unwanted attention |
| Can be easily removed and reattached when needed | May require additional tools or accessories, such as a lock or cable ties, to ensure maximum security |
By securely fastening the security box to a tree or post, you can have peace of mind knowing that your trail camera is well-protected and will capture the footage you need without any interference.
Camouflaging Your Security Box in the Natural Environment
When it comes to protecting your trail camera from theft and vandalism, camouflage is key. By blending your security box into the natural surroundings, you can make it virtually undetectable. Here are some tips for camouflaging your security box to ensure it goes unnoticed:
- Choose a camouflage pattern that matches the environment where you’ll be placing your trail camera. This could be a woodland, desert, or grassy area. By selecting the right pattern, you can help your security box blend in seamlessly.
- Consider using natural materials to cover your security box. This could be branches, leaves, or even moss. By attaching these materials to the box’s exterior, you can help it blend into the surrounding vegetation.
- Strategically place your security box. Look for areas where the natural environment provides cover and concealment, such as near bushes or behind a tree trunk. By positioning your security box in these areas, you can maximize its camouflage.
- Utilize additional camouflage techniques. Depending on the terrain, you may want to consider using camouflage netting or paint to further disguise your security box. These additional measures can make your box virtually invisible.
- Regularly check and maintain your camouflage. Over time, natural materials may degrade or wither away. It’s essential to regularly inspect and replace any camouflage elements to ensure your security box remains hidden.
By following these tips and taking the time to camouflage your security box properly, you can greatly reduce the risk of it being discovered or tampered with. Remember, the more inconspicuous your security box is, the more effective it will be in protecting your trail camera.
Testing and Checking the Functionality of Your Trail Camera’s Security Box
Once you have built your security box for your trail camera, it is important to test and check its functionality to ensure that it will effectively protect your camera from theft or damage. Here are some steps you can take to test your security box:
1. Fit and Alignment Test
First, check if your trail camera fits securely inside the security box. The camera should fit snugly without any room for movement. Ensure that the camera lens and sensors are properly aligned with the openings in the security box.
2. Lock and Key Test
Next, check if the locks and keys of your security box function properly. Insert the key into the lock and determine if it turns smoothly and effortlessly. Ensure that the lock securely fastens and unlocks without any issues.
3. Strength and Durability Test
Test the strength and durability of your security box by applying pressure and attempting to open it forcefully. The box should remain intact and keep your trail camera protected even under significant pressure.
4. Weather Resistance Test
Expose your security box to different weather conditions, such as rain or extreme heat, to ensure that it remains waterproof and resistant to the elements. Check for any signs of water leakage or damage to the box after exposure.
5. Security Assessment
Assess the security features of your trail camera’s security box. Look for any vulnerabilities or weak points that could potentially be exploited by thieves. Make any necessary adjustments or improvements to enhance its security.
| Test | Result |
|---|---|
| Fit and Alignment Test | Camera fits securely and is properly aligned |
| Lock and Key Test | Lock functions smoothly and securely locks/unlocks |
| Strength and Durability Test | Box remains intact under pressure |
| Weather Resistance Test | No signs of water leakage or damage after exposure |
| Security Assessment | No vulnerabilities or weak points identified |
By thoroughly testing and checking the functionality of your trail camera’s security box, you can have peace of mind knowing that it will effectively protect your camera in various conditions and deter potential thieves.
FAQ,
What materials do I need to build a security box for a trail camera?
To build a security box for a trail camera, you will need a sturdy metal box, hinges, padlocks, screws, and a drill. Additionally, you may want to use camouflage tape or paint to make the box blend in with its surroundings.
Can I use a plastic box instead of a metal one?
While a plastic box may provide some level of protection for your trail camera, it is generally not as secure as a metal box. Plastic may be easier to break or cut through, allowing potential thieves to access your camera. It is recommended to use a metal box for the best security.
How do I attach the security box to a tree?
To attach the security box to a tree, you can use a metal strap or a cable lock. Wrap the strap or cable around the tree trunk and secure it tightly to the box using screws or bolts. Make sure the box is positioned in a way that provides a clear view for your camera while still being securely attached to the tree.
What are the benefits of using a security box for a trail camera?
Using a security box for a trail camera offers several benefits. Firstly, it helps protect your camera from theft or vandalism, as the box acts as a deterrent and is difficult to tamper with. The box also provides added protection from the elements, helping to keep your camera safe and functioning properly. Furthermore, a security box can make your trail camera less noticeable to wildlife, allowing you to capture more natural and undisturbed images.