
In today’s digital age, security cameras have become an essential part of our lives. From protecting our homes and businesses to monitoring public spaces, these devices play a crucial role in ensuring safety and security. While there are several security cameras available in the market, building one from scratch can be an exciting and rewarding project.
Building your own security camera allows you to customize and tailor it to your specific needs. Whether you want to monitor your property remotely or implement advanced features like motion detection and facial recognition, the possibilities are endless. In this article, we will guide you through the process of building a security camera from scratch.
The first step in this project is to gather the necessary components. You will need a Raspberry Pi or similar single-board computer, a camera module, an SD card, and a power supply. Additionally, you may also want to consider a housing to protect your camera from the elements. Once you have all the components, you can proceed with the installation.
Next, you will need to set up the operating system on your Raspberry Pi. You can choose to use a pre-configured operating system like Raspbian, which is specifically designed for the Raspberry Pi. After the installation, you can connect the camera module to the Raspberry Pi’s CSI (Camera Serial Interface) port. Make sure to follow the instructions provided with your camera module for the correct connection.
What is a security camera?
A security camera, also known as a surveillance camera, is a device that captures and records video footage of a specific area or location. It is commonly used for security purposes to monitor and protect both residential and commercial properties.

Security cameras are equipped with sensors, lenses, and image processors that allow them to capture and record videos or images. They can be either wired or wireless and can be installed both indoors and outdoors. Some cameras are designed to be discreet and blend in with the surroundings, while others are more visible to act as a deterrent.
There are different types of security cameras available, including:
1. Closed-Circuit Television (CCTV) Cameras
CCTV cameras are commonly used in surveillance systems to monitor specific areas. They are connected to a closed circuit television system, allowing the footage to be recorded and viewed on a monitor or a digital video recorder.
2. Network Cameras
Network cameras, also known as IP cameras, use the internet to transmit video footage. They can be accessed remotely using a computer or smartphone, making them ideal for monitoring properties from a remote location.
| Pros | Cons |
|---|---|
| Can be accessed remotely | Dependent on internet connectivity |
| Easy to install and set up | May require additional network equipment |
| Ability to integrate with other security systems | Higher cost compared to analog cameras |
Security cameras play a crucial role in deterring criminal activities, capturing evidence, and providing peace of mind to property owners. They have become an integral part of modern security systems and are widely used in homes, businesses, and public areas.
Why build a security camera from scratch?
Building a security camera from scratch can offer several advantages over purchasing a pre-built system. While it may require some technical skills and effort, the benefits can outweigh the challenges.
Customization and Flexibility
By building your own security camera, you have complete control over its features and functionalities. You can customize the camera to suit your specific needs and preferences. This means you can incorporate advanced features such as motion detection, facial recognition, or night vision. The flexibility to tailor the camera to your requirements ensures optimal security for your specific environment.
Cost Savings
Building a security camera from scratch can be more cost-effective compared to purchasing a pre-built system. By sourcing individual components and assembling them yourself, you can save money on labor and markup costs. Additionally, you have the ability to choose components that fit within your budget, making it a more economical option.
Furthermore, as a DIY project, you have the ability to upgrade or expand the camera system over time, allowing you to invest in the latest technologies as your budget allows.
Learning Experience
Building a security camera from scratch provides a valuable learning opportunity. It allows you to gain hands-on experience with various components and technologies involved in a surveillance system. This can deepen your understanding of how security cameras work and enhance your knowledge of electronics and programming.

| Advantages | Disadvantages |
|---|---|
| Customization | Technical skills required |
| Cost savings | Time and effort |
| Learning experience | No technical support |
Choosing the Components
When building a security camera from scratch, it is important to carefully choose the right components to ensure optimal functionality and performance. Here are some key considerations to keep in mind:
Camera Module
The camera module is the heart of any security camera system. It is responsible for capturing the video feed and transmitting it to the monitoring device. When choosing a camera module, it is important to consider factors such as resolution, field of view, low-light performance, and connectivity options. Higher resolution and wider field of view allow for better image quality and a larger surveillance area. Additionally, selecting a camera module with good low-light performance is crucial for capturing clear footage in dark or low-light conditions.
Microcontroller
A microcontroller is a vital component that controls the various functions of the security camera system. It acts as the central processing unit, enabling the camera to perform tasks such as image processing, motion detection, and network communication. When selecting a microcontroller, it is important to look for one that has a sufficient processing power, memory, and input/output capabilities to handle these tasks effectively.
Power Supply
A reliable power supply is essential for ensuring continuous operation of the security camera system. When choosing a power supply, it is important to consider factors such as voltage requirements, power consumption of the components, and backup options. It is recommended to use a power supply with sufficient voltage and current capacity to meet the requirements of all the components. Additionally, having a backup power source, such as a battery or uninterruptible power supply (UPS), can help maintain surveillance even during power outages.
Connectivity Options
The security camera system should have appropriate connectivity options to ensure seamless integration with the monitoring device or network. Depending on the setup requirements, options such as Wi-Fi, Ethernet, or cellular connectivity should be considered. Wi-Fi is a common choice for indoor installations, while Ethernet or cellular connectivity may be preferred for outdoor or remote monitoring setups.

| Component | Considerations |
|---|---|
| Camera Module | Resolution, field of view, low-light performance, connectivity options |
| Microcontroller | Processing power, memory, input/output capabilities |
| Power Supply | Voltage requirements, power consumption, backup options |
| Connectivity Options | Wi-Fi, Ethernet, cellular connectivity |
Camera module
The camera module is an essential component of a security camera system. It is responsible for capturing and recording visual information. The module consists of a lens, image sensor, and other supporting circuitry.
The lens is responsible for focusing and capturing light onto the image sensor. It determines the field of view and the level of detail that can be captured by the camera. A higher quality lens can result in sharper and clearer images.
The image sensor is the heart of the camera module. It converts light into electrical signals, which are then processed by the supporting circuitry. There are two main types of image sensors: CCD (Charge-Coupled Device) and CMOS (Complementary Metal-Oxide-Semiconductor). Each has its advantages and disadvantages, and the choice depends on factors such as cost, image quality, and power consumption.
The supporting circuitry includes components such as analog-to-digital converters, amplifiers, and processors. These components convert the electrical signals from the image sensor into a digital format suitable for storage and processing.
Some camera modules also include features such as autofocus, image stabilization, and low-light capabilities. These features enhance the functionality and performance of the security camera system.

When building a security camera from scratch, it is important to choose a camera module that meets the requirements of the desired application. Factors such as resolution, frame rate, and compatibility should be considered to ensure optimal performance.
Microcontroller
A microcontroller is the brain of a security camera system. It is a small computer on a single integrated circuit (IC). The microcontroller is responsible for controlling and coordinating the various components of the security camera, including the image sensor, lens, and memory storage.
Microcontrollers are designed to be low-cost, low-power, and easy to deploy, making them ideal for security camera applications. They typically have built-in digital input/output pins, analog-to-digital converters, and communication interfaces, which allow them to interface with sensors, store data, and communicate with other devices.
There are many microcontrollers available on the market, each with its own set of features and capabilities. Some popular microcontroller brands include Arduino, Raspberry Pi, and ESP8266. These microcontrollers offer a wide range of programming languages and development environments, making them accessible to beginners and experienced developers alike.
When building a security camera system from scratch, it is important to choose a microcontroller that is compatible with the desired features and functionality. Factors to consider include the number of input/output pins, processing power, memory capacity, and communication capabilities. Additionally, it is important to consider the availability of software libraries and community support for the chosen microcontroller to ensure smooth development and troubleshooting.

In summary, the microcontroller is a crucial component in building a security camera system from scratch. It provides the necessary control and coordination for the various components of the camera, and choosing the right microcontroller is essential for a successful project.
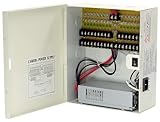
Power supply
When building a security camera from scratch, one crucial component to consider is the power supply. The power supply is responsible for providing the necessary electrical energy to the camera system to function properly. Without a reliable power supply, the security camera may not operate consistently or at all.
Types of Power Supplies
There are several types of power supplies that can be used for a security camera system:
| Type | Description |
|---|---|
| Plug-in power supply | This type of power supply is commonly used for small-scale security camera systems. It plugs directly into a power outlet and provides a constant power source for the camera. |
| PoE (Power over Ethernet) | PoE power supplies are often used for larger-scale security camera systems. This technology allows both data and power to be transmitted through the same Ethernet cable, simplifying installation and reducing the need for additional power outlets. |
| Battery-powered | In cases where there is no access to a power outlet, a battery-powered power supply can be used. These power supplies are portable and can provide temporary power for the security camera system. |
Factors to Consider
When selecting a power supply for your security camera system, it is important to consider the following factors:
- Power requirements: Determine the power needs of your camera system to ensure that the power supply can deliver enough power to support all the cameras.
- Reliability: Choose a power supply from a reputable manufacturer to ensure reliable and consistent power delivery.
- Scalability: If you plan to expand your security camera system in the future, consider a power supply that can accommodate additional cameras.
- Backup power: Consider a power supply that has a built-in backup battery or the ability to connect to an external battery in case of a power outage.
- Installation: Depending on your needs, choose a power supply that is easy to install and configure.
By carefully selecting the right power supply for your security camera system, you can ensure that your cameras will have a stable and continuous power source, allowing them to function effectively in monitoring and protecting your property.

Assembling the Camera
Once you have gathered all the necessary components and tools, you can begin assembling your security camera from scratch. Follow these steps to ensure a successful build:
Step 1: Preparing the Camera Housing
- Open the camera housing and remove any packaging materials.
- Mount the camera lens onto the housing according to the manufacturer’s instructions.
- Attach the camera’s image sensor to the designated spot inside the housing.
- Secure all components in place and ensure they are tightly fastened.
Step 2: Wiring the Camera
Now that the camera housing is ready, you need to connect the necessary wires:
- Identify the power supply wires for the camera. They are typically labeled as positive (+) and negative (-).
- Connect the power supply wires to the camera’s power input using the appropriate connectors.
- If your camera has additional features, such as audio or night vision, refer to the manufacturer’s instructions to connect any required wires.
- Securely fasten all wired connections with electrical tape or connectors to ensure a reliable connection.
Step 3: Installing the Camera System
Now that your camera is wired and ready to go, it’s time to install it:
- Choose a suitable location for your camera, such as a high vantage point overlooking the area you want to monitor.
- Mount the camera housing securely using screws or brackets.
- Ensure the camera is protected from the elements, such as rain or direct sunlight, using a weatherproof housing or cover.
- Adjust the camera’s viewing angle to capture the desired area effectively.
Once you have completed these steps, your security camera is ready to send live video feed to a recording device or display monitor. Remember to test your camera and make any necessary adjustments to achieve optimal performance.
Connecting the camera module
Once you have assembled the hardware components of your security camera, the next step is to connect the camera module. The camera module is a crucial part of the camera, as it contains the lens and sensor that capture images and videos.

To connect the camera module, follow these steps:
- Locate the camera module connector on the camera board. It is typically a small rectangular port.
- Gently insert the ribbon cable from the camera module into the connector, making sure it is properly aligned. Be careful not to bend or damage the cable.
- Secure the ribbon cable by gently pushing down on the tabs on either side of the connector. This will ensure a secure connection.
- Once the camera module is connected, you can attach the camera board to the casing or mounting bracket, if applicable.
It is important to handle the camera module with care, as it is a sensitive component. Avoid dropping or mishandling it to prevent any damage.
Once the camera module is connected, you can proceed with configuring and setting up the software for your security camera.
Connecting the microcontroller
Once you have chosen a microcontroller for your DIY security camera, it’s time to connect it to the other components. The microcontroller will be responsible for processing and controlling the camera’s functions.
Start by identifying the necessary pins on your microcontroller. Typically, you will need to connect the power supply, ground, and data pins. Consult the datasheet or documentation of your microcontroller to find the specific pin configuration.
Next, connect the power supply to the appropriate pins on the microcontroller. This will ensure that your camera has the necessary power to operate. Make sure to connect the positive and negative terminals correctly to avoid any damage to the microcontroller.
After connecting the power supply, connect the ground pins. Ground connections are crucial for establishing a stable electrical reference point. They help prevent electrical noise and ensure the smooth operation of the microcontroller and other components.
Finally, connect the data pins of the microcontroller to the camera module. These pins will be responsible for transmitting and receiving data between the microcontroller and the camera. Follow the pin configuration specified in the camera module’s datasheet or documentation.
Once you have made all the necessary connections, double-check them to ensure they are secure and correctly connected. Loose connections can cause malfunctions or damage to the components.
With the microcontroller properly connected, you are now ready to move on to programming it to perform the desired actions for your security camera.

Powering the camera
To ensure the proper functioning of your security camera, it is crucial to provide it with a reliable power source. There are several options to consider when it comes to powering your camera, each with its own advantages and limitations.
1. AC power
One of the most common ways to power a security camera is by connecting it directly to a traditional AC power outlet. This option provides a stable and continuous power supply, ensuring uninterrupted operation. However, it may require professional installation to ensure proper wiring and compliance with electrical regulations.
2. Batteries
If you need flexibility or have difficulty accessing an AC power source, you can opt for a battery-powered camera. This option eliminates the need for wiring and allows for easy relocation of the camera. However, the batteries need to be periodically recharged or replaced, which can be inconvenient and potentially lead to gaps in surveillance if not managed properly.
3. Solar power
For remote locations or sustainable energy solutions, solar-powered cameras can be a viable choice. These cameras are equipped with solar panels that convert sunlight into electrical energy, providing a continuous source of power. It is an eco-friendly solution that reduces the reliance on external power sources, but it can be more expensive initially and may require additional components, such as batteries or inverters, for uninterrupted operation during cloudy days or nights.
Before selecting a power source for your security camera, assess your specific requirements, such as the camera’s location, accessibility to power outlets, and budget considerations. It is important to choose a reliable and suitable power option to ensure the camera operates efficiently and provides the necessary surveillance for your security needs.
| Power Source | Advantages | Limitations |
|---|---|---|
| AC power | Stable and continuous power supply | May require professional installation |
| Batteries | Flexibility and easy relocation | Requires recharging or battery replacement |
| Solar power | Remote and sustainable energy solution | Higher initial cost and dependency on sunlight |
Programming the Microcontroller
Once you have assembled the necessary hardware components for your security camera, the next step is to program the microcontroller. The microcontroller serves as the brain of the camera, controlling its various functions and operations.
When programming the microcontroller, you will need to consider the specific features and capabilities of the chosen microcontroller. This may include setting up input and output pins, configuring interrupt handlers, and managing memory and storage.
Start by determining the programming language and development environment you will be using. Popular options for programming microcontrollers include C and C++, as well as specialized languages like Arduino’s dialect of C++.
Before writing your code, it is important to define the desired functionality of your security camera. This will guide your programming efforts and help you write clear and concise code.
You will need to break down the camera’s operations into smaller tasks or functions. For example, you may have functions for capturing images, recording video, sending alerts, and handling user inputs.
Once you have identified the functions that your camera needs to perform, you can start writing the code. Begin by including any necessary libraries or header files and defining any global variables.
Next, implement the functions one by one, ensuring that each function performs its intended task correctly. Test each function independently before integrating them into the main program.
Remember to include error handling and exception handling in your code. This will help catch any issues or errors that may occur during the camera’s operation.
Finally, upload the compiled code to the microcontroller and test the camera’s functionality. Make any necessary adjustments or modifications to the code as needed.
Programming the microcontroller is a crucial step in building your security camera from scratch. It allows you to customize the camera’s features and functions to suit your specific needs and requirements.
FAQ,
What are the basic components needed to build a security camera?
To build a security camera from scratch, you will need a camera module, a processor board, storage space (such as an SD card), power supply, and a way to connect to the internet (like Wi-Fi or Ethernet).
How can I connect the security camera to the internet?
You can connect the security camera to the internet by using either Wi-Fi or Ethernet. Wi-Fi allows for wireless connectivity, while Ethernet provides a more stable and reliable wired connection.
Can I use a Raspberry Pi to build a security camera?
Yes, you can use a Raspberry Pi to build a security camera. Raspberry Pi is a popular single-board computer that can be used as the processor board for the camera. You can attach a camera module to the Raspberry Pi and use its GPIO pins for additional functionality.
Is it necessary to have storage space for the security camera?
Yes, it is necessary to have storage space for the security camera. The camera captures video footage that needs to be stored for later viewing or analysis. An SD card is commonly used to provide storage space for the camera.


