Looking for a cost-effective way to enhance the security of your home or office? By utilizing the power of technology, you can easily create your own security camera system using a Canakit Raspberry Pi. This compact and versatile device allows you to monitor your surroundings, deter potential intruders, and have peace of mind knowing that you are in control of your security.
In this article, we will guide you through the step-by-step process of building your very own security camera system using a Canakit Raspberry Pi. Whether you are a tech-savvy enthusiast or a beginner in the world of DIY projects, this guide will provide you with all the information you need to get started.
Why choose Canakit Raspberry Pi as the foundation for your security camera system? Canakit Raspberry Pi is a popular choice among DIY enthusiasts and professionals alike due to its affordability, versatility, and compatibility with a wide range of accessories. This single-board computer packs a powerful punch, allowing you to connect multiple cameras, install various software applications, and customize your security system to suit your specific needs.
What is Canakit Raspberry Pi?
The Canakit Raspberry Pi is a popular option for building a security camera. It is a complete kit that includes a Raspberry Pi board, a power supply, an SD card, a case, and other necessary components. The Canakit Raspberry Pi is designed to be affordable and user-friendly, making it a great choice for beginners.
The Raspberry Pi is a small but powerful single-board computer that can be used for a variety of projects, including building your own security camera. It runs on a Linux-based operating system and can be easily connected to a camera module to capture and record video footage.
Key features of the Canakit Raspberry Pi:
- Includes a Raspberry Pi board: The kit comes with the latest Raspberry Pi model, providing a powerful and efficient platform for your security camera project.
- Complete kit: The Canakit Raspberry Pi includes all the necessary components, such as a power supply, an SD card, a case, and more.
- User-friendly: The kit is designed to be beginner-friendly, with easy setup and installation instructions.
- Affordable: The Canakit Raspberry Pi offers great value for its price, making it accessible to a wide range of users.
With the Canakit Raspberry Pi and a few additional components, you can easily build your own security camera and customize it to fit your specific needs. Whether you want to monitor your home, office, or any other space, the Canakit Raspberry Pi provides a reliable and cost-effective solution.
Why Build a Security Camera?
Building your own security camera using a Canakit Raspberry Pi can provide numerous benefits and advantages.
Firstly, it allows you to have full control over your security system. You can customize and configure the camera according to your specific needs, ensuring that it meets your security requirements. This flexibility allows you to set up the camera in different locations, adjust its settings, and monitor specific areas or angles as per your preferences.
Secondly, building a security camera with a Raspberry Pi is a cost-effective solution. Raspberry Pi boards are affordable and readily available, making the overall project cost significantly lower than purchasing a commercial security camera. It is a great option for those on a budget or for DIY enthusiasts who enjoy building and tinkering with electronics.
Another advantage is that it offers a high level of privacy and data security. By building your own camera, you have full control over the data it collects, ensuring that your footage is not accessible to external parties or vulnerable to hacking. This is particularly important for individuals or organizations who prioritize privacy and want to have a secure surveillance system.

Furthermore, assembling your own security camera can be a fun and educational project. It allows you to gain valuable knowledge and hands-on experience in areas such as electronics, coding, and network setup. The process of building and configuring the camera can be a rewarding learning experience and empower you to tackle more complex DIY projects in the future.
In conclusion, building a security camera with a Canakit Raspberry Pi is an excellent choice due to the control, customization, cost-effectiveness, privacy, and educational benefits it offers. Whether you are looking to enhance your home security or learn more about electronics, this DIY project provides a practical and rewarding solution.
Choosing the Right Components
Building a security camera with a CanaKit Raspberry Pi requires careful consideration of the components you select. Here are some key factors to keep in mind when choosing the right components for your project:
1. Raspberry Pi Model
The first and most important component to consider is the Raspberry Pi model. Depending on the specific requirements of your security camera, you may opt for a Raspberry Pi Zero, Raspberry Pi 3, or Raspberry Pi 4. Each model has its own set of capabilities, so it’s crucial to choose the one that best suits your needs.
2. Camera Module
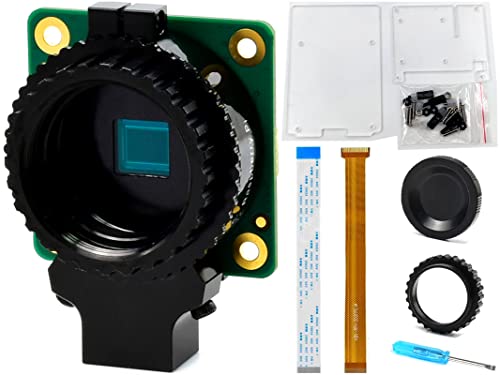
The camera module is another essential component for your security camera. The Raspberry Pi Camera Module V2 is a popular choice among enthusiasts due to its compact size and excellent image quality. However, if you need more advanced features such as night vision or higher resolution, you may consider other camera modules compatible with the Raspberry Pi.

3. Power Supply
Ensuring a reliable power supply is crucial for the continuous operation of your security camera. It is recommended to use a high-quality micro USB power supply that is compatible with your Raspberry Pi model. Make sure to check the power requirements of your components and choose a power supply with sufficient capacity.
4. Storage
To store the captured video footage or images, you will need to decide on the storage solution. You can use a microSD card to store the data directly on the Raspberry Pi, but keep in mind that it has limited capacity. Alternatively, you can connect an external hard drive or use cloud storage for added flexibility and capacity.
5. Enclosure
Consider the environment where your security camera will be installed. Depending on whether it will be indoors or outdoors, you may need an enclosure to protect the components from dust, moisture, or extreme temperatures. Look for waterproof and dustproof enclosures that are compatible with your chosen Raspberry Pi model and camera module.
By carefully selecting the right components for your security camera, you can ensure optimal performance and functionality. Take your time to research and choose the components that best fit your specific requirements and budget. This will help you build a reliable and effective security camera using a CanaKit Raspberry Pi.
What You’ll Need
- A CanaKit Raspberry Pi or any Raspberry Pi model
- A Micro SD card with at least 16GB of storage
- A power adapter for the Raspberry Pi
- An HDMI cable
- A USB keyboard and mouse
- A monitor or TV with HDMI input
- An Ethernet cable or Wi-Fi adapter
- A USB webcam or Raspberry Pi camera module
- Wires for connecting the camera module (if using)
- A suitable case for your Raspberry Pi
With these components, you will have everything you need to build your own security camera using the CanaKit Raspberry Pi or any other Raspberry Pi model.

Understanding the Raspberry Pi
The Raspberry Pi is a small single-board computer that has gained popularity for its versatility and affordability. It was developed by the Raspberry Pi Foundation with the aim of promoting the teaching of basic computer science skills in schools.
Features
The Raspberry Pi comes equipped with multiple features that make it an excellent choice for various projects:
- Processor: The Raspberry Pi is powered by a Broadcom processor, which provides sufficient processing power for most tasks.
- Memory: It has different models with varying memory capacities, allowing users to choose the one that suits their needs.
- GPIO: General Purpose Input/Output pins allow users to connect various hardware components and peripherals to the Raspberry Pi.
- Connectivity: The Raspberry Pi has built-in Ethernet and USB ports, as well as Wi-Fi and Bluetooth capabilities.
Operating System
The Raspberry Pi supports different operating systems, including:
- Raspberry Pi OS: This is the official operating system for the Raspberry Pi, based on the Linux kernel.
- Ubuntu: It is possible to install Ubuntu on the Raspberry Pi, allowing users to benefit from its extensive software ecosystem.
- Windows 10 IoT Core: Microsoft’s operating system designed specifically for Internet of Things (IoT) devices.
Note: It is essential to choose an operating system that is compatible with the specific model of the Raspberry Pi being used.
Applications
Due to its versatility, the Raspberry Pi can be used in a wide range of projects, including:

- Home automation: The Raspberry Pi can control various smart home devices, such as lights, thermostats, and security systems.
- Media center: By connecting the Raspberry Pi to a TV, users can transform it into a media center to stream movies, TV shows, and music.
- Robotics: The Raspberry Pi provides an affordable platform for building and programming robots.
- IoT projects: With its connectivity options, the Raspberry Pi is ideal for creating Internet of Things projects like smart weather stations and home security systems.
In conclusion, the Raspberry Pi is a versatile and affordable single-board computer that can be used for various projects. Its features, operating system options, and applications make it an attractive choice for both beginners and experienced makers.
Setting Up Your Raspberry Pi
Step 1: Download the latest version of the Raspberry Pi operating system from the official website.
Step 2: Insert the microSD card into your computer and format it using the SD Card Formatter tool.
Step 3: Use the Raspberry Pi Imager tool to write the operating system to the microSD card.
Step 4: Insert the microSD card into the Raspberry Pi and connect it to a power source.

Step 5: Connect a monitor, keyboard, and mouse to the Raspberry Pi using the HDMI and USB ports.
Step 6: Turn on the Raspberry Pi and follow the on-screen instructions to set up the operating system.
Step 7: Once the setup is complete, open the Terminal and update the Raspberry Pi software using the following commands:
$ sudo apt-get update
$ sudo apt-get upgrade

Step 8: Install any necessary software packages for your security camera project using the Terminal and relevant install commands provided by the software documentation.
Step 9: Configure the Raspberry Pi to connect to your local network and enable SSH for remote access if desired.
Step 10: Test the functionality of your security camera setup by accessing the camera feed and adjusting any settings as needed.
Note: Make sure to follow proper security practices, such as changing default passwords and securing your network, to protect your Raspberry Pi and camera system.
Installing the Operating System
Before setting up your security camera with CanaKit Raspberry Pi, you need to install the operating system on your Raspberry Pi. The operating system for Raspberry Pi is called Raspbian, which is based on the Linux distribution, Debian.

Step 1: Download Raspbian
Start by downloading the Raspbian image file from the official Raspberry Pi website. Make sure to choose the version compatible with your Raspberry Pi model. It is recommended to download the “Raspbian Buster with desktop and recommended software” for a complete experience.
Step 2: Flash the Image to a MicroSD Card
Once you have downloaded the Raspbian image file, you will need to flash it to a microSD card. You can use tools such as Etcher or Win32 Disk Imager to do this. Insert the microSD card into your computer and open the chosen tool. Choose the Raspbian image file and the microSD card, then start the flashing process.
Step 3: Set Up the Raspberry Pi
After flashing the image to the microSD card, insert the card into the Raspberry Pi. Connect the Raspberry Pi to a power source and a monitor using the HDMI cable. You will also need a USB keyboard and a mouse to navigate through the setup process. Plug them into the USB ports of the Raspberry Pi.
Turn on the Raspberry Pi, and the Raspbian desktop will appear on the monitor. Follow the on-screen instructions to set up the language, Wi-Fi, and other preferences.
Step 4: Update the System
Once you have completed the initial setup, it is important to update the operating system to ensure that you have the latest security patches and improvements. Open the Terminal on the Raspberry Pi and run the following commands:
| Command | Description |
|---|---|
| sudo apt update | Updates the package lists for upgrades and new installations. |
| sudo apt upgrade | Upgrades all installed packages to their latest versions. |
Wait for the updates to complete, and then restart the Raspberry Pi.
Connecting the Camera Module
The Raspberry Pi Camera Module is a popular choice for building a security camera project. It’s a small and affordable camera that can capture high-quality images and videos.
Step 1: Power off your Raspberry Pi
Before connecting the camera module, make sure to power off your Raspberry Pi to avoid any potential damage.
Step 2: Locate the CSI port
The Camera Serial Interface (CSI) port is where you will connect the camera module. On most Raspberry Pi models, including the Canakit Raspberry Pi, the CSI port is located next to the HDMI port. It is a rectangular-shaped connector with a latch.
Step 3: Connect the camera module
To connect the camera module, gently lift the latch on the CSI port. Align the camera module’s flex cable with the gold contacts facing towards the HDMI port. Slide the flex cable into the CSI port, making sure it is fully inserted. Once inserted, close the latch to secure the connection.

Ensure that the connection is secure and the flex cable is not twisted or bent, as this can cause issues with the camera module.
Step 4: Power on your Raspberry Pi
After connecting the camera module, you can power on your Raspberry Pi. The camera module should be recognized automatically, and you can start using it to capture images and videos.
Note that you may need to enable the camera module in the Raspberry Pi’s configuration settings if it is not enabled by default. You can do this by running the raspi-config command and navigating to the interface options.
With the camera module successfully connected, you are now ready to proceed with setting up the software and configuring your security camera project.
Building the Security Camera
To build a security camera using the CanaKit Raspberry Pi, follow these steps:
1. Set up your Raspberry Pi by connecting it to a monitor, keyboard, and mouse. Install the operating system and update it to the latest version.
2. Connect the Raspberry Pi camera module to the Raspberry Pi board. Make sure it is securely attached.
3. Install the necessary software by opening the Terminal and typing the following command: sudo apt-get install motion. This software allows the Raspberry Pi to capture and analyze video footage.
4. Configure the motion software by editing the configuration file. Open the Terminal and type: sudo nano /etc/motion/motion.conf. Adjust the settings according to your preferences, such as video resolution and detection sensitivity.
5. Save the configuration file by pressing Ctrl + X, then Y, and finally Enter.
6. Start the motion software by typing the following command in the Terminal: sudo service motion start. The Raspberry Pi is now ready to capture video footage.
7. Access the video feed from a web browser on another device by entering the IP address of the Raspberry Pi followed by the port number (default is 8081). For example, 192.168.1.100:8081.
8. To view recorded footage, navigate to the specified directory in the motion configuration file. By default, it is /var/lib/motion.
That’s it! You have successfully built a security camera using the CanaKit Raspberry Pi. You can now monitor your surroundings and review recorded footage for added security and peace of mind.
Configuring the Camera
To build a security camera using the Canakit Raspberry Pi, you will need to properly configure the camera module. Follow these steps:
- Connect the camera module to the Raspberry Pi’s CSI (Camera Serial Interface) port. This port is located next to the HDMI port on the Raspberry Pi board.
- Make sure the Raspberry Pi is powered off before connecting the camera module.
- Once the camera module is connected, power on the Raspberry Pi.
- Open the terminal on the Raspberry Pi and enter the following command:
sudo raspi-config - In the raspi-config menu, use the arrow keys to navigate and select “Interfacing Options”.
- Select “Camera” and press Enter.
- When prompted, select “Yes” to enable the camera interface.
- Exit the raspi-config menu and reboot the Raspberry Pi.
After following these steps, the camera module will be properly configured and ready to use. You can now begin programming and testing your security camera application.
Note: It’s important to handle the camera module with care and avoid touching the lens to prevent any smudges or scratches that may affect the image quality.
Remember to always respect the privacy of others when using a security camera and abide by any laws or regulations regarding surveillance in your area.
FAQ,
What is CanaKit Raspberry Pi?
CanaKit Raspberry Pi is a complete starter kit that includes the Raspberry Pi board, power supply, case, and other essential components. It is designed to provide beginners with everything they need to get started with Raspberry Pi projects.
Why would I want to build a security camera with Raspberry Pi?
Building a security camera with Raspberry Pi allows you to have a cost-effective and customizable surveillance solution. You can monitor your home or office remotely, receive notifications on your smartphone, and even integrate additional features like motion detection or facial recognition.
What components do I need to build a security camera with CanaKit Raspberry Pi?
To build a security camera with CanaKit Raspberry Pi, you will need a Raspberry Pi board, a Raspberry Pi camera module, a microSD card, a power supply, a case, and an internet connection. Additionally, you may need some cables, a monitor, and a keyboard for the initial setup.


