Building your own first-person view (FPV) drone can be an exciting and rewarding experience. FPV drones allow you to place yourself in the pilot’s seat, experiencing the thrill of flying as if you were right there in the cockpit. Whether you are a hobbyist looking for a new project or an aspiring drone racer, building your own FPV drone gives you more control over its specifications, performance, and customization options.
Before diving into the build process, it is essential to familiarize yourself with the components that make up an FPV drone. The key components include the frame, motors, electronic speed controllers (ESCs), flight controller, camera, transmitter, receiver, and FPV goggles. Each component plays a vital role in the overall functionality and performance of the drone, so it is crucial to choose high-quality components that suit your needs and budget.
Once you have gathered all the necessary components, the next step is to assemble the drone. Start by attaching the motors to the frame, ensuring they are secure and aligned correctly. Then, connect the ESCs to the motors and the flight controller. Make sure to follow the manufacturer’s instructions for wiring and soldering to ensure proper connectivity.
After the physical assembly is complete, it is time to configure the drone’s settings. This involves connecting the flight controller to a computer and using software to set up the flight modes, controls, and other parameters. Make sure to calibrate the sensors and perform a test flight to ensure the drone is responding correctly to your inputs.
Once the drone is fully assembled and configured, it is time to gear up for the FPV experience. Put on your FPV goggles, power up the drone, and get ready for an immersive flying experience like no other. Be sure to start in an open and safe area, away from obstacles and people, to ensure a smooth and enjoyable flight.
Remember, building an FPV drone is not only about the technical aspects; it is also about the thrill and joy of flying. So, take your time, enjoy the process, and have fun as you embark on your journey to build and fly your own FPV drone.
The Basics of FPV Drones
FPV drones, or First Person View drones, have gained popularity in recent years for their immersive flying experience. In this article, we’ll explore the basics of FPV drones and how to build one.
What is an FPV Drone?
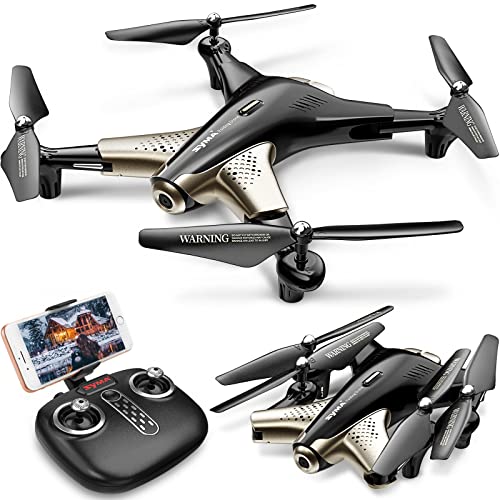
An FPV drone is a type of drone that allows the pilot to see the drone’s flight from a first-person perspective using a live video feed. Unlike traditional drones that rely on line-of-sight flying, FPV drones use onboard cameras and video transmitters to send the live feed to a pair of goggles or a monitor that the pilot wears or uses to navigate.
Components of an FPV Drone
Building an FPV drone involves several key components:
- Frame: The frame is the structural foundation of the drone. It should be durable and lightweight to ensure stability and maneuverability during flight.
- Flight Controller: The flight controller is the brain of the drone; it controls the motors, receives inputs from the pilot, and helps stabilize the drone.
- ESCs: Electronic Speed Controllers (ESCs) regulate the speed of the motors and translate the flight controller’s commands into motor movements.
- Propellers: Propellers generate the lift and propulsion needed for the drone to fly. They come in various sizes and pitches.
- FPV Camera: The FPV camera captures the live video feed and transmits it to the pilot’s goggles or monitor. It should have a wide field of view and high image quality.
- Video Transmitter: The video transmitter sends the live video feed from the FPV camera to the pilot’s goggles or monitor. It should have sufficient transmission power and range.
- FPV Goggles or Monitor: The pilot uses FPV goggles or a monitor to view the live video feed from the drone. Goggles provide a more immersive experience, while a monitor offers convenience.
- Battery: The battery provides power to the drone’s motors and electronics. It should have enough capacity to support the flight duration.
- Radio Transmitter and Receiver: The radio transmitter allows the pilot to control the drone’s movements, while the receiver receives the pilot’s commands and relays them to the flight controller.
These are some of the essential components required to build an FPV drone. Additional components such as an antenna, GPS module, and OSD (On-Screen Display) can be added for extended functionality and features.
In conclusion, FPV drones provide an immersive flying experience and require specific components to build. Understanding these basics is crucial for successfully constructing an FPV drone.
Choosing the Right Components
When it comes to building an FPV drone, choosing the right components is essential for a successful and enjoyable flying experience. Each component plays a crucial role in the overall performance and functionality of the drone, so it’s important to understand what each component does and how it affects the drone’s performance.
Flight Controller
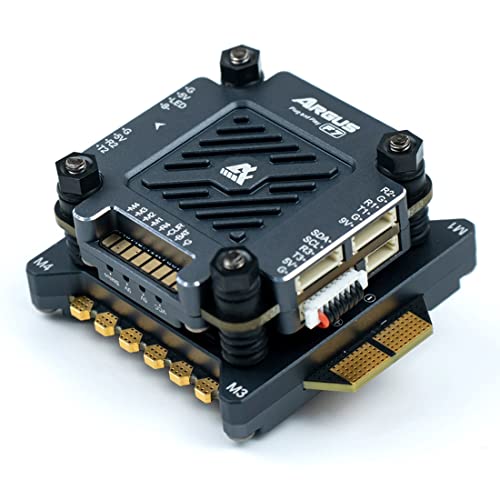
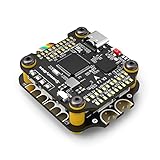
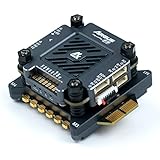
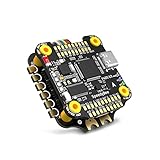
The flight controller is like the brain of the drone. It receives input from the pilot and other sensors and controls the motors accordingly. When choosing a flight controller, it’s important to consider factors such as processing power, support for different firmware, and ease of configuration. Some popular flight controllers include the Betaflight F4, F7, and the Kakute F7.
Electronic Speed Controllers (ESCs)
ESCs are responsible for controlling the speed of the motors. They receive signals from the flight controller and translate them into commands that the motors can understand. When selecting ESCs, factors such as voltage and current ratings, motor compatibility, and firmware support should be considered. Some popular ESCs include the BLHeli_S and BLHeli_32.
FPV Camera
The FPV camera provides real-time video feed to the pilot, allowing them to navigate the drone from a first-person perspective. Factors to consider when choosing an FPV camera include image quality, resolution, field of view, and compatibility with the video transmitter. Popular FPV camera brands include Foxeer, Runcam, and Caddx.

Video Transmitter (VTx)
The VTx is responsible for transmitting the video feed from the FPV camera to the pilot’s goggles or monitor. It’s important to choose a VTx that supports the desired frequency band and power output. Popular VTx brands include TBS, AKK, and RushFPV.
Radio Transmitter and Receiver
The radio transmitter and receiver are essential for controlling the drone. When choosing a radio system, factors such as range, reliability, and compatibility with the flight controller should be considered. Popular radio transmitter brands include FrSky, Flysky, and TBS.
Battery and Charger
The battery is what powers the drone. When selecting a battery, factors such as capacity, voltage, and discharge rate should be considered. Additionally, a reliable charger capable of properly charging the batteries is essential. Popular battery and charger brands include Tattu, CNHL, and iSDT.
| Component | Considerations | Popular Brands |
|---|---|---|
| Flight Controller | – Processing power – Firmware support – Configuration ease |
Betaflight F4, F7 Kakute F7 |
| Electronic Speed Controllers (ESCs) | – Voltage and current ratings – Motor compatibility – Firmware support |
BLHeli_S BLHeli_32 |
| FPV Camera | – Image quality – Resolution – Field of view |
Foxeer Runcam Caddx |
| Video Transmitter (VTx) | – Frequency band support – Power output |
TBS AKK RushFPV |
| Radio Transmitter and Receiver | – Range – Reliability – Compatibility |
FrSky Flysky TBS |
| Battery and Charger | – Capacity – Voltage – Discharge rate |
Tattu CNHL iSDT |
Building the Frame
When it comes to building an FPV drone, one of the most important aspects is the frame. The frame provides the structural support for the entire drone and holds all the components together. Choosing the right frame is crucial for the performance and durability of your drone.
1. Frame Materials
There are various materials to consider when selecting a frame for your FPV drone. The most common options are carbon fiber, aluminum, and plastic. Carbon fiber frames are lightweight and offer excellent strength, making them a popular choice among FPV drone builders. Aluminum frames are also strong, but they can be heavier than carbon fiber. Plastic frames are more affordable and can be a good option for beginners.

2. Frame Design
Frame design plays a vital role in the flight characteristics and agility of your FPV drone. There are three main design types to consider:
- X-Frame: This design offers a symmetrical shape with the center of gravity in the middle, providing a well-balanced flight experience.
- H-Frame: This design resembles the letter “H,” with the arms extending outwards. H-frames are known for their stability and durability.
- True-X Frame: This design has equal motor-to-motor distances, creating a balanced flight experience. True-X frames are popular for freestyle flying.
Consider your flying style and the type of maneuvers you want to perform when choosing the frame design.
It’s essential to ensure that the frame size is compatible with your chosen flight controller, motors, and propellers. Most FPV frames come in different sizes, such as 5-inch, 6-inch, or 7-inch, so choose the appropriate frame size based on your components.
When building the frame, make sure to follow the manufacturer’s instructions and use the provided screws and standoffs. It’s crucial to secure all the components properly to avoid any vibration or instability issues during flight.
Building the frame is a critical step in the process of building an FPV drone. Take your time to research and select the right frame that suits your needs and flying style. A well-built frame will provide a solid foundation for the rest of your drone components.

Installing the Electronics
Once you have gathered all the necessary components for your FPV drone, it’s time to install the electronics. This step is crucial as it involves connecting all the different parts that make up the core of your drone.
1. Flight Controller
The first component to install is the flight controller. This is the brain of your drone and controls its flight behavior. Start by placing the flight controller in the designated location on your frame, usually at the center. Make sure to mount it securely using zip ties or screws.
2. ESCs
Next, you’ll need to install the electronic speed controllers (ESCs). These are responsible for controlling the speed of each motor. Connect each ESC to the corresponding motor, ensuring that the rotation direction matches. Securely mount the ESCs to the arms of your frame using double-sided sticky tape or zip ties.
3. Power Distribution Board
The power distribution board (PDB) is responsible for distributing power from the battery to the flight controller and other electronics. Connect the main battery leads to the PDB and then connect the flight controller and ESCs to the appropriate outputs on the PDB. Make sure all connections are secure and well-insulated.
4. Cameras and VTX
If you’re planning to use FPV (first-person view) capabilities, you’ll need to install a camera and video transmitter (VTX). Mount the camera securely on your frame, preferably with an adjustable mount for optimal angle adjustment. Connect the camera to the VTX, and then connect the VTX to the flight controller for control and power.
5. Receiver
If you’re using a radio controller, you’ll need to install a receiver. Connect the receiver to the flight controller, following the manufacturer’s instructions. Ensure that the receiver is securely mounted and that all antenna wires are properly positioned.
6. GPS module (optional)
If you want to add GPS capabilities to your drone for autonomous flight or return-to-home functionality, you can install a GPS module. Connect the GPS module to the flight controller, usually using a serial connection. Make sure the GPS module has a clear view of the sky for optimal performance.
Once you have installed all the electronics, double-check all the connections to ensure they are secure and properly connected. Test each component individually before attempting a test flight to minimize any potential issues or failures.
| Component | Installation Steps |
|---|---|
| Flight Controller | 1. Place the flight controller in the designated location on the frame. 2. Securely mount the flight controller using zip ties or screws. |
| ESCs | 1. Connect each ESC to the corresponding motor. 2. Securely mount the ESCs to the arms of the frame using sticky tape or zip ties. |
| Power Distribution Board | 1. Connect the main battery leads to the PDB. 2. Connect the flight controller and ESCs to the appropriate outputs on the PDB. |
| Cameras and VTX | 1. Mount the camera securely on the frame. 2. Connect the camera to the VTX. 3. Connect the VTX to the flight controller. |
| Receiver | 1. Connect the receiver to the flight controller. 2. Ensure the receiver is securely mounted and antenna wires are properly positioned. |
| GPS module (optional) | 1. Connect the GPS module to the flight controller using a serial connection. 2. Ensure the GPS module has a clear view of the sky. |
Calibrating and Testing
Once you have assembled your FPV drone, it is important to calibrate and test it before taking it for a flight. Calibration ensures that all the components are functioning properly and allows you to fine-tune the settings for optimal performance.
The first step in the calibration process is to check the center of gravity by balancing the drone on a flat surface. This ensures that the weight distribution is equal on all sides and prevents any unwanted tilting during flight.

Next, you need to calibrate the electronic speed controllers (ESCs) to ensure that they are synchronized with the flight controller. This can be done by connecting the drone to a computer or transmitter and following the manufacturer’s instructions for ESC calibration.
After calibrating the ESCs, it is necessary to test the motors to ensure they are rotating correctly. You can do this by gently increasing the throttle and observing the rotation of each motor. If any motor is not spinning in the correct direction, you will need to swap the motor wires to reverse the rotation.
Once the motors are tested, you can proceed to test the flight controller and other electronic components. This involves connecting the drone to a computer or transmitter and performing a series of tests such as checking the gyroscopes, accelerometer, and receiver signal.
Finally, it is important to perform a pre-flight check by ensuring that all the controls are working correctly and the video transmission is clear. You should also check the GPS signal if your drone is equipped with GPS functionality.
By following these steps and thoroughly calibrating and testing your FPV drone, you can ensure a safe and successful flight experience.
Troubleshooting and Maintenance
Building and flying an FPV drone can be an exciting and rewarding experience. However, like any piece of technology, drones can sometimes encounter issues that require troubleshooting and maintenance. Here are some common problems you may encounter and how to address them:
Loss of Video Signal
If you suddenly lose video signal while flying your FPV drone, there are a few potential causes. First, check the connections between your FPV camera, transmitter, and receiver. Ensure that all cables are securely plugged in and that there are no loose connections. If the issue persists, try replacing the antennas on your transmitter and receiver as they may be damaged or not properly tuned. Additionally, interference from other electronic devices or environmental factors such as nearby metal structures can also cause signal loss.
Poor Flight Performance
If your drone is not flying as expected, it may be due to incorrect motor direction or propeller installation. Make sure that your motors are spinning in the correct direction – all motors should spin clockwise or counterclockwise. If they are not, you may need to adjust the motor direction in the flight controller software. Additionally, check that your propellers are securely fastened and not damaged. Unbalanced or damaged propellers can cause vibrations and affect flight performance.
| Problem | Solution |
|---|---|
| Unstable Flight | Check the flight controller settings and calibrate the gyro if necessary. Ensure that your drone’s center of gravity is properly balanced and that all components are securely fastened. |
| Poor Battery Life | Make sure you are using a high-quality battery that is compatible with your drone. Check the voltage and capacity of the battery and consider upgrading to a higher capacity if needed. Avoid overcharging or deep discharging the battery as it can shorten its lifespan. |
| Motor Overheating | Inspect the motor for any debris or obstructions that may be causing excessive heat. Ensure that the motor’s cooling system is functioning properly. If the problem persists, consider upgrading to a motor with a higher heat dissipation capacity. |
Regular maintenance is crucial for keeping your FPV drone in optimal condition. Here are some maintenance tips:
Clean Your Drone
After every flight, clean your drone to remove any dust, dirt, or debris that may have accumulated. Use a soft brush or compressed air to clean the frame, motors, and propellers. Avoid using water or harsh chemicals as they can damage the electronics.
Inspect and Tighten Screws
Regularly inspect all the screws and fasteners on your drone and ensure that they are tightened properly. Loose screws can cause vibrations and affect flight performance.
By following these troubleshooting tips and performing regular maintenance, you can enjoy a smoother and more reliable FPV drone flying experience.
Question-answer:
What is an FPV drone?
An FPV (First Person View) drone is a remotely controlled quadcopter equipped with a camera that allows the pilot to view the drone’s flight in real-time through goggles or a screen.
What are the components required to build an FPV drone?
To build an FPV drone, you will need a frame, motors, electronic speed controllers (ESCs), flight controller, camera, video transmitter, receiver, battery, and propellers.
Can I use any type of frame for building an FPV drone?
It is recommended to use a frame specifically designed for FPV drones as they are lightweight, durable, and provide optimal space and mounting options for the other components. However, you can use other types of frames with modifications.