
Have you accidentally cracked the rear camera glass on your iPhone 7 Plus? Don’t worry, you’re not alone. Many iPhone users have faced this issue, but the good news is that you can easily replace the rear camera glass yourself. In this guide, we will walk you through the step-by-step process of changing the rear camera glass on your iPhone 7 Plus.
Why should you replace the rear camera glass?
The rear camera glass on your iPhone 7 Plus not only protects the camera lens but also plays a crucial role in capturing high-quality photos and videos. If it gets cracked or damaged, it can significantly affect the camera’s performance, resulting in blurry or distorted images. It’s important to replace the rear camera glass as soon as possible to ensure that your iPhone’s camera functions optimally.
Please note: Before you proceed with replacing the rear camera glass, make sure you have the necessary tools and a replacement camera glass. You can easily find camera glass replacement kits online or at your nearest electronics store.
Step 1: Prepare your workspace

Before you begin, find a clean and well-lit area to work in. It’s important to have a clutter-free workspace to avoid losing any small screws or parts during the process. Gather all the necessary tools, such as a screwdriver set, tweezers, and a suction cup, and keep them within reach.
Now that you’re ready to start, let’s move on to the next step in replacing the rear camera glass on your iPhone 7 Plus.
Prepare for repair
Before you begin repairing the rear camera glass on your iPhone 7 Plus, make sure you have all the necessary tools and materials ready. This will ensure a smooth and efficient repair process.
Tools you will need:
- Small screwdriver set
- Plastic opening tools
- Suction cup
- Tweezers
- Adhesive strips
Materials you will need:
- Replacement rear camera glass
- Cleaning solution or isopropyl alcohol
- Microfiber cloth
Ensure you have a clean and well-lit workspace before starting the repair process. It’s also a good idea to have a magnetic tray or mat for organizing and keeping track of small screws and components.
If you are unsure about any step of the repair process, it’s recommended to consult a professional or refer to online guides and tutorials for assistance. Taking your time and following the instructions carefully will help prevent any further damage to your device.
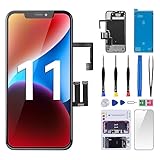
Tools you’ll need
Before you start replacing the rear camera glass on your iPhone 7 Plus, make sure you have the following tools:
-
Replacement Camera Glass:
Make sure you have the correct replacement camera glass for your iPhone 7 Plus. You can purchase this online or from a reputable mobile parts supplier.
-
Flathead Screwdriver:
You’ll need a small flathead Screwdriver to remove the screws holding the rear camera frame in place.
-
Plastic Pry Tool:
A plastic pry tool is useful for gently prying open the back cover without damaging the phone’s frame or glass.
-
Tweezers:
Tweezers will help you handle small parts and screws more easily.
-
Adhesive Strips:
You’ll need adhesive strips to secure the new camera glass in place.
-
Cleaning Cloth:
A clean, lint-free cloth will help you clean the camera lens and remove any fingerprints or debris.
-
Heat Gun or Hair Dryer:
Using a heat gun or hair dryer can help loosen the adhesive holding the rear camera glass in place.
-
Isopropyl Alcohol:
You’ll need isopropyl alcohol to clean any adhesive residue left behind after removing the old camera glass.
Having these tools ready before you start the replacement process will make the job much easier and ensure you have everything you need to complete the task successfully.
Turn off your iPhone
Before attempting to change the rear camera glass on your iPhone 7 Plus, it’s important to turn off the device to avoid any potential damage or accidents. Follow these steps to turn off your iPhone:
- Press and hold the power button located on the right side or top of your iPhone.
- Slide the “slide to power off” switch from left to right.
- Wait for a few seconds until your iPhone completely shuts down.
By turning off your iPhone, you ensure that there is no power running through the device during the camera glass replacement process. This helps prevent any potential short-circuits or damage to the internal components.
Remove existing camera glass
To change the rear camera glass on your iPhone 7 Plus, you will first need to remove the existing glass. Follow these steps:

Step 1: Gather necessary tools
Before you begin, gather the following tools:
- Precision screwdriver set
- Suction cup
- Plastic pry tool
- Tweezers
- Cleaning cloth
Step 2: Power off your iPhone
Before working on any electronics, it’s important to power off the device. Press and hold the power button until “slide to power off” appears, then slide to power off your iPhone.
Step 3: Remove the rear cover
Use the pentalobe screwdriver from your precision screwdriver set to remove the two screws located at the bottom of the iPhone. Place the suction cup near the home button and gently pull up, creating a small gap between the display assembly and the rear case. Insert the plastic pry tool into the gap and carefully detach the clips securing the rear cover.
Step 4: Disconnect the camera connector
Once the rear cover is removed, locate the camera connector near the top of the iPhone. Use the plastic pry tool to gently lift the connector and disconnect it from the motherboard.
Step 5: Remove the adhesive and glass
Using the plastic pry tool, carefully peel off the adhesive holding the camera glass in place. Once the adhesive is removed, use the tweezers to lift and remove the old camera glass.

Step 6: Clean the surface
Before installing the new camera glass, make sure to clean the surface using the cleaning cloth. This will ensure a proper bond between the adhesive and the new glass.
Now that you have successfully removed the existing camera glass, you are ready to proceed with installing the new glass. Refer to the manufacturer’s instructions or a reliable repair guide for the specific steps on how to install the replacement camera glass. Remember to be gentle and take your time during the removal process to avoid damaging any components of your iPhone 7 Plus.
Heat the lens cover
Before removing the lens cover, you’ll need to heat it to soften the adhesive and make it easier to remove. Here’s how:
- Begin by heating the back of the iPhone using a hairdryer or a heat gun on a low setting. Be careful not to overheat the device as excessive heat can damage internal components.
- Focus the heat on the area around the lens cover for about 1-2 minutes to ensure the adhesive is adequately softened.
- Once heated, use a suction cup or a strong adhesive tape to lift the lens cover gently.
- If the lens cover doesn’t come off easily, apply more heat and try again. It’s important to be patient and gentle to avoid damaging the camera or the lens cover.
Remember to avoid touching the lens cover with your fingers as this can leave smudges or fingerprints that may affect the camera’s performance.
Remove the broken lens cover
To begin, make sure your iPhone 7 Plus is powered off. This will minimize the risk of damaging the internal components while replacing the rear camera glass.

Use a hairdryer or a heat gun to apply heat to the back of the iPhone. Be careful not to overheat the device, as it may cause damage. The heat will soften the adhesive holding the broken lens cover in place.
Once the adhesive is soft, use a suction cup to gently lift the broken lens cover off the back of the iPhone. If the suction cup doesn’t work, you can use a thin, plastic pry tool or a guitar pick to carefully pry the lens cover away from the device.
Continue to apply heat as needed while prying to keep the adhesive soft and pliable. Be patient and go slowly to avoid damaging the camera module or the internal components.
Once the broken lens cover is removed, clean any remaining adhesive residue from the back of the iPhone using isopropyl alcohol and a microfiber cloth. This will ensure proper adhesion when installing the new lens cover.
Dispose of the broken lens cover properly and prepare to install the new one. Follow the next steps in the guide to complete the replacement process.

Clean the camera area
Before replacing the rear camera glass on your iPhone 7 Plus, it is important to thoroughly clean the camera area first. This will ensure that no dirt or debris gets trapped between the glass and the camera lens, which could affect the quality of your photos.
Materials needed:
- Clean microfiber cloth
- Cotton swabs
- Isopropyl alcohol (70% or higher concentration)
Follow these steps to clean the camera area:
- Gently wipe the camera area with a clean microfiber cloth to remove any dust or fingerprints.
- Dip a cotton swab in isopropyl alcohol.
- Gently clean the camera lens and surrounding area with the alcohol-soaked cotton swab.
- Use a dry end of the cotton swab or a clean area of the microfiber cloth to wipe away any excess alcohol.
- Inspect the camera area to ensure it is clean and free of any debris.
It is important to be gentle while cleaning the camera area to avoid scratching the lens or damaging the internal components. If you encounter any stubborn dirt or debris, you can try using a toothpick or a soft brush to carefully remove it. However, be cautious not to apply too much pressure.
Once the camera area is clean, you can proceed with replacing the rear camera glass by following the necessary steps. Remember to work in a well-lit and dust-free environment to minimize the chances of any further contamination.
Install the new camera glass
Once you have removed the old camera glass, it’s time to install the new one. Follow these steps:

- Clean the camera frame: Use a microfiber cloth and cleaning solution to gently clean the camera frame. This will ensure that the new glass adheres properly.
- Remove the protective film: The new camera glass may come with a protective film. Carefully peel off the film before installing.
- Align the new glass: Place the new camera glass on the camera frame, making sure it is aligned properly with the lens and flash.
- Press and secure: Press the new glass firmly onto the camera frame to ensure a good adhesive bond. Apply even pressure to all areas of the glass.
- Check for proper placement: Inspect the camera glass and ensure it is securely in place and aligned correctly with the lens and flash. If necessary, adjust it before proceeding.
- Let it set: Allow the adhesive to dry according to the manufacturer’s instructions. This usually takes a few minutes, but it’s best to wait at least 24 hours before using the camera.
Remember to handle the new camera glass with care to avoid leaving fingerprints or smudges that could affect the camera’s performance.
Apply adhesive to the new cover
Once you have removed the old broken glass cover from your iPhone 7 Plus, it’s time to apply adhesive to the new cover. The adhesive is necessary to ensure that the new glass cover stays in place and doesn’t fall off.
Start by cleaning the back of your iPhone 7 Plus with a microfiber cloth and a small amount of rubbing alcohol. This will remove any dirt or debris that could prevent the adhesive from sticking properly.
Next, carefully peel off the protective backing from the adhesive tape that comes with the new glass cover. Be sure to handle the adhesive tape with clean hands to avoid transferring any oils or dirt onto it.
Place the adhesive tape around the edges of the new glass cover, making sure to align it properly with the edges of your iPhone. Press down firmly on the tape to ensure it adheres securely to the glass. Take your time to ensure that the adhesive covers the entire perimeter of the glass cover.
Finally, remove any excess adhesive that may have oozed out from under the edges of the glass cover. This can be done using a clean cloth or cotton swab dampened with rubbing alcohol.
Allow the adhesive to dry and set for at least 24 hours before using your iPhone 7 Plus. This will ensure a strong bond between the glass cover and the phone.
Note: It’s important to follow the manufacturer’s instructions that come with the adhesive tape for best results.
Align and stick the new cover
Once you have removed the old rear camera glass cover and cleaned the area, it’s time to align and stick the new one. Follow these steps:
- Peel off the adhesive backing from the new rear camera glass cover.
- Hold the cover carefully and align it with the camera lens and flash module on your iPhone 7 Plus.
- Make sure the holes in the cover match up with the camera and flash perfectly.
- Press down firmly on the cover to secure it in place.
- Use a soft cloth to polish and remove any fingerprints or smudges from the cover.
It’s important to align the new cover correctly to ensure that the camera and flash function properly. Take your time and double-check the alignment before sticking it down. Once the cover is securely in place, you can proceed with reassembling your iPhone 7 Plus.
Remove any excess adhesive
After successfully removing the broken rear camera glass, there may still be adhesive residue on the device. This excess adhesive needs to be removed before installing the new camera glass.
To remove the excess adhesive, you will need a small flat head screwdriver or a plastic pry tool. Carefully insert the edge of the tool between the adhesive and the device, and gently pry it away. Be cautious not to scratch or damage the surrounding areas of the device.
Once you have loosened the adhesive, slowly peel it off using your fingers or tweezers. Take your time and be gentle to avoid any further damage to the device.
If there are any stubborn adhesive remnants that are difficult to remove, you can use a small amount of isopropyl alcohol or adhesive remover. Apply a small amount onto a microfiber cloth or cotton swab and gently rub the residue until it is completely dissolved and removed.
Make sure to thoroughly clean the area where the adhesive was removed to ensure a clean surface for the installation of the new camera glass. You can use a microfiber cloth or cotton swab dampened with isopropyl alcohol to wipe away any remaining residue.
Important tips:
- Be patient and gentle when removing the excess adhesive to avoid causing further damage.
- Do not use excessive force when prying or pulling the adhesive, as it may result in damage to the device.
- Always use isopropyl alcohol or adhesive remover in a well-ventilated area.
- Ensure that the device is completely dry and free of any residue before proceeding with the installation of the new camera glass.
Test the camera
After replacing the rear camera glass on your iPhone 7 Plus, it’s important to test the camera to ensure that it’s functioning properly. Follow these steps to test the camera:
- Open the camera app on your iPhone 7 Plus.
- Select the rear camera option.
- Take a few test photos to check the image quality.
- Switch to video mode and record a short video to check the video quality.
- Zoom in and out using the camera app to ensure that the zoom function is working correctly.
- Test the flash by taking photos in low light conditions.
- Test the autofocus by moving the camera around and checking if it adjusts focus accordingly.
If you notice any issues with the camera after replacing the rear camera glass, it’s possible that there may be an underlying problem. In this case, it’s recommended to seek professional help or contact Apple support for further assistance.
Remember, it’s important to handle the camera and any other internal components of your iPhone with care to avoid causing further damage.
Question-answer:
Can I change the rear camera glass on my iPhone 7 Plus?
Yes, you can change the rear camera glass on your iPhone 7 Plus. It’s a relatively simple process that can be done with the right tools and replacement parts.
What tools do I need to change the iPhone 7 Plus rear camera glass?
To change the iPhone 7 Plus rear camera glass, you will need the following tools: a small Phillips screwdriver, a plastic pry tool, a suction cup, tweezers, and a replacement camera glass.


