
A clean camera lens is essential for capturing sharp and clear photos. Over time, dust, fingerprints, and smudges can accumulate on the lens, affecting the quality of your images. However, cleaning a digital camera lens at home is a delicate task that requires care and precision. In this article, we will guide you through the steps to effectively clean your camera lens and ensure optimal image quality.
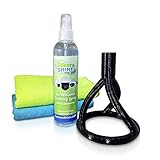
Before you begin the cleaning process, it’s important to gather the necessary tools. You will need a blower brush, microfiber cloth, lens cleaning solution, and lens tissue or cotton swabs. It’s crucial to use cleaning materials specifically designed for camera lenses to avoid damaging the delicate lens coatings.
Start by using the blower brush to remove any loose dust particles from the lens surface. Gently brush the lens in a circular motion, being careful not to apply too much pressure. This will help eliminate the majority of dust and debris before moving on to more thorough cleaning methods.
Next, apply a small amount of lens cleaning solution to the microfiber cloth. Be sure to use a lens cleaning solution that is alcohol-free and specifically designed for camera lenses. Avoid applying the solution directly to the lens to prevent it from seeping into the camera body. Gently wipe the lens in a circular motion, starting from the center and moving towards the outer edges. Use light pressure and be cautious not to scrub or rub the lens too harshly.
If there are stubborn smudges or fingerprints that the lens cleaning solution cannot remove, you can use lens tissue or a cotton swab dampened with lens cleaning solution. Again, be gentle and avoid applying excessive pressure. Carefully wipe the affected area until the smudges or fingerprints are removed.
After cleaning the lens, allow it to air dry for a moment or use a clean section of the microfiber cloth to gently dry the surface. Avoid using tissues or rough materials that can leave lint or scratches on the lens.
Regularly cleaning your camera lens will prolong its lifespan and ensure the best image quality. By following these steps and using the proper cleaning materials, you can maintain a clean and clear camera lens for capturing stunning photographs.
Why cleaning your digital camera lens is important
Keeping your digital camera lens clean is essential for maintaining the quality of your photos. The lens is one of the most critical parts of your camera, and any dirt, dust, or smudges on it can affect the clarity and sharpness of your images.
1. Image quality
A dirty lens can result in blurred or hazy images, especially when shooting in low light or using a large aperture. Dust, fingerprints, and other debris on the lens can cause light to scatter, causing a loss of sharpness and contrast in your photos.
2. Color accuracy
A dirty lens can also impact the color accuracy of your photos. Dust or smudges on the lens can affect the way light enters the camera, resulting in a color cast or inaccurate color representation in your images. Cleaning your lens regularly ensures that the colors in your photos remain true and vibrant.
![Clean & Clear Microfiber Cleaning Cloth, EXTRA LARGE [100 Pack] ULTRA PREMIUM Microfiber Cleaning Cloth - Microfiber Cloth for Camera Lens, Glasses, Screens, and all Lens.](https://m.media-amazon.com/images/I/51GYJbY+YKS._SL160_.jpg)
3. Long-term lens health
Regular cleaning of your camera lens can help prevent long-term damage. Dust and debris can accumulate on the lens and potentially scratch the surface over time. By cleaning your lens regularly, you can remove these particles and reduce the risk of scratching or other permanent damage to the lens.
It’s important to note that cleaning your camera lens requires caution to avoid causing any damage. Always use specialized lens cleaning tools, such as a lens cleaning solution and a microfiber cloth, and follow the manufacturer’s instructions for cleaning your specific lens model.
In conclusion, keeping your digital camera lens clean is crucial for maintaining image quality, color accuracy, and the long-term health of your lens. Regular cleaning will ensure that your photos remain clear, sharp, and true to color, allowing you to capture your memories with the best possible results.
Gather the necessary supplies
Before you begin cleaning your digital camera lens, it is important to gather the necessary supplies. Having the right tools will ensure that you can properly clean the lens without causing any damage. Here are the supplies you will need:
- Clean, microfiber cloth
- Lens cleaning solution
- Blower brush
- Cotton swabs
A clean, microfiber cloth is essential for gently removing any dust or smudges on the lens without scratching the surface. Avoid using rough materials like paper towels or tissues, as they can leave behind fibers or scratch the lens.

Lens cleaning solution is specifically designed to clean camera lenses and remove any fingerprints or oils. Avoid using household cleaners, as they can damage the lens coating. Apply a small amount of cleaning solution to the microfiber cloth to avoid any excess liquid coming into contact with the lens.
A blower brush is useful for blowing away any loose dust particles before cleaning the lens. Use short, gentle bursts of air to avoid pushing any debris further into the lens.
Cotton swabs can be used to clean hard-to-reach areas or stubborn smudges on the lens. Moisten the cotton swab with lens cleaning solution and gently wipe the affected areas.
By gathering these supplies, you will be well-prepared to clean your digital camera lens effectively and safely.
Cleaning solution
When it comes to cleaning the lens of your digital camera, it is important to use a proper cleaning solution. Using the wrong solution can damage the delicate lens surface. Here are some tips on choosing and using a cleaning solution:

1. Commercial lens cleaning solution
Commercial lens cleaning solutions are specifically designed for cleaning camera lenses and are widely available in camera stores. These solutions are formulated to effectively remove smudges, fingerprints, and other dirt without damaging the lens coating. Always follow the manufacturer’s instructions when using a commercial cleaning solution.
2. Homemade cleaning solution
If you prefer to make your own cleaning solution, you can mix a small amount of mild dish soap with distilled water. Avoid using tap water as it may contain minerals that can leave streaks on the lens. Mix a few drops of dish soap with distilled water in a clean container. Gently stir the solution to create a mild soapy mixture. Dip a clean microfiber cloth or lens cleaning tissue into the solution, making sure it is not dripping wet, and use it to gently wipe the lens surface.
Note: Before using any cleaning solution, always remove any loose particles or dust from the lens surface with a blower brush or a clean, dry microfiber cloth.
Table:
| Pros | Cons |
|---|---|
| Commercial lens cleaning solution | – Designed for camera lenses – Highly effective at removing dirt and smudges |
| Homemade cleaning solution | – Easy to make – Affordable – Safe for the lens coating |
Regardless of the cleaning solution you choose, always remember to use a soft, lint-free cloth or lens cleaning tissue to wipe the lens. Avoid using paper towels or tissues that can scratch the lens. Clean the lens surface in a circular motion and be gentle to prevent any damage.

Cleaning cloth
When it comes to cleaning your camera lens, a high-quality microfiber cleaning cloth is essential. This special cloth is designed to gently remove dust, fingerprints, and smudges from the lens without scratching it. Here are a few tips to keep in mind:
Choose the right cloth
Tip: Look for a microfiber cloth specifically made for cleaning camera lenses. These cloths are usually lint-free and have a fine weave that effectively traps dirt and debris. Avoid using tissues, paper towels, or regular cloths as they can leave scratches or residue on the lens.
Proper cleaning technique
Step 1: Before cleaning the lens, make sure to turn off your camera to avoid any accidental damage. Remove any loose dust or dirt particles by using a blower brush or air blower.
Step 2: Gently breathe on the lens surface to create condensation. This will help loosen any stubborn smudges or fingerprints.
Step 3: Use the microfiber cloth to gently wipe the lens in a circular motion. Start from the center and work your way outwards to avoid pushing dirt into the lens edges.

Step 4: If there are still smudges or fingerprints remaining, dampen a small portion of the cloth with lens cleaning solution or distilled water. Be sure to only use a minimal amount of liquid.
Step 5: After cleaning, use the dry part of the cloth to remove any moisture or residue from the lens surface.
Remember, cleaning the camera lens is a delicate process, so it’s important to handle the cloth with clean hands and avoid excessive pressure. With proper care, your camera lens will stay clean and produce sharp, high-quality images.
Blower brush
A blower brush is an essential tool for cleaning a digital camera lens. It is a small and portable device that uses a blast of air to remove dust and debris from the lens surface.
To use a blower brush, follow these steps:
![iCloth Lens Cleaning Wipes [5 x 3.5 Inches] Safe for All Screens, Electronics & Glasses. Streak & Lint Free, Individually Wrapped, 1 Wipe Can Clean Camera, Smartphone, and Pair of Glasses (800 Count)](https://m.media-amazon.com/images/I/41lDLcsFshL._SL160_.jpg)
- First, make sure the camera is turned off to avoid any accidental damage.
- Gently remove the lens cap or any other protective covers from the lens.
- Hold the camera in one hand and the blower brush in the other.
- Position the blower brush close to the lens surface, but make sure it doesn’t touch the lens directly.
- Gently squeeze the blower to release a blast of air onto the lens surface. Be careful not to blow too forcefully, as it may cause damage.
- Move the blower brush around in a circular motion to cover the entire lens surface.
- Repeat the process if necessary, especially if there are stubborn particles that aren’t being removed.
After using the blower brush, check the lens surface to ensure that all dust and debris have been removed. If there are still visible particles, you may need to use a different cleaning method such as a microfiber cloth or lens cleaning solution.
Remember to store the blower brush in a clean and dry place to prevent it from accumulating dust or debris. Regularly cleaning your camera lens using a blower brush can help maintain its clarity and performance.
Prepare your camera
Before cleaning the lens of your digital camera, it is important to prepare the camera properly to avoid any damage:
Gather the necessary materials
Make sure you have all the necessary materials for cleaning your camera lens. This may include a blower brush, lens cleaning solution, lens cleaning tissue or microfiber cloth, and lens cleaning pen.
Turn off the camera and remove the lens
Before you start cleaning, turn off your camera to prevent any accidental damage. Remove the lens carefully by pressing the lens release button and twisting it counterclockwise.
Place the lens on a clean and soft surface, such as a lint-free cloth or lens cleaning station, to prevent any scratches.
Inspect the lens
Take a close look at the lens for any visible dirt, dust, or fingerprints. Identify the areas that need cleaning.
Be careful not to touch the lens directly with your fingers as this can leave oils or smudges on the lens. If you do accidentally touch the lens, use a lens cleaning solution and cloth to remove the smudges.
If there is stubborn dirt or debris on the lens, you can use a blower brush to gently remove it. Avoid using excessive force or applying too much pressure, as this can damage the lens.
Once you have inspected the lens and identified the areas that need cleaning, you are ready to proceed with cleaning the lens.
Power off your camera
Before cleaning your camera lens, it is important to power off your camera to prevent any accidental damage or errors. This step will ensure that the camera is not in use and the lens is not moving while cleaning.
Turn off your camera by pressing the power button or flipping the switch to the off position. Wait for a few seconds to make sure the camera is completely powered down before proceeding.
It is also a good idea to remove the battery or disconnect the camera from its power source to further prevent any electrical mishaps. This step will add an extra layer of safety and protect your camera from any potential harm.
Remember, cleaning a camera lens with the camera powered on can result in accidental damage to the lens or other parts of the camera. So, be sure to always power off your camera before proceeding with any cleaning or maintenance tasks.
Remove any attachments
Before attempting to clean the camera lens, it is important to remove any attachments or filters that may be attached to it. This includes lens hoods or protective filters that are commonly used to reduce glare or protect the lens from scratches. Carefully unscrew or detach these attachments, taking care not to damage the lens or any delicate parts of the camera.
Remove dust and debris
One of the most common issues with camera lenses is the presence of dust and debris on the surface. This can cause blurry images or spots in your photos. Cleaning the lens regularly will improve the overall image quality of your camera.
Gather the necessary supplies
Before you start cleaning the lens, make sure you have all the necessary supplies:
| Soft-bristled brush | Used for removing loose dust particles from the lens without scratching the surface. |
| Microfiber cloth | Ideal for removing smudges and fingerprints on the lens. Ensure that it is clean and free from any debris. |
| Lens cleaning solution | Specifically designed for cleaning camera lenses, this solution helps to remove stubborn smudges and dirt. |
Step-by-step cleaning process
Follow these steps to safely remove dust and debris from your camera lens:
- Ensure your camera is turned off before you begin cleaning.
- Gently use the soft-bristled brush to remove any loose dust particles from the lens surface. Start from the center and work your way outward in a circular motion.
- If there are any stubborn smudges or fingerprints, apply a small amount of lens cleaning solution onto the microfiber cloth.
- Gently wipe the lens surface using the microfiber cloth in a circular motion. Avoid applying excessive pressure to prevent scratching the lens.
- If there are still any remaining smudges or dirt, repeat steps 3 and 4 until the lens is clean.
- Once the lens is clean, use a blower brush to remove any dust particles that may have settled on the camera body or inside the lens cap.
Remember to be cautious and gentle while cleaning the lens to prevent any damage. If you’re unsure about cleaning your camera lens, it’s always a good idea to consult the camera’s user manual or take it to a professional for cleaning.
Use the blower brush
One of the easiest and safest ways to clean your digital camera lens at home is by using a blower brush. A blower brush is a small, handheld device that produces a burst of air to remove dust and debris from the lens surface.
Here are the step-by-step instructions to clean your digital camera lens with a blower brush:
Step 1: Prepare your equipment
Before you start cleaning, make sure you have a blower brush specifically designed for camera lens cleaning. You can easily find one at any camera store or online.
It’s also important to find a clean and well-lit space where you can work comfortably. Avoid dusty areas or places where there might be a risk of your lens getting scratched.
Step 2: Remove loose debris
Gently remove any loose debris or dust particles from the lens surface using the blower brush. Hold the camera upside down to prevent any particles from falling back onto the lens.
Using the blower brush, direct a stream of air onto the lens surface while keeping the brush a safe distance away. Be careful not to touch the surface of the lens with the brush, as this could cause scratches.
Step 3: Inspect the lens
After using the blower brush, inspect the lens for any remaining dust or smudges. If there are still visible particles, you may need to move on to the next cleaning method.
| Equipment | Pros | Cons |
|---|---|---|
| Blower brush | – Safe and gentle – Removes loose debris |
– May not remove stubborn dirt – Not suitable for oily smudges |
| Lens cloth | – Effectively removes smudges – Portable and convenient |
– May not remove all dust particles – Easy to scratch lens if not used properly |
| Cleaning solution | – Removes stubborn dirt and smudges – Provides a clear lens surface |
– Requires additional materials – Potential risk of liquid damage |
Remember, a clean camera lens is essential for capturing clear and sharp images. Regular maintenance and cleaning will help prolong the life of your camera lens and ensure optimal performance.
Clean the lens surface
One of the most important parts of cleaning a digital camera lens is ensuring the surface of the lens is free from smudges, fingerprints, dust, and other debris. A clean lens surface will help you capture sharp and clear images.
Gather the necessary tools
Before you start cleaning the lens surface, gather the necessary tools:
| Microfiber cloth | Air blower | Lens cleaning solution |
Remove loose particles
Use an air blower to remove any loose particles from the lens surface. Be gentle and take care not to blow any debris further onto the lens.
If there are stubborn particles that won’t come off with air blowing, do not attempt to scrape them off. This could scratch the lens surface. Instead, move on to the next step.
Clean the lens surface
Dampen a corner of the microfiber cloth with lens cleaning solution. Gently wipe the lens surface in a circular motion, starting from the center and moving towards the edges. Avoid applying excessive pressure.
If there are stubborn smudges or fingerprints, moisten the cloth with more cleaning solution and continue cleaning until the surface is clean. Always use a clean part of the cloth to avoid spreading dirt.
Once the lens surface is clean, let it air dry or gently pat it dry with a dry corner of the microfiber cloth. Make sure the lens is completely dry before attaching any lens cap or using the camera.
Remember to clean your lens surface regularly to maintain the best image quality and prevent dirt buildup. Store your camera in a clean and dust-free environment to minimize the need for frequent cleaning.
Question-answer:
What is the best way to clean a digital camera lens at home?
The best way to clean a digital camera lens at home is to start by using a blower brush or air blower to remove any dust particles on the surface of the lens. Then, use a microfiber cloth or lens cleaning wipes to gently wipe away any smudges or fingerprints. If there are stubborn stains or dirt on the lens, you can use a lens cleaning solution and a lens cleaning pen to gently remove them. Remember to always be gentle and avoid applying too much pressure on the lens to prevent any scratches or damage.
Can I use a regular cloth to clean my camera lens?
No, it is not recommended to use a regular cloth to clean your camera lens. Regular cloths may contain rough fibers or debris that can scratch the lens surface. It is best to use a microfiber cloth specifically designed for lens cleaning, as they are soft and gentle on the lens and do not leave any lint or scratches.
Is it necessary to use a lens cleaning solution?
Using a lens cleaning solution can be beneficial in removing stubborn stains or dirt from the camera lens. However, it is not always necessary for regular cleaning. Most smudges and fingerprints can be easily cleaned using a microfiber cloth alone. If you do decide to use a lens cleaning solution, make sure to choose one that is specifically formulated for camera lenses and follow the instructions carefully to avoid any damage to the lens coating.
Can I clean the inside of my camera lens at home?
Cleaning the inside of a camera lens is a delicate process and should be done by a professional technician. The inside of the lens is a sealed environment and any attempts to clean it at home can lead to damage or contamination. If you suspect that there is dirt or dust inside your lens affecting the image quality, it is best to take your camera to a trusted camera repair center or contact the manufacturer for assistance.


