
The camera on your iPhone is an incredibly powerful tool that lets you capture stunning photos and videos. But over time, you may notice that your pictures aren’t turning out as crisp and clear as they used to be. This could be due to a dirty camera sensor, which can gather dust, fingerprints, and other debris.
Cleaning your iPhone camera sensor is a simple process that can greatly improve the quality of your photos. By removing any dirt or smudges from the sensor, you can ensure that your pictures are sharp, vibrant, and free from any unwanted specks or blurriness.
Before you start cleaning your iPhone camera sensor, it’s important to note that this process should be done with caution. Apple recommends using a microfiber cloth or lens cleaning brush, as well as being gentle and avoiding any excess pressure. It’s also a good idea to turn off your iPhone and remove any protective case before cleaning.
Follow these steps to clean your iPhone camera sensor:
- Gather the necessary tools: You will need a microfiber cloth or lens cleaning brush, a blower brush, and a cleaning solution specifically designed for camera lenses or electronics. Avoid using any harsh chemicals or liquids.
- Turn off your iPhone: This will help prevent any accidental damage or disruption while you’re cleaning the camera sensor.
- Remove the protective case: If you have a case on your iPhone, remove it to access the camera sensor more easily.
- Blow away any loose debris: Use a blower brush to gently remove any dust or particles from the camera sensor. Be careful not to blow directly into the lens to avoid causing damage.
- Clean the sensor with a cloth or brush: Gently wipe the camera sensor with a microfiber cloth or lens cleaning brush, using light pressure. Make sure to remove any fingerprints or smudges that may have accumulated.
- Use a cleaning solution if necessary: If the camera sensor is still dirty, you can apply a small amount of cleaning solution to the cloth or brush and gently wipe the sensor again, following the manufacturer’s instructions.
- Let the sensor dry completely: After cleaning, allow the camera sensor to air dry before turning on your iPhone or reattaching the protective case.
By regularly cleaning your iPhone camera sensor, you can ensure that your photos are consistently clear and of the highest quality. Remember to be gentle and cautious during the cleaning process to avoid any damage to your device.
Disclaimer: Cleaning your iPhone camera sensor is done at your own risk. If you’re unsure or uncomfortable with cleaning it yourself, it’s always best to consult a professional or contact Apple support for assistance.
Why cleaning the iPhone camera sensor is important
Keeping the camera sensor of your iPhone clean is crucial for ensuring high-quality photos and videos. Over time, dust, dirt, fingerprints, and other particles can accumulate on the camera sensor, which can negatively impact the clarity and sharpness of your images.
When the camera sensor is dirty, it may result in blurry or hazy photos, especially in low-light conditions. The presence of smudges or fingerprints can also cause unwanted lens flares or distortions. Cleaning the iPhone camera sensor regularly helps to eliminate these issues and ensures that you capture crisp, vibrant images.
Furthermore, a clean camera sensor allows your iPhone to perform at its best in various shooting scenarios. Whether you’re capturing landscapes, portraits, or macro shots, a clean sensor ensures accurate colors, better contrast, and improved overall image quality.
Not only does a clean camera sensor contribute to better image quality, but it also extends the lifespan of your iPhone. Regular maintenance and cleaning prevent particles from settling onto the sensor and potentially causing damage. By keeping the sensor clean, you can avoid costly repairs or having to replace your iPhone prematurely.

Cleaning the iPhone camera sensor is a simple process that can be done at home with the right tools. It is recommended to use a microfiber cloth or a specialized cleaning kit to gently wipe away any dirt or smudges. Avoid using harsh chemicals or abrasive materials that could potentially scratch the sensor.
In conclusion, cleaning your iPhone camera sensor is important for achieving optimal image quality, preventing possible lens defects, and prolonging the lifespan of your device. By taking the time to clean your camera sensor regularly, you can ensure that your iPhone captures breathtaking photos and videos every time you use it.
Understanding the camera sensor
The camera sensor is a vital component of any iPhone and plays a crucial role in capturing high-quality photos and videos. It is responsible for converting light into digital signals, which are then processed to create the final image.
Inside the camera module, the sensor is made up of millions of small light-sensitive pixels. Each pixel captures incoming light and converts it into an electrical charge. The larger the sensor, the more pixels it can fit, resulting in a higher resolution image.
Two main types of sensors are commonly used in iPhone models: CMOS (Complementary Metal-Oxide-Semiconductor) and CCD (Charge-Coupled Device). CMOS sensors are more popular due to their lower power consumption and faster readout speeds. CCD sensors, on the other hand, tend to offer better image quality but at the cost of greater power usage.

Camera sensors are prone to collecting dust, dirt, and smudges over time, which can negatively impact image quality. It is essential to keep the sensor clean to ensure optimal performance. Regular cleaning can help eliminate spots, stains, and other imperfections from your photos.
However, cleaning the camera sensor requires caution and proper technique. It is recommended to use a soft, lint-free cloth or specialized sensor cleaning kits designed specifically for digital cameras. Avoid using any abrasive materials or harsh chemicals, as they can damage the sensor surface.
It is also worth noting that the camera sensor is a delicate and sensitive component, so it is essential to handle it with care. When cleaning, make sure to follow the manufacturer’s instructions and guidelines. If you are unsure about the cleaning process, it may be better to seek professional assistance or consult with Apple Support.
In conclusion, understanding the camera sensor’s role and how to clean it properly can help you maintain the best image quality on your iPhone. By keeping the sensor clean and free from debris, you can ensure that your photos and videos turn out sharp and vibrant.
Different types of sensors in iPhones
iPhones are equipped with various sensors that enable them to capture high-quality photos and videos. These sensors work together to optimize image and video quality, as well as enhance the overall user experience. Here are some of the most common types of sensors found in iPhones:

1. Image Sensor:
The image sensor is one of the main components of the iPhone’s camera system. It captures light and converts it into an electrical signal, which is then processed to produce a digital image. The image sensor plays a crucial role in determining the quality and clarity of the photos taken with the iPhone.
2. Depth Sensor:
The depth sensor, also known as a ToF (Time of Flight) sensor, measures the distance between the camera and the objects in the scene. This sensor helps in creating depth maps, which are used for various features like portrait mode and augmented reality applications.
3. Proximity Sensor:
The proximity sensor is primarily used for controlling the display of the iPhone. It detects when the device is held close to the user’s ear during a phone call and automatically turns off the display to prevent accidental touches. This sensor helps in conserving battery power as well as improving usability during a call.
4. Accelerometer Sensor:
The accelerometer sensor detects changes in the device’s orientation and motion. It allows features like screen rotation, auto-leveling of photos, and motion-based gaming. The sensor measures the acceleration force in three axes (X, Y, and Z) and provides data to various applications for precise control.
5. Gyroscope Sensor:
The gyroscope sensor works in conjunction with the accelerometer to provide precise motion tracking. It measures the device’s angular velocity and determines its orientation in space. The gyroscope sensor is essential for features like image stabilization, augmented reality, and virtual reality applications.

6. Ambient Light Sensor:
The ambient light sensor adjusts the brightness of the iPhone’s display according to the surrounding lighting conditions. It measures the intensity of light and automatically adjusts the display brightness to provide optimal viewing experience and conserve battery power.
These are just a few examples of the various sensors present in iPhones. Each sensor plays a vital role in enhancing the camera capabilities and overall functionality of the device.
Signs that your iPhone camera sensor needs cleaning
The camera on your iPhone is an essential tool that allows you to capture precious moments and create lasting memories. However, over time, the camera sensor can accumulate dirt, dust, and smudges, leading to a decrease in image quality. Here are some signs that indicate your iPhone camera sensor may need cleaning:
1. Blurry or hazy images
If your photos appear blurry or hazy, even when your subject is in focus, it could be a sign that your camera sensor is dirty. Dirt and dust on the sensor can obstruct light and create a soft, unfocused appearance in your images.
2. Dark spots or specks in photos
When there are dark spots or specks visible in your photos, particularly against lighter backgrounds, it is an indication of debris or smudges on the camera sensor. These imperfections can appear as small dots or irregular shapes and can be particularly noticeable when shooting in bright light.

If you notice any of these signs, it’s time to clean your iPhone camera sensor to restore optimal image quality. Remember to follow the manufacturer’s guidelines and use approved cleaning materials to avoid damaging the sensor.
Blurry or smudged photos
If you are experiencing blurry or smudged photos on your iPhone, it is likely that your camera sensor needs cleaning. Over time, dust, dirt, and fingerprints can accumulate on the sensor, affecting the image quality. Cleaning the camera sensor can help improve the sharpness and clarity of your photos.
Check for dirt and smudges
Before proceeding with cleaning the camera sensor, it is important to check for any visible dirt or smudges on the lens. Use a clean, lint-free cloth to gently wipe the lens of the camera. Avoid using any harsh chemicals or abrasive materials as they can damage the lens.
Cleaning the camera sensor
To clean the camera sensor, you will need a specialized sensor cleaning kit. These kits usually include a sensor cleaning swab and a cleaning solution specifically designed for camera sensors. Follow the instructions provided with the kit to safely and effectively clean the sensor.
| Steps to clean the camera sensor: |
|---|
| 1. Power off your iPhone and remove the case if you have one. |
| 2. Use a blower or a brush to remove any loose dust or debris from the camera area. |
| 3. Apply a few drops of the cleaning solution to the sensor cleaning swab. |
| 4. Gently swipe the sensor cleaning swab across the camera sensor in one fluid motion. |
| 5. Repeat the process if necessary, using a new swab each time. |
| 6. Allow the sensor to dry completely before turning on your iPhone. |
It is important to note that cleaning the camera sensor should be done with caution. If you are unsure or uncomfortable with performing the cleaning yourself, it is best to seek professional help or take your iPhone to an authorized service center.

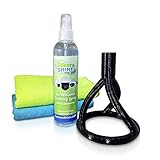
Tools required for cleaning
Properly cleaning your iPhone camera sensor requires a few essential tools. Before you begin, make sure you have the following items:
1. Microfiber cloth: This soft and lint-free cloth is ideal for gently wiping away dust, dirt, and smudges from the camera lens and sensor.
2. Lens cleaning solution: Use a lens cleaning solution that is specifically designed for camera lenses. Avoid using alcohol-based cleaners, as they can damage the sensor.
3. Sensor cleaning swabs: Sensor cleaning swabs are specially designed to reach the camera sensor and effectively remove stubborn dirt and debris. Make sure to choose swabs that are the correct size for your iPhone camera.
4. Blower: A blower is great for removing loose particles from the camera sensor without touching it. It helps to dislodge dust and debris that may be stuck on the surface.
Remember, it’s important to handle your iPhone camera sensor with care to avoid causing any damage. Using the right tools will help ensure a successful and safe cleaning process.
Microfiber cloth and cleaning solution
One of the best ways to clean the camera sensor of your iPhone is to use a microfiber cloth and a cleaning solution specifically designed for electronics. Here is a step-by-step guide on how to do it:
Step 1: Gather the necessary materials
Before you start cleaning the camera sensor, make sure you have the following materials:
- A microfiber cloth
- A cleaning solution for electronics
Step 2: Power off your iPhone
To avoid any potential damage to the camera sensor, it is important to turn off your iPhone before attempting to clean it. This will prevent any accidental button presses or unnecessary movements while cleaning.
Step 3: Apply the cleaning solution
Apply a small amount of the cleaning solution to the microfiber cloth. Make sure not to oversaturate the cloth, as excessive moisture could potentially damage the sensor. It is always better to start with a small amount and apply more if necessary.
Step 4: Gently wipe the camera sensor
Using the moistened microfiber cloth, gently wipe the camera sensor in a circular motion. Avoid applying too much pressure, as it could scratch or damage the delicate surface. Be thorough but gentle throughout the cleaning process.
If there are stubborn dirt or smudges, you can apply a little more cleaning solution to the cloth and repeat the process until the sensor is clean.
Step 5: Let it dry
Once you are satisfied with the cleanliness of the camera sensor, allow it to air dry for a few minutes. Avoid using any external heat sources or blowing on the sensor, as this could introduce debris or cause damage.
After the sensor is completely dry, you can turn on your iPhone and test the camera to ensure that it is functioning properly.
Note: It is always recommended to clean the camera sensor of your iPhone in a clean and dust-free environment. This will minimize the chances of introducing additional dust or debris to the sensor during the cleaning process.
Step-by-step guide to cleaning the iPhone camera sensor
Having a clean camera sensor on your iPhone is crucial for capturing high-quality images. Over time, dust, dirt, and fingerprints can accumulate on the sensor, leading to blurry or hazy photos. To ensure that your iPhone camera captures crisp and clear images, follow this step-by-step guide on how to clean the camera sensor.
Step 1: Prepare the necessary tools
Before you begin cleaning the camera sensor, gather the following tools:
- Microfiber cloth or lens cleaning wipes
- Clean compressed air blower
- Cotton swabs
- Isopropyl alcohol (90% or higher concentration)
Step 2: Turn off your iPhone
Before you start cleaning the camera sensor, turn off your iPhone to prevent any accidental damage during the cleaning process. It’s important to ensure that the phone is powered off to avoid any electrical mishaps.
Step 3: Remove the case and exterior dust
Take off any protective case from your iPhone. Use a clean microfiber cloth or lens cleaning wipes to gently wipe away any dust or dirt from the exterior of your iPhone, including the camera lens area.
Step 4: Use compressed air to remove loose particles
Hold the compressed air blower a few inches away from the camera sensor and gently squeeze the bulb to release short bursts of air. This will help dislodge any loose particles or debris on the sensor surface without touching it.
Step 5: Clean the camera sensor with a cotton swab
Moisten a cotton swab with isopropyl alcohol. Gently swipe the cotton swab across the camera sensor in a sweeping motion, avoiding excessive pressure or scrubbing. Be cautious not to touch any other components of the camera module.
Step 6: Dry the sensor
After cleaning the camera sensor with the alcohol-moistened cotton swab, use a clean cotton swab or microfiber cloth to gently dry the sensor. Make sure there is no residual moisture left on the sensor surface.
Step 7: Reassemble your iPhone and test
Once the camera sensor is dry, reattach any protective case you removed earlier. Turn on your iPhone and test the camera to ensure that the sensor is clean and functioning properly. Take a few test shots to confirm the clarity of the images.
By following these step-by-step instructions, you can effectively clean the camera sensor on your iPhone and improve the quality of your photos. Remember to perform this cleaning process in a clean and dust-free environment to avoid introducing more particles onto the sensor surface.
Preparation: Power off your iPhone
Before cleaning the camera sensor on your iPhone, it’s important to power off the device to avoid any potential damage. This will ensure the safety of your device and prevent any accidental changes or disruptions during the cleaning process.
To power off your iPhone, follow these simple steps:
Step 1: Locate the power button
The power button is usually located on the side or top of your iPhone, depending on the model. It is used to turn the device on or off.
Note: If you have an iPhone X or newer model, the power button is typically located on the right side of the device.
Step 2: Press and hold the power button
To power off your iPhone, press and hold the power button until a slider appears on the screen.
Note: If you have an iPhone X or newer model, press and hold the power button and either volume button simultaneously until the slider appears.
Step 3: Slide to power off
Once the slider appears, swipe it from left to right to power off your iPhone. Wait a few seconds for the device to completely shut down.
Note: If you have an iPhone X or newer model, you can slide the slider from top to bottom instead of left to right.
By following these steps and powering off your iPhone before cleaning the camera sensor, you can ensure a safe and successful cleaning process without any interference or potential damage to your device. Now you’re ready to move on to the next step of the cleaning process.
Avoiding Common Mistakes During Cleaning
When cleaning the camera sensor of your iPhone, it is important to be cautious and avoid common mistakes that could potentially damage the sensor or other components of your device. Here are a few mistakes to avoid:
1. Using Abrasive Materials
Never use abrasive materials such as paper towels or tissues to clean the camera sensor. These materials can scratch the delicate surface of the sensor, affecting the quality of your photos. Instead, opt for lens cleaning cloths or microfiber cloths that are specifically designed for delicate surfaces.
2. Applying Excessive Force
Applying excessive force while cleaning the sensor can lead to damage. Avoid pressing too hard or using sharp objects that could potentially scratch the surface. Instead, use gentle and light strokes to clean the sensor.
Pro tip: If you are unsure about how much force to apply, it is always best to err on the side of caution and be as gentle as possible.
3. Using Cleaning Liquids Directly on the Sensor
Never apply cleaning liquids or sprays directly onto the camera sensor. These liquids can seep into the device and cause damage. Instead, apply a small amount of the cleaning liquid onto a microfiber cloth and gently wipe the sensor.
4. Ignoring the Camera Lens
While cleaning the camera sensor, it is important not to overlook the camera lens. Dust or smudges on the lens can also affect the quality of your photos. Use a separate microfiber cloth to clean the lens using gentle motions.
Note: If you are unsure about cleaning the camera sensor yourself, it is always recommended to seek professional assistance.
Question-answer:
What is a camera sensor?
A camera sensor is the part of a digital camera that captures and records light to create an image. It is like the “film” in a traditional camera.
Why would I need to clean my iPhone camera sensor?
You may need to clean your iPhone camera sensor if you notice dust, smudges, or other debris on your photos. Cleaning the sensor can help improve image quality.
What tools do I need to clean my iPhone camera sensor?
To clean your iPhone camera sensor, you will need a blower, a lens cleaning solution, a microfiber cloth, and a sensor cleaning swab. Make sure to use tools specifically designed for camera sensors.


