
Keeping your DSLR camera body clean is essential for maintaining its optimal performance and longevity. Regular cleaning helps to remove dust, dirt, and smudges that can affect your photos and potentially damage your camera’s sensitive components. In this article, we will guide you on how to effectively clean your DSLR camera body.
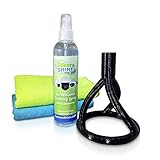
1. Gather the necessary cleaning tools: Before you begin, make sure you have the right tools for the job. This includes a blower or air blaster to remove loose dust, a soft brush for cleaning hard-to-reach places, a microfiber cloth or lens cleaning wipes for cleaning the camera body, and sensor cleaning swabs for removing stubborn dirt.
2. Power off and remove the lens: Before cleaning your camera body, turn it off and remove the lens. This will prevent any accidental damage to your lens and camera. Check the camera manual for specific instructions on how to remove the lens for your particular model.
3. Use a blower to remove dust: Start by using a blower or air blaster to remove any loose dust and dirt from the camera body. Hold the blower a few inches away from the camera and direct the air onto the surface. Be careful not to touch the camera with the blower nozzle to avoid causing scratches.
4. Clean the camera body with a microfiber cloth: Gently wipe the camera body with a microfiber cloth or lens cleaning wipes. Start from the top and work your way down. Pay attention to areas such as the buttons, dials, and LCD screen, as these are often prone to collecting dust and fingerprints. Use gentle, circular motions to remove any smudges or dirt.
5. Clean the sensor: If you notice that your photos have spots or smudges, it may be an indication that your sensor needs cleaning. Sensor cleaning should be done with caution, as the sensor is a delicate component. Consult your camera manual for specific instructions on how to clean the sensor or consider taking your camera to a professional for sensor cleaning.
By regularly cleaning your DSLR camera body, you can ensure that it performs optimally and produces high-quality images. Remember to always handle your camera and cleaning tools with care, and consult your camera manual for any specific cleaning instructions or precautions.
Note: It is recommended to consult your camera manual or seek professional assistance if you are unsure about cleaning specific parts of your DSLR camera body.
Why is it important to clean your DSLR camera body?
Maintaining a clean DSLR camera body is essential to ensure optimal performance and longevity of your equipment. Regular cleaning not only improves the appearance of your camera, but it also helps to prevent damage and maintain image quality. Cleaning your DSLR camera body helps to remove dust, dirt, smudges, and other particles that can accumulate over time.
1. Dust and dirt prevention
One of the main reasons to clean your DSLR camera body is to prevent dust and dirt from accumulating on the sensitive internal parts, such as the image sensor and mirror mechanism. Dust particles can accumulate on the sensor and cause image spots or affect the overall image quality. It is essential to keep your camera body free from dust to ensure accurate and high-quality photographs.

2. Optimal performance
A clean DSLR camera body ensures optimal performance of your equipment. Dust and dirt can affect the functionality of buttons and dials, leading to misfires, delays, or inconsistent operation. By cleaning your camera body regularly, you can ensure smooth and accurate operation, allowing you to capture your best shots.
Additionally, a clean camera body also helps to prevent issues with autofocus, exposure metering, and overall camera performance. These problems can significantly impact your ability to capture images as desired.
3. Longevity of equipment
Cleaning your DSLR camera body not only improves its performance but also contributes to the longevity of your equipment. Dust, dirt, and other contaminants can accumulate in hard-to-reach areas, potentially causing damage to sensitive components. Regular cleaning helps to remove these particles, reducing the risk of long-term damage and extending the lifespan of your camera.
By practicing proper cleaning and maintenance, you can ensure that your DSLR camera body remains in optimal condition for years to come.
| Benefits of cleaning your DSLR camera body: |
|---|
| Prevents dust and dirt accumulation |
| Ensures optimal performance |
| Improves image quality |
| Prolongs the lifespan of your camera |
Tools needed for cleaning
Properly cleaning your DSLR camera body requires the use of specific tools designed for this purpose. Here are the essential tools you will need:

Microfiber Cleaning Cloth
A microfiber cleaning cloth is a must-have tool for cleaning your DSLR camera body. This soft cloth is specifically designed to remove dust, fingerprints, and smudges without scratching the delicate surfaces of the camera.
Blower Brush
A blower brush is a handy tool for removing loose dust and debris from hard-to-reach areas of your DSLR camera body. It uses a burst of air to dislodge dust particles from crevices, corners, and buttons.
It is important to use a blower brush with a soft bristle brush to prevent any damage to the camera body.
Isopropyl Alcohol
Isopropyl alcohol can be used to clean the camera body, especially for removing stubborn dirt or sticky residues. However, it is important to use it sparingly and avoid contact with sensitive areas, such as the LCD screen, to prevent damage.
You should apply a small amount of isopropyl alcohol to a microfiber cloth and gently wipe the affected area, being careful not to allow any liquid to seep into the camera body.

Remember to always refer to your camera’s manual for specific cleaning instructions and to proceed with caution when cleaning your DSLR camera body to avoid any potential damage. With the right tools and proper technique, you can keep your camera clean and in optimal condition for years to come.
Microfiber cloth
A microfiber cloth is an essential tool for cleaning your DSLR camera body. Microfiber cloths are made from synthetic fibers that are finer than a human hair, so they are incredibly soft and gentle on delicate surfaces like camera bodies.
To clean your DSLR camera body with a microfiber cloth, follow these steps:
1. Gently remove any loose dirt or debris from the camera body using a soft brush. This will prevent scratching the surface when wiping with the cloth.
2. Fold the microfiber cloth into a small square and lightly dampen it with distilled water or a cleaning solution specifically designed for camera equipment. It’s important not to use excessive moisture, as it can damage the camera.

3. Gently wipe the camera body using slow, circular motions. Pay extra attention to areas with smudges or fingerprints.
4. If necessary, use the corners of the cloth to reach small crevices and corners of the camera body.
5. After cleaning, allow the camera body to air dry before reassembling and using it again.
Remember to avoid using harsh chemicals, abrasive materials, or excessive force when cleaning your DSLR camera body. Proper maintenance and regular cleaning with a microfiber cloth will help keep your camera in optimal condition and ensure high-quality photos.
Camera cleaning solution
When it comes to cleaning your DSLR camera body, using a camera cleaning solution is essential. This solution is specifically designed to effectively and safely remove dirt, smudges, and other debris from your camera’s surfaces without causing any damage.

What to look for in a camera cleaning solution?
When choosing a camera cleaning solution, there are a few factors to consider:
1. Alcohol-free: Avoid solutions that contain alcohol, as it can potentially harm the protective coatings on your camera’s surfaces.
2. Non-abrasive: Look for a solution that is gentle and non-abrasive to prevent scratching or damaging your camera’s body.
How to use camera cleaning solution?
1. Begin by turning off your camera and removing any batteries or memory cards.
2. Apply a small amount of the camera cleaning solution to a microfiber cloth or lens cleaning paper.

3. Gently wipe the camera body using circular motions, paying extra attention to any areas with visible dirt or smudges.
4. For stubborn stains or dirt, you can dampen the cloth or paper slightly with the cleaning solution and continue wiping.
5. Allow the camera body to air dry completely before reattaching batteries or memory cards and turning it on again.
Remember to use the camera cleaning solution sparingly and avoid getting it into any crevices or openings of your camera. Always follow the manufacturer’s instructions and recommendations for cleaning your specific camera model.
Regularly cleaning your DSLR camera body with a suitable camera cleaning solution will help maintain its performance and extend its lifespan.
Blower Brush
A blower brush is an essential tool for cleaning your DSLR camera body. It is designed specifically to remove dust and debris from hard-to-reach areas.
To use a blower brush, start by removing the lens from your camera body. Hold your camera body with the lens mount facing downward to prevent any dust from falling back into the camera.
Next, gently squeeze the blower brush to expel a burst of air. Direct the air stream towards the areas you want to clean, such as the camera sensor, buttons, and crevices.
Move the blower brush around the camera body, making sure to cover all the nooks and crannies. The burst of air will dislodge any dust or particles, which can then be blown away.
Be careful not to touch any of the internal components of the camera with the blower brush, as this can cause damage. Also, avoid using excessive force, as this can cause the blower brush to scratch the camera body.
After using the blower brush, inspect your camera body to ensure that all dust and debris have been removed. If needed, you can repeat the process until your camera body is clean.
Using a blower brush regularly will help keep your DSLR camera body clean and ensure optimal performance. It is a simple and effective tool for maintaining your camera and extending its lifespan.
Preparing Your Camera for Cleaning
Before you start cleaning your DSLR camera body, it’s important to prepare the camera properly to avoid any potential damage. Here are some steps to follow:
-
Gather the necessary cleaning tools
Make sure you have all the necessary cleaning tools at hand before you begin. These may include a blower brush, microfiber cloth, sensor swabs, sensor cleaning solution, lens cleaning solution, lens cleaning wipes, and a small soft brush.
-
Choose a clean and dust-free environment
Find a clean and dust-free environment for the cleaning process. This could be a well-ventilated room with minimal air movement to prevent dust from settling on the camera body.
-
Turn off the camera
Before starting the cleaning process, turn off the camera to prevent any accidental damage. Removing the battery is also recommended to avoid any electrical mishaps.
-
Remove any accessories
Remove any accessories attached to the camera, such as lenses or memory cards. This will make it easier to access and clean the camera body without obstruction.
-
Inspect the camera body
Take a close look at the camera body to identify any visible dust, dirt, or smudges. This will help you prioritize the areas that require cleaning.
By following these steps, you will ensure that your camera is properly prepared for cleaning, which will help maintain its performance and ensure the longevity of your DSLR camera.
Turn off your camera
Before starting the cleaning process, it is important to turn off your DSLR camera. This is necessary to prevent any accidents or damage to the camera or its components.
Make sure that the camera is completely powered off and not in standby or sleep mode. Look for the power switch, usually located on the top or side of the camera body, and slide it to the off position.
Turning off the camera will ensure that no electrical current is running through the camera’s circuits, reducing the risk of short circuits or other malfunctions during the cleaning process.
You should also remove any batteries or power sources from the camera before proceeding with the cleaning. This will further minimize the risk of accidental damage.
Why is it important to turn off your camera?
Turning off your camera is important because it prevents any accidental damage during the cleaning process. By switching off the camera, you reduce the risk of electrical surges or short circuits that could occur if the camera is powered on. This is especially important when cleaning the camera’s sensitive electronic components.
Additionally, removing any power sources, such as batteries, ensures that there is no power running through the camera, reducing the risk of accidental shocks or other electrical accidents.
It is always best to err on the side of caution and turn off your camera before beginning any cleaning or maintenance tasks.
By following this simple step, you will ensure the safety of your camera and be ready to proceed with the cleaning process.
Remove the battery
Removing the battery from your DSLR camera body is an important step in the cleaning process. The battery should be removed to prevent any electrical damage and ensure your safety.
To remove the battery, locate the battery compartment on your camera body. It is usually located on the bottom or side of the camera. Consult your camera’s manual if you are unsure of the exact location.
Once you have located the battery compartment, open it using the designated latch or button. Gently remove the battery from the compartment, being careful not to touch the metal contacts on the battery or inside the compartment.
After removing the battery, it is a good idea to inspect it for any signs of damage or corrosion. If you notice any damage, it is recommended to replace the battery before continuing with the cleaning process.
Keep the battery in a safe place away from the cleaning area to avoid accidentally reinserting it while cleaning. This will prevent any accidental damage to the camera or injury to yourself.
By removing the battery, you are ensuring that no power is running through the camera while you clean it. This reduces the risk of electrical damage and makes the cleaning process safer.
Remember to reinsert the battery once you have finished cleaning your DSLR camera body and are ready to use it again. Make sure it is properly aligned and securely inserted before turning on the camera.
Detach the lens
Before cleaning your DSLR camera body, it is crucial to detach the lens properly. Removing the lens ensures that no dust or dirt particles get inside the camera body during the cleaning process. Follow these steps to safely remove the lens:
|
By properly detaching the lens from your DSLR camera body, you can proceed to clean it and ensure optimal performance and image quality.
Cleaning the exterior of your camera
Keeping the exterior of your DSLR camera clean is important not only for its appearance but also for its functionality. Dust, dirt, and grime can accumulate on the body of your camera, potentially affecting the performance of buttons, dials, and other controls. Here are some steps you can take to effectively clean the exterior of your camera:
| Step | Instructions |
| 1 | Start by turning off your camera and removing the lens. |
| 2 | Use a blower or a soft brush to remove any visible dust or debris from the camera body. Be gentle to avoid scratching the surface. |
| 3 | Dampen a microfiber cloth with a small amount of water or lens cleaning solution. Avoid using excessive liquid, as it can seep into the camera and cause damage. |
| 4 | Gently wipe the camera body with the damp cloth, paying careful attention to areas with smudges or fingerprints. |
| 5 | If there are stubborn stains or marks on the camera body, you can use a mild detergent or specialized camera cleaning solution. Apply it to a cloth and gently rub the affected area. |
| 6 | After cleaning, use a dry microfiber cloth to gently remove any remaining moisture from the camera body. |
| 7 | Finally, reattach the lens to your camera once the body is completely dry. |
Remember to regularly clean the exterior of your camera to maintain its condition and ensure optimal performance. However, if you’re unsure about cleaning certain parts or specific camera models, it’s always best to consult the manufacturer’s instructions or seek professional assistance.
Wipe away dust and dirt
Regularly cleaning your DSLR camera body is essential to maintain the quality of your photographs. Dust and dirt can accumulate on your camera over time, affecting image quality and potentially causing damage. Here are some steps to help you properly wipe away dust and dirt from your camera:
- Before cleaning, turn off your camera and remove the battery.
- Use a brush with soft bristles to gently brush away loose dust and debris from the camera body. Pay extra attention to crevices and buttons.
- Dampen a microfiber cloth with a small amount of lens cleaning solution or isopropyl alcohol. Ensure the cloth is not dripping wet.
- Gently wipe the camera body in a circular motion, starting from the top and working your way down.
- Pay close attention to the areas around the LCD screen, viewfinder, and buttons. Use a cotton swab dipped in cleaning solution to clean hard-to-reach areas.
- Avoid applying excessive pressure while cleaning to prevent damaging the delicate parts of your camera.
- Once you have wiped the camera body, use a dry microfiber cloth to remove any remaining moisture.
- Allow your camera body to air dry completely before reattaching the battery and using the camera.
Regularly cleaning your DSLR camera body will not only keep it looking good but also ensure optimal performance and longevity of your equipment.
Question-answer:
What is the best way to clean a DSLR camera body?
The best way to clean a DSLR camera body is to start by turning off the camera and removing the lens. Then, using a blower or brush, gently remove any loose dust or debris from the body. Next, using a microfiber cloth and lens cleaning solution, lightly wipe down the body to remove any smudges or fingerprints. Finally, take a cotton swab and carefully clean any hard-to-reach areas or stubborn grime. Just make sure to be gentle and avoid getting any liquids directly on the camera body.
Can I use water to clean my DSLR camera body?
It is not recommended to use water to clean your DSLR camera body. Water can damage the sensitive electronics and components of the camera. Instead, it is best to use a blower, brush, microfiber cloth, and lens cleaning solution specifically designed for cleaning camera equipment. These tools and products will safely and effectively remove dust, smudges, and fingerprints without causing any harm to the camera.
How often should I clean my DSLR camera body?
The frequency of cleaning your DSLR camera body depends on how often you use it and the environments in which you use it. If you frequently use your camera in dusty or dirty environments, it is recommended to clean the body more often, perhaps once every couple of weeks. However, if you mostly use your camera in clean environments and take good care of it, cleaning the body once a month or every few months should be sufficient. Ultimately, it is important to regularly check your camera for any dust, smudges, or dirt and clean it as needed.
Can I use compressed air to clean my DSLR camera body?
It is generally safe to use compressed air to clean your DSLR camera body, but caution must be taken. Use a blower specifically designed for camera cleaning, as compressed air from other sources may contain moisture or propellants that can damage the camera. When using the blower, hold the camera body steady and carefully direct the air stream to blow away any loose dust or debris. Avoid using excessive force or blowing directly on the sensor or delicate parts of the camera. It is always recommended to read the camera’s manual and follow the manufacturer’s guidelines for cleaning to ensure the safety of your equipment.


