If you are looking to enhance the security of your home or office, installing a security camera is a wise decision. However, you may not want to invest in a Digital Video Recorder (DVR) due to its cost or complexity. In this article, we will guide you on how to connect a security camera without a DVR, saving you money and hassle.
Firstly, it’s important to understand that the primary function of a DVR is to record, store, and manage video footage. However, modern security cameras come equipped with various advanced features, including the ability to connect directly to your smartphone or computer. By bypassing the need for a DVR, you can still monitor and access live video feeds from your security camera without any additional equipment.
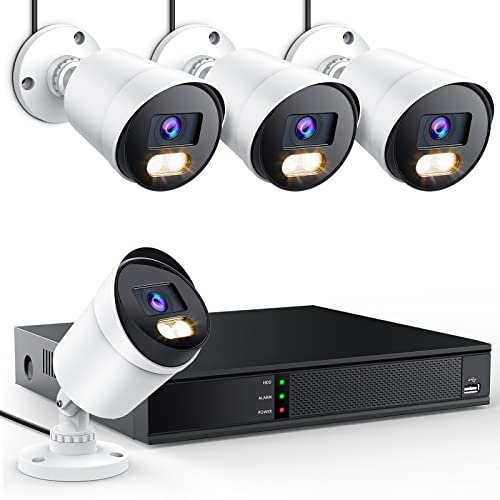
To connect a security camera without a DVR, you will need a few essential components. Firstly, ensure that your camera supports wireless connectivity or has an Ethernet port for a wired connection. Next, you will need a stable internet connection for seamless remote access. Additionally, you might consider a Network Video Recorder (NVR) if you want to store the recorded video footage.
Once you have gathered the necessary equipment, follow these steps to connect your security camera without a DVR:
Step 1: Power the Camera

Connect the security camera to a power source using the provided power adapter. Ensure that the camera receives a consistent power supply for optimal functionality.
Step 2: Connect to the Internet
If your camera supports wireless connectivity, follow the manufacturer’s instructions to connect it to your Wi-Fi network. Alternatively, for a wired connection, use an Ethernet cable to connect the camera to your router.
Step 3: Install Software/App
Download and install the software or app provided by the camera manufacturer. This software will allow you to monitor and access your camera’s live video feeds remotely from your smartphone or computer.

Step 4: Configure the Camera
Using the software/app, configure the security camera’s settings, such as motion detection, audio recording, or night vision. Customize the settings to suit your specific requirements.
By following these steps, you can easily connect a security camera without a DVR and enjoy the benefits of remote surveillance. Remember to prioritize security by setting strong passwords and regularly updating your camera’s firmware to protect against potential vulnerabilities.
Why connect a security camera without a DVR?
There are several reasons why someone might want to connect a security camera without a DVR:
- Cost: DVRs can be expensive, especially if you need to purchase one for each camera. Connecting a security camera without a DVR can be a more cost-effective solution.
- Flexibility: Connecting a security camera without a DVR allows for more flexibility in terms of where the footage is stored. Rather than being limited to a single DVR, you can choose to store the footage on a local storage device, in the cloud, or on a network-attached storage (NAS) device.
- Accessibility: By connecting a security camera without a DVR, you can access the footage remotely from anywhere using a smartphone, tablet, or computer. This can be especially useful if you want to keep an eye on your property while you are away.
- Scalability: Connecting a security camera without a DVR gives you the ability to easily add additional cameras to your system without the need for additional DVRs. This can be particularly beneficial if you want to expand your surveillance coverage in the future.
- Ease of installation: Installing a security camera without a DVR can be simpler and less time-consuming than setting up a traditional DVR system. With the right equipment and software, you can typically have your cameras up and running in a matter of minutes.
While connecting a security camera without a DVR may not be the right solution for everyone, it can offer numerous advantages in terms of cost, flexibility, accessibility, scalability, and ease of installation. By considering your specific needs and budget, you can determine whether connecting a security camera without a DVR is the best option for your situation.

Choose the right camera for your needs
When it comes to setting up a security camera without a DVR, it’s important to choose the right camera that meets your specific needs. With a wide range of options available in the market, understanding the different types of cameras can help you make an informed decision.
1. Wired vs Wireless Cameras
Firstly, you need to decide whether you want a wired or wireless camera. Wired cameras generally provide a more reliable and stable connection, as they are directly connected to your network. They require cables to transmit data and power, which can be a bit more complicated to install but offer better performance and less interference. On the other hand, wireless cameras are easier to install and offer flexibility in terms of placement, without the need for cables. However, the signal can be affected by distance, obstructions, and interference from other devices.
2. Resolution and Field of View
The next factor to consider is the camera’s resolution and field of view. The resolution determines the level of detail captured by the camera, with higher resolutions providing clearer and sharper images. It’s recommended to choose a camera with at least 1080p resolution for better clarity. Additionally, the field of view refers to the camera’s coverage area. A wider field of view can capture more areas, while a narrower field of view allows for more focused surveillance.
Pro-tip: If you require detailed visuals or need to monitor a large area, consider opting for a camera with a higher resolution and a wider field of view.
3. Night Vision and Weather Resistance
If you need to monitor your property during the night or in low-light conditions, it’s essential to choose a camera with infrared night vision capabilities. Night vision allows the camera to capture clear footage even in complete darkness. Additionally, if you plan to install the camera outdoors, make sure it is weather-resistant and can withstand extreme temperatures and harsh weather conditions.

Pro-tip: Look for cameras with a minimum night vision range of 30 feet and an IP65 or higher weather resistance rating for reliable outdoor surveillance.
4. Motion Detection and Advanced Features
Many security cameras come with motion detection capabilities, which can send alerts to your smartphone or email when motion is detected in the monitored area. This feature can help you stay informed about any unexpected activity. Some cameras also offer advanced features like two-way audio, which allows you to communicate with anyone near the camera, and PTZ (pan-tilt-zoom) control, which enables you to remotely control the camera’s movement.
Pro-tip: Consider cameras with customizable motion detection zones and advanced features that suit your monitoring needs.
By considering these important factors, you can choose the right security camera that fulfills your requirements, ensuring effective surveillance without the need for a DVR. It’s always recommended to thoroughly research and compare different camera models before making a final decision.
Prepare the necessary equipment
Before you can connect a security camera without a DVR, you need to make sure you have the necessary equipment. Here is a list of items you will need:

A security camera: Choose a high-quality security camera that meets your needs. There are various types available, such as wireless cameras or IP cameras. Make sure to select one that is compatible with your setup.
Power supply: Most security cameras require an external power source. Make sure you have a power supply that matches the camera’s voltage requirements.
Coaxial cable or Ethernet cable: Depending on the type of camera you have, you may need a coaxial cable or an Ethernet cable to connect it to your network or monitor.
BNC connectors: If you are using a coaxial cable, you will need BNC connectors to connect the cable to the camera and the monitor.
Monitor: You will need a monitor to view the live footage from the camera. This can be a computer monitor, a television, or a dedicated monitor designed for security camera systems.

Network switch or router (optional): If you are using IP cameras, you may need a network switch or router to connect the cameras to your network.
Having all the necessary equipment ready before you start will make the process of connecting a security camera without a DVR much easier. Make sure to double-check compatibility and gather all the required components before proceeding.
Setting up the camera for wireless connection
Connecting a security camera wirelessly can provide flexibility and convenience. Follow these steps to set up your camera for wireless connection:
- Ensure that your camera supports wireless connectivity. Check the camera’s specifications or user manual to confirm.
- Power on the camera by plugging it into a power source.
- Access the camera’s settings menu. This can usually be done through a mobile app or a web browser interface.
- Locate the network settings section in the camera’s settings menu.
- Choose the wireless network you want to connect to from the list of available networks.
- Enter the password for your wireless network, if necessary.
- Ensure that the camera is within range of your wireless router for a reliable connection.
- If prompted, choose a specific channel or frequency for the wireless connection. It is recommended to use the default setting unless you are experiencing interference issues.
- Save and apply the network settings.
- Wait for the camera to establish a connection with the wireless network. This process may take a few moments.
- Once connected, test the camera’s functionality by accessing the live video stream or performing a test recording.
Following these steps should help you set up your security camera for wireless connection without the need for a DVR. Enjoy the convenience of monitoring your property wirelessly.
Connecting the camera to your computer or mobile device
If you want to connect your security camera to your computer or mobile device without using a DVR, there are a few options available. Here’s how you can do it:

1. Wi-Fi connection:
If your security camera supports Wi-Fi connectivity, you can connect it directly to your computer or mobile device. Simply follow the instructions provided by the camera manufacturer to set up the Wi-Fi connection. Once connected, you can access the camera’s live feed using the manufacturer’s app or software.
2. Wired connection:
If your security camera does not support Wi-Fi, you can connect it to your computer or mobile device using a network cable. First, ensure that your camera has an Ethernet port. Then, connect one end of the network cable to the camera’s Ethernet port and the other end to an available Ethernet port on your computer or mobile device. Once connected, you can access the camera’s live feed using the manufacturer’s app or software.
3. USB connection:
Some security cameras can be connected to your computer or mobile device using a USB cable. Check if your camera has a USB port. If it does, simply connect one end of the USB cable to the camera and the other end to an available USB port on your computer or mobile device. Once connected, you can access the camera’s live feed using the manufacturer’s app or software.
Note: Make sure to install any necessary drivers or software provided by the camera manufacturer to enable proper connectivity and functionality.
Configuring remote access to the camera
Remote access to your security camera allows you to monitor the footage and control the camera’s settings from anywhere in the world. To configure remote access, follow these steps:
Step 1: Assign a static IP address to your camera
Assigning a static IP address to your camera is essential to ensure stable remote access. To do this, access your camera’s settings through its web interface and navigate to the network settings. Find the option to set a static IP address and enter the desired IP address, subnet mask, and default gateway. Save the changes.
Step 2: Configure port forwarding
To enable remote access, you need to configure port forwarding on your router. Access your router’s settings by typing its IP address into a web browser and logging in with the appropriate credentials. Locate the port forwarding settings and create a new rule specifically for your camera. Enter the static IP address you assigned to your camera and specify the appropriate port number, typically 80 or 8080 for HTTP access. Save the settings.
Step 3: Set up a DDNS service
If you have a dynamic IP address from your internet service provider, you will need to set up a Dynamic Domain Name System (DDNS) service. This service associates a domain name with your changing IP address, allowing you to access your camera using a consistent URL. Sign up for a DDNS service provider and create an account. Follow the provider’s instructions to link your camera’s IP address to a domain name.
Once you have completed these steps, you should be able to access your security camera remotely by entering the registered domain name or your router’s public IP address into a web browser. Remember to configure the appropriate security measures, such as strong passwords and enabling encryption, to protect your camera and ensure secure remote access.
Ensuring the security of your camera feed
When connecting a security camera without a DVR, it is important to take measures to ensure the security of your camera feed. Here are some tips to help you maintain the privacy and integrity of your camera footage:
- Change default camera credentials: Many security cameras come with default usernames and passwords, which are often easily accessible to hackers. Always change the default credentials to a unique and strong username and password combination.
- Use encryption: Encrypting your camera feed can add an extra layer of security. Make sure to enable Secure Socket Layer (SSL) or Transport Layer Security (TLS) encryption if your camera supports it.
- Set up a secure network: Ensure that your camera is connected to a secure network. Use strong Wi-Fi passwords and regularly update your router firmware to prevent unauthorized access.
- Enable two-factor authentication: Many modern security cameras offer two-factor authentication, which requires an additional verification step to access the camera feed. Enable this feature for enhanced security.
- Regularly update camera firmware: Keep your camera firmware up to date with the latest security patches and bug fixes. Manufacturers often release firmware updates to address vulnerabilities, so it is important to install them promptly.
By following these best practices, you can ensure the security of your camera feed and protect your privacy. Remember, maintaining a secure camera setup is essential to prevent unauthorized access and potential misuse of your footage.
Monitoring and recording the camera feed
Once you have connected your security camera without a DVR, you will need to set up a system to monitor and record the camera feed. There are several ways you can do this, depending on your specific needs and preferences.
Using a computer
One option is to use a computer as a monitoring and recording device. You can connect the camera to your computer using the appropriate cable or adapter, and then use software to view and record the camera feed. There are many software options available, both free and paid, that allow you to monitor multiple camera feeds and record footage.
Using a network video recorder (NVR)
Another option is to use a network video recorder, also known as an NVR. An NVR is a dedicated device that is designed to record and store video footage from multiple cameras. You can connect your security camera to the NVR using an Ethernet cable, and then use the NVR’s interface to view and manage the camera feed. NVRs often have additional features such as motion detection and remote access, which can be useful for surveillance purposes.
| Method | Advantages | Disadvantages |
|---|---|---|
| Using a computer | Flexibility to choose software, ability to monitor and record on a single device | Dependent on computer performance, may require additional hardware |
| Using an NVR | Dedicated device designed for surveillance, additional features like motion detection | Can be more expensive, limited to the number of camera inputs supported by the NVR |
When setting up your monitoring and recording system, it is important to consider your specific needs and budget. Take into account the number of cameras you have, the level of surveillance you require, and any additional features you may need. With the right setup, you can effectively monitor and record the camera feed from your security camera without a DVR.
Troubleshooting common issues
When setting up a security camera without a DVR, you may encounter some common issues. Here are a few troubleshooting steps to help you resolve these problems:
No power to the camera
If your security camera is not receiving power, make sure that it is properly connected to a power source. Check if the power cable is securely plugged into both the camera and the power outlet. If you are using a power adapter, ensure that it is functioning correctly.
No video signal
If you are not getting a video signal from your camera, there are a few things you can check. First, verify that the camera is properly connected to the monitor or device you are using to view the footage. Ensure that the cables are securely connected and not damaged. If you are using wireless cameras, ensure that the signal is strong and there are no interferences causing disruptions.
Additionally, check the settings on your monitor or device to ensure that it is correctly configured to receive the video signal from the camera. Adjust the input source settings if necessary.
Poor image quality
If you are experiencing poor image quality with your security camera, there are a few potential causes to consider. First, make sure that the camera lens is clean and free from any dirt or smudges. A dirty lens can significantly impact the clarity of the footage.
Next, check the camera’s resolution settings. Ensure that the resolution is set to the appropriate level for your needs. Keep in mind that higher resolutions may require more bandwidth and storage space.
If you are using wireless cameras, the distance between the camera and the receiver can also affect image quality. Consider moving the camera closer to the receiver or using a signal booster to improve the signal strength.
Lastly, check the lighting conditions in the area where the camera is installed. Insufficient lighting or harsh lighting can impact the image quality. Adjust the camera’s exposure settings or consider adding additional lighting to improve the visuals.
By thoroughly troubleshooting these common issues, you can ensure that your security camera without a DVR is functioning properly and providing you with the desired level of surveillance.
FAQ,
What is a DVR and why would I want to connect a security camera without it?
A DVR, or digital video recorder, is a device that is used to record and store video footage from security cameras. However, there may be situations where you don’t have a DVR or don’t want to use one. In such cases, you can connect a security camera directly to a computer or a network video recorder (NVR) to access and record the video footage.
Can I connect a security camera directly to my computer?
Yes, you can connect a security camera directly to your computer. Most security cameras come with a software that allows you to connect the camera to your computer via a USB or Ethernet cable. Once connected, you can use the software to view and record the video footage from the camera.


