Many content creators, vloggers, and filmmakers use DSLR cameras for their projects due to their impressive image quality and versatility. However, one challenge that arises when using a DSLR camera for audio recording is the limited audio capabilities of the built-in microphone. To overcome this limitation, it is often recommended to connect an external USB microphone to your DSLR camera. In this article, we will guide you through the simple steps on how to connect a USB mic to your DSLR camera.
Step 1: Check your DSLR camera’s compatibility
Before purchasing a USB microphone for your DSLR camera, it is important to check the compatibility of your camera with external microphones. Some DSLR cameras may not have a USB port or may not support external microphones altogether. Consult your camera’s manual or visit the manufacturer’s website to ensure compatibility.
Step 2: Choose a suitable USB microphone
Once you have confirmed the compatibility, the next step is to choose a USB microphone that suits your needs. USB microphones come in various types, such as handheld microphones, lapel microphones, or shotgun microphones. Consider the audio quality, directionality, and intended use of the microphone before making your selection.
Step 3: Connect the USB microphone to your DSLR camera
To connect the USB microphone to your DSLR camera, you will need a USB-to-audio adapter cable. Plug the USB end of the microphone into the adapter cable, and then connect the 3.5mm audio jack of the adapter cable to the microphone input of your DSLR camera. Make sure the microphone is securely attached to the camera to avoid any audio interruptions during recording.
Note: Some DSLR cameras may require additional settings adjustments to enable audio recording through an external microphone. Refer to your camera’s manual for specific instructions.
By following these simple steps, you can enhance the audio quality of your DSLR camera recordings by connecting a USB microphone. Enjoy crystal-clear audio for your videos and take your content creation to the next level!
Preparation for Connection
Before connecting a USB microphone to your DSLR camera, there are a few steps you should take to ensure a smooth setup and optimal audio quality.

1. Check compatibility
First, make sure that your DSLR camera supports external microphones. Not all cameras have this capability, so it’s essential to check your camera’s specifications or consult the user manual.
2. Select a compatible USB microphone
Choose a USB microphone that is compatible with your DSLR camera. Look for a model that specifically mentions support for DSLR cameras or offers compatibility with audio input via USB. This will ensure that the microphone is recognized and can be used with your camera.
Important: Keep in mind that not all USB microphones are compatible with all DSLR cameras. It’s crucial to do your research and find a microphone that is known to work well with your specific camera model.
3. Familiarize yourself with your camera’s audio settings
Take some time to explore the audio settings on your DSLR camera. Familiarize yourself with the various options available and understand how to adjust the microphone input level. This will help you fine-tune the audio and prevent any issues during recording.
4. Gather necessary cables and accessories
Make sure you have all the necessary cables and accessories to connect your USB microphone to your DSLR camera. Most USB microphones come with a USB cable, but you may need an additional adapter or connector depending on your camera’s input port. Check the camera’s specifications to determine the type of adapter or cable you may need.

Tip: It’s a good idea to have spare batteries or a power source available for your USB microphone in case you need them during a recording session.
By following these preparation steps, you can ensure a seamless connection between your USB microphone and DSLR camera, helping you achieve high-quality audio recordings for your videos.
Gathering the Equipment
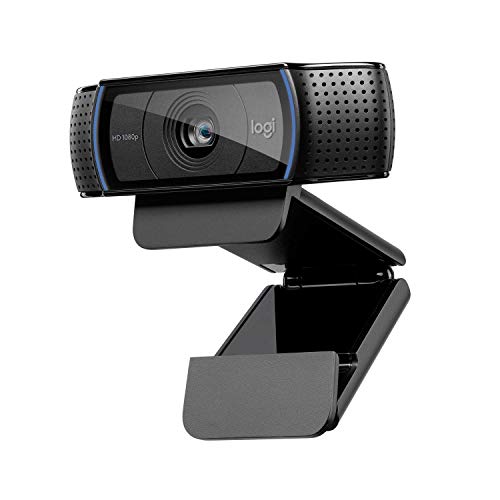
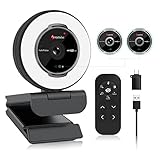
Before you can connect a USB mic to a DSLR camera, you’ll need to gather the necessary equipment. Here’s a list of what you’ll need:
| 1. USB Microphone: | A USB microphone is the main component you’ll need to connect to your DSLR camera. Make sure it is compatible with your camera model and has a USB output. |
| 2. DSLR Camera: | You’ll also need a DSLR camera that supports an external microphone input. Check your camera’s specifications to ensure it has the necessary port. |
| 3. USB Cable: | A USB cable is required to connect the USB microphone to the camera. Make sure the cable is long enough to reach from the microphone to the camera comfortably. |
| 4. Microphone Mount or Bracket: | In order to securely attach the USB microphone to your DSLR camera, you’ll need a microphone mount or bracket. Choose one that is compatible with your camera’s hot shoe or a tripod mount. |
| 5. Windscreen or Pop Filter (optional): | If you plan to record audio outdoors or in windy conditions, a windscreen or pop filter can help reduce unwanted noise and improve the quality of your recordings. |
Once you have gathered all the necessary equipment, you’ll be ready to connect your USB microphone to your DSLR camera and start capturing high-quality audio for your videos.
Checking Compatibility
Before connecting a USB microphone to your DSLR camera, it’s important to check the compatibility of both devices. Not all cameras support USB audio input, so it’s essential to do a bit of research beforehand.

First, consult the user manual or visit the manufacturer’s website to see if your camera model has USB audio input capabilities. Look for any specific instructions or limitations mentioned in the documentation.
If your camera does support USB audio input, make sure it is compatible with the USB microphone you plan to use. Check the microphone’s user manual or the manufacturer’s website for information on compatible camera models. Alternatively, you can search online forums or discussion boards for user experiences and recommendations.
Keep in mind that each camera and microphone combination may have different compatibility requirements. Make sure the USB microphone is specifically designed for use with DSLR cameras and has been tested and confirmed to work with your specific camera model.
USB Microphone Features to Consider
When checking compatibility, consider the features of the USB microphone that may affect its compatibility with your DSLR camera. Here are a few factors to consider:
- Connector Type: Check if the USB microphone uses a standard USB-A connector or a USB-C connector. Ensure that the camera and microphone have compatible connector types.
- Power Requirements: Some USB microphones require external power sources or batteries. Check if your camera can provide the necessary power or if additional accessories are needed.
- Audio Format: Confirm that the USB microphone outputs audio in a format that your camera can handle. Common audio formats include WAV and AAC.
Testing Compatibility
When you have confirmed compatibility between your DSLR camera and the USB microphone, it’s recommended to test the setup before using it in a critical recording situation. This can help identify any issues or limitations that may arise.

Connect the USB microphone to your camera following the instructions provided by the manufacturer. Adjust the camera’s audio settings to use the USB microphone as the input source. Record a short test video or audio clip and play it back to ensure that the microphone is delivering the desired sound quality.
| Camera Model | USB Audio Input Support |
|---|---|
| Canon EOS 5D Mark IV | Yes |
| Nikon D750 | No |
| Sony Alpha a7 III | Yes |
Refer to the table above for examples of camera models with USB audio input support. Note that this list is not exhaustive, and it’s crucial to verify compatibility with your specific camera model.
Confirming USB Support
Before connecting a USB microphone to your DSLR camera, it is important to confirm whether your camera supports USB audio input. Not all DSLR cameras have USB ports that are compatible with audio devices.
To check if your camera supports USB audio input, refer to the camera’s manual or visit the manufacturer’s website. Look for information on the camera’s specifications or audio capabilities.
If your camera does support USB audio input, you will need to ensure that the USB port on your camera is designed to accept audio input from external devices. Some USB ports on DSLR cameras are solely for data transfer and do not support audio input.

You may also need to check if your camera requires any additional accessories or adapters to connect a USB microphone. Some cameras may require a specific USB cable or an audio interface device to enable USB audio input.
If your camera does not support USB audio input or if you are unsure about its compatibility, you may need to consider alternative methods for capturing audio. This could include using an external audio recorder or connecting a microphone directly to your computer or smartphone for recording audio separately.
| Recommended Steps: |
|---|
| 1. Check the camera’s manual or manufacturer’s website for information on USB audio support. |
| 2. Verify if the USB port on your camera supports audio input or requires additional accessories. |
| 3. Explore alternative methods for capturing audio if your camera does not support USB audio input. |
Ensuring DSLR Compatibility
When connecting a USB microphone to a DSLR camera, it is important to ensure that the camera is compatible with such external devices. Not all DSLR cameras have the capability to support USB microphones, so it is recommended to check the camera’s specifications and documentation.
Firstly, check if the DSLR camera has a USB port. Most modern DSLR cameras do have a USB port, but it is always good to double-check. The USB port is typically located on the side or back of the camera, and it may be labeled as “USB” or have a symbol representing USB.
Next, verify if the USB port on the camera is compatible with USB microphones. USB microphones typically use a USB 2.0 or USB 3.0 connection, so ensure that the camera’s USB port supports either of these standards. You can find this information in the camera’s manual or specifications sheet.

In addition to physical compatibility, it is important to check if the camera’s software supports USB microphones. Some DSLR cameras have limitations on the audio input sources they can accept. The camera’s documentation should contain information on whether USB microphones are supported and any limitations or restrictions associated with their use.
Lastly, make sure to choose a USB microphone that is compatible with DSLR cameras. Some USB microphones are specifically designed for use with computers or other devices and may not work with DSLR cameras. Look for USB microphones that mention DSLR camera compatibility in their product descriptions.
Remember: It is crucial to ensure compatibility between the USB microphone and the DSLR camera to ensure proper functionality and prevent potential issues during recording.
Connecting the USB Mic
To connect a USB microphone to a DSLR camera, you will need to follow a few steps. Here’s a simple guide to help you get started:
Step 1: Check for Compatibility
Before connecting the USB microphone to your DSLR camera, make sure that your camera supports USB audio input. Not all DSLR cameras have this capability, so it’s important to check your camera’s specifications or user manual.
Step 2: Choose the Right USB Cable
Next, you’ll need to choose the appropriate USB cable for connecting the microphone to your camera. Most USB microphones come with a USB-A or USB-B connector, while DSLR cameras typically have a USB-C or mini-USB port. Make sure to use a cable that matches the ports on both the microphone and your camera.
Step 3: Connect the USB Mic to Camera
Once you have the correct cable, connect one end to the USB port of your microphone and the other end to the USB port on your DSLR camera. Insert the connectors firmly, ensuring a secure connection.
Step 4: Configure Audio Settings
After connecting the USB microphone to your camera, you may need to adjust the audio settings. Go to your camera’s menu and locate the audio settings section. Depending on your camera model, you may need to enable USB audio input or select the USB microphone as the audio source.
Step 5: Test the Audio
Before you start recording, it’s essential to test the audio to ensure everything is working correctly. Record a short test video while speaking into the USB microphone and play it back to check the sound quality. Adjust the audio levels if necessary.
Now you’re ready to use your USB microphone with your DSLR camera. Make sure to monitor the audio levels during recording and periodically check the connectivity to ensure a smooth and uninterrupted recording experience.
Locating the Mic Input
Before connecting a USB microphone to a DSLR camera, it is important to locate the mic input on the camera. This enables proper connection and ensures the best audio quality for your recordings.
Typically, the mic input can be found on the side or front panel of the camera. It is often marked by a symbol resembling a microphone or the word “mic” itself. Some cameras may have multiple audio input options, so make sure to identify the specific mic input.
Once you have located the mic input, prepare your USB microphone by plugging it into your computer or a power source if required. Ensure that the microphone is powered on and ready to use.
Now, using an appropriate audio cable, connect the USB microphone to the mic input on the DSLR camera. It is crucial to use a compatible cable that fits both the microphone’s USB port and the camera’s mic input.
Remember to handle the cable and connections gently to avoid any damage. Securely plug in the cable to prevent any loose connections that could affect the audio quality.
With the USB microphone connected to the DSLR camera’s mic input, you are now ready to capture high-quality audio directly into your recordings. Test the audio by recording a short sample to ensure everything is functioning correctly.
It is essential to refer to the camera’s user manual for any specific instructions or recommendations regarding microphone input configuration and adjustment. Different camera models may have slightly different settings or options.
In conclusion, locating the mic input on your DSLR camera is the first step to connect a USB microphone. Understanding the location and functionality of the mic input helps you establish a proper audio connection and ensures optimal audio quality for your recordings.
Inserting the USB Cable
Once you have your USB microphone and DSLR camera ready, you will need to connect them using a USB cable. Follow these steps to insert the USB cable properly:
- Locate the USB port on your DSLR camera. It is usually located on the side or the back of the camera.
- Take the USB cable and find the USB connector. It has a rectangular shape with one side slightly wider than the other.
- Align the wider side of the USB connector with the wider side of the USB port on the camera.
- Gently insert the USB connector into the USB port. Make sure it fits snugly and is fully inserted.
- If your USB cable has a locking mechanism, such as a latch or screw, secure it to prevent accidental disconnection.
Once the USB cable is properly inserted, you have successfully connected your USB microphone to your DSLR camera. You can now proceed with configuring the audio settings and using the USB microphone to capture high-quality audio while recording videos.
Configuring Camera Settings
Once you have connected your USB mic to your DSLR camera, it is important to configure the camera settings to ensure proper audio recording. Follow these steps to configure the camera settings:
Step 1: Turn on your DSLR camera and access the camera menu.
Step 2: Navigate to the “Audio Settings” or “Sound Settings” option in the menu.
Step 3: Select the option for external audio input or microphone.
Step 4: Choose the USB mic as the audio input source.
Step 5: Adjust the audio levels to an appropriate setting. It is recommended to test the audio levels by speaking into the USB mic and checking the audio meter on the camera display.
Step 6: Save the settings and exit the camera menu.
Note: The exact steps may vary depending on the make and model of your DSLR camera. Refer to the camera’s user manual for specific instructions on configuring audio settings.
By properly configuring the camera settings, you will be able to record high-quality audio using your USB mic with your DSLR camera.
Question-answer:
What is a USB mic?
A USB mic is a microphone that can be connected directly to a computer or other device via a USB port. It eliminates the need for additional equipment such as audio interfaces or mixers.
Can I connect a USB mic to a DSLR camera?
Yes, it is possible to connect a USB mic to a DSLR camera, but you will need some additional equipment. You will need a USB to audio adapter to convert the USB signal from the microphone into an analog audio signal that can be recognized by the camera.


