
Connecting a DSLR camera to a monitor can be extremely useful in various situations, such as live shooting, studio photography, or simply for a larger and more detailed view of your photos and videos. Whether you are a professional photographer or a hobbyist, the ability to connect your camera to a monitor can enhance your overall shooting experience and help you achieve better results.
Step 1: Check Compatibility
Before attempting to connect your DSLR camera to a monitor, it is important to check the compatibility of your camera and monitor. Most modern DSLR cameras have an HDMI output, which can be easily connected to the HDMI input on a monitor. However, some older camera models may not have this feature, in which case you may need to use other methods, such as HDMI to AV converters or USB capture devices.
Step 2: Gather the necessary equipment
Once you have determined that your camera and monitor are compatible, you will need to gather the necessary equipment. This may include an HDMI cable, an HDMI to AV converter (if needed), and any additional cables or adapters required to connect your camera and monitor.

Step 3: Set up the connection
Begin by turning off both your camera and monitor. Connect one end of the HDMI cable to the HDMI output port on your camera, and the other end to the HDMI input port on your monitor. If you are using an HDMI to AV converter, connect the HDMI cable to the converter, and then connect the AV cables to the corresponding ports on your monitor.
Note: Make sure all connections are secure and tightened to avoid any loose connections or interruptions during use.
Step 4: Power on and adjust settings
Once all the connections are securely in place, power on your camera and monitor. You may need to adjust the input settings on your monitor to ensure it is receiving the correct signal from your camera. Consult the user manual for your specific camera and monitor for instructions on how to adjust these settings.

With the camera successfully connected to the monitor, you can now take advantage of the larger screen to review your photos and videos in greater detail, adjust settings, or even use the monitor as a live viewfinder. This setup can significantly enhance your workflow and give you more control over the creative process.
Remember to disconnect the camera and monitor properly when you are finished using them to prevent any potential damage or wear and tear. By following these simple steps, you can easily connect your DSLR camera to a monitor and improve your overall shooting experience.
Choosing the right cable for the connection
When it comes to connecting a DSLR camera to a monitor, selecting the right cable is essential to ensure a reliable and efficient connection. Here are a few factors to consider when choosing the cable:
1. Type of camera: Different DSLR cameras may have different ports for video output. Some cameras may have an HDMI output, while others may have a mini HDMI or a USB-C port. Make sure to check the camera’s specifications to determine the appropriate cable type.
2. Resolution requirements: Consider the resolution capabilities of your camera and your monitor. If you’re working with high-resolution videos or images, you’ll want to choose a cable that supports the required resolution. HDMI cables are typically the best choice for high-resolution connections.

3. Cable length: Depending on your setup, you may need a longer cable to connect your camera to the monitor. Keep in mind that longer cables can result in signal loss, so choose a cable length that suits your needs without compromising the quality of the connection.
4. Cable quality: It’s important to invest in a high-quality cable to ensure a stable and clear connection between your DSLR camera and the monitor. Cheap cables may not provide the same level of performance and can lead to signal disruptions or loss of quality.
5. Cable compatibility: Ensure that the cable you choose is compatible with both your DSLR camera and your monitor. Check the specifications of both devices to find out which types of cables are supported. HDMI cables are generally compatible with most DSLR cameras and monitors.
6. Additional features: Some cables may have additional features such as gold-plated connectors or shielding to minimize signal interference. While these features may not be essential, they can contribute to better overall performance.
In conclusion, selecting the right cable is crucial for connecting a DSLR camera to a monitor. Consider the type of camera, resolution requirements, cable length, cable quality, compatibility, and any additional features when making your decision.

Connecting the camera to the monitor
When it comes to connecting a DSLR camera to a monitor, there are a few different options available depending on the camera model and the type of monitor you have. Here, we’ll go over some of the most common methods for making this connection.
1. HDMI connection
One of the most straightforward ways to connect your camera to a monitor is through an HDMI connection. Many DSLR cameras have an HDMI output port that allows you to directly connect it to a monitor using an HDMI cable. Simply plug one end of the cable into the camera and the other end into the monitor, and you should be good to go. Make sure that both the camera and the monitor are turned off before making the connection.
2. HDMI to DVI or VGA adapter
If your camera has an HDMI output but your monitor doesn’t have an HDMI input, you can use an HDMI to DVI or VGA adapter to make the connection. HDMI to DVI adapters are widely available and can be easily connected to your camera’s HDMI port. Once connected, you can then use a DVI or VGA cable to connect the adapter to your monitor.
| Camera Connection | Monitor Connection |
|---|---|
| HDMI | HDMI to DVI adapter |
| HDMI to DVI adapter | DVI or VGA cable |
Keep in mind that when using an adapter, you may need to adjust some settings on both the camera and the monitor to ensure compatibility and proper display.
Overall, connecting a DSLR camera to a monitor is a relatively simple process. By using the appropriate cables or adapters, you can easily transfer the live view or playback from your camera to a larger screen, allowing for a more detailed and immersive experience.

Adjusting camera settings for the monitor
Before connecting your DSLR camera to a monitor, it is important to adjust the camera settings to ensure the best possible display quality on the monitor. Here are a few steps to help you adjust the settings:
1. Resolution and Aspect Ratio
Firstly, check the resolution and aspect ratio of your monitor and make sure that your camera’s settings match those specifications. Adjusting the resolution and aspect ratio will help you get an accurate representation of the image on the monitor.
2. HDMI Output
If your camera supports HDMI output, connect the HDMI cable from the camera to the HDMI input of the monitor. Then, navigate through the camera’s menu to find the HDMI output settings. Depending on your camera model, you may need to select the appropriate resolution or adjust the HDMI output settings to match your monitor.
Some cameras also offer the option to customize the HDMI display, allowing you to choose what information is shown on the monitor, such as shooting information, histograms, or gridlines. Explore these options to customize your monitor display based on your preferences.
3. Picture Profile and Picture Style
Adjusting the camera’s picture profile and picture style can also impact the image quality on the monitor. These settings control the contrast, sharpness, color, and other image characteristics. Experiment with different profiles and styles to find the one that best suits your desired monitor display.

Additionally, it is important to disable any overlays or display options on the camera that may interfere with the monitor display. This includes things like focus peaking, zebra lines, or exposure warnings, as they might not be accurately represented on the monitor.
By adjusting these camera settings, you can ensure that your DSLR camera is compatible with the monitor and achieve the best possible display quality.
Understanding video output options
When it comes to connecting a DSLR camera to a monitor, it’s important to understand the different video output options available. This will allow you to choose the most suitable method for your specific needs and equipment.
HDMI output
HDMI (High-Definition Multimedia Interface) is a common video output option found on most modern DSLR cameras. It provides a digital connection that carries both high-quality video and audio signals.
To connect your DSLR camera to a monitor via HDMI, you’ll need an HDMI cable that matches the HDMI ports on both your camera and monitor. Simply plug one end of the cable into the camera’s HDMI output port and the other end into the monitor’s HDMI input port. The camera’s video feed should then be displayed on the monitor.
Composite output
Although less common, some DSLR cameras may have a composite video output option. This type of output uses a standard yellow RCA connector and carries an analog video signal. However, it doesn’t provide high-definition video quality.
To connect your DSLR camera to a monitor via composite output, you’ll need a composite video cable with a yellow RCA connector. Plug one end of the cable into the camera’s composite output port and the other end into the monitor’s composite input port. The camera’s video feed should then be displayed on the monitor, but the quality may not be as high as with an HDMI connection.
Other options
In addition to HDMI and composite outputs, some DSLR cameras may offer other video output options, such as component video, S-video, or even USB. These options may provide different levels of video quality and compatibility with monitors. Consult your camera’s user manual or manufacturer’s website to determine the available video output options and their specific requirements.
It’s also worth noting that not all DSLR cameras have a video output option. Older or entry-level models might only support transferring images and videos to a computer via USB.
Understanding the different video output options available for connecting a DSLR camera to a monitor will ensure that you can find the most suitable solution for your specific needs. Whether you choose HDMI, composite, or another type of connection, you’ll be able to view your camera’s video feed on a larger screen and make any necessary adjustments with greater ease and precision.
Using a HDMI cable for high quality connection
If you want to achieve the best possible video quality between your DSLR camera and monitor, using a HDMI cable is the way to go. HDMI stands for High-Definition Multimedia Interface and it supports both video and audio signals, providing a seamless connection between your camera and monitor.
Here are the steps to connect your DSLR camera to a monitor using a HDMI cable:
Step 1: Check the HDMI port
First, check if your DSLR camera and monitor have HDMI ports. Most DSLR cameras have a micro HDMI port, while monitors usually have a full-sized HDMI port. If your camera or monitor do not have HDMI ports, you may need to use an adapter or consider other connection options.
Step 2: Connect the HDMI cable
Once you have verified that both your camera and monitor have HDMI ports, connect one end of the HDMI cable to the camera’s HDMI port and the other end to the monitor’s HDMI port. Make sure the cable is securely plugged in to avoid any connection issues.
Step 3: Select the HDMI input
Turn on your monitor and use its menu or remote control to select the HDMI input to which your camera is connected. This may be labeled as “HDMI”, “HDMI 1”, or similar. The monitor should now display the live feed from your camera.
Note: Some cameras may require you to adjust the video output settings to enable HDMI output. Refer to your camera’s manual for instructions on how to do this.
By using a HDMI cable, you can take advantage of the high-definition capabilities of your DSLR camera, allowing you to view your photos and videos on a larger screen with stunning clarity. Additionally, using HDMI ensures a stable and reliable connection, minimizing the chances of signal loss or interference.
Remember to always handle the HDMI cable and connectors carefully to avoid any damage. Also, keep in mind that the length of the HDMI cable may affect the quality of the signal, so choose a cable of appropriate length for your setup.
Connecting wirelessly using Wi-Fi or Bluetooth
Modern DSLR cameras often come with built-in Wi-Fi or Bluetooth capabilities, allowing for wireless connectivity with monitors and other devices. This wireless connection eliminates the need for physical cables and provides greater flexibility in positioning both the camera and the monitor.
Wi-Fi Connection
To connect your DSLR camera to a monitor using Wi-Fi:
- Ensure that both your camera and monitor support Wi-Fi connectivity.
- Enable the Wi-Fi feature on your camera and follow the manufacturer’s instructions to connect it to your home Wi-Fi network.
- Make sure your monitor is also connected to the same Wi-Fi network.
- Install any necessary monitoring apps on your camera and monitor, if required. These apps will allow you to view the camera’s live feed on the monitor wirelessly.
- Launch the monitoring app on your monitor and select the camera from the list of available devices.
- You should now be able to see the camera’s live feed on your monitor.
Bluetooth Connection
If your camera supports Bluetooth connectivity, you can connect it to a monitor using the following steps:
- Ensure that both your camera and monitor support Bluetooth connectivity.
- Enable the Bluetooth feature on your camera and monitor.
- Put your camera and monitor in pairing mode following the manufacturer’s instructions.
- On your monitor, search for available Bluetooth devices and select your camera from the list.
- Pair both devices by following the on-screen prompts.
- Once paired, you should be able to view the camera’s live feed on your monitor.
Wirelessly connecting your DSLR camera to a monitor using Wi-Fi or Bluetooth offers convenience and flexibility, allowing you to view the camera’s live feed from a distance. This makes it especially useful for scenarios where you need to monitor the camera’s output while being away from it, such as during remote photoshoots or when using the camera for surveillance purposes.
Using a USB cable for data transfer
If your DSLR camera supports USB connectivity, you can easily connect it to your monitor using a USB cable. This method allows you to transfer images and videos directly from your camera to your monitor, providing a convenient way to review and edit your photos.
To connect your DSLR camera to the monitor using a USB cable, follow these steps:
- Locate the USB port on your DSLR camera. It is usually located on the side or back of the camera.
- Connect one end of the USB cable to the USB port on your camera.
- Locate the USB port on your monitor. It is usually located on the side or back of the monitor.
- Connect the other end of the USB cable to the USB port on your monitor.
- Turn on your camera and monitor.
- Once the connection is established, your camera should appear as a removable storage device on your monitor. You can then access your camera’s files, including photos and videos, through your monitor’s file explorer.
- To transfer files from your camera to your monitor, simply drag and drop them from your camera’s folder to your desired location on your monitor.
Using a USB cable for data transfer between your DSLR camera and monitor is a straightforward method that does not require any additional software or drivers. However, it is important to ensure that your camera and monitor are compatible with USB connectivity before attempting this method.
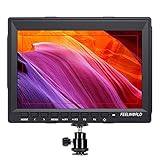
Working with different monitor types
When connecting a DSLR camera to a monitor, it’s important to consider the different monitor types available and how they can enhance your photography or videography workflow. Here are some common types of monitors you may encounter and their advantages:
1. LCD Monitors
LCD monitors are a popular choice for photographers and videographers due to their affordability and versatility. These monitors offer a sharp and vibrant display, making it easier to review and analyze your shots in real-time. LCD monitors also come in various sizes, allowing you to choose the one that best suits your needs.
2. OLED Monitors
OLED (Organic Light Emitting Diode) monitors are known for their exceptional color accuracy and contrast. They offer deep blacks and vibrant colors, which can be especially beneficial for editing and color grading tasks. OLED monitors are typically more expensive than LCD monitors but provide superior image quality.
Regardless of the monitor type you choose, there are a few essential factors to consider to ensure optimal performance:
- Resolution: Look for a monitor with a high resolution to ensure clear and detailed image representation.
- Size: Consider the size of the monitor and how it fits into your workspace. A larger monitor can provide a better viewing experience but may take up more space.
- Connectivity: Check the connectivity options available on the monitor and ensure they are compatible with your camera and other devices.
- Mounting options: Look for monitors that offer various mounting options, such as a hot shoe mount or VESA mount, for easy attachment to your camera setup.
- Additional features: Some monitors may come with additional features like focus peaking, zebras, or waveform monitors, which can be beneficial for precise focusing and exposure control.
Overall, choosing the right monitor type and considering these important factors will greatly enhance your DSLR camera setup and improve your workflow for both photography and videography projects.
Calibrating the monitor for accurate color reproduction
Having a properly calibrated monitor is crucial for achieving accurate color reproduction when connecting a DSLR camera to a monitor. Without proper calibration, the colors displayed on the monitor may appear different from the actual colors captured by the camera, leading to inconsistent and unreliable results.
To calibrate your monitor, follow these steps:
Step 1: Adjust the brightness
Start by adjusting the brightness setting on your monitor. Set it to a level that suits your environment and ensures comfortable viewing without causing eye strain.
Step 2: Set the white balance
Next, set the white balance of your monitor. Use the monitor’s built-in settings or software to adjust the white point to a neutral shade of white. This will help ensure that whites and grays are accurately represented on-screen.
Step 3: Adjust the contrast
Now, adjust the contrast setting on your monitor to achieve the desired level of differentiation between light and dark areas. Be careful not to overdo it, as excessive contrast can lead to loss of detail in both highlights and shadows.
Step 4: Fine-tune color temperature
Use the monitor’s color temperature settings to fine-tune the overall warmth or coolness of the displayed colors. Aim for a color temperature that closely matches the lighting conditions under which your images will be viewed, whether it’s daylight or artificial lighting.
Step 5: Use calibration software
To ensure the most accurate color reproduction, consider using professional calibration software or hardware devices. These tools help generate precise color profiles for your monitor, taking into account factors like gamma, color saturation, and hue. They provide more advanced and refined adjustments compared to manual calibration techniques.
By following these steps and regularly calibrating your monitor, you can ensure that the colors you see on-screen are as close as possible to the actual colors captured by your DSLR camera. This will result in consistent and reliable color reproduction, making your editing and post-processing workflows more accurate and efficient.
Troubleshooting common connection issues
While connecting a DSLR camera to a monitor is generally a straightforward process, there can be some common issues that may arise. Here are some troubleshooting tips to help resolve any connection problems:
1. Check the cables: Ensure that all cables are securely connected to both the camera and the monitor. Sometimes, loose connections can cause issues.
2. Verify compatibility: Ensure that your DSLR camera and monitor are compatible with each other. Check the camera’s manual or the manufacturer’s website for any compatibility requirements or recommendations.
3. Adjust camera settings: Make sure that the camera’s settings are correctly configured for outputting video to an external monitor. Refer to the camera’s manual for instructions on how to change the output settings.
4. Test with a different cable: If possible, try using a different cable to connect the camera and the monitor. Sometimes, faulty cables can cause connection problems.
5. Restart the devices: Try restarting both the camera and the monitor. Sometimes, a simple restart can resolve any temporary glitches or conflicts.
6. Update firmware: Check if there are any firmware updates available for your camera or monitor. Outdated firmware can sometimes cause compatibility issues. Visit the manufacturer’s website to download and install any available updates.
7. Try a different monitor: If none of the above steps work, try connecting the DSLR camera to a different monitor. This will help determine if the issue is with the camera, the monitor, or the connection itself.
Note: It’s always a good idea to consult the camera’s manual or contact the manufacturer’s customer support for specific troubleshooting instructions related to your camera model.
Question-answer:
What is the purpose of connecting a DSLR camera to a monitor?
Connecting a DSLR camera to a monitor allows for a larger display of the camera’s live view, making it easier to compose shots and adjust settings. It is especially useful for photographers who require a more accurate representation of their images.
What cables do I need to connect my DSLR camera to a monitor?
The cables you need will depend on the specific camera and monitor you are using. Most DSLR cameras have an HDMI output, so you will typically need an HDMI cable to connect the camera to the monitor. However, if your camera or monitor has a different type of output or input, you may need a different cable or an adapter.


