
Welcome to our comprehensive guide on how to connect your security cameras! Whether you’re looking to monitor your home or business, setting up a surveillance system can provide peace of mind and help keep your property safe.
Connecting your security cameras can seem like a daunting task, but with the right knowledge and guidance, you’ll have your cameras up and running in no time. In this article, we’ll walk you through the process step by step, covering everything from choosing the right cameras to configuring your network.
Before we get started, it’s important to understand the different types of security cameras available. From traditional wired cameras to modern wireless options, the market offers a wide range of choices to suit your needs. We’ll explore the pros and cons of each type and help you decide which is best for you.
Once you have your cameras, we’ll dive into the setup process. We’ll show you how to properly install and position your cameras for optimal coverage, as well as how to connect them to your network. We’ll discuss the different methods of connecting, such as using Ethernet cables or connecting wirelessly, and provide troubleshooting tips along the way.
Whether you’re a tech-savvy individual or a beginner, this guide will equip you with the knowledge and tools needed to connect your security cameras. Let’s get started and turn your surveillance dreams into a reality!

Choosing the Right Security Camera
When it comes to selecting a security camera for your home or business, there are several factors to consider. Understanding these factors will help you make an informed decision and choose the right camera for your specific needs.
Types of Cameras
There are several types of security cameras available, each with its own unique features and benefits:
- Dome Cameras: These cameras are generally discreet and ideal for indoor use. They provide a wide-angle view and can be easily mounted on ceilings.
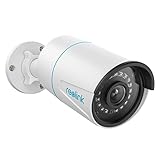
- Bullet Cameras: Bullet cameras are designed for outdoor use and have a long-range view. They are visible and act as a deterrent to potential intruders.
- PTZ Cameras: PTZ stands for Pan, Tilt, and Zoom. These cameras can be remotely controlled to rotate, tilt, and zoom in on specific areas of interest.
Resolution
The resolution of a security camera determines the clarity of the recorded footage. Higher resolution cameras provide more detail, allowing you to clearly see faces and other important details. If you require higher levels of detail, consider investing in cameras with 1080p or even 4K resolution.
Field of View
The field of view of a security camera refers to the area it can capture. Cameras with wide-angle lenses have a larger field of view, allowing them to cover more area. If you need to monitor a large space, consider cameras with a wider field of view.
Connectivity
When choosing a security camera, consider how it connects to your recording system or network. There are wired and wireless options available. Wired cameras provide a more stable and reliable connection, while wireless cameras offer flexibility in terms of installation. Consider your specific needs and the available infrastructure when deciding on connectivity.

In conclusion, choosing the right security camera involves considering factors such as the type of camera, resolution, field of view, and connectivity. By evaluating these aspects, you can select a camera that best suits your requirements and ensures the safety and security of your property.
Understanding the Camera’s Connectivity Options
When it comes to connecting your security cameras, there are several options available to choose from. Understanding these connectivity options can help you make an informed decision about which one is right for you.
1. Wired Connection
- One of the most common connectivity options for security cameras is a wired connection.
- With a wired connection, the camera is physically connected to the recording device or network through cables.
- This type of connection provides a reliable and stable video transmission, making it ideal for long-term installations.
- However, the installation process can be more complex and time-consuming compared to other options.
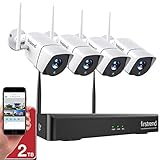
2. Wireless Connection
- If you prefer a more flexible installation process, a wireless connection might be the right choice for you.
- Wireless cameras transmit video signals through Wi-Fi or other wireless technologies.
- This option eliminates the need for cables, making it easier to install and reposition the cameras as needed.
- However, wireless connections can be susceptible to interference and signal loss, especially if there are physical obstacles like walls or other wireless devices in the area.
3. IP Connection
- IP cameras connect to your network using the Internet Protocol (IP).
- This allows you to access and control the cameras remotely through a computer, smartphone, or tablet.
- IP cameras can be either wired or wireless, providing you with flexibility in terms of installation.
- They also offer advanced features such as high-resolution video, motion detection, and cloud storage options.
4. Power Over Ethernet (PoE)
- Power Over Ethernet (PoE) cameras use a single Ethernet cable to both power the camera and transmit data.
- This eliminates the need for separate power and data cables, simplifying the installation process.
- However, PoE cameras require a PoE switch or injector to provide power over the Ethernet cable.
- This option is ideal for installations where power outlets are not easily accessible.
By understanding the different connectivity options for security cameras, you can choose the one that best suits your needs and budget. Whether you opt for a wired, wireless, IP, or PoE connection, ensure that it aligns with your specific requirements and provides reliable surveillance coverage.
Setting Up a Wired Connection
If you prefer a wired connection for your security cameras, follow these steps to set it up:
1. Check your camera’s specifications
Before starting, review the specifications of your security cameras to ensure they support a wired connection. Look for information regarding Ethernet ports or POE (Power over Ethernet) capability. This information will help you determine if your cameras are compatible with a wired setup.
2. Acquire the necessary equipment
If your cameras support a wired connection, you will need the following equipment:
- Ethernet cables: Purchase enough Ethernet cables to connect each camera to your network switch or router. Ensure that the cables are long enough to reach the desired locations.
- Network switch or router: Depending on the number of cameras you have, you may need a network switch or router with enough available ports to connect all your cameras. If your cameras support POE, consider getting a POE switch to simplify the setup.
- Power adapters (if applicable): Some cameras may require separate power adapters even when using a wired connection. Check the specifications of your cameras to determine if power adapters are needed.
3. Connect the cameras to the network switch or router
Once you have all the necessary equipment, follow these steps to connect your cameras:
- Position the network switch or router: Choose a suitable location for your network switch or router, preferably close to a power outlet and accessible for future maintenance.
- Connect the cameras to the switch or router: Use Ethernet cables to connect each camera to an available port on the network switch or router. Ensure that the cables are securely connected.
- If applicable, connect power adapters: If your cameras require separate power adapters, connect them to a power source according to the manufacturer’s instructions. Ensure that the power adapters are compatible with the cameras.
4. Configure your cameras and network settings
After connecting your cameras, you may need to configure them and your network settings to ensure they communicate properly. Refer to the user manuals or manufacturer’s instructions for detailed guidance on configuring your cameras and network.
Following these steps should help you set up a wired connection for your security cameras. Remember to test the connection and make any necessary adjustments to optimize performance and security.
Configuring a Wireless Connection
Connecting your security cameras wirelessly can provide you with more flexibility and convenience. To configure a wireless connection for your cameras, follow these steps:

Step 1: Assess your network
Before setting up a wireless connection, ensure that your Wi-Fi network is reliable and has sufficient coverage throughout your premises. Assess the signal strength and stability in the areas where you plan to install the cameras.
Step 2: Choose a suitable wireless protocol
Select a wireless protocol that is compatible with your cameras and offers a strong and secure connection. Common options include Wi-Fi, Bluetooth, and Zigbee. Research and choose the protocol that best fits your needs.
Step 3: Set up your cameras
Follow the manufacturer’s instructions to set up your cameras for wireless connectivity. This typically involves connecting the cameras to a power source and configuring the wireless settings through a companion mobile app or web interface.
Step 4: Connect to your Wi-Fi network
Access the camera’s settings and navigate to the Wi-Fi configuration section. Select your Wi-Fi network from the available options and enter the corresponding password. Once connected, the camera should be able to transmit video feed wirelessly.
Step 5: Test and adjust
After connecting your cameras to the Wi-Fi network, perform a test to ensure a stable and reliable connection. Monitor the video feed and check for any signal drops or latency issues. If necessary, reposition the cameras or troubleshoot your network settings to optimize the wireless connection.

By following these steps, you can easily configure a wireless connection for your security cameras, providing you with a convenient and flexible surveillance solution.
Connecting the Camera to the Network
Connecting your security cameras to the network is essential for remote access and monitoring. Here are the steps to connect your cameras:
- Check the camera’s network compatibility: Ensure that your camera supports network connections and has an Ethernet port or Wi-Fi capability.
- Choose the connection type: Decide whether you want to connect the camera using a wired Ethernet connection or a wireless Wi-Fi connection.
- Wired Ethernet connection:
- Connect the camera to the router: Use an Ethernet cable to connect the camera to an available Ethernet port on your router.
- Configure the camera’s network settings: Access the camera’s settings interface using a web browser and enter the network details provided by your Internet Service Provider (ISP).
- Test the connection: Once configured, test the connection by accessing the camera’s video feed using the camera’s IP address on a computer or mobile device connected to the same network.
- Wireless Wi-Fi connection:
- Access the camera’s Wi-Fi settings: Using a web browser, connect to the camera’s settings interface and locate the Wi-Fi settings option.
- Scan for available Wi-Fi networks: Select your home Wi-Fi network from the available networks list.
- Enter the Wi-Fi password: Provide the password for your Wi-Fi network when prompted.
- Confirm the connection: The camera will attempt to connect to the Wi-Fi network. Wait for the camera to establish a successful connection.
- Test the connection: Once connected, verify the camera’s connection by accessing the camera’s video feed using the camera’s IP address on a computer or mobile device connected to the same network.
Following these steps will ensure that your security cameras are successfully connected to your network, allowing you to monitor your premises remotely and keep an eye on any potential security threats.
Accessing the Camera’s Live Feed
Once you have set up your security cameras and connected them to a central hub or recording device, you may want to access the live feed from your cameras. This allows you to monitor your property or premises in real time, whether you’re at home or away.
To access the live feed from your security cameras, you will need to follow these steps:
- Ensure that your cameras are powered on and connected to the central hub or recording device.
- Open the designated mobile app or software provided by the camera manufacturer.
- Log in to your account using the credentials you set up during the initial setup process.
- Select the camera you want to view from the list of available cameras. This may be displayed as a thumbnail or a numbered list, depending on the app or software.
- Tap or click on the camera’s name or thumbnail to open the live feed.
- Wait for the feed to load, which may take a few seconds depending on your internet connection and the camera’s settings.
- You should now be able to see the live feed from your camera. Depending on the app or software, you may have additional options such as zooming in, adjusting viewing angles, or enabling audio.
It’s important to note that accessing the live feed from your security cameras may require an internet connection. If you’re accessing the feed remotely, you will need a stable internet connection on both your mobile device or computer and the location where the cameras are installed.
By following these steps, you can easily access the live feed from your security cameras and effectively monitor your property or premises at any time.
Ensuring Remote Viewing and Monitoring
When it comes to connecting your security cameras, remote viewing and monitoring are crucial functionalities that you should consider. These features allow you to keep an eye on your property or premises from anywhere in the world, as long as you have an internet connection.
To ensure remote viewing and monitoring, follow these steps:
- Choose a security camera system that supports remote access. Look for cameras with built-in Wi-Fi or internet connectivity.
- Connect the security camera system to your home or office network. You can do this by connecting the cameras to a Wi-Fi router or using Ethernet cables.
- Install the appropriate software or mobile app provided by the camera manufacturer on your smartphone, tablet, or computer.
- Create an account on the camera’s software or app and follow the setup instructions to add the cameras to your account.
- Configure the remote viewing settings on the software or app. This may involve creating a username and password, enabling remote access, and setting up notifications.
- Once the setup is complete, you can access the live feed from your security cameras remotely.
- Depending on the software or app, you may also have access to additional features such as motion detection, video recording, and playback.
It is essential to ensure the security of your remote access. To do this, follow these best practices:

- Use strong and unique passwords for your camera system and associated accounts, and change them regularly.
- Enable two-factor authentication if available.
- Keep the firmware and software of your cameras up to date to protect against security vulnerabilities.
- Create a separate network for your cameras to isolate them from your main network.
- Regularly check the access logs of your camera system for any suspicious activity.
- Consider using a virtual private network (VPN) to enhance the security of your remote access.
Following these steps and best practices will help ensure that you can remotely view and monitor your security cameras with peace of mind.
FAQ,
Is it possible to connect my security cameras to a mobile network?
Yes, it is possible to connect your security cameras to a mobile network. However, this requires a special type of camera that has a built-in SIM card slot. With this type of camera, you can insert a SIM card from a mobile network provider into the camera and access the live feed from your camera using a mobile app. This is useful in situations where you don’t have access to a Wi-Fi network and still want to monitor your security cameras remotely.


