
Mini DV tapes were once a popular format for recording videos on camcorders. However, as technology advances, many are now looking to digitize their mini DV tapes to preserve their memories and make them easily accessible on digital devices. If you have a collection of mini DV tapes and want to convert them into digital format, this guide will provide you with step-by-step instructions on how to do it.
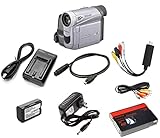
First, you will need a mini DV camcorder and a computer with video capture capabilities. Connect your camcorder to your computer using a FireWire cable. Make sure your computer has a FireWire port, otherwise you will need to install one. Once connected, turn on your camcorder and set it to “VCR” mode.
Open video capture software on your computer. There are many options available, such as Windows Movie Maker, iMovie, or Adobe Premiere. Choose the software that you are most comfortable with or that best fits your needs. Start the video capture process and press play on your camcorder to begin playing the mini DV tape.
As the tape plays, the software will capture the video and audio data in real-time and save it to your computer’s hard drive. You can choose to capture the entire tape or select specific sections to capture. Once the capture process is complete, you will have a digital copy of your mini DV tape on your computer.
After capturing the video, you can edit it using the video editing software of your choice. You can trim out unwanted sections, add titles and effects, and enhance the overall quality of the video. Once you are satisfied with the edits, you can save the final video file in a format that is compatible with your desired playback devices, such as MP4 or AVI.
Remember to back up your digital files to prevent any loss of data. You can store them on an external hard drive, cloud storage, or burn them to DVDs. By digitizing your mini DV tapes, you not only ensure the longevity of your videos but also make it easier to preserve, share, and enjoy them in the digital age.
Preparing your Mini DV camera
Before you begin the process of digitizing your mini DV tapes, it is important to properly prepare your Mini DV camera. Follow these steps to ensure a smooth and successful digitization process:
1. Check the condition of your camera
Inspect your Mini DV camera for any signs of damage or wear. Make sure all buttons and controls are working properly. If you notice any issues, it is recommended to have your camera serviced or repaired before proceeding with the digitization process.
2. Clean the camera
Before using your camera, clean the exterior and lens to remove any dust or dirt. Use a soft cloth or lens cleaning solution to wipe the camera body and lens. This will help ensure the best possible image quality during the digitization process.
3. Charge the battery
Make sure your camera’s battery is fully charged before starting the digitization process. Plug your camera into a power source and allow it to charge for the recommended amount of time. Having a fully charged battery will prevent any interruptions during the digitization process.

4. Check available storage space
Make sure you have enough available storage space on your camera’s memory card or hard drive to save the digitized footage. If necessary, transfer or delete any existing files to free up space.
5. Set the recording settings
Before starting the digitization process, set your camera’s recording settings to the highest quality possible. This will ensure that you capture the best possible footage during the digitization process. Consult your camera’s user manual for instructions on how to adjust the recording settings.
6. Connect the camera to your computer
Lastly, make sure you have the necessary cables and adapters to connect your Mini DV camera to your computer. Depending on your camera model and computer, you may need a FireWire or USB cable. Consult your camera’s user manual or the manufacturer’s website for the correct cables and connection instructions.
By following these steps to prepare your Mini DV camera, you will be ready to start the digitization process and preserve your precious memories in a digital format.
Connecting your Mini DV camera to a computer
If you have precious memories stored on mini DV tapes and want to transfer them to a digital format, you can easily do so by connecting your Mini DV camera to a computer. Here, we will guide you through the process.

What you will need
Before getting started, make sure you have the following items:
- A Mini DV camera
- A computer with a FireWire (IEEE 1394) port or a USB port
- A FireWire or USB cable, depending on the available port on your computer
Step-by-step guide
Follow these steps to connect your Mini DV camera to your computer:
- Ensure both your camera and computer are turned off.
- Locate the FireWire or USB port on your computer and connect one end of the cable to it.
- Depending on your camera, locate either the FireWire or USB port on it and connect the other end of the cable to it.
- Turn on your computer.
- Turn on your Mini DV camera and set it to the “VCR” mode. Refer to your camera’s user manual for specific instructions.
- Wait for your computer to recognize the camera. This may take a few moments.
- Once the camera is recognized, you can use video capture software to transfer the footage from the tape to your computer. There are various software options available, such as Windows Movie Maker, iMovie, or Adobe Premiere Pro.
- Open your preferred video capture software and follow the software’s instructions to import the video from your camera. This typically involves selecting the camera as the video source and clicking on the recording or capture button.
- Monitor the video transfer process on your computer screen.
- Once the video transfer is complete, you can save the digital files on your computer for future editing, sharing, or archiving.
Troubleshooting tips
If your computer fails to recognize the camera, try the following troubleshooting steps:
- Check the cable connections to ensure they are securely plugged in.
- Try a different USB or FireWire port on your computer.
- If you are using a FireWire cable, make sure it is compatible with your computer’s FireWire port.
- Ensure your camera is set to the correct mode (VCR mode) for data transfer.
- Restart your computer and try again.
- If the issue persists, consult the user manual of your camera or seek technical support from the manufacturer.
By following these steps, you can easily connect your Mini DV camera to your computer and begin the process of digitizing your precious memories.
Transferring Mini DV footage to your computer
If you have precious footage captured on Mini DV tapes, transferring them to your computer can help preserve and share those memories. The process is relatively simple and can be done with the right equipment and software.

Here are the steps to transfer your Mini DV footage to your computer:
| Step 1: | Make sure you have a Mini DV camera or a DV deck. This device will play your Mini DV tapes and connect to your computer. |
| Step 2: | Check if your computer has a FireWire port. Most Mini DV cameras and DV decks use FireWire to connect to a computer. If your computer does not have a FireWire port, you will need to install a FireWire card to add this functionality. |
| Step 3: | Connect your Mini DV camera or DV deck to your computer using a FireWire cable. Make sure both devices are powered on. |
| Step 4: | Open your video editing software on your computer. If you don’t have any video editing software installed, there are free options available online. |
| Step 5: | Import the footage from your Mini DV tape into your video editing software. This process may vary depending on the software you are using. |
| Step 6: | Once the footage is imported, you can make any necessary edits or adjustments to improve the quality or add effects to your video. |
| Step 7: | Save your edited video file to your computer’s hard drive or any other desired storage location. |
Following these steps will help you transfer your Mini DV footage to your computer and give you the opportunity to preserve and share those special moments for years to come.
Choosing the right video capture software
When it comes to digitizing mini DV footage from your camera, having the right video capture software is essential. With the right software, you can easily transfer the content from your mini DV tapes to your computer and preserve those memories for years to come. Here are some factors to consider when choosing the right video capture software:
Compatibility
Before selecting any video capture software, make sure it is compatible with your operating system. Whether you are using Windows, macOS, or Linux, ensure that the software you choose works seamlessly on your chosen platform. Compatibility issues can lead to frustration and unnecessary complications, so it is important to double-check before making a final decision.
Features
Consider the features offered by the video capture software. Look for software that allows you to capture video in the desired format, such as AVI, MP4, or MOV. Some software may also offer additional features like the ability to edit and enhance captured videos, add captions or subtitles, or apply special effects. Assess your needs and choose software that offers the features that are important to you.

User-Friendliness
Video capture software should be user-friendly, especially if you are new to the process of digitizing mini DV tapes. Look for software with a straightforward interface that makes it easy to navigate through the various options and settings. It should also provide clear instructions or tutorials to guide you through the process. Avoid overly complex software that can be confusing and time-consuming to learn.
Price
Consider your budget when choosing video capture software. There are both free and paid options available, each with its own set of features and limitations. While free software may meet your basic needs, paid software usually offers more advanced features and support. It’s important to strike a balance between your budget and the functionality you require. Additionally, check for any additional costs or subscription fees associated with the software you choose.
By considering compatibility, features, user-friendliness, and price, you can choose the right video capture software to digitize your mini DV tapes effectively. Take your time in researching and comparing different options to ensure you make an informed decision that meets your specific needs.
Adjusting video capture settings
When digitizing mini DV from a camera, it is important to properly adjust the video capture settings to ensure optimal quality and compatibility with your desired output format. Here are some key settings to consider:
1. Frame rate: The frame rate determines how many frames are captured per second. The standard frame rate for most videos is 30 frames per second, but you may need to adjust it depending on your specific requirements.

2. Resolution: The resolution refers to the number of pixels captured in each frame. Higher resolutions offer better image quality but may also result in larger file sizes. Make sure to select a resolution that suits your needs without sacrificing too much disk space.
3. Audio settings: In addition to video settings, pay attention to the audio settings as well. Adjust the audio bitrate and sampling rate to ensure clear audio capture and playback.
4. Compression format: Choose an appropriate compression format for your video. Common formats include MPEG-4, H.264, and AVI. Each format has its own advantages and disadvantages, so consider your output device and required file size when making a selection.
5. Lighting and exposure: Proper lighting and exposure can greatly affect the quality of your captured video. Make sure to adjust these settings on your camera to avoid underexposed or overexposed footage.
By adjusting these video capture settings, you can ensure that your digitized mini DV footage meets your desired quality standards and is compatible with your intended output format. Don’t forget to experiment and test different settings to find the best configuration for your specific needs.

Starting the digitization process
Digitizing mini DV tapes from your camera involves several steps to ensure the highest quality transfer of your valuable footage. Follow these instructions to get started:
Gather necessary equipment
Before you begin, make sure you have the following equipment:
- A mini DV camera
- A computer with a FireWire or IEEE 1394 port
- A FireWire cable
- Software for video capture and editing
Connect your camera to the computer
1. Locate the FireWire or IEEE 1394 port on your computer.
2. Connect one end of the FireWire cable to the port on your computer and the other end to the corresponding port on your mini DV camera.
Prepare the camera for playback
1. Insert the mini DV tape containing the footage you want to digitize into your camera.
2. Turn on your camera and set it to VCR or playback mode.
Launch the video capture software
1. Open the video capture software on your computer.
2. Configure the settings to match your desired video format, resolution, and frame rate.
3. Start the video capture function within the software and prepare to begin playback on your camera.
Note: It is recommended to capture the video in the highest quality possible to maintain the integrity of your footage.
Start the digitization process
1. Press play on your camera to begin playback of the mini DV tape.
2. Monitor the video capture software on your computer to ensure the footage is being recorded properly.
3. Allow the tape to play in its entirety or pause and manually control the playback as needed.
Tip: Make sure to monitor the available storage space on your computer to avoid running out of disk space during the capture process.
Once you have completed the digitization process, you can begin editing and organizing your videos using video editing software. Remember to safely store the captured digital files to prevent loss or damage to your valuable footage.
Monitoring the progress of digitization
Digitizing mini DV tapes from your camera can be a time-consuming process, but with the right tools and techniques, you can effectively monitor the progress of your digitization project. Here are some steps you can follow:
1. Organize your tapes
Before you start digitizing, it’s important to organize your mini DV tapes. Create a system that allows you to easily identify and track the tapes you have already digitized and those that are still pending. You can use labels or a spreadsheet to keep a record of the tapes.
2. Create a digitization schedule
To effectively monitor the progress of your digitization project, create a schedule that outlines when and how you plan to digitize each tape. This will help you stay on track and ensure that you don’t miss any tapes. Consider factors such as the time required for digitization, available resources, and your own availability.
3. Track your progress
As you start digitizing your mini DV tapes, keep a log to track your progress. Note down the date, tape number, and any relevant details about the digitization process (e.g., any issues encountered, quality of the digitized footage). This log will serve as a reference point and help you assess your progress over time.
Additionally, you can use a visual indicator to track your progress. For example, you can create a chart or checklist where you can mark off each tape as it gets digitized. This will give you a visual representation of how many tapes are left to digitize.
4. Regularly review and adjust
Regularly review your digitization progress and make any necessary adjustments to your schedule or approach. If you notice that you’re falling behind or encountering unexpected challenges, take the time to reassess and make changes as needed. This will ensure that you stay on track and complete your digitization project successfully.
By following these steps and monitoring the progress of your digitization project, you can effectively track your efforts and ensure a smooth and successful completion of the process.
Saving and organizing digitized Mini DV footage
Once you have successfully digitized your Mini DV footage from your camera, it is important to properly save and organize the files for easy access and future use. Follow these steps to ensure a systematic approach to managing your digitized Mini DV footage:
1. Create a dedicated folder on your computer’s hard drive or an external storage device to store all the digitized Mini DV files. Name the folder something descriptive, such as “Mini DV Footage” or “Digitalized Videos”.
2. Within the main folder, create subfolders to categorize your footage. For example, you could have separate folders for different projects or events. Give each subfolder a clear and concise name to easily identify its contents.
3. Copy the digitized files from your camera to the appropriate subfolders. You can either drag and drop the files or use the “copy” function in your computer’s file explorer.
4. Consider renaming the files to something more descriptive or organized. This can be helpful if you have a large amount of footage and want to quickly locate specific videos. For instance, you could prefix each file name with a date or an event name.
5. Make sure to create backups of your digitized Mini DV footage. This can be done by copying the entire folder or individual files to a separate storage device or cloud service. It is important to have multiple copies in case of accidental deletion or hardware failure.
6. To further organize and keep track of your Mini DV files, you can use software or applications specifically designed for video organization. These tools often offer features such as tagging, searching, and categorizing videos. Choose a software that suits your needs and preferences.
By following these steps, you can ensure that your digitized Mini DV footage is properly saved, organized, and easily accessible whenever you need it.
Tips for preserving Mini DV tapes
|
Taking proper care of your Mini DV tapes is essential for preserving your valuable memories. Follow these tips to ensure that your tapes last for years to come:
By following these tips, you can ensure that your Mini DV tapes remain in good condition and that you can continue to enjoy your cherished memories for years to come. |
Question-answer:
What is mini dv?
Mini DV is a type of digital video cassette. It is smaller in size compared to traditional VHS tapes and is commonly used in camcorders for recording and storing video footage.
Why would I want to digitize mini DV tapes?
Digitizing mini DV tapes allows you to preserve and archive your video footage in a digital format. It also makes it easier to edit and share your videos on modern devices and platforms.


